Set up IT Support Genie
Use this guide to install and configure IT Support Genie in your workspace.
Prerequisites
Complete the following before beginning setup:
- Connect either Okta or Microsoft Entra ID as your identity provider. Don't use both at once. Entra ID requires a P1 or P2 license. Provision your app licenses through this same SSO provider.
- If you plan to enable manager approval, ensure each user's manager can be looked up in Okta, Microsoft Entra ID, or Workday. Configure manager lookups in only one of these systems.
- Identify the group ID (Okta) or application role ID (Entra ID) for each license in each application before running provisioning workflows.
- Collect admin email addresses for each application and license name. Separate multiple addresses with commas.
- Choose a notification channel for user-facing messages: Slack, Microsoft Teams, or Workato GO.
- Install the Google Docs, Highspot, and Intercom custom connectors from the community library. These are required for the installation, even if you don't plan to use them.
Install IT Support Genie
Complete the following steps to install the required packages for IT Support Genie:
ALREADY HAVE THE INSTALLER?
If your workspace already has the Genie Installer, skip to Step 5.
Download the Genie Installer package. Contact your Workato account team if you don't have it.
Create the following projects in your workspace:
- Agentic | All Genies
- Agentic | Installer
Go to Tools > Recipe lifecycle management and import the Genie Installer zip file into the Agentic | Installer project.
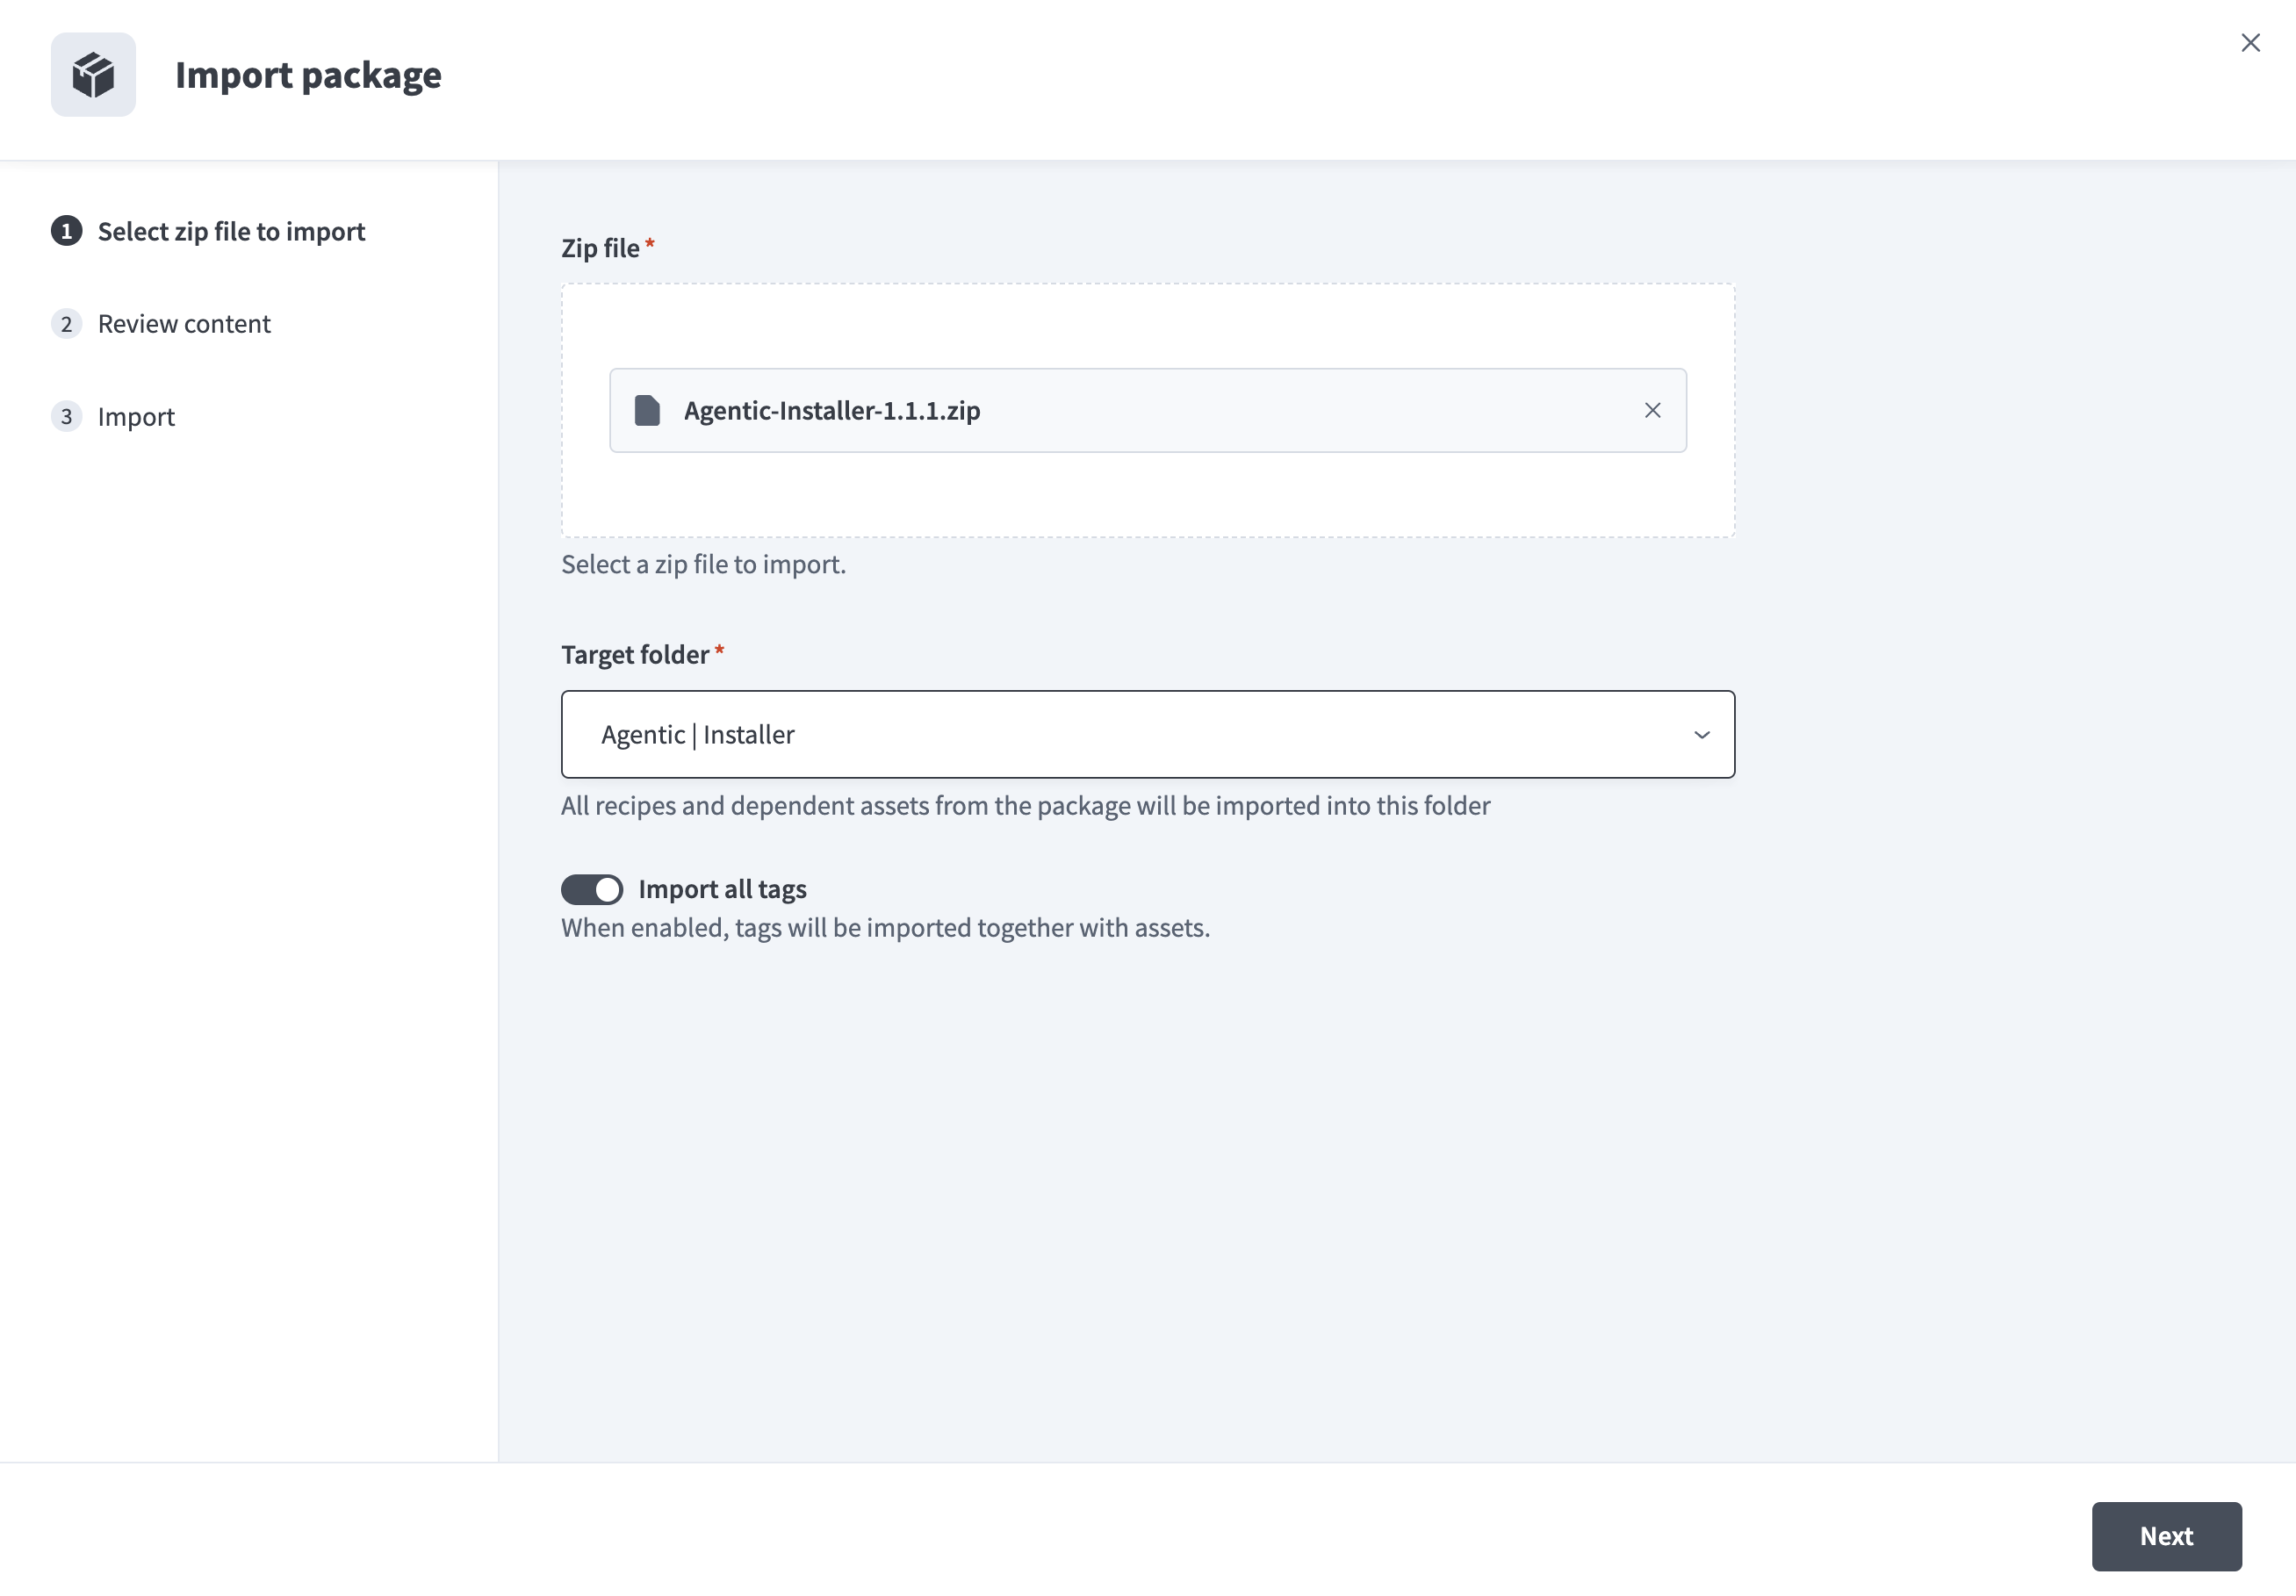 Import the Genie Installer package
Click Next to proceed through the import.
You should see the installer assets in Agentic | Installer after the import completes.
Go to Workspace admin > API clients > Client roles and click Create client role.
Assign the following permissions to the client role:
| Category | Sub-category | Permission | Endpoint |
|---|---|---|---|
| Project assets | Projects & folders | List folders | GET /api/folders |
| Project assets | Projects & folders | Create a project or folder | POST /api/folders |
| Project assets | Recipes | List | GET /api/recipes |
| Project assets | Recipes | Start | PUT /api/recipes/:id/start |
| Deployments & lifecycle | Recipe lifecycle management | Get package details | GET /api/packages/:id |
| Deployments & lifecycle | Recipe lifecycle management | Import package | POST /api/packages/import/:id |
| Workspace details | Workspace details | Get details | GET /api/users/me |
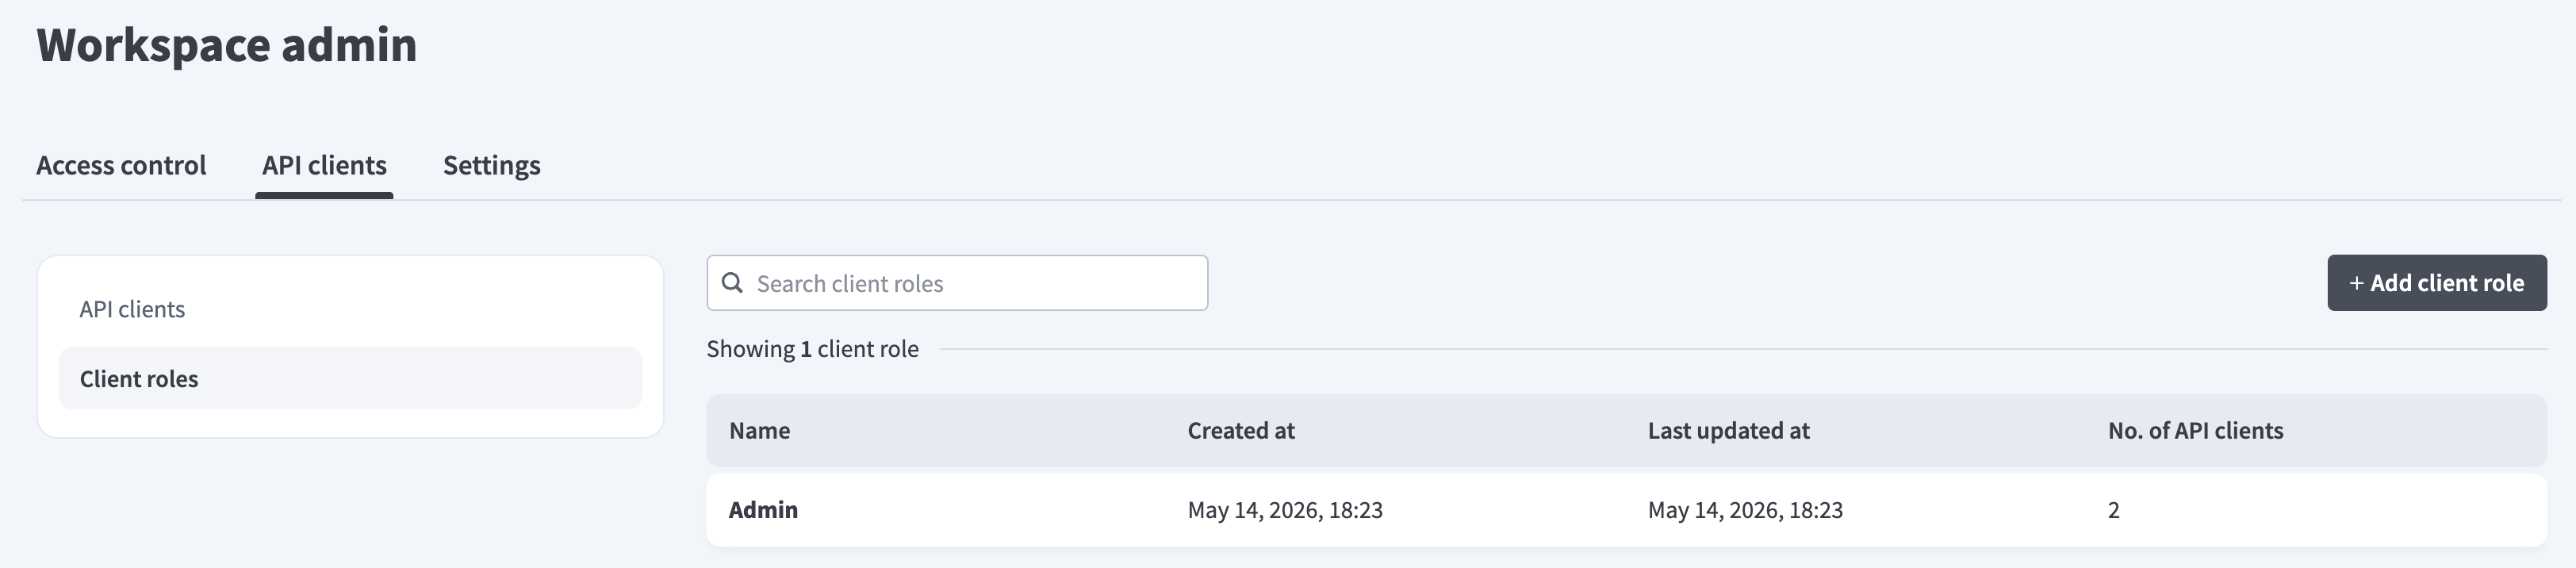 Create a client role with the required permissions
Create an API client. Assign the client role and project access to the new client, then copy and save the generated token.
 Copy and save the generated API client token
Contact your Workato account team to obtain your organization's Genie module installer token. Save this token in a secure location.
Go to Agentic | Installer > Connections > CON | Agentic Apps Installer and configure the following fields:
| Field | Description |
|---|---|
| Data center (Current Workato Workspace) | Select the data center for your Workato workspace. |
| API key (Current Workato Workspace) | Enter your workspace API client token from Step 7. |
| API key (Genie Module Installer) | Enter the installer token from your Workato account team. |
Click Connect.
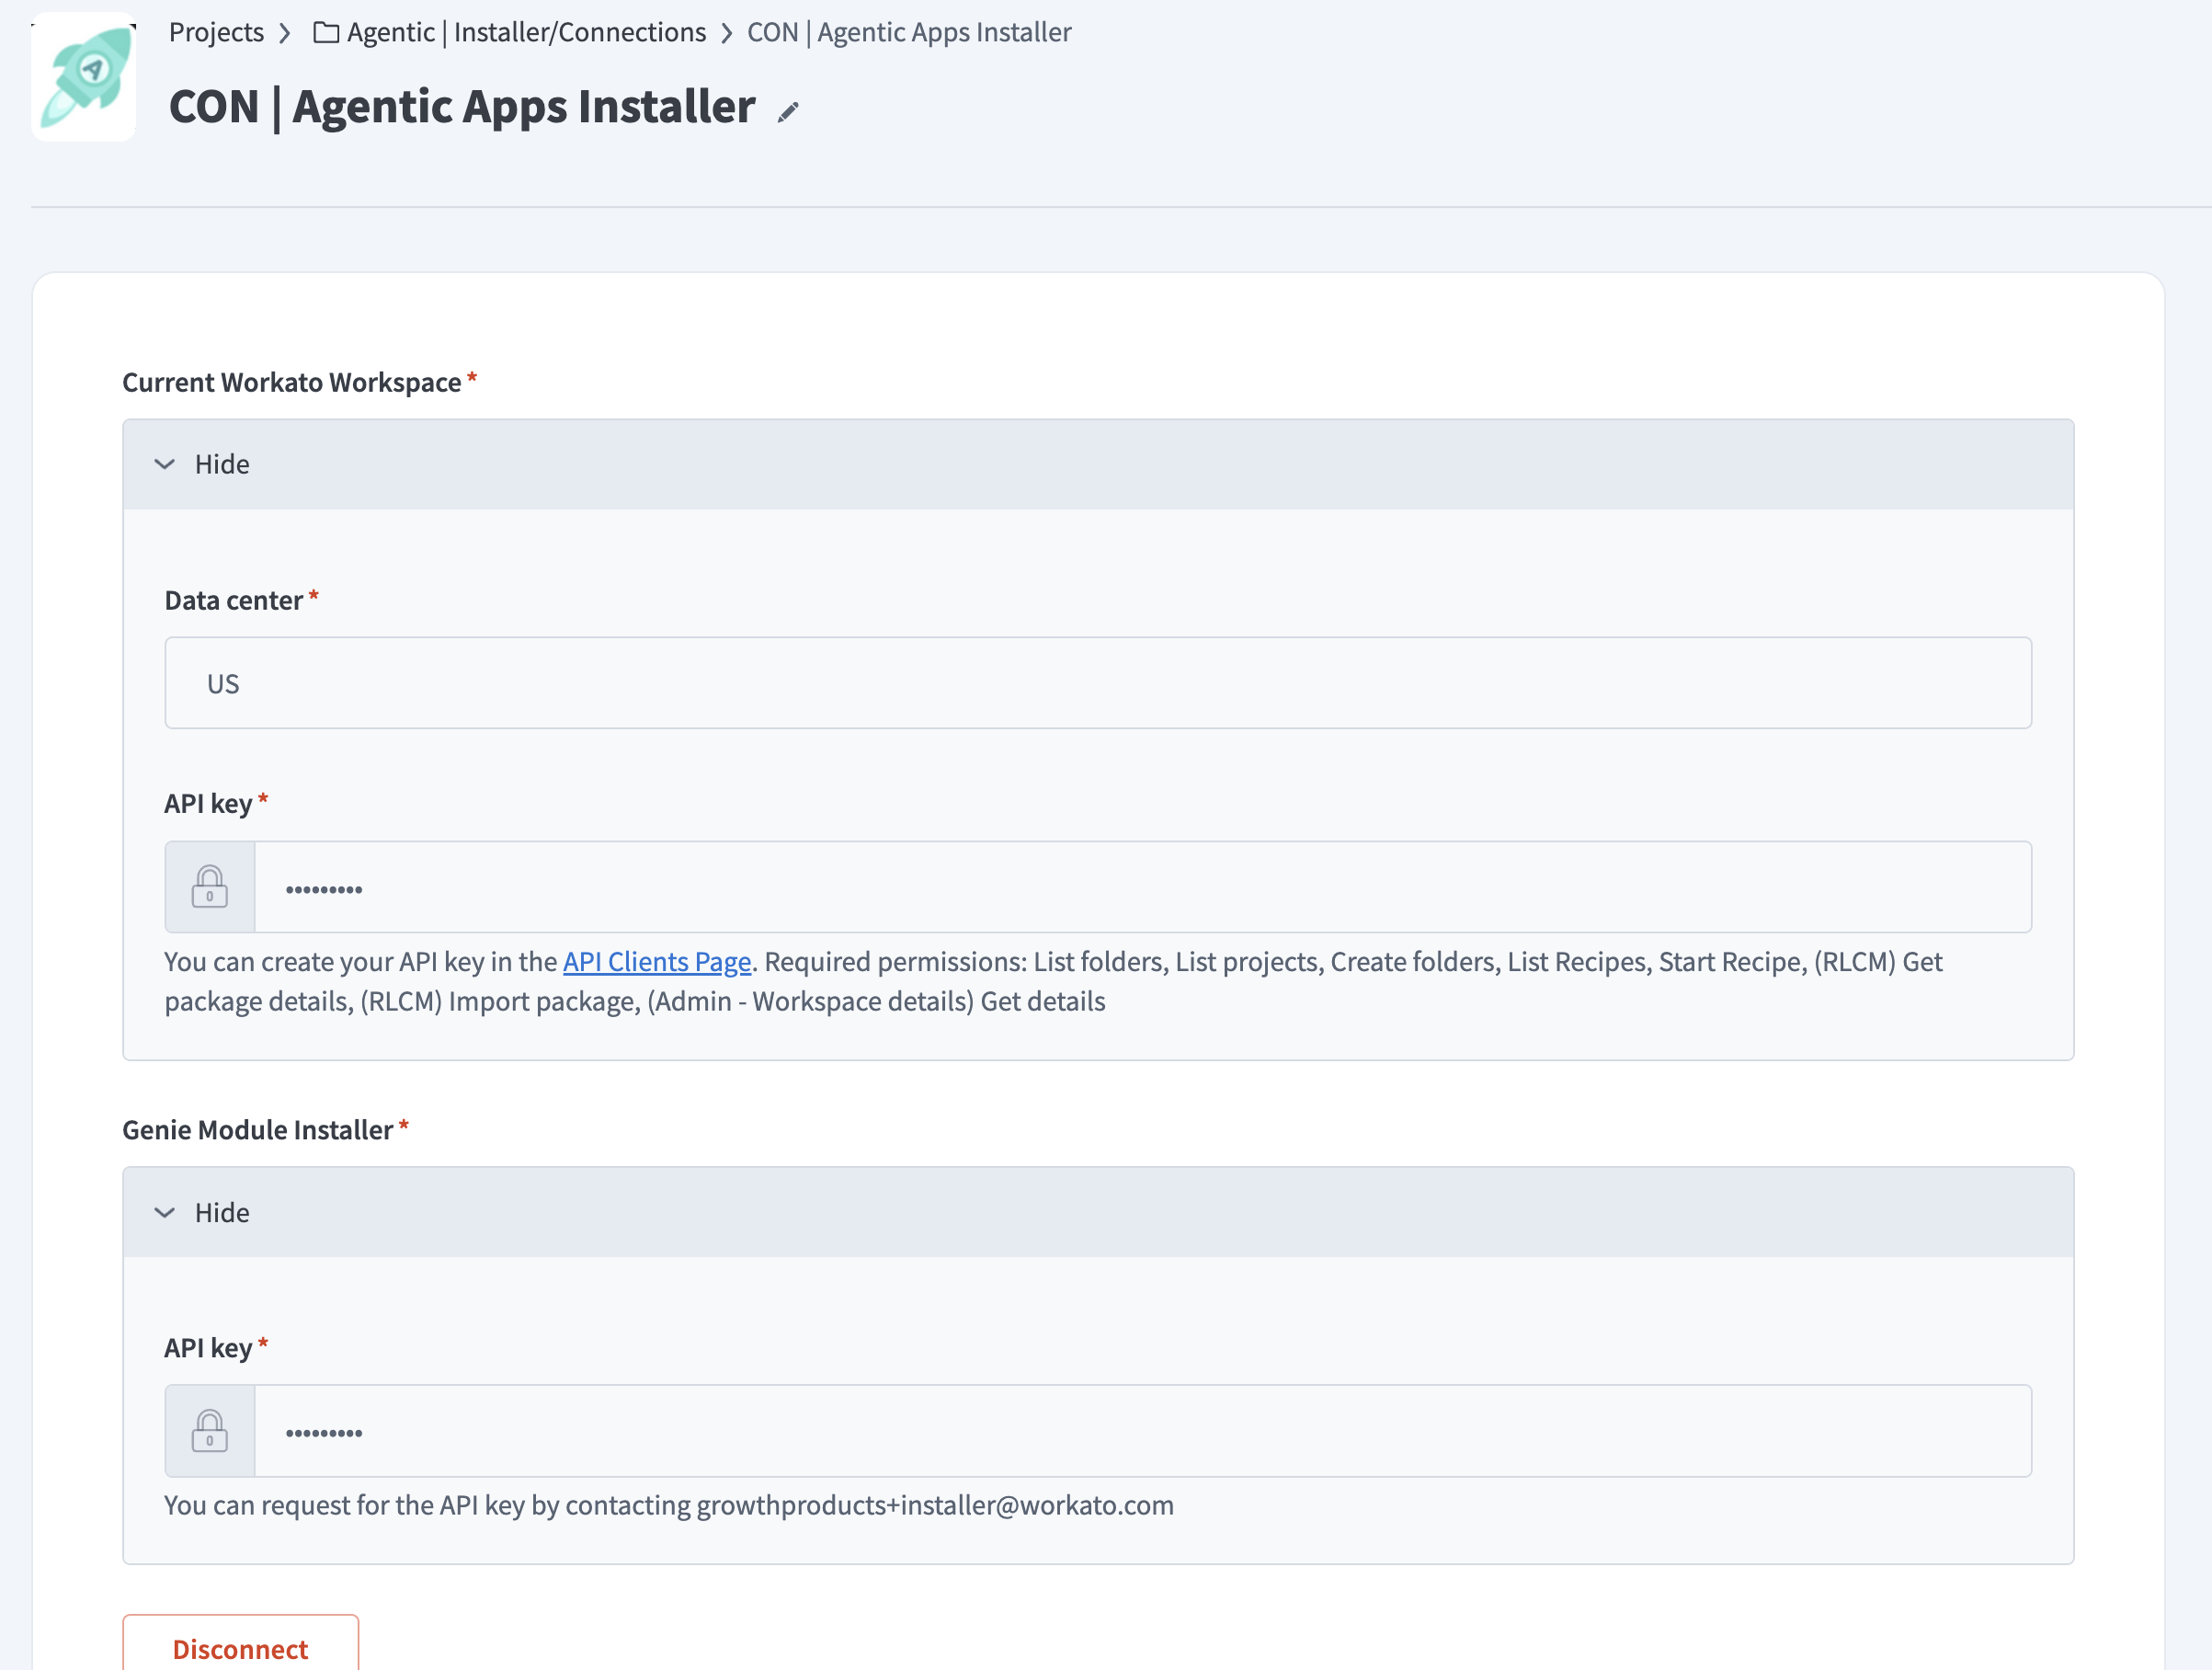 Configure the Agentic Apps Installer connection
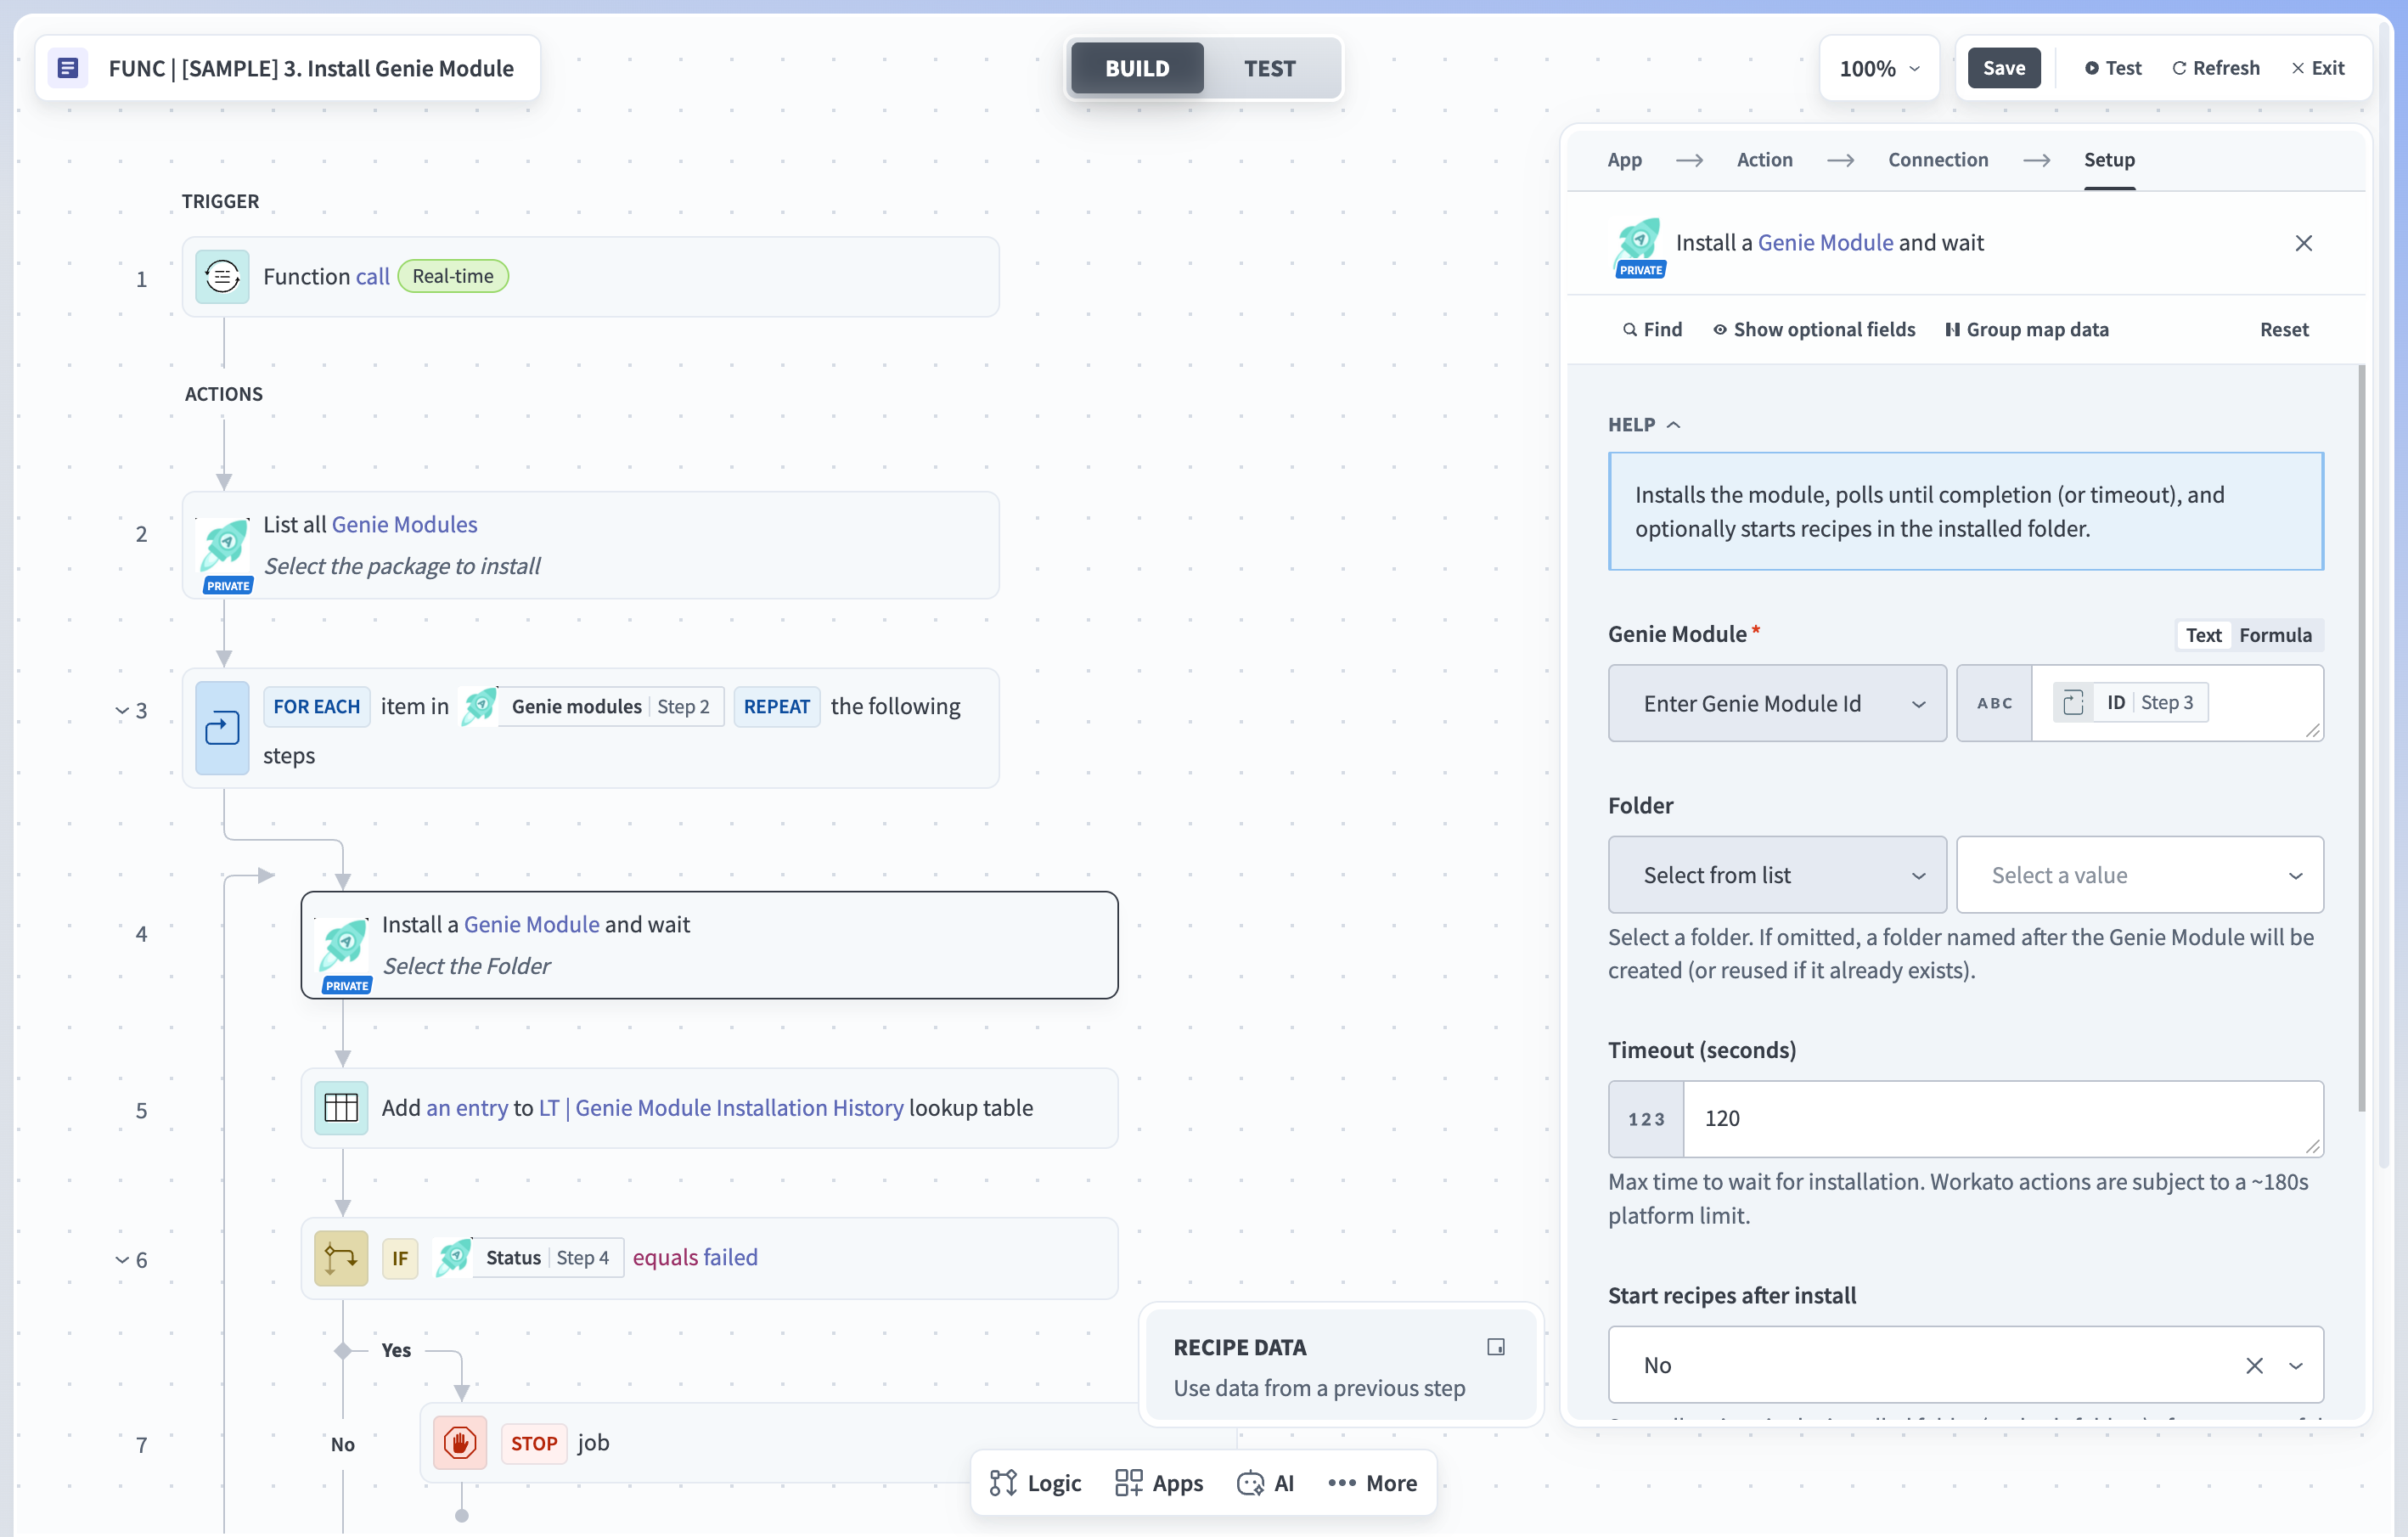
Go to Agentic | Installer > Templates > FUNC | [SAMPLE] 3. Install Genie Module.
Click Edit recipe, then do the following:
Refresh the recipe to load the latest available packages.
In Step 2, select the latest version of Agentic | IT Support Genie from the Genie Module drop-down menu. Set Get Dependencies to false.
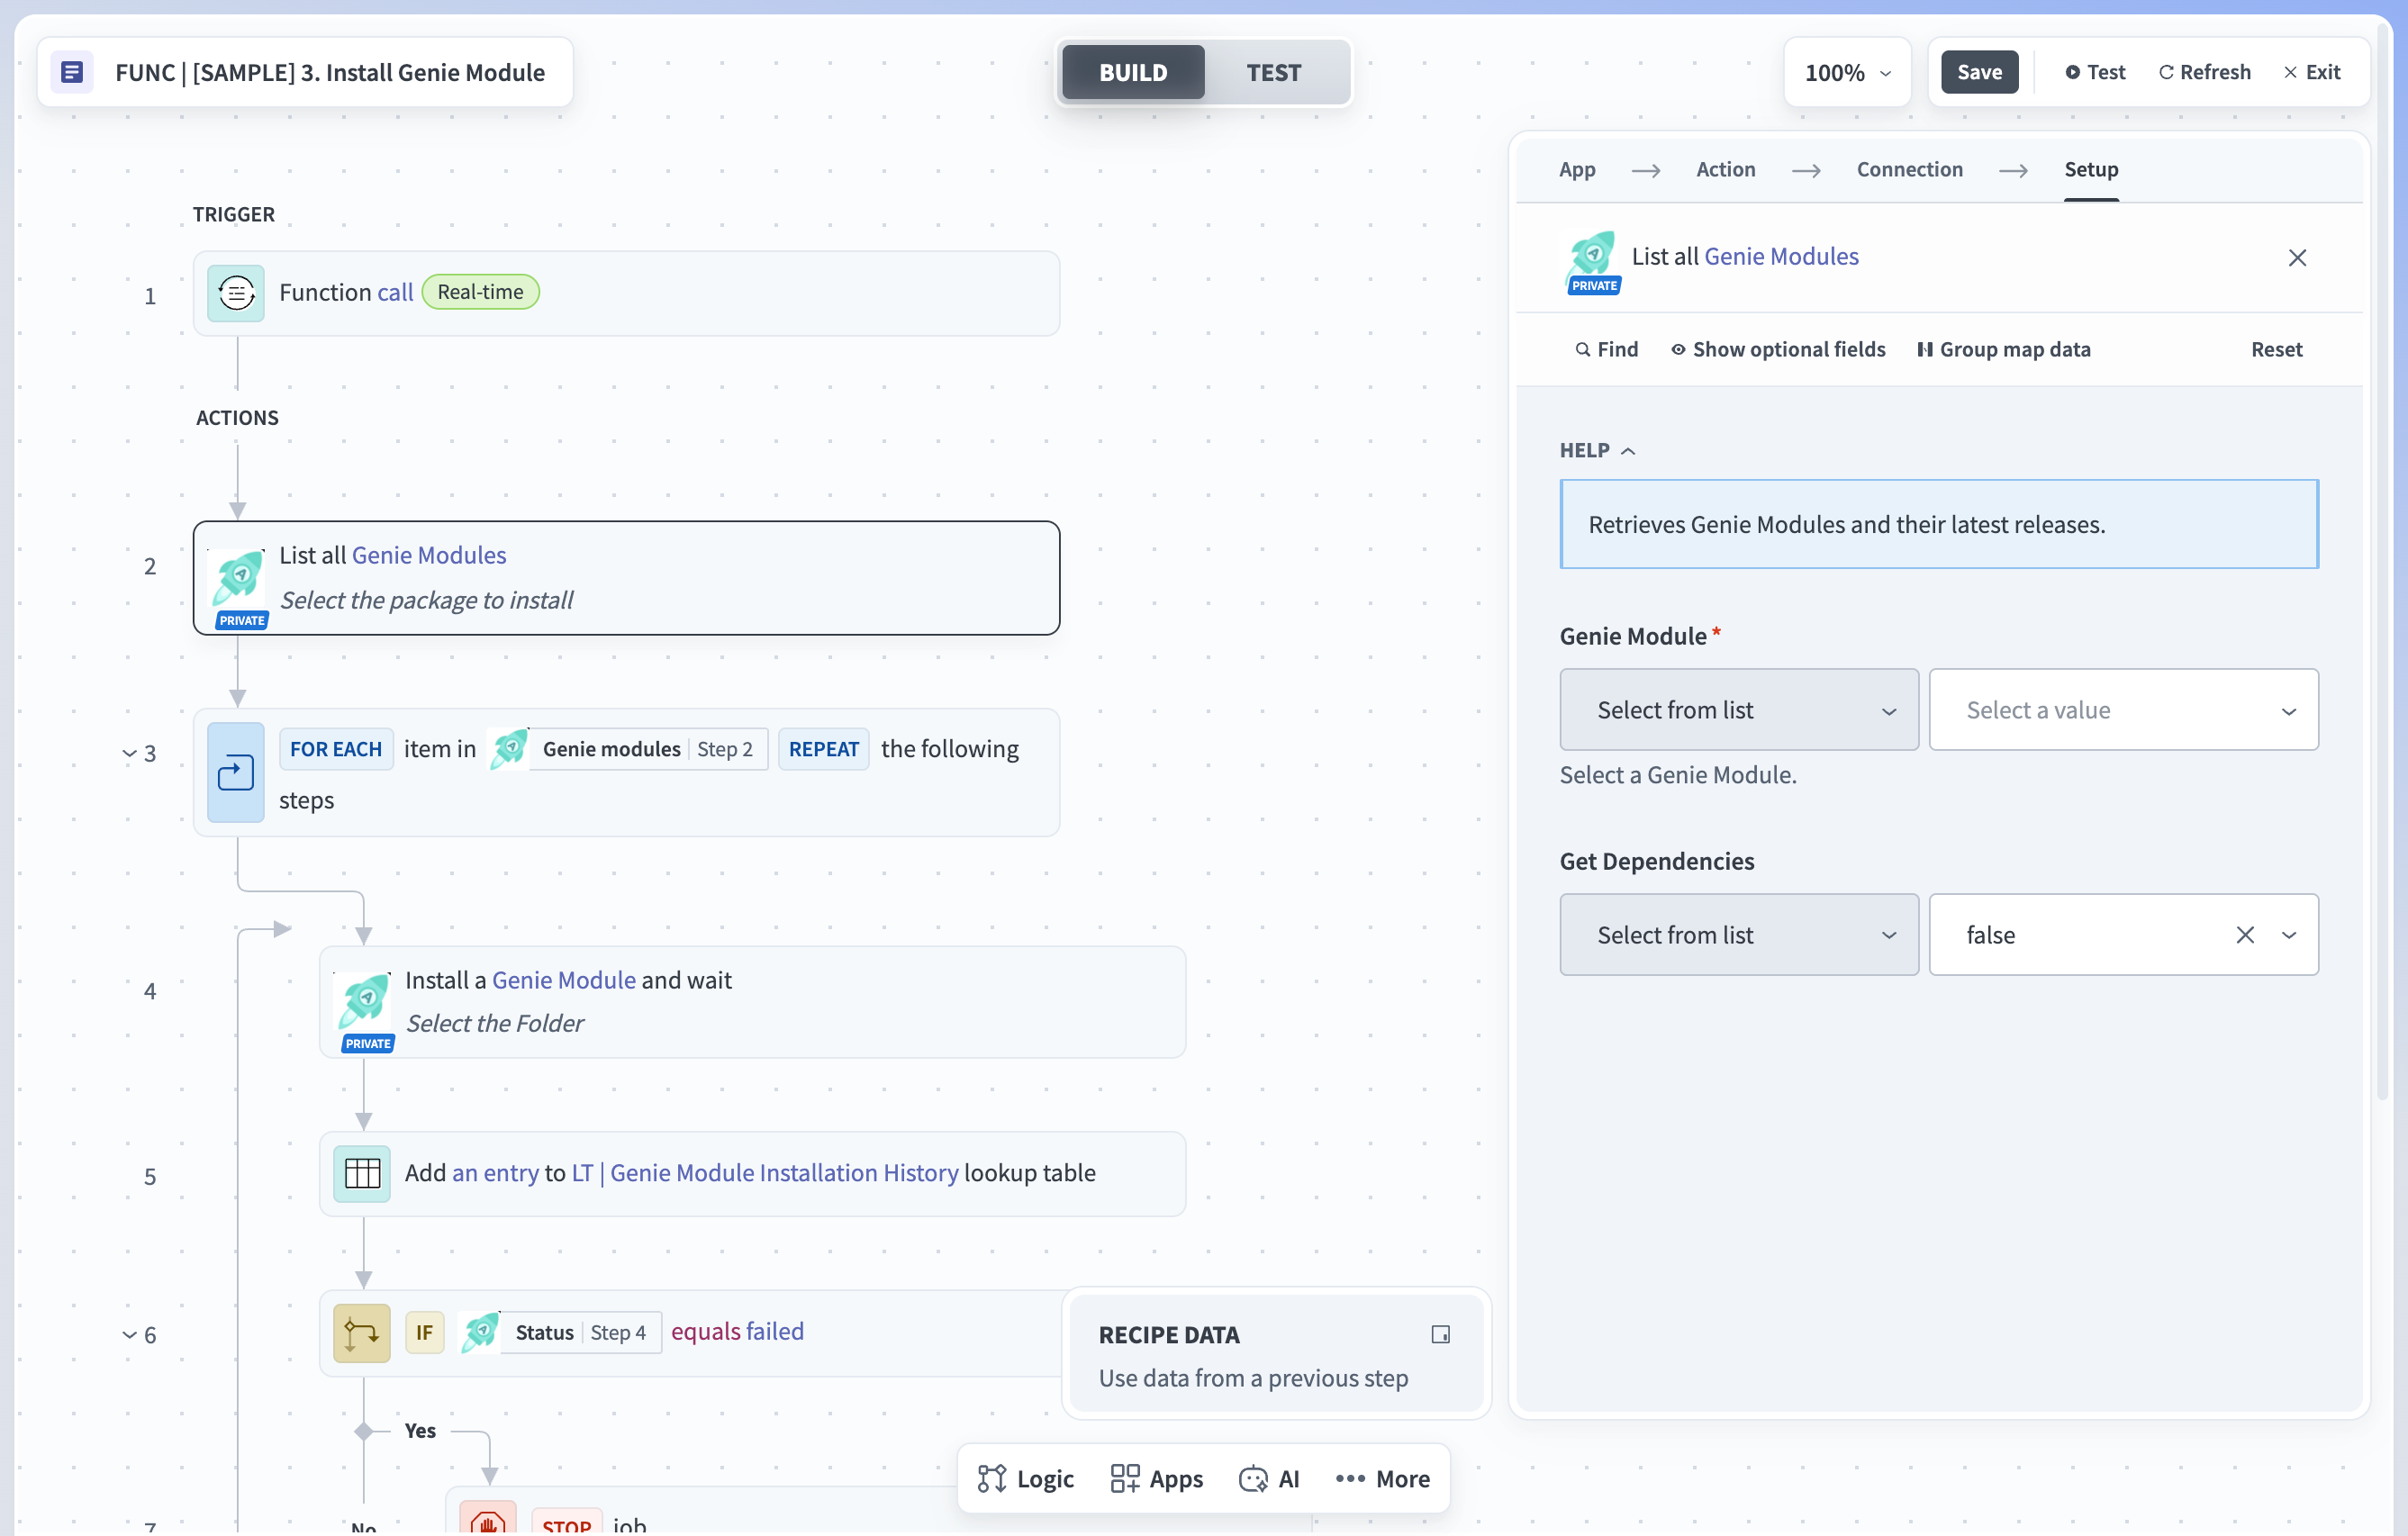 Select the latest version of the genie module
MODULE NOT VISIBLE
If Agentic | IT Support Genie doesn't appear in the drop-down menu, your workspace may not have been granted access. Contact your Workato account team and repeat this step once access is confirmed.
In Step 4, set the Folder field based on your install type:
- Fresh install: Leave the field empty. If you see an x icon next to the Folder field, click it to clear the cached value before running the job.
- Upgrade: Select the existing Agentic | IT Support Genie project. This preserves your existing configuration.
 Select the folder to install IT Support Genie
Click Test recipe and wait for it to complete. Confirm that the output of Step 5 in the recipe shows a success status.
Confirm that Agentic | IT Support Genie now appears in your workspace's projects list.
Configure connections
Complete the following steps to configure connections:
Review the requirements for each app you plan to use and complete any required configuration before you create the connection.
Okta
Grant the following OAuth scopes to the Okta connection:
okta.groups.readokta.groups.manageokta.users.readokta.apps.readokta.apps.manageokta.logs.read
Create the API token or OAuth client with a Super Administrator or Organization Administrator account, which has the directory, group, application, and log permissions these scopes require. Refer to the Okta connector documentation for connection details.
Microsoft Entra ID
- Requires a P1 or P2 license.
- Enable Reports and Audit logs permissions in the Azure Portal. Refer to the Microsoft data retention reference for details on audit log retention.
- Grant the following application permissions to the API client used for the connection:
AuditLog.Read.AllDirectory.Read.AllIdentityRiskyUser.Read.AllIdentityRiskyUser.ReadWrite.AllRoleManagement.Read.AllUser.ReadWrite.AllUserAuthenticationMethod.ReadWrite.All
Refer to the Microsoft Entra ID connector documentation for connection details.
Jira Service Desk
Refer to the Jira Service Desk connector documentation for connection details.
Google Workspace
Refer to the Google Workspace connector documentation for connection details.
Confluence
Refer to the Confluence connector documentation for connection details.
Go to Agentic | IT Support Genie > Config > Connections and configure a connection for each app you plan to use.
Configure metadata
Complete the following steps to configure the data tables IT Support Genie uses to route approvals and schedule knowledge ingestion:
Go to Agentic | IT Support Genie > Config > Metadata > Application Approvers. This table defines each application and its provisioning and approval configuration.
 The Application Approvers table
| Column | Description |
|---|---|
| Data Source | Enter the SSO provider that provisions the application, such as Okta or Entra ID. Leave this field blank if the application isn't provisioned through an identity provider. |
| Application | Enter the name of the application. |
| License Name | Enter the role or access level to assign within the application.
|
| group_id / application_role_id | Enter the unique identifier for the role or group in your identity provider.
|
| Processing Type | Enter A for automatic provisioning or M for manual. |
| Manager Approval Enabled | Set to TRUE if manager approval is required for this application license. |
| 2nd Approval Enabled | Set to TRUE if a second-tier approval is required. |
| 2nd Approver User/Channel | Enter the second approver's email address or notification channel. Separate multiple emails with commas. |
| Admin Approval Enabled | Set to TRUE if admin approval is required. |
| Admin User / Channel | Enter the admin's email address or notification channel. Separate multiple emails with commas. |
Go to Agentic | IT Support Genie > Config > Metadata > Data Ingestion | Scheduler. This table defines the schedule and data source for knowledge base ingestion.
| Column | Description |
|---|---|
| Data Source | Enter the name of the application that is the data source, such as Confluence. |
| Type | Enter delta to ingest only changes since the last run, or full to load all specified data. |
| Frequency | Enter how often ingestion runs, such as daily, weekly, monthly, or initial. |
| Day/Date/Time | Enter when the scheduler runs ingestion for the data source. For example, Mon/09:00, 15/09:00, 09:00, or NA. |
| Filter/Path | Enter the scope when a data source has pages, categories, folders, domains, or spaces. For Confluence, enter the space name. |
| Is Active? | Set to TRUE to activate ingestion for this data source. |
| Exclusions | Enter a JSON object defining file types to exclude. For example, { "file_extensions": ["mp4","mov"] }. |
| deleteFilesOlderThan_inDays | Enter the number of days after which files are deleted. Not implemented for all data sources. |
Configure project and environment properties
Complete the following steps to configure project and environment properties:
Go to Agentic | IT Support Genie > Settings > Project properties and edit the following:
| Property | Description |
|---|---|
| Approval.ReminderFrequency.Days | Set the number of days between reminder notifications sent to approvers. |
| Approval.TimeOut.Days | Set the number of days before an approval request times out. |
| Approval.TimedOutDefaultAction | Set the action taken when all configured approvals time out. Accepts APPROVED or REJECTED. The recommended value is REJECTED. |
| Enable Logging | Set to true to run the audit log recipe after every skill execution, capturing the action, the user, and the outcome. |
| Genie.Name | Set the display name for the IT Support Genie instance. This name appears in notifications. |
| Feedback.URL | Set the URL of the portal where user feedback is captured after a genie interaction. For example, https://acme.com/feedback. |
Go to Agentic | IT Support Genie > Settings > Project access and add the collaborators who need access to this project. This should include only the admins and developers responsible for custom extension work. End users don't need project access.
Go to Tools > Environment properties and configure the following Jira Service Desk properties for your instance:
| Property | Description |
|---|---|
| JiraServiceDesk.Base.URL | Set the base URL of your Jira instance. IT Support Genie uses this as the root endpoint for API calls. For example, https://acme.atlassian.net. |
| JiraServiceDesk.projects | Set the Jira project key that scopes the integration to a specific project. For example, ISG. |
| JiraServiceDesk.status.required | Set the ticket statuses that a ticket must have for the workflow to process it. Separate multiple with commas. For example, Open, In Progress, Waiting for Support. |
| JiraServiceDesk.TicketsAge.Months | Set the age threshold in months used to filter tickets. The workflow fetches only tickets older than this number of months. |
Configure IT Support Genie
Complete the following steps to configure IT Support Genie:
Go to Agentic | IT Support Genie, select the genie, and click Edit. Select your AI model and chat interface. Don't change the genie description.
Under the Enterprise skills section, start the recipe for each application skill you want IT Support Genie to use.
Configure the genie action in each of the following recipes to use the genie you set up, then start the recipes:
| Recipe | Location |
|---|---|
| FUNC | User notification & Genie Trigger | Extensions > App Event |
| Provision Application Access | Core > Access Provisioning |
| TRIGGER | Notify Users on Comments | Extensions > App Event > Jira Service Desk |
| TRIGGER | Notify Users on Request Update | Extensions > App Event > Jira Service Desk |
Confirm that the following required skills are started. For any that aren't, click the skill name, then click Start recipe:
| Skill | Location |
|---|---|
| Get Users' Basic Details | Core |
| Save Details in Audit Log | Core |
| App Access Request | Core > Access Provisioning |
| Get Available Licenses | Core > Access Provisioning |
| Provisioning Status Update | Core > Access Provisioning |
| Request Approval | Core > Approval Workflow |
| Log User Conversation | Core > User Feedback |
| Capture User Feedback | Core > User Feedback |
Go to Agentic | IT Support Genie > Core, click the Assets filter, select Recipes, and start any recipes in the folder that aren't already started.
Click Start genie.
SETUP COMPLETE
IT Support Genie is now configured. Use Activate and test to confirm it's working, or Extend IT Support Genie to add knowledge base content and custom skills.
Extend IT Support Genie
You can extend IT Support Genie to ingest knowledge, configure manager lookups, and build custom skills. All steps in this section are optional, except where noted.
The Core folder holds the genie's foundational logic and is read-only. You extend the genie through the Extensions and Custom Extensions folders without changing its default behavior.
Knowledge ingestion
Complete the following steps to make IT policies, runbooks, documentation, or Jira Service Desk history available to IT Support Genie:
Go to Agentic | IT Support Genie > Extensions > Knowledge Ingestion, select the folder for your source app, and start the required recipes in that folder. IT Support Genie supports Confluence and Jira Service Desk as ingestion sources.
Add the corresponding knowledge base to the genie.
After the recipes are started, a background scheduler syncs content from the source system into the knowledge base at regular intervals, using full and delta loads. This doesn't create or modify records in the source system.
Manager lookup
If manager approval is enabled, configure the Get manager details function so IT Support Genie can route approvals to managers. This step is required when manager approval is enabled.
Go to Agentic | IT Support Genie > Extensions > Functions and select FUNC | Get manager details.
Connect the function to your organization's provisioning app.
Unskip the steps for your provisioning app. All other steps are skipped by default.
| Provisioning app | Action |
|---|---|
| Okta | Unskip steps 3–9 |
| Microsoft Entra ID | Unskip steps 10–13 |
| Workday | Unskip steps 14–19 |
CUSTOM PROVISIONING APPS
If your provisioning app isn't listed above, this function may need additional configuration. Clone the function into Custom Extensions and refer to your app's connector documentation to build your own version.
Custom extensions
The Custom Extensions folder is where you build new skills or modify existing Extension skills. Clone assets from the Extensions folder into Custom Extensions before making changes.
Complete the following steps to build a custom skill:
Go to Agentic | IT Support Genie > Custom Extensions > [App Name]. Templates for new apps are already configured.
Rename the folder and skill to match the app name.
Add the skill to IT Support Genie.
Activate and test
Complete the following steps to confirm your setup.
WORKATO GO EXAMPLE
These steps use Workato GO as an example. If you configured Slack or Microsoft Teams, access IT Support Genie through that interface instead. The verification step is the same: send a message and check the genie's reply.
Go to Manage > Workato GO admin > Subdomain and copy your subdomain URL.
Open the URL and log in with your Workato Identity credentials.
Select Genies in the sidebar and select your IT Support Genie.
Enter Who are you? in the chat. IT Support Genie greets you by name, confirms its name, and describes its role.
Last updated: