Case Intake & Triage MCP server
The Case Intake & Triage MCP server enables LLMs to interact with Jira Service Desk, Salesforce, Confluence, and PagerDuty for end-to-end support ticket triage through natural conversation. It provides tools to fetch a ticket, enrich it with customer context, apply a priority matrix, and write the resulting priority and routing back to the ticket, without requiring direct interaction with the Jira Service Desk, Salesforce, Confluence, and PagerDuty interfaces.
Uses
Use the Case Intake & Triage MCP server to perform the following actions:
- Triage a ticket by pulling its classification fields, enriching it with Salesforce customer context, and applying a priority matrix
- Write the resulting priority and routing, or a specific assignee, back to the ticket
- Look up a ticket's customer tier and active entitlements without changing anything
- Search configured Confluence spaces for a runbook matching a ticket's issue
- Notify the on-call PagerDuty responder when a ticket is triaged as P1
- List the agents eligible for assignment to a ticket
- Reassign a ticket to a different agent with a fresh triage write
- Re-triage a ticket after its classification changes and get the resulting SLA state
Example prompts
Use the following example prompts to invoke Case Intake & Triage MCP server tools:
Triage HELPDESK-1234What tier is the customer on ticket HELPDESK-1234?Prioritize this ticket and page on-call if it's P1Find a runbook that matches this ticketWho could work on HELPDESK-1234?Reassign HELPDESK-1234 to a different agentWhat's the current severity and impact on HELPDESK-5678?Search Confluence for a runbook about database timeoutsRe-triage HELPDESK-1234 now that the impact has changed
Case Intake & Triage MCP server tools
The Case Intake & Triage MCP server provides the following tools:
| Tool | Description |
|---|---|
| get_case_context | Fetches a ticket's request state and classification fields, and establishes the workflow for the case. |
| get_customer_account_context | Resolves the ticket's Salesforce account and returns the customer's tier and active entitlements for the triage matrix. |
| search_known_issues | Searches configured Confluence spaces for a runbook matching the ticket. |
| apply_triage_to_case | Runs the ticket through the triage matrix and writes the resulting priority and routing back to it. |
| trigger_p1_escalation | Notifies the on-call PagerDuty responder for a ticket triaged as P1. |
| list_assignable_agents | Lists the users eligible for assignment to the ticket. |
Install the Case Intake & Triage MCP server
Complete the following steps to install a prebuilt MCP server to your project:
Sign in to your Workato account.
Go to AI Hub > Enterprise MCP > Custom servers.
Click + Create MCP server.
Go to the Start with pre-built MCP Servers using your connected apps section and select the prebuilt MCP server you plan to use.
Click Use this server.
Provide a name for your MCP server in the Server name field.
Use the Location drop-down menu to select the project for the MCP server.
Go to the Connections section and connect to your app account.
Select the connection type you plan to use for the MCP server template.
- User's connection: MCP server tools perform actions based on the identity and permissions of the user who connects to the application. Users authenticate with their own credentials to execute the skill.
- Your connection: This option uses the connection established by the recipe builder and follows the same principles as normal app connections.
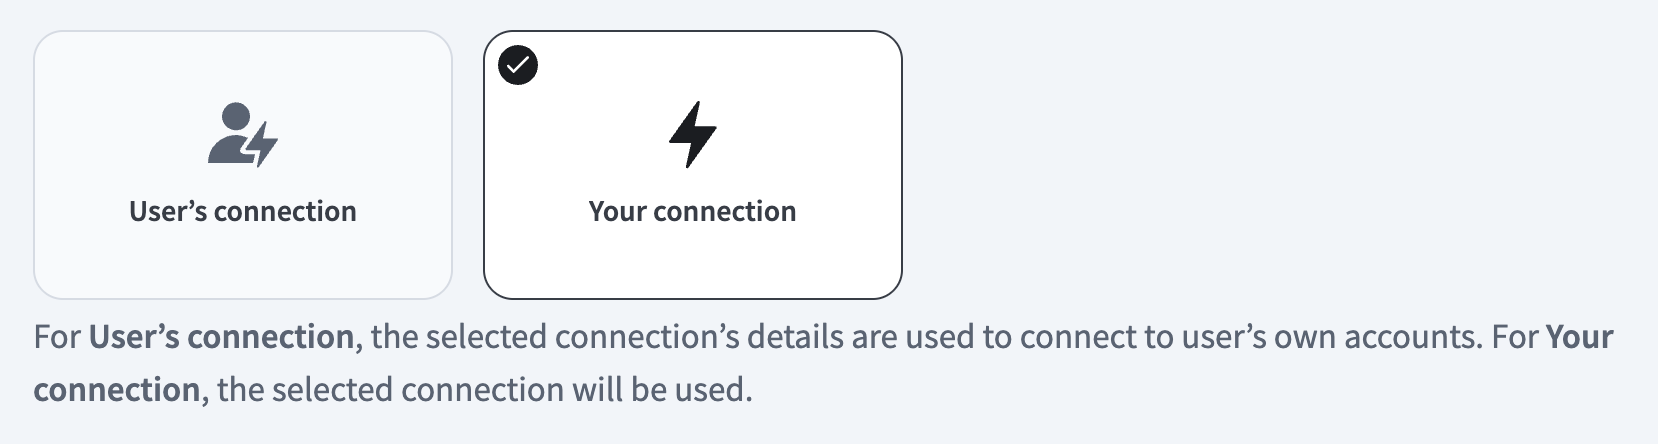 Select your connection type
VERIFIED USER ACCESS AUTHENTICATION REQUIREMENTS
Only app connections that use OAuth 2.0 authorization code grant are available for user's connection. Refer to Verified user access for more information.
Complete the app-specific connection setup steps in the following section.
Case Intake & Triage connection setup
View Case Intake & Triage connection setup steps
Configure the following connections to set up the Case Intake & Triage MCP server:
- Jira: Required. Reads and writes ticket priority, assignee, and routing through the core Issue API.
- Jira Service Desk: Required. Reads request state, SLA cycles, and customer-request details.
- Salesforce: Required. Enriches a ticket with the customer's tier and active entitlements.
- Confluence: Required if runbook search is enabled.
- PagerDuty: Required if P1 on-call escalation is enabled.
Jira connection setup
View Jira connection setup steps
There are six ways to connect to Jira:
- API token
- Service account (API token)
- OAuth 2.0 (Cloud - Atlassian-hosted Jira)
- OAuth 2.0 (Data Center)
- Personal access tokens
- Basic authentication (password)
We strongly recommend using API tokens, service account API tokens, OAuth 2.0, or personal access tokens to connect to Jira instead of basic authentication with a password.
LIMITATIONS
Authentication methods for the Jira connector have the following limitations:
- Real-time triggers aren't supported with OAuth 2.0 (Cloud - Atlassian-hosted Jira) or OAuth 2.0 (Data Center).
- On-prem Jira connections aren't supported with API token or service account (API token) authentication.
- Atlassian deprecated basic authentication for cloud connections in December 2018. On-premise Jira is not affected.
API token
View API token steps
API tokens authenticate your Atlassian account without using a username and password. API token authentication doesn't support connections to on-premise Jira.
Prerequisites
You must generate an Atlassian API token for this authentication method. Refer to the Atlassian Manage API tokens guide for more information.
Connect to Jira using an API token
Complete the following steps to connect to Jira in Workato using an API token:
Click Create > Connection or press C twice.
Search for and select Jira as your connection on the New connection page.
Provide a name for your connection in the Connection name field.
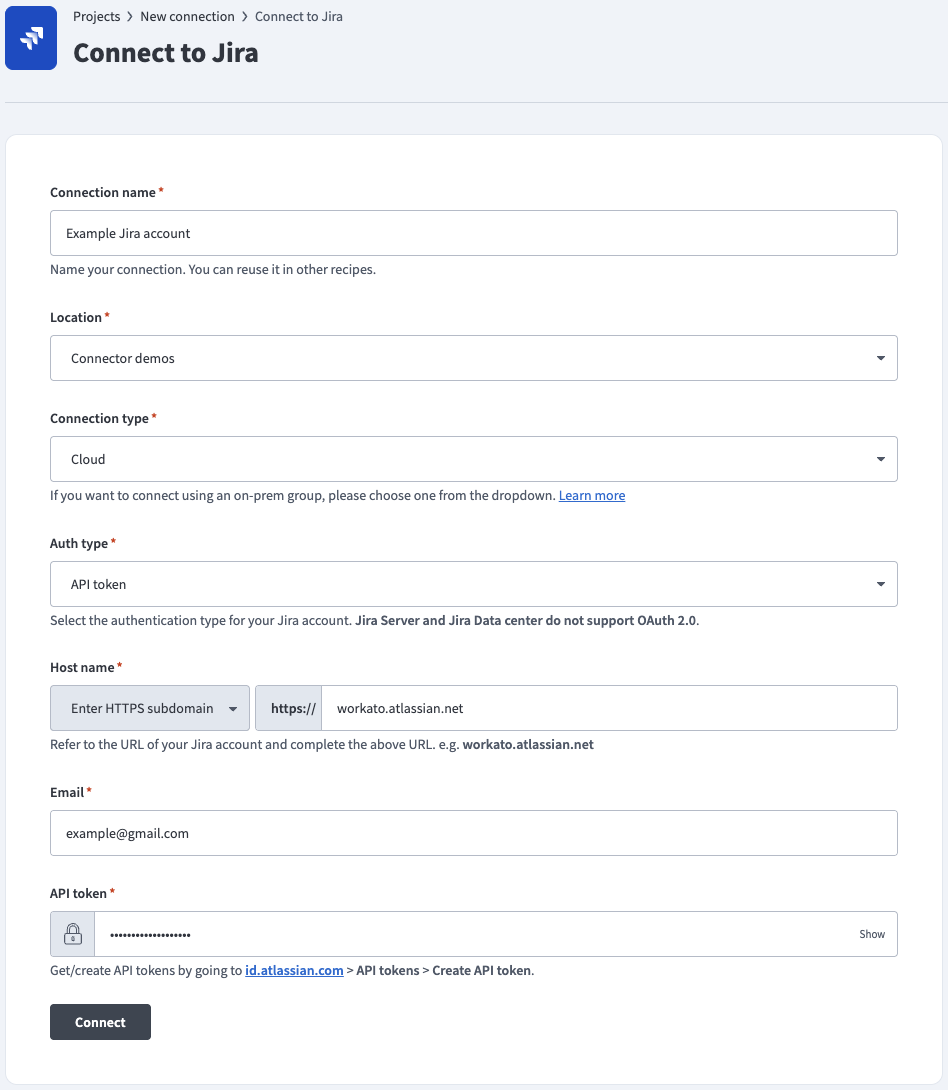 API token auth
Use the Location drop-down menu to select the project where you plan to store the connection.
Use the Connection type drop-down menu to select your connection type.
Use the Auth type drop-down menu to select API token.
Enter the URL subdomain for your Jira instance in the Host name field. For example: workato.atlassian.net
Enter the Email of the Jira account to link to Workato.
Enter the API token for your Atlassian account. Refer to the Atlassian Manage API tokens guide to generate this value.
Optional. Use the Custom OAuth profile drop-down menu to select a custom OAuth profile for your connection.
Click Connect.
Service account (API token)
View Service account (API token) steps
Use this authentication method to connect Workato to Jira using an Atlassian Cloud service account. A service account is a dedicated, non-personal Atlassian account used for integrations. Service accounts aren't tied to individual users, so connections remain stable when team members leave or change roles.
Service account (API token) authentication supports Jira Cloud connections only.
Prerequisites
Complete the following tasks before you connect:
Set up the service account
Go to Atlassian Administration.
Select your organization.
Select Directory > Service accounts and click Create a service account.
Enter a name and description for the service account, then click Create a service account.
Select the apps and roles for the service account on the Select app role for service account page.
Add the service account to groups to grant access to specific projects or spaces.
Click Create.
Click Create credentials.
Select API token on the Choose authentication type screen.
Enter a Name and Expires on date on the Name API token page.
Select the scopes for your connection. At minimum, you must select read:jira-user to establish the connection. Select additional scopes based on the triggers and actions your recipes use. Refer to Manage API tokens for service accounts for the full list of available scopes.
Click Next.
Review the scopes assigned to your token on the Review your API token screen.
Click Create.
Click Copy to copy your API token. Save this value for use in Workato.
Click Done.
Connect to Jira using a service account API token
Complete the following steps to connect to Jira in Workato using a service account API token:
Click Create > Connection or press C twice.
Search for and select Jira as your connection on the New connection page.
Provide a name for your connection in the Connection name field.
Use the Location drop-down menu to select the project where you plan to store the connection.
Use the Connection type drop-down menu to select your connection type.
Use the Auth type drop-down menu to select Service account (API token).
Enter the URL subdomain for your Jira instance in the Host name field. For example: workato.atlassian.net
Enter the email address associated with the service account in the Email field.
Enter the API token for the service account. Refer to the Atlassian Manage API tokens guide to generate this value.
Optional. Use the Custom OAuth profile drop-down menu to select a custom OAuth profile for your connection.
Click Connect.
OAuth 2.0 (Cloud - Atlassian-hosted Jira)
View OAuth 2.0 (Cloud - Atlassian-hosted Jira) steps
OAuth 2.0 enables you to share specific data with an application while keeping your username, password, and other information private. OAuth 2.0 (Cloud - Atlassian-hosted Jira) supports Jira Cloud connections.
REAL-TIME TRIGGERS NOT SUPPORTED
OAuth 2.0 doesn't support real-time triggers because it's incompatible with webhooks. As an alternative, you can register the Webhooks connector in Jira to use Jira's static webhook functionality. Refer to the Cloud Jira webhook documentation for registration steps.
Connect to Jira using OAuth 2.0 (Cloud - Atlassian-hosted Jira)
Complete the following steps to connect to Jira in Workato using OAuth 2.0 (Cloud - Atlassian-hosted Jira):
Click Create > Connection or press C twice.
Search for and select Jira as your connection on the New connection page.
Provide a name for your connection in the Connection name field.
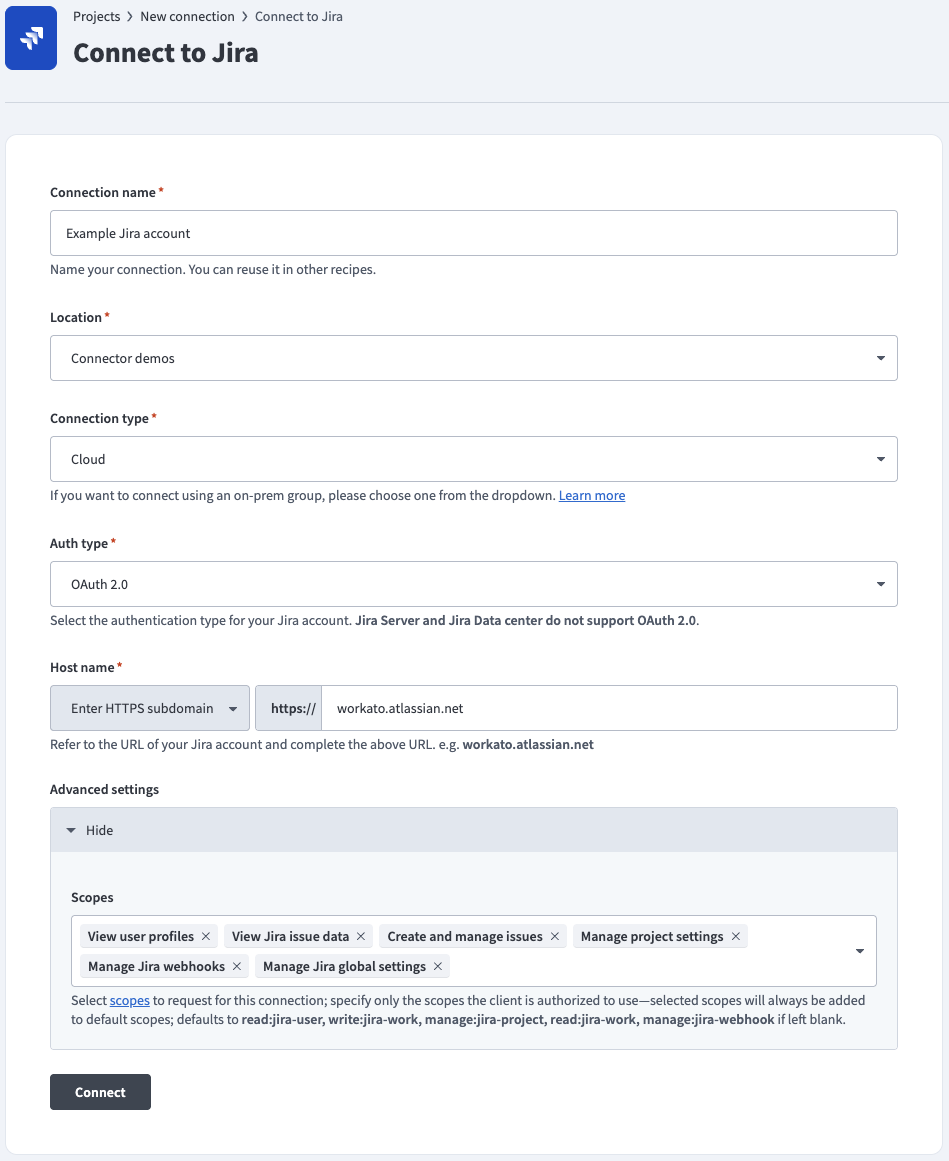 OAuth 2.0 auth
Use the Location drop-down menu to select the project where you plan to store the connection.
Use the Connection type drop-down menu to select your connection type.
Use the Auth type drop-down menu to select OAuth 2.0 (Cloud - Atlassian-hosted Jira).
Enter the URL subdomain for your Jira instance in the Host name field. For example: workato.atlassian.net
Optional. Use the Scopes drop-down menu to select the authorization scopes to request. Workato requests the following scopes by default:
read:jira-userwrite:jira-workmanage:jira-projectread:jira-workmanage:jira-webhook
Optional. Use the Custom OAuth profile drop-down menu to select a custom OAuth profile for your connection.
Click Connect and sign in to your Jira instance.
Authorize Workato's request to access your Jira instance.
OAuth 2.0 (Data Center)
View OAuth 2.0 (Data Center) steps
OAuth 2.0 (Data Center) enables you to connect to an on-premise Jira Data Center instance using OAuth 2.0.
REAL-TIME TRIGGERS NOT SUPPORTED
OAuth 2.0 doesn't support real-time triggers because it's incompatible with webhooks. As an alternative, you can register the Webhooks connector in Jira to use Jira's static webhook functionality. Refer to the Jira Datacenter webhook documentation for registration steps.
Prerequisites
You must generate an Atlassian client ID and client secret if you plan to connect to Jira Data Center using OAuth 2.0. Refer to the Atlassian Configure an incoming link guide to generate these values using https://www.workato.com/oauth/callback as the redirect URI.
Connect to Jira using OAuth 2.0 (Data Center)
Complete the following steps to connect to Jira in Workato using OAuth 2.0 (Data Center):
Click Create > Connection or press C twice.
Search for and select Jira as your connection on the New connection page.
Provide a name for your connection in the Connection name field.
Use the Location drop-down menu to select the project where you plan to store the connection.
Use the Connection type drop-down menu to select your connection type.
Use the Auth type drop-down menu to select OAuth 2.0 (Data Center).
Enter the hostname of your Jira Data Center instance in the Host name field. For example: jira.yourcompany.com
Expand the Advanced settings section.
Enter the Client ID and Client secret from your Jira Data Center application link configuration. Refer to the Prerequisites section to generate these values.
Optional. Use the Scopes drop-down menu to select the authorization scopes to request. Defaults to READ and WRITE.
Optional. Use the Custom OAuth profile drop-down menu to select a custom OAuth profile for your connection.
Click Connect and sign in to your Jira instance.
Authorize Workato's request to access your Jira instance.
Personal access tokens
View Personal access tokens steps
Personal access tokens (PATs) authenticate your Atlassian account without using a username and password. PAT authentication supports on-premise Jira connections.
Prerequisites
You must generate an Atlassian personal access token for this authentication method. Refer to the Atlassian Using Personal Access Tokens guide for more information.
Connect to Jira using a personal access token
Complete the following steps to connect to Jira in Workato using a personal access token:
Click Create > Connection or press C twice.
Search for and select Jira as your connection on the New connection page.
Provide a name for your connection in the Connection name field.
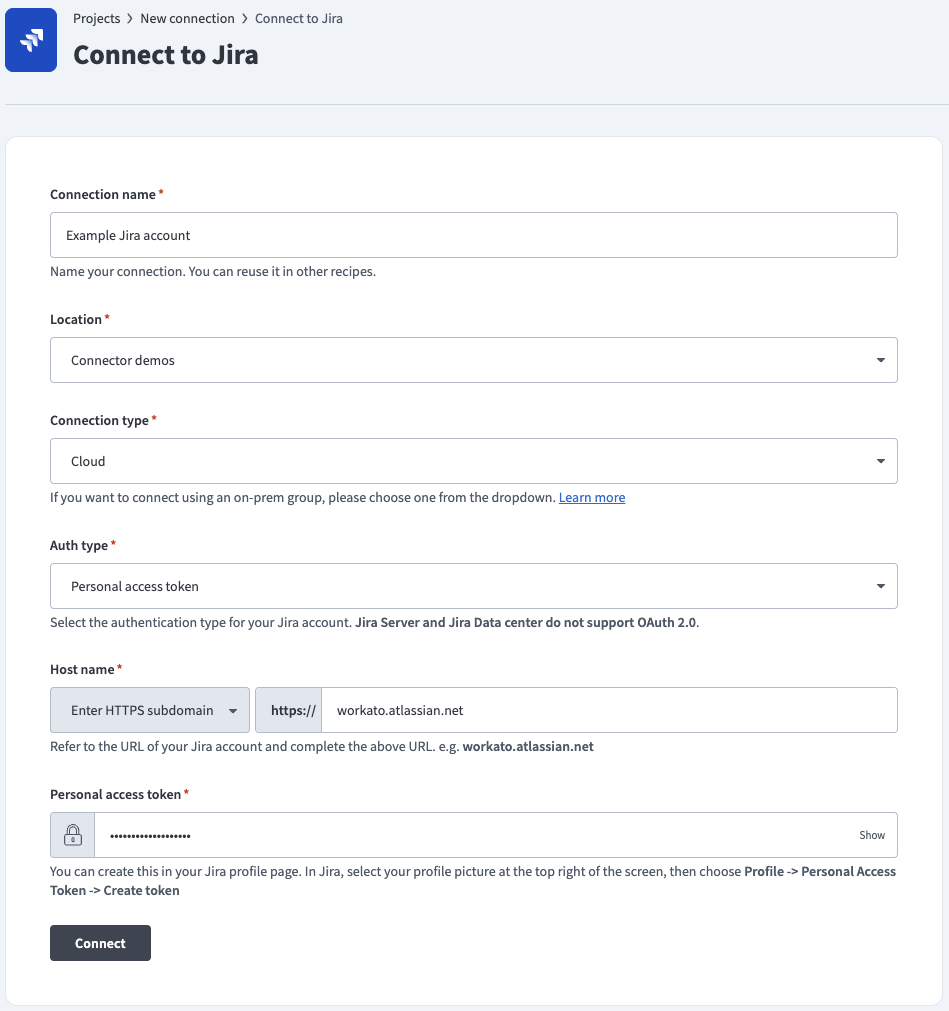 Personal access token auth
Use the Location drop-down menu to select the project where you plan to store the connection.
Use the Connection type drop-down menu to select your connection type.
Use the Auth type drop-down menu to select Personal access token.
Enter the URL subdomain for your Jira instance in the Host name field. For example: workato.atlassian.net
Enter the Personal access token of the Jira account to link to Workato. Refer to the Atlassian Using Personal Access Tokens guide to generate this value.
Optional. Use the Custom OAuth profile drop-down menu to select a custom OAuth profile for your connection.
Click Connect.
Basic authentication with password
View Basic authentication with password steps
Basic authentication connects to your Atlassian account using a username and password. Basic authentication supports on-premise Jira connections.
DEPRECATED PASSWORD AUTHENTICATION
Atlassian deprecated basic authentication for cloud connections in December 2018. On-premise Jira is not affected.
Connect to Jira using basic authentication
Complete the following steps to connect to Jira in Workato using basic authentication:
Click Create > Connection or press C twice.
Search for and select Jira as your connection on the New connection page.
Provide a name for your connection in the Connection name field.
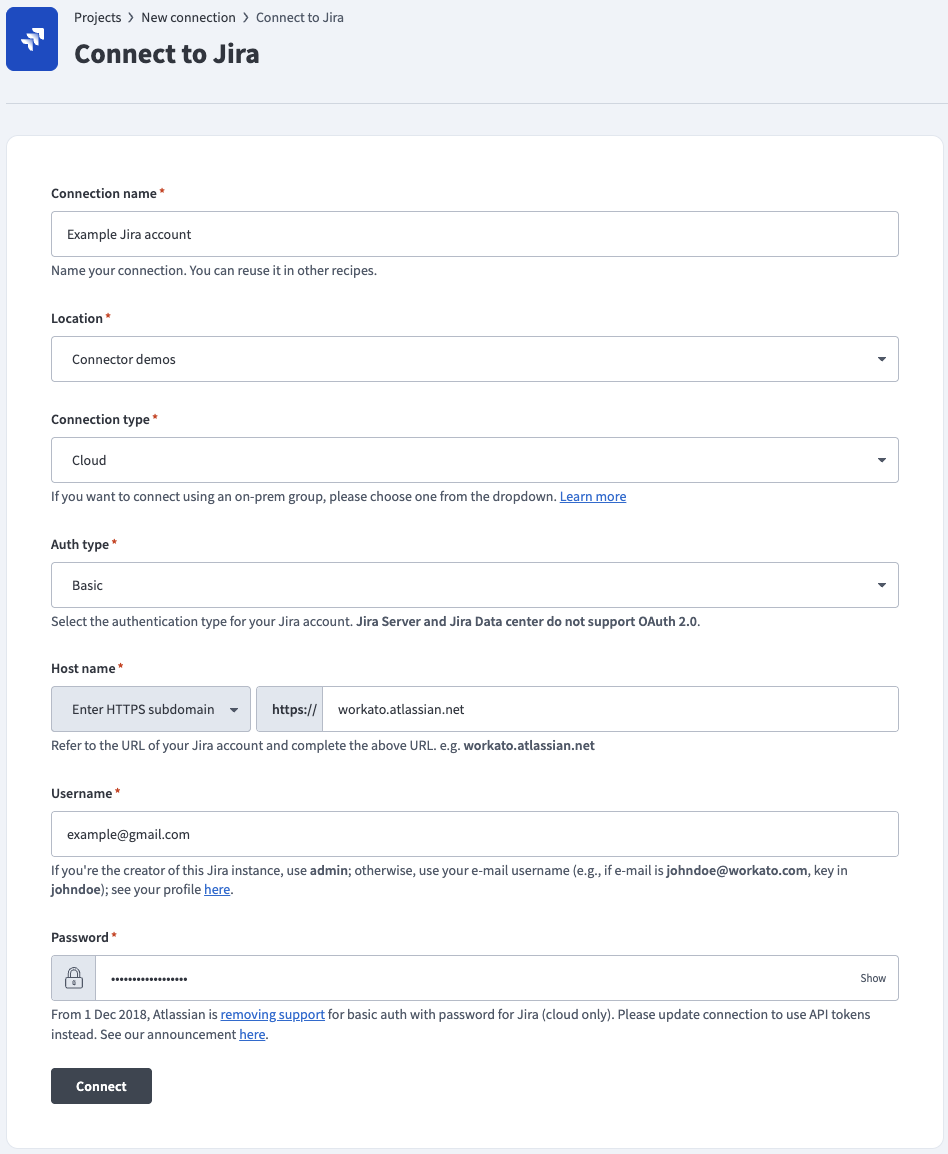 Basic password auth
Use the Location drop-down menu to select the project where you plan to store the connection.
Use the Connection type drop-down menu to select your connection type.
Use the Auth type drop-down menu to select Basic.
Enter the URL subdomain for your Jira instance in the Host name field. For example: workato.atlassian.net
Enter your Jira Username and Password.
Optional. Use the Custom OAuth profile drop-down menu to select a custom OAuth profile for your connection.
Click Connect.
Jira Service Desk connection setup
View Jira Service Desk connection setup steps
Jira Service Desk API version
The Jira Service Desk connector uses the Jira Service Desk Cloud REST API.
Jira Service Desk supported editions and versions
The Jira Service Desk connector works with both cloud and on-prem instances 7.x and later.
The Jira Service Desk connector supports the following authentication types:
Jira Service Desk API token
View API token authentication steps
Use API token authentication to connect to Jira Service Desk with a token generated from your Atlassian account. Use basic authentication with password for on-prem instances.
Get an API token
Refer to Manage API tokens for your Atlassian account in the Atlassian documentation.
Connect to Jira Service Desk using an API token
Complete the following steps to set up an API token connection to Jira Service Desk in Workato:
Click Create > Connection or press C twice.
Search for and select Jira Service Desk on the New connection page.
Enter a name for your connection in the Connection name field.
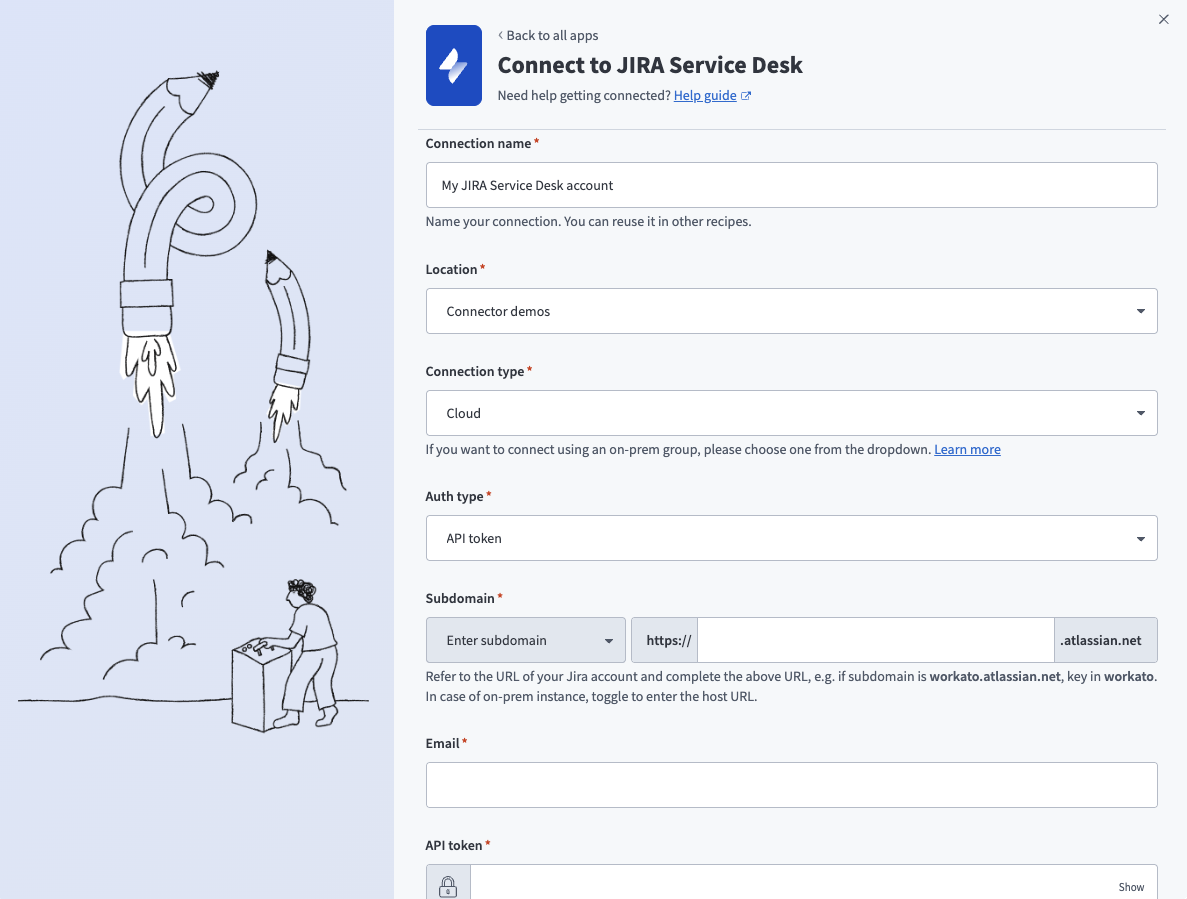 API token connection setup
Use the Location drop-down menu to select the project where you plan to store the connection.
Use the Connection type drop-down menu to select Cloud.
Use the Auth type drop-down menu to select API token.
Enter your Jira Service Desk subdomain in the Subdomain field.
Enter the email address for your Jira Service Desk account in the Email field.
Enter your API token in the API token field.
Optional. Use the Custom OAuth profile drop-down menu to select a custom OAuth profile for your connection.
Click Connect.
Jira Service Desk OAuth 2.0
View OAuth 2.0 authentication steps
Use OAuth 2.0 to connect to Jira Service Desk by signing in and granting access through Atlassian's authorization flow.
Default scopes
Workato requests the following scopes by default:
read:jira-userread:jira-workwrite:jira-workmanage:jira-projectmanage:jira-configurationmanage:jira-webhookread:servicedesk-requestwrite:servicedesk-requestmanage:servicedesk-customer
Connect to Jira Service Desk using OAuth 2.0
Complete the following steps to set up an OAuth 2.0 connection to Jira Service Desk in Workato:
Click Create > Connection or press C twice.
Search for and select Jira Service Desk on the New connection page.
Enter a name for your connection in the Connection name field.
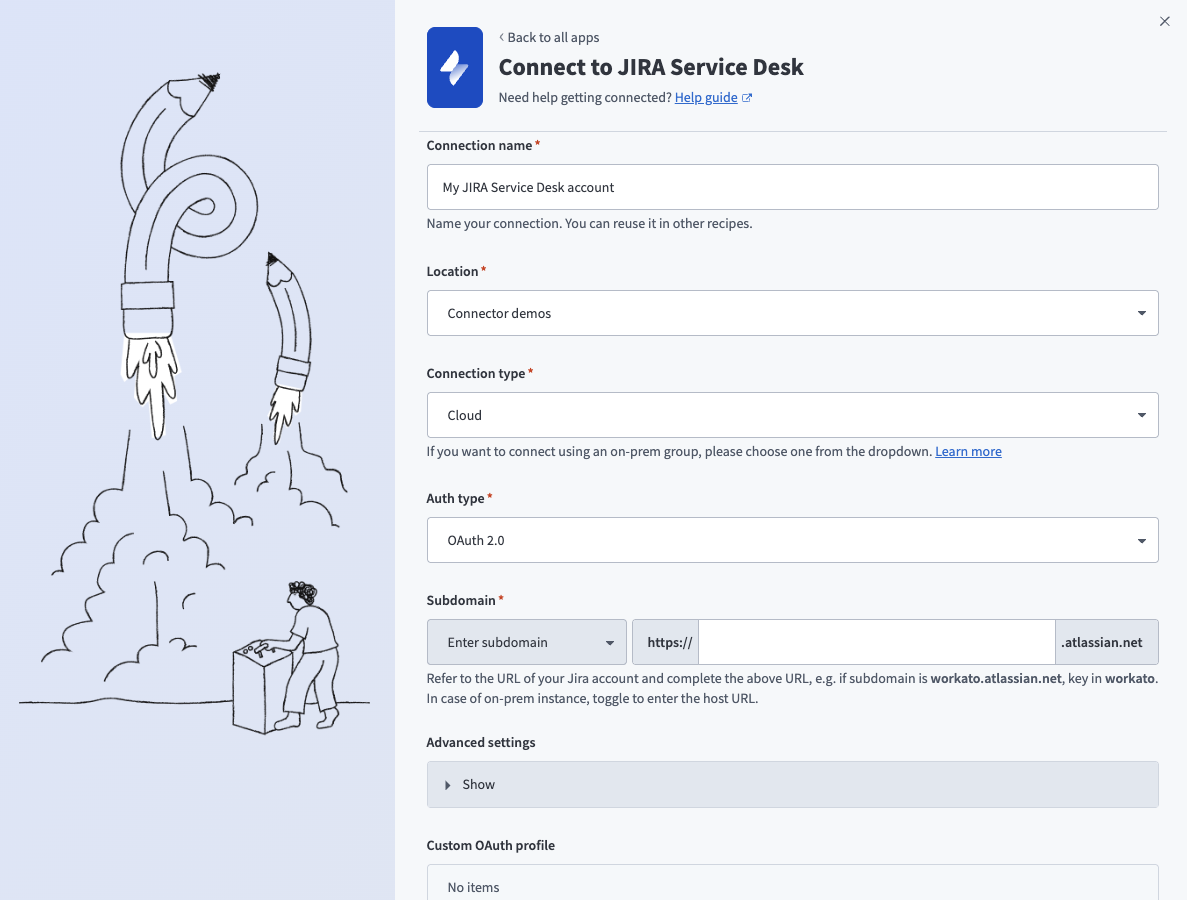 OAuth 2.0 connection setup
Use the Location drop-down menu to select the project where you plan to store the connection.
Use the Connection type drop-down menu to select Cloud.
Use the Auth type drop-down menu to select OAuth 2.0.
Enter your Jira Service Desk subdomain in the Subdomain field.
Optional. Expand Advanced settings and use the Scopes field to request additional scopes. Refer to Default scopes for the list of scopes Workato requests by default.
Optional. Use the Custom OAuth profile drop-down menu to select a custom OAuth profile for your connection.
Click Connect and sign in to your Jira Service Desk instance using your account username and password when prompted.
Authorize Workato's request to access your Jira Service Desk instance.
Jira Service Desk basic authentication with password
View basic authentication steps
Atlassian deprecated basic authentication with password for Jira Service Desk (cloud only) on December 1, 2018, in favor of API tokens. On-prem Jira Service Desk connections aren't affected by this change.
Connect to Jira Service Desk using basic authentication
Complete the following steps to set up a basic authentication connection to Jira Service Desk in Workato:
Click Create > Connection or press C twice.
Search for and select Jira Service Desk on the New connection page.
Enter a name for your connection in the Connection name field.
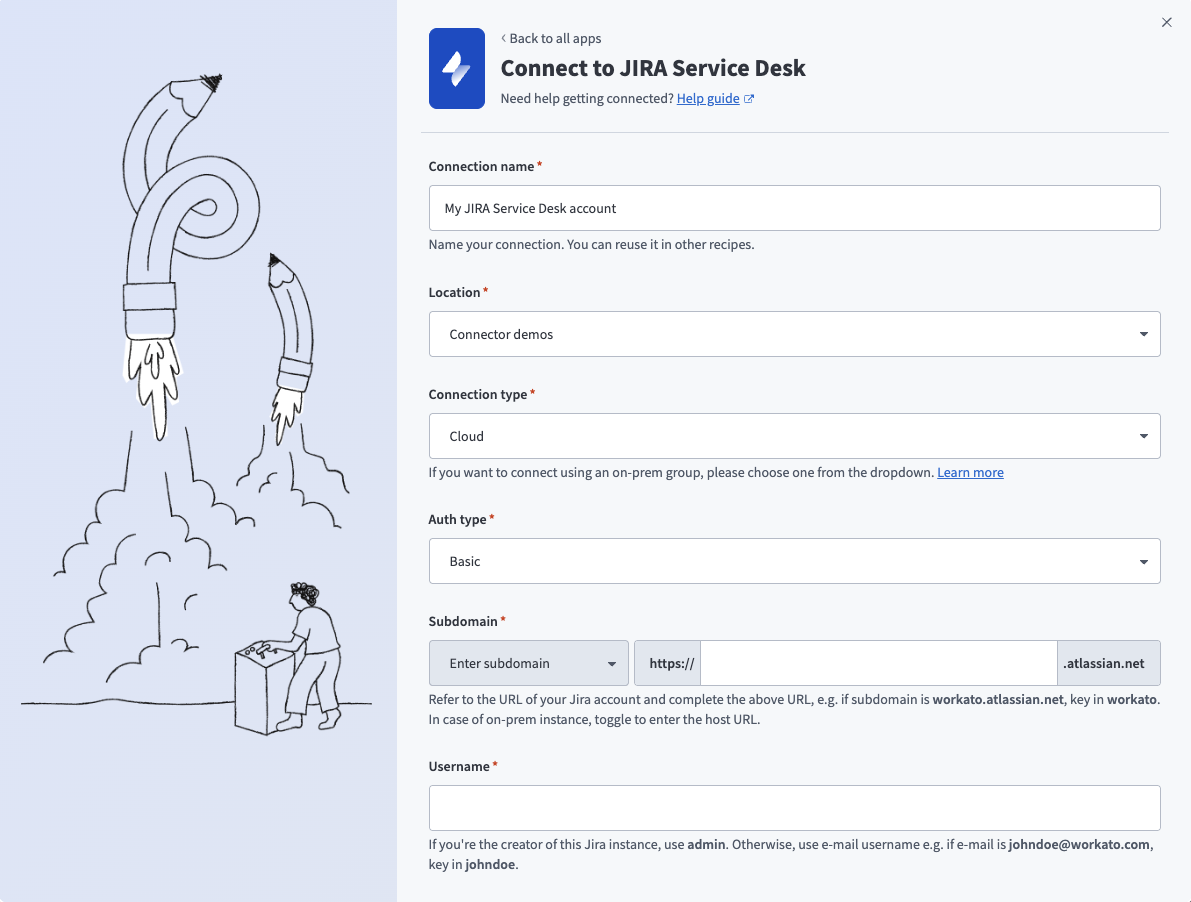 Basic authentication connection setup
Use the Location drop-down menu to select the project where you plan to store the connection.
Use the Connection type drop-down menu to specify whether this is a cloud or on-prem connection.
Use the Auth type drop-down menu to select Basic.
Enter your Jira Service Desk subdomain in the Subdomain field.
Enter your Jira Service Desk username in the Username field.
Enter your Jira Service Desk password in the Password field.
Optional. Use the Custom OAuth profile drop-down menu to select a custom OAuth profile for your connection.
Click Connect.
Salesforce connection setup
View Salesforce connection setup steps
Workato supports OAuth 2.0 authentication and JWT bearer authentication connections for Salesforce.
OAuth 2.0 authentication
View OAuth 2.0 authentication steps
Connect to Salesforce using OAuth 2.0 (Authorization Code Grant)
Complete the following steps to set up an OAuth 2.0 (Authorization Code Grant) connection to Salesforce in Workato:
OAUTH RESTRICTIONS
As of early September 2025, Salesforce restricts the use of uninstalled Salesforce Connected Apps. Refer to OAuth restrictions for required actions if you encounter errors when you create a new connection. These steps are required for all new Salesforce connections starting September 17, 2025.
Click Create > Connection or press C twice.
Search for Salesforce and select it as your app.
Enter a name in the Connection name field.
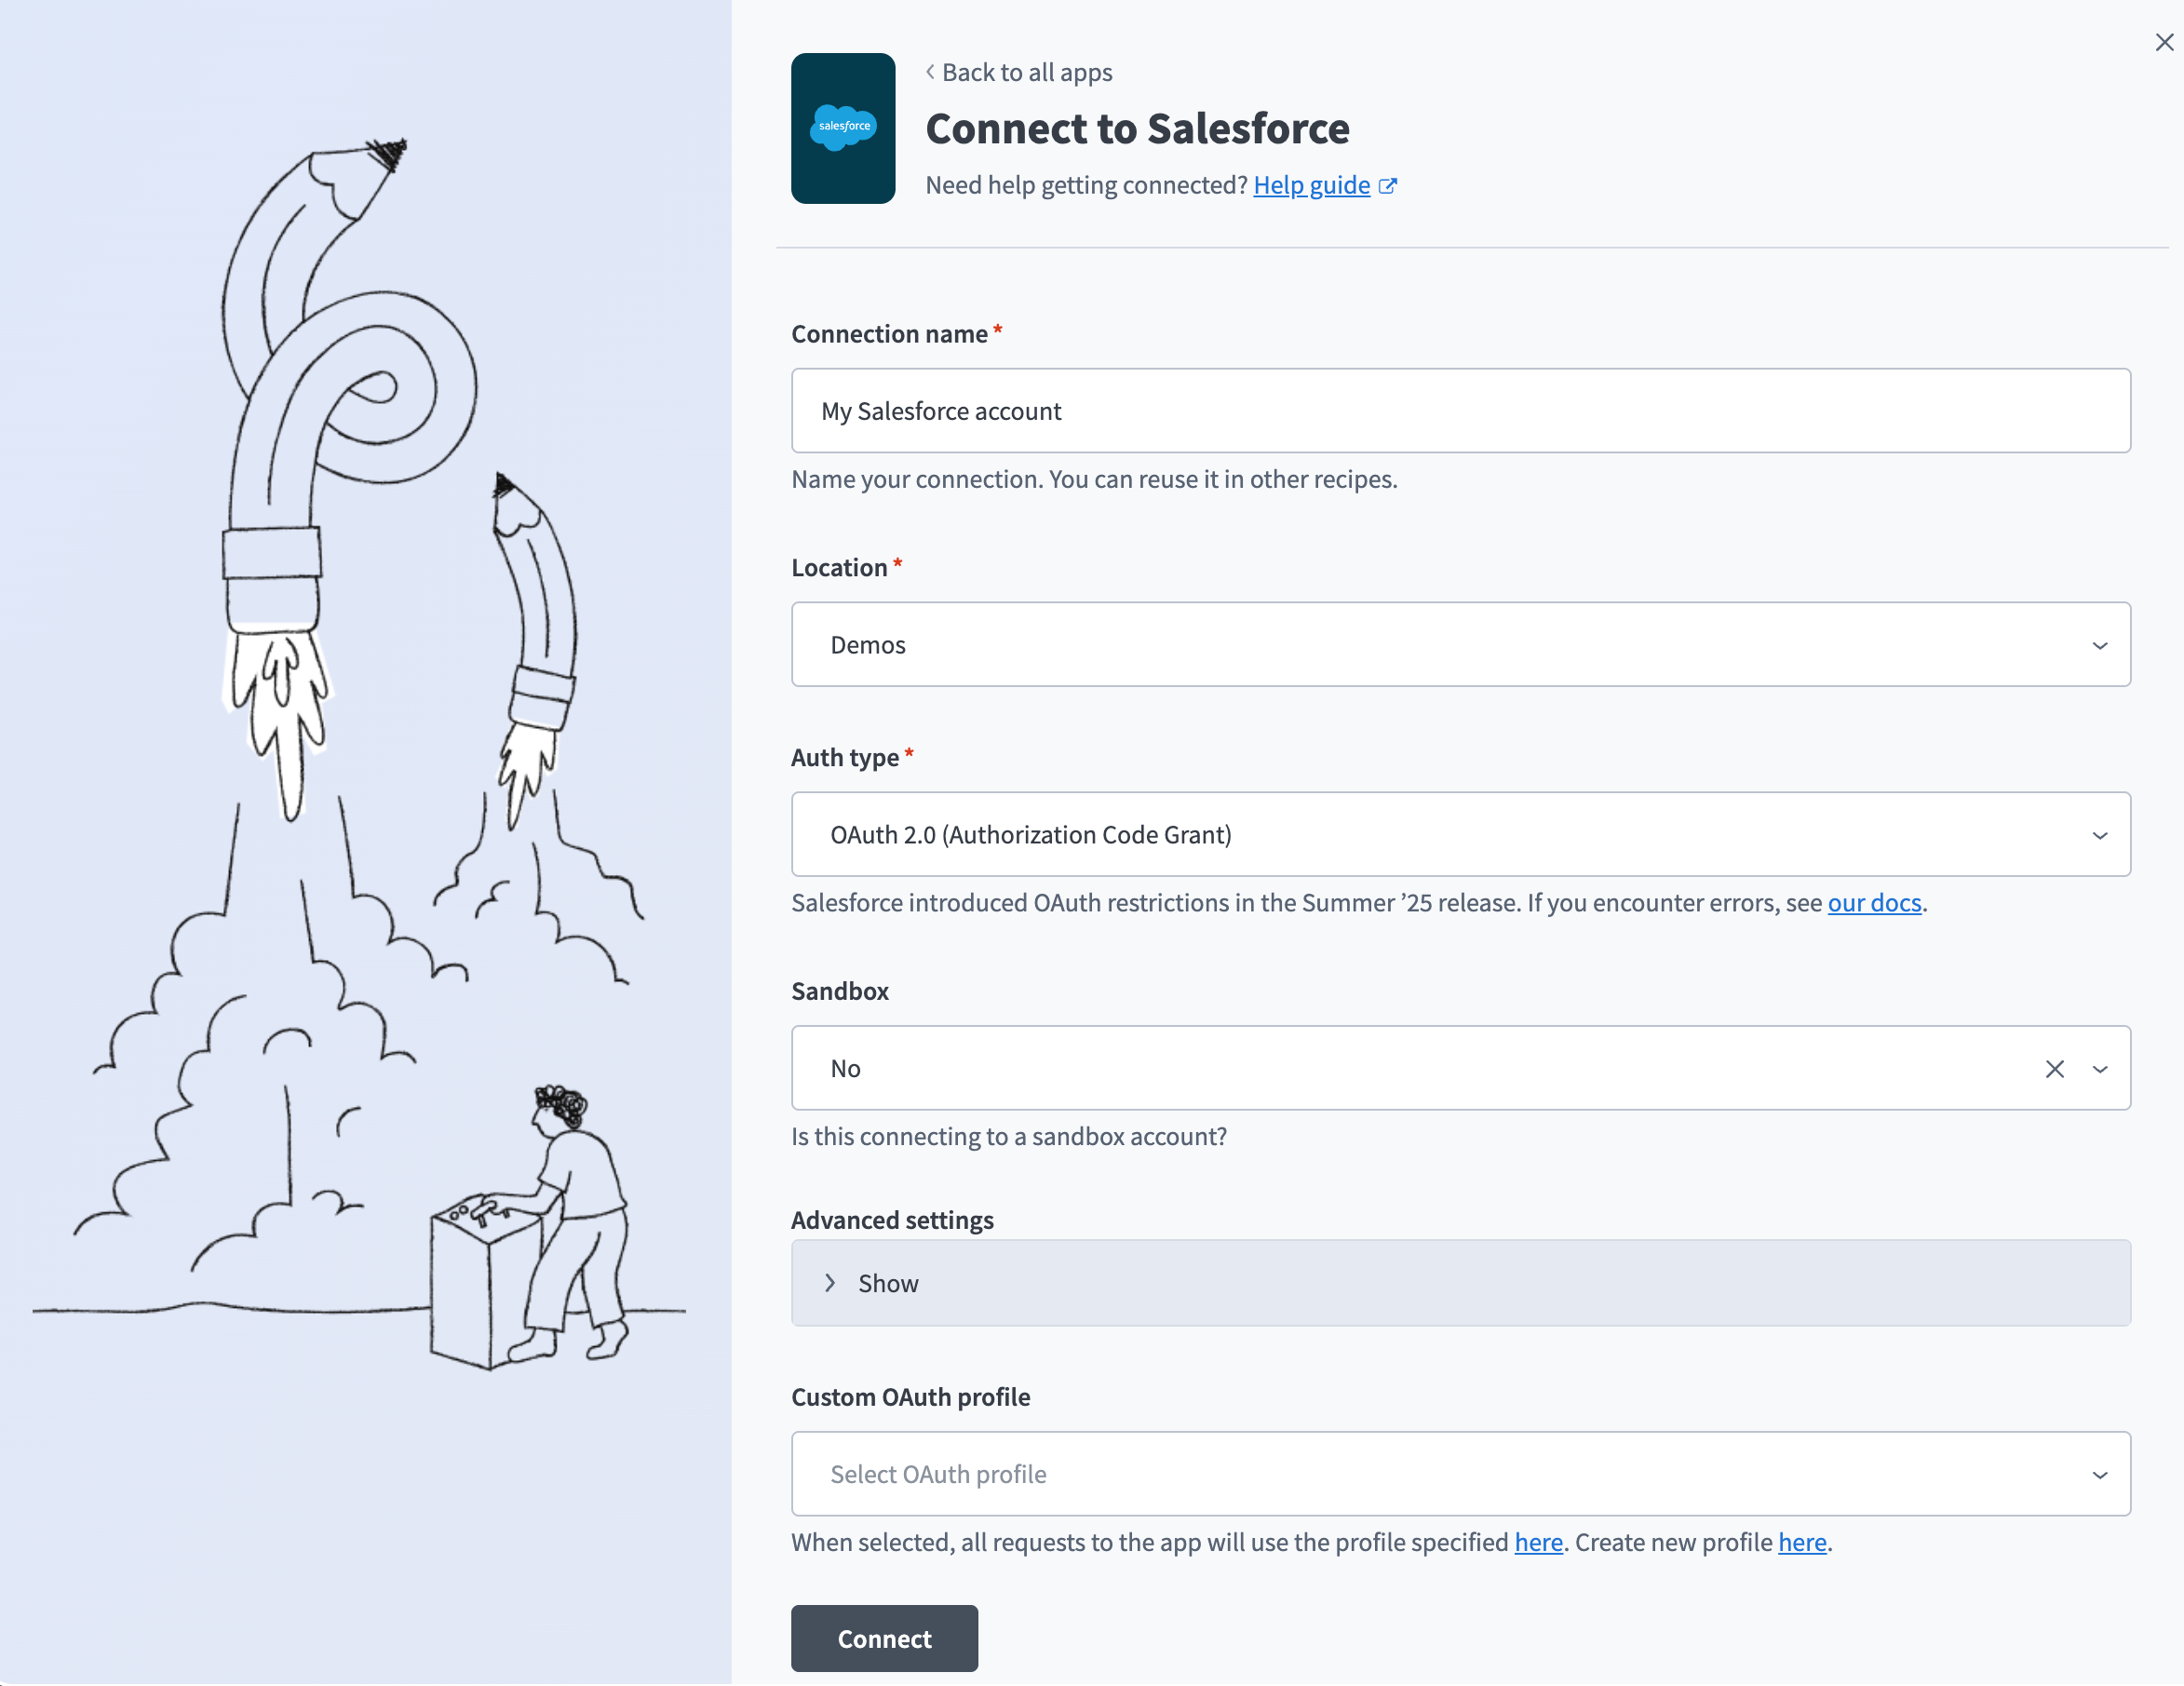 OAuth2.0 Salesforce connection setup
Use the Location drop-down menu to select the project where you plan to store the connection.
Use the Auth type drop-down menu to select OAuth 2.0 (Authorization Code Grant).
Use the Sandbox drop-down menu to specify whether the Salesforce account is a sandbox account.
Optional. Expand Advanced settings to configure the following options:
Advanced settings
- Organization/community custom domain URL: Enter the URL to your Salesforce community's custom domain. Required for community connections with unique domains.
- Requested permissions: Select permissions to request for this connection. Refer to Minimum and default scopes for the scopes Workato requests by default.
- Verified user access configuration: Configure custom auth for personal connections. Refer to Runtime user connections for more information.
REFRESH TOKEN SCOPE IS REQUIRED
The Perform requests at any time scope is one of Workato's minimum scopes for OAuth 2.0 connections, but whether Salesforce actually grants this scope depends on the Connected App's own OAuth policies, not on the Workato connection's settings. Refer to Salesforce connection disconnects repeatedly if your connection later disconnects when the access token expires. A Refresh Token Policy or IP Relaxation setting can cause the same symptom.
Optional. Use the Custom OAuth profile drop-down menu to select a custom OAuth profile for your connection. Refer to Create a custom OAuth profile for Salesforce for more information.
Click Connect.
Optional. If your Salesforce organization or community uses a custom domain, complete the following in the sign-in modal:
- Click Use Custom Domain.
- Enter your Custom domain, then click Continue.
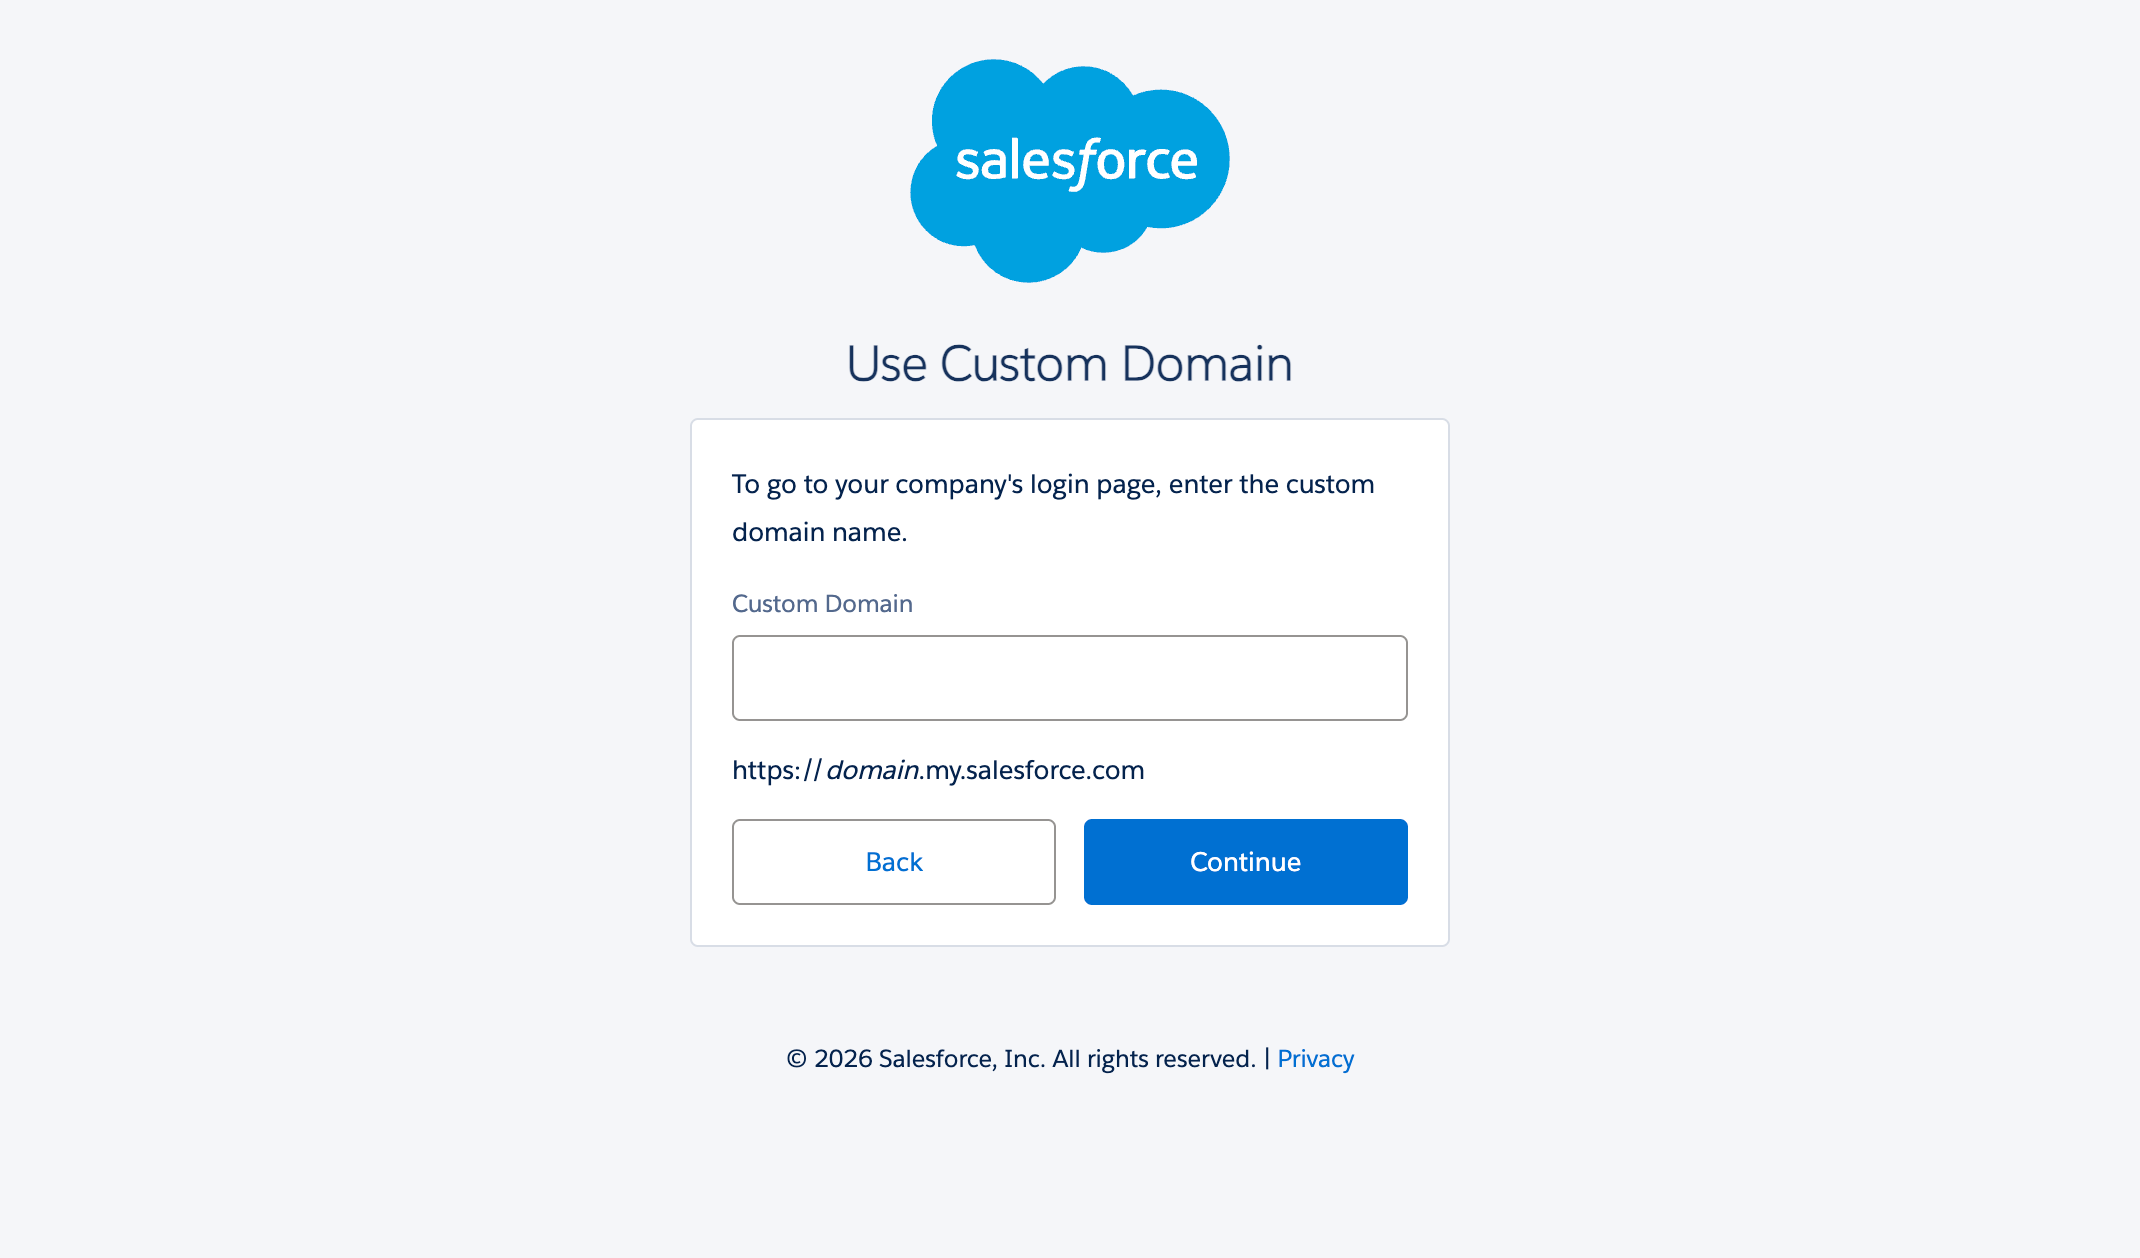 Enter your Custom domain.
Enter your Salesforce Username and Password.
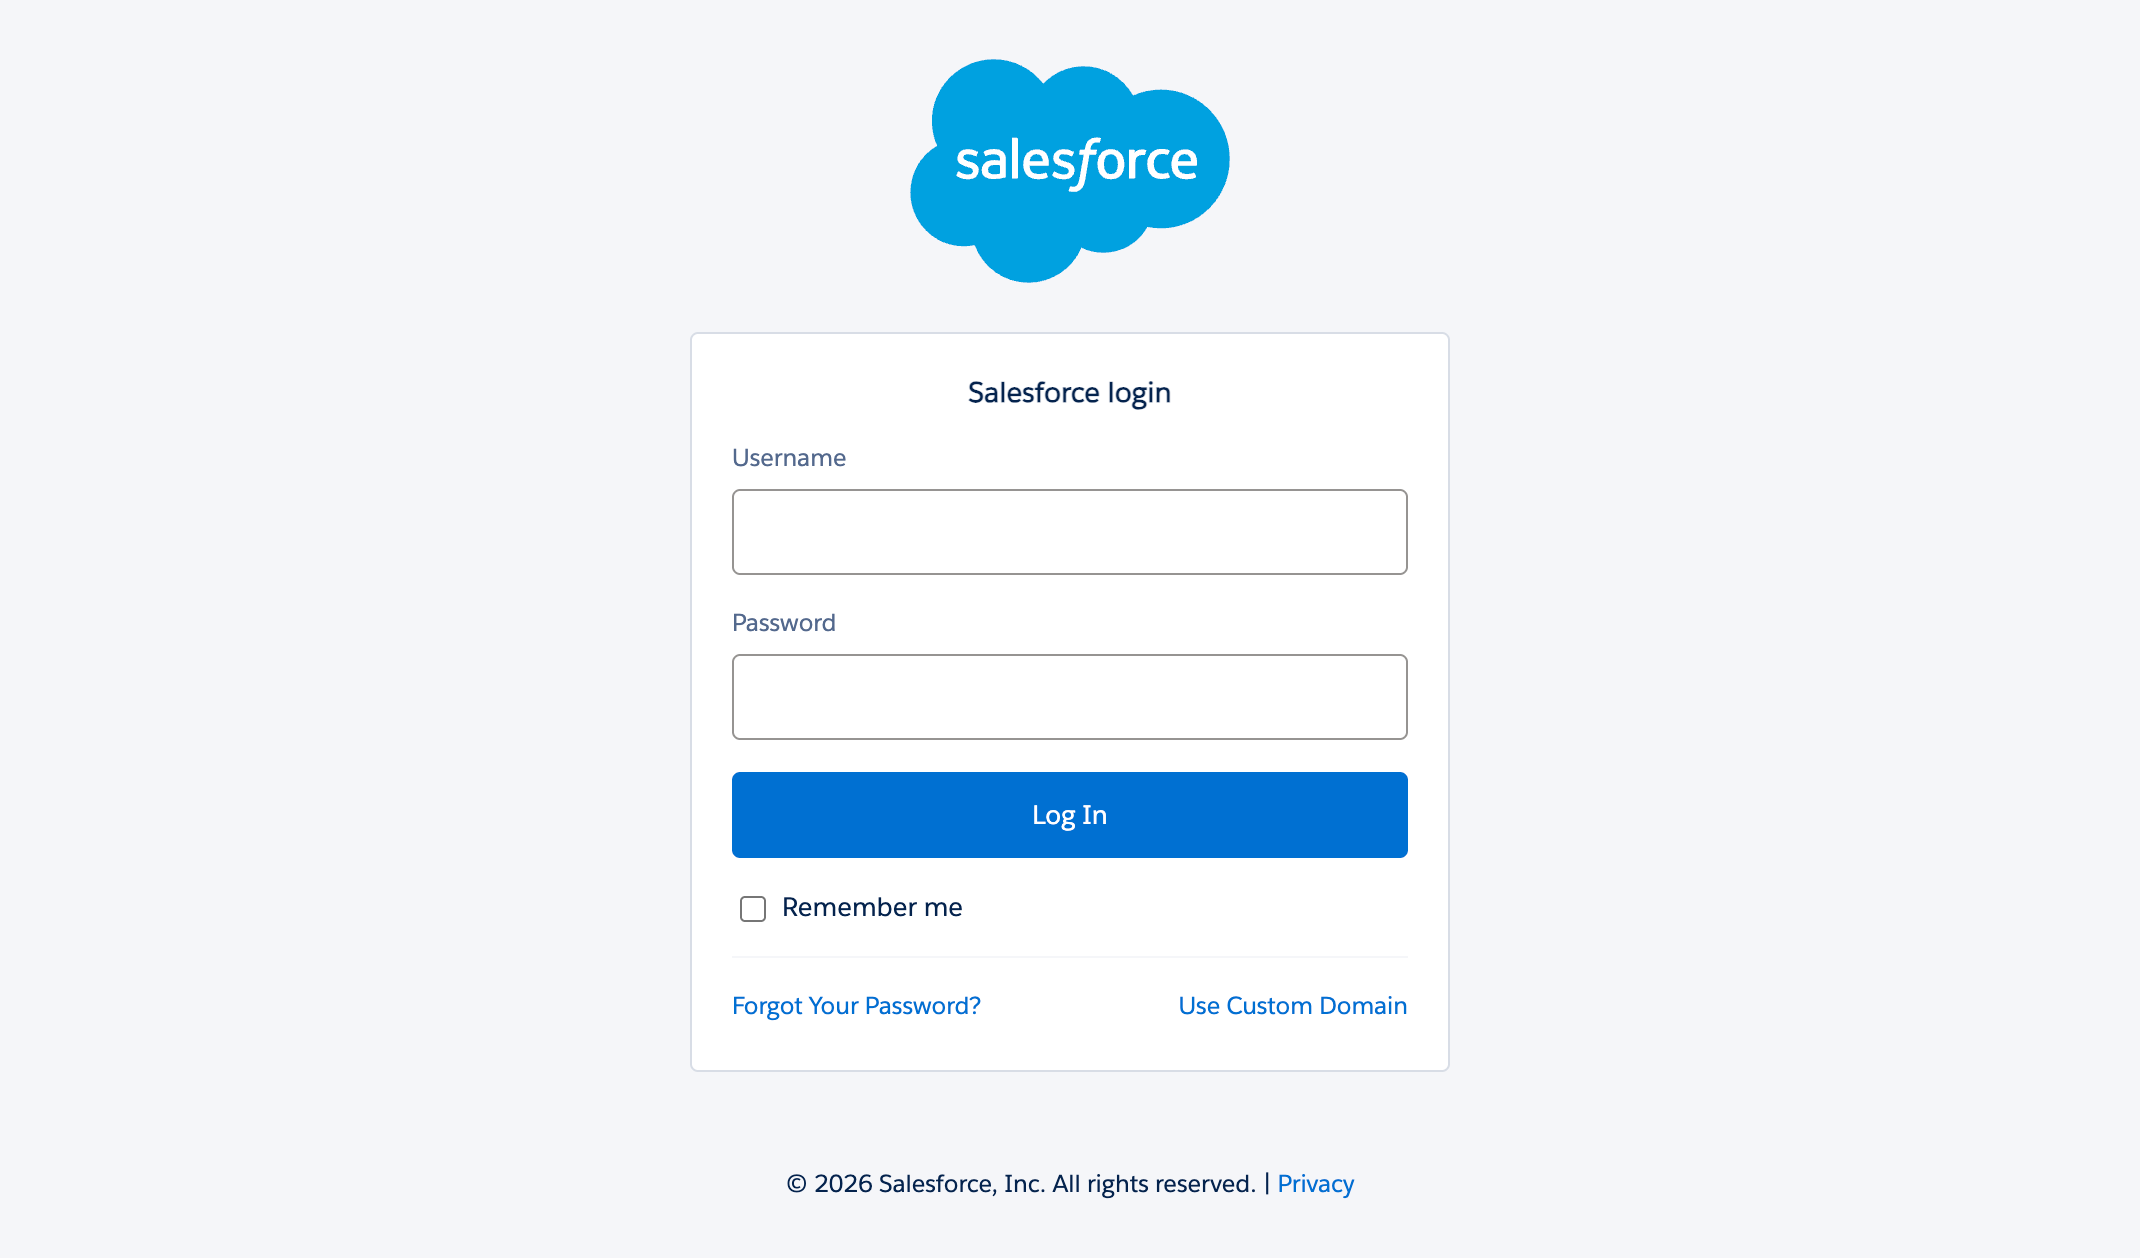 Log in to your Salesforce account
Click Log In to complete the setup.
OAUTH_APPROVAL_ERROR_GENERIC
If you see this error, Salesforce is restricting the Workato app because it isn't installed. A Salesforce admin must install the app in Connected Apps OAuth Usage or assign the Salesforce permissions. Refer to OAuth restrictions for details.
JWT bearer authentication
View JWT bearer authentication steps
ACTIONS ON BEHALF OF USER
JWT connections can perform actions on behalf of a user you specify using the On-behalf-of-user email field. Contact your Workato Customer Success Manager to enable this feature.
How it works
JWT bearer authentication connects using a digital certificate that signs a JWT request. Workato sends a JWT to the Salesforce OAuth token endpoint, where Salesforce processes the JWT and issues an access token based on prior approval of Workato in Salesforce.
Although JWT bearer skips interactive sign-in, Salesforce still evaluates every request against the permissions of the user specified in the connection and attributes any changes to that user. Use a dedicated integration user rather than a personal account.
Refer to Required roles and permissions for the Salesforce permissions the connected user needs.
Generate a private key and certificate
JWT bearer authentication requires a private key and a certificate. The following command generates both using OpenSSL. Replace the -subj values with your own:
openssl req -x509 -sha256 -nodes -newkey rsa:2048 \
  -keyout server.key \
  -out server.crt \
  -days 365 \
  -subj "/CN=Your App Name/O=Your Organization/C=US"
This generates two files:
| File | Description |
|---|---|
server.key | Your private key for Workato. Keep this secret. |
server.crt | Your public certificate for Salesforce. |
Refer to Salesforce's documentation for more information:
- OAuth 2.0 JWT Bearer Flow for Server-to-Server Integration: Details on how Salesforce uses this certificate to sign and validate JWTs.
- Create a Private Key and Self-Signed Digital Certificate: Other ways to generate a private key and certificate.
Create an external client app for JWT bearer
JWT bearer authentication also requires a registered external client app in Salesforce. Complete the following steps before creating your connection in Workato. Refer to Salesforce's Create an External Client App documentation for more information.
Sign in to Salesforce.
Go to Setup > Apps > External Client Apps > External Client App Manager.
Click New External Client App.
Enter a name in the External Client App Name field, such as Workato.
Enter a name in the API Name field that meets the following requirements:
- Contains only underscores and alphanumeric characters.
- Is unique.
- Starts with a letter.
- Doesn't include spaces.
- Doesn't end with an underscore.
- Doesn't contain consecutive underscores.
Enter the contact email address for your app in the Contact Email field.
Use the Distribution State drop-down menu to select either Local or Packaged.
Expand API (Enable OAuth Settings) and select the Enable OAuth checkbox. Refer to Salesforce's Configure the External Client App OAuth Settings documentation for more information.
Enter https://www.workato.com/oauth/callback in the Callback URL field.
Select your OAuth scopes in the OAuth Scopes field based on the actions and triggers you plan to use, then click the Move selection to Selected OAuth Scopes arrow to apply them.
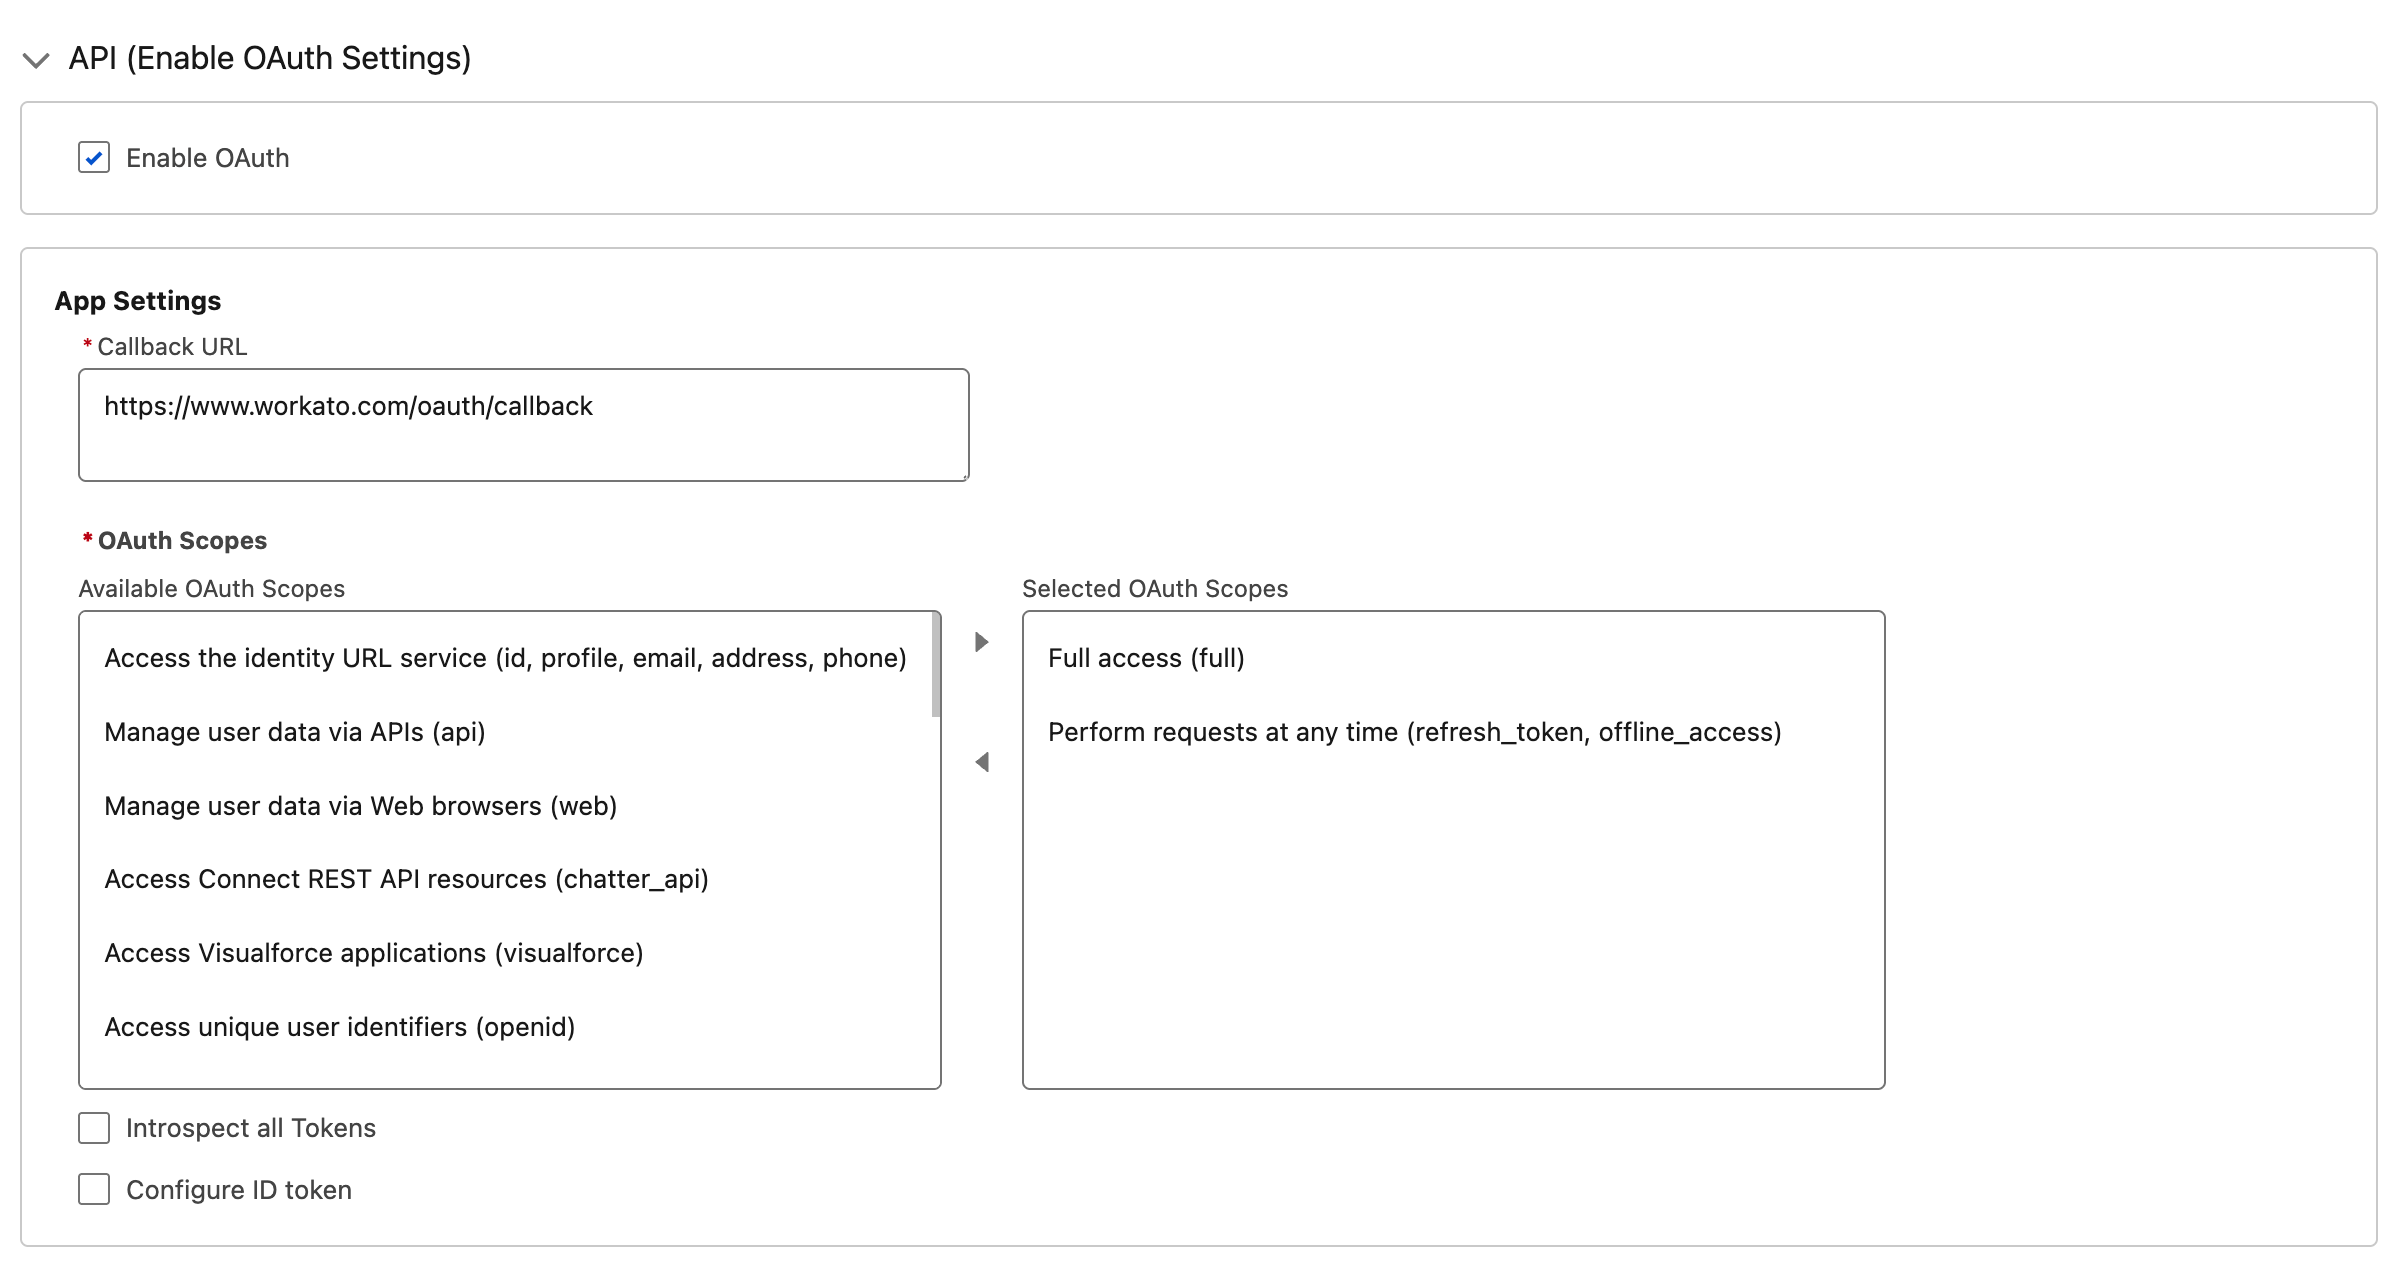 Configure scopes for your external client app
REFRESH_TOKEN SCOPE IS REQUIRED
If you see the error refresh_token scope is required and the connected app should be installed and preauthorized, add Perform requests at any time (refresh_token, offline_access) to your OAuth scopes. If you then see an invalid session error, also add Manage user data via APIs (api).
Select Enable JWT Bearer Flow in the Flow Enablement section. Refer to Salesforce's Configure a JWT Bearer Flow documentation for more information.
Upload server.crt as the digital certificate.
Click Create.
Click the Policies tab, then click Edit.
Expand the OAuth Policies section and set Permitted Users to Admin approved users are pre-authorized.
USER HASN'T APPROVED THIS CONSUMER
If you see this error when connecting, this step was likely missed.
Locate the App Policies section. Add either the profile or permission set assigned to the Salesforce user Workato connects as to the Select Profiles or Select Permission Sets list. Refer to Salesforce's Preauthorize User App Access Through External Client App Policies documentation for more information.
USER IS NOT ADMIN APPROVED TO ACCESS THIS APP
If you see this error when connecting, this step was likely missed.
Click Save.
Click the Settings tab for your external client app.
Expand the OAuth Settings section.
Click Consumer Key and Secret.
Verify your identity when prompted.
Copy the Consumer Key. You'll enter this as the Issuer when connecting in Workato.
Connect to Salesforce using JWT bearer
Complete the following steps to connect to Salesforce using JWT bearer authentication:
Click Create > Connection or press C twice.
Search for Salesforce and select it as your app.
Enter a name in the Connection name field.
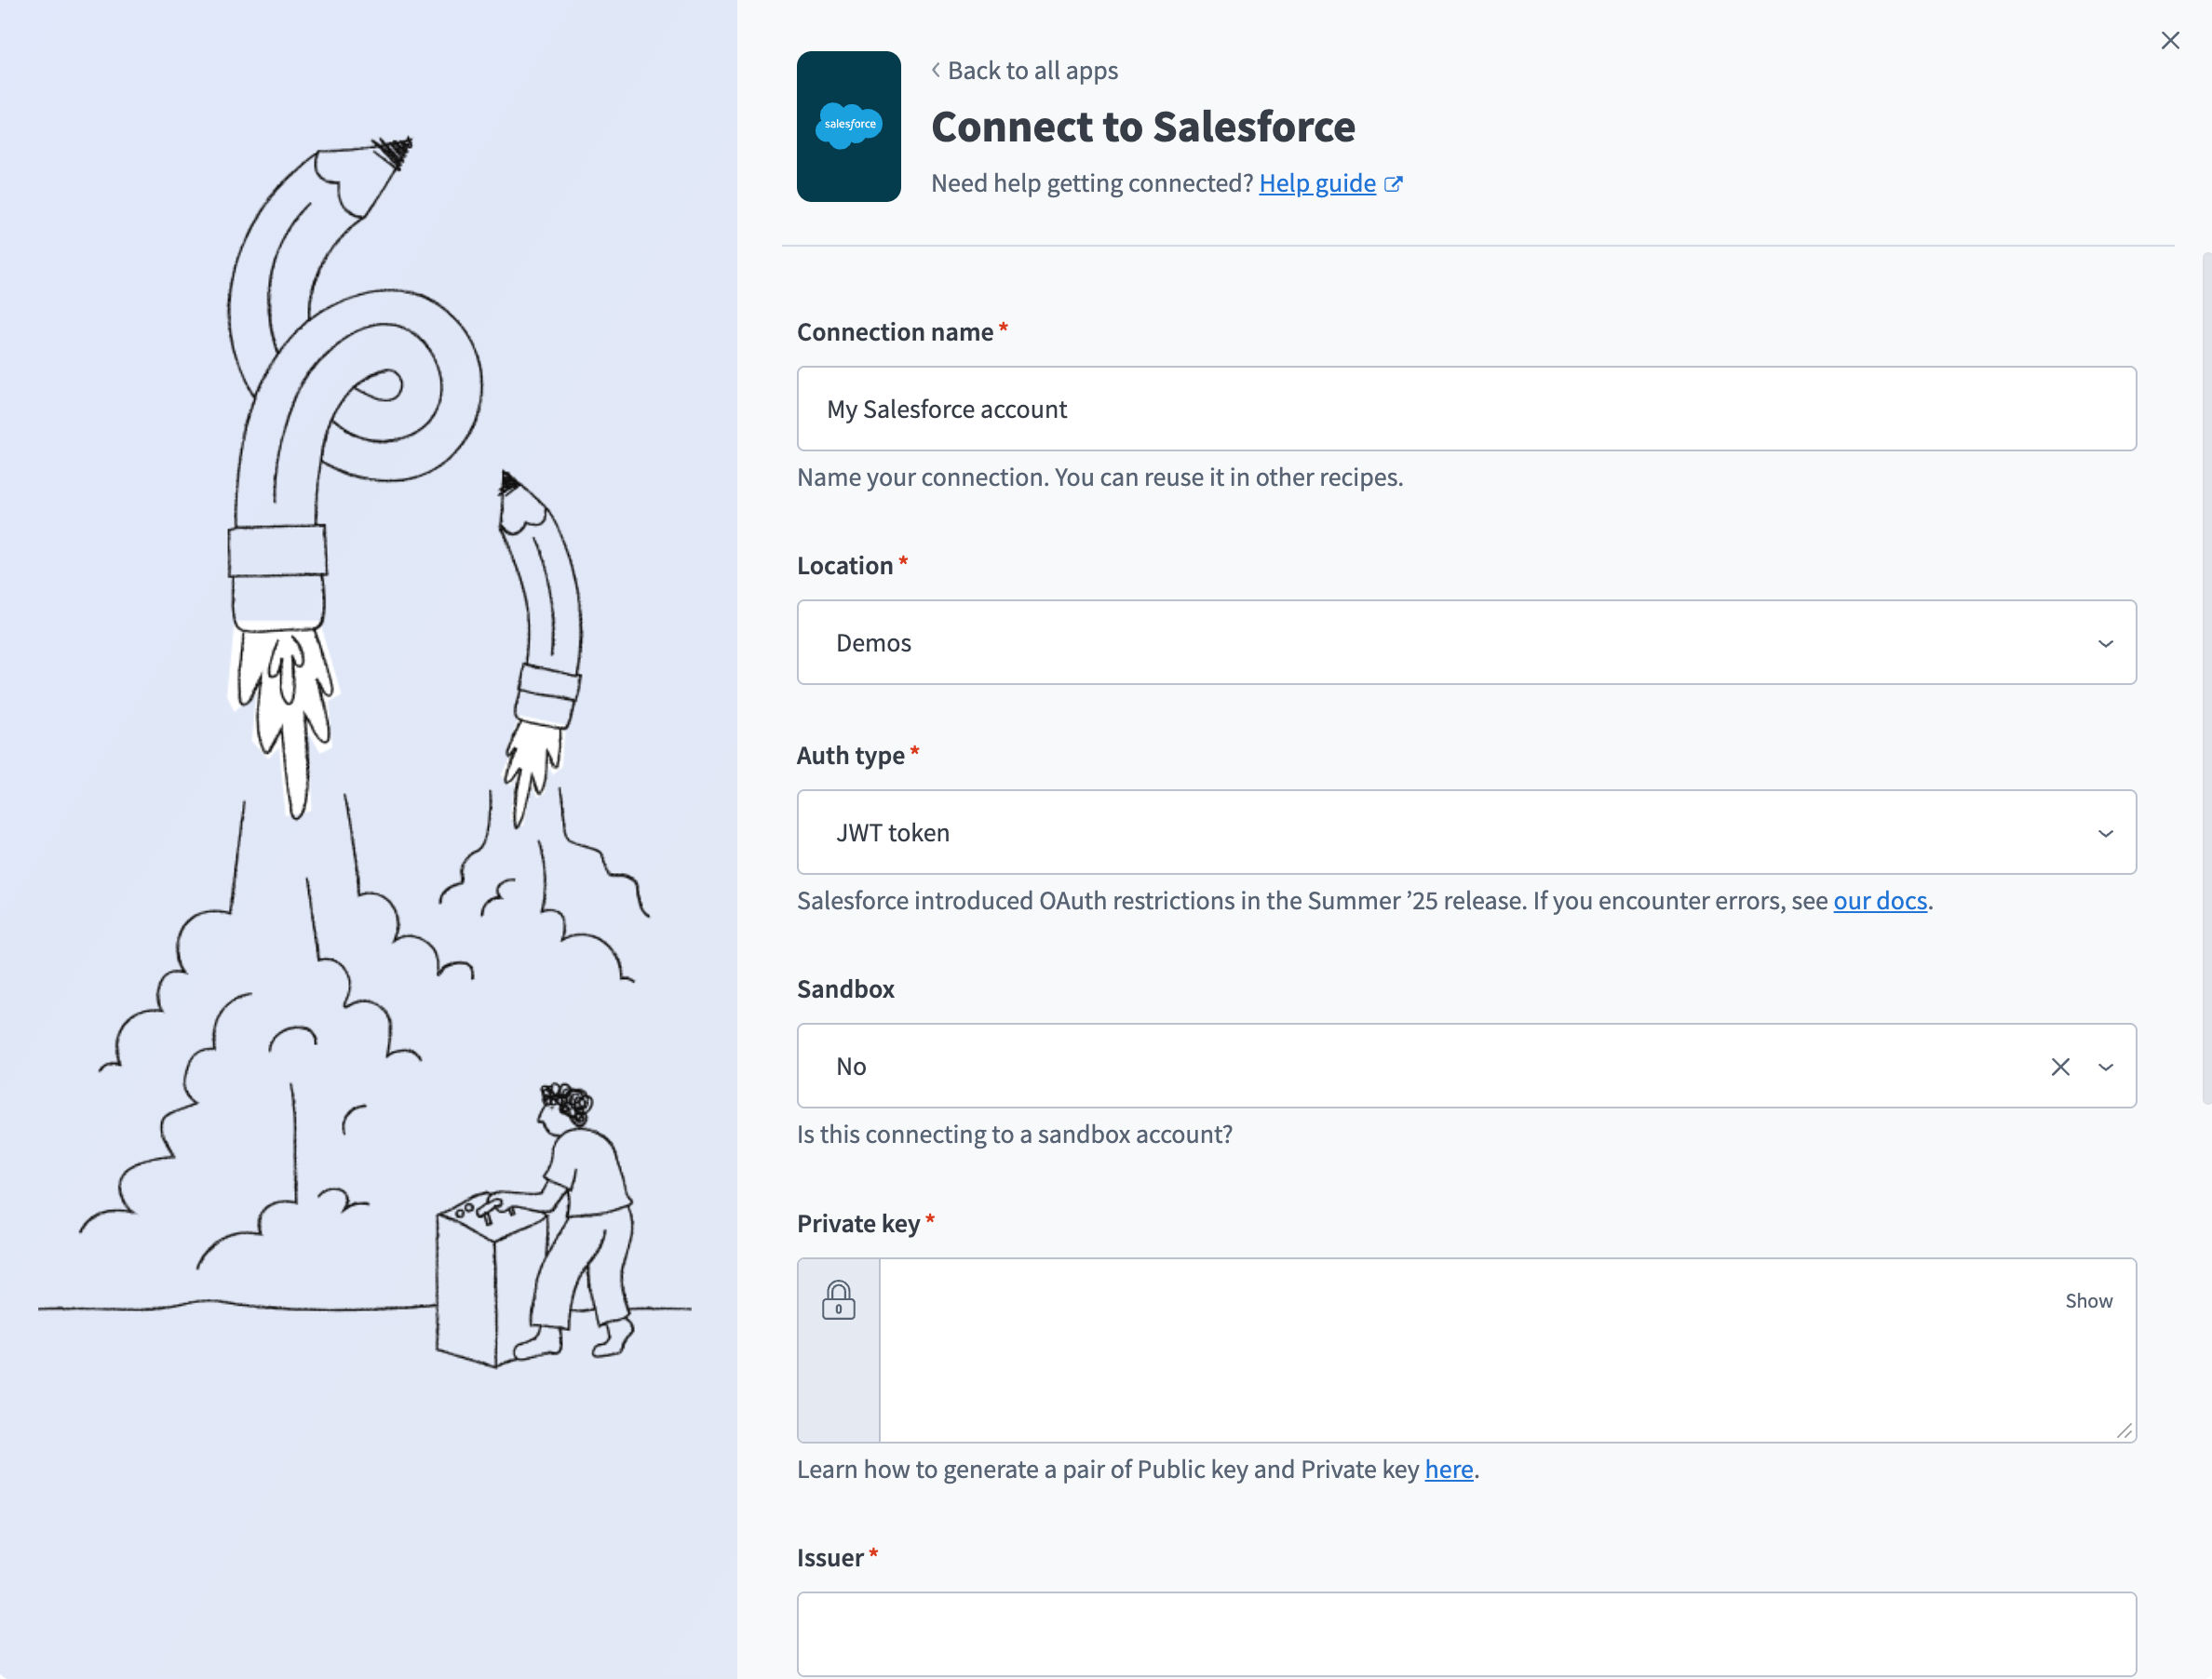 Configure Salesforce JWT Bearer connection
Use the Location drop-down menu to select the project where you plan to store the connection.
Use the Auth type drop-down menu to select JWT token.
Use the Sandbox drop-down menu to specify whether the Salesforce account is a sandbox account.
Paste the full contents of server.key in the Private key field, including the -----BEGIN PRIVATE KEY----- and -----END PRIVATE KEY----- lines.
Enter the Consumer Key from your external client app in the Issuer field.
Enter the Subject for the JWT connection. This is the username of the Salesforce user you want Workato to authenticate as, or a valid Experience Cloud username if you're connecting to an Experience Cloud site. You can use principal (prn) in place of subject (sub) for backward compatibility. If you specify both, Workato uses prn.
Enter your Salesforce Subdomain. For example, if your Salesforce URL is yourInstance.salesforce.com, the subdomain is yourInstance.
Optional. Use the Custom OAuth profile drop-down menu to select a custom OAuth profile for your connection. Refer to Create a custom OAuth profile for Salesforce for more information.
Click Connect.
Confluence connection setup
View Confluence connection setup steps
The Confluence connector supports the following authentication types:
Basic authentication
Use basic authentication with your Confluence username and password.
View basic authentication steps
Complete the following steps to set up a basic authentication connection to Confluence in Workato:
Click Create > Connection.
Search for Confluence and select it as your app.
Enter a name for your connection in the Connection name field.
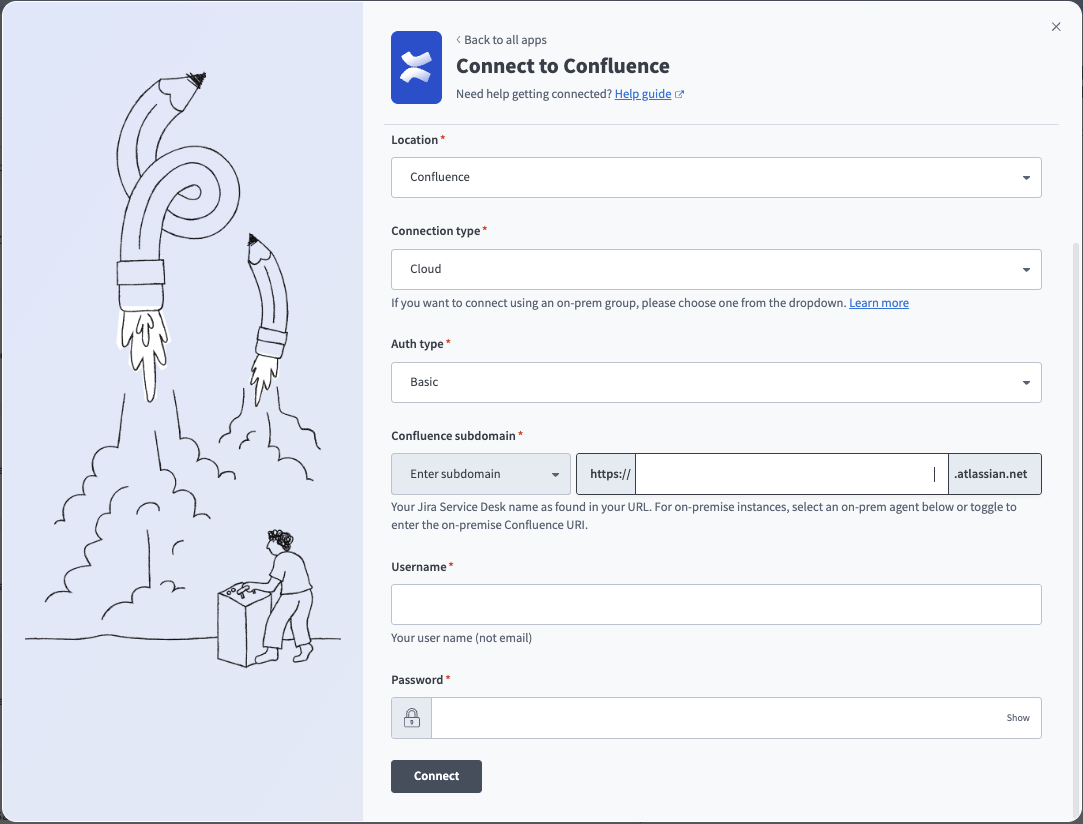 Basic connection
Use the Location drop-down menu to select the project where you plan to store the connection.
Use the Connection type drop-down menu to select Cloud for Confluence cloud instances or the corresponding option for on-prem connections. Refer to Connections using an on-prem agent for more information.
Use the Auth type drop-down menu to select Basic.
Enter your subdomain for cloud instances in the Confluence subdomain field. This is typically found in the Confluence URL. For example, your subdomain is acme if your URL is https://acme.atlassian.net.
Optionally, select Enter on-prem URI from the drop-down menu and enter your Confluence URI in the Confluence domain field. This is the root URI of your on-prem Confluence host. For example, https://confluence.intranet.acme.com:7654. You might need to add Workato's IP address to the allowlist to connect. Refer to IP allowlists for more information.
Enter your Confluence Username and Password.
Click Connect.
API token authentication
You must generate an API token to use API token authentication.
Confluence setup for API token authentication
View generate API token steps
Complete the following steps to generate an API token in Confluence:
Go to the Atlassian API Tokens page.
Click Create API token.
Enter a Name and select an Expires on date.
Click Create.
Copy and save the API token for use in Workato.
Connect to Confluence with API token authentication
View connect to Confluence with API token authentication steps
Complete the following steps to set up an API token connection to Confluence in Workato:
Click Create > Connection.
Search for Confluence and select it as your app.
Enter a name for your connection in the Connection name field.
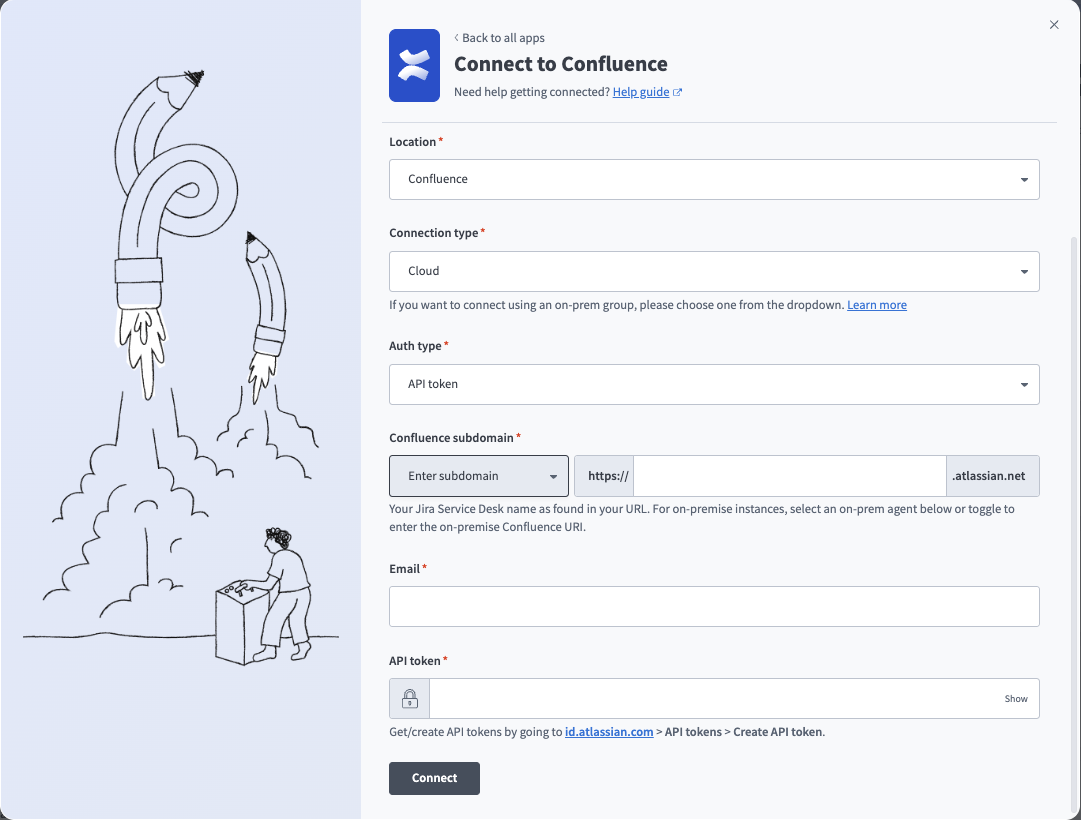 API token connection
Use the Location drop-down menu to select the project where you plan to store the connection.
Use the Connection type drop-down menu to select Cloud for Confluence cloud instances or the corresponding option for on-prem connections. Refer to Connections using an on-prem agent for more information.
Use the Auth type drop-down menu to select API token.
Enter your subdomain for cloud instances in the Confluence subdomain field. This is typically found in the Confluence URL. For example, your subdomain is acme if your URL is https://acme.atlassian.net.
Optionally, select Enter on-prem URI from the drop-down menu and enter your Confluence URI in the Confluence domain field. This is the root URI of your on-prem Confluence host. For example, https://confluence.intranet.acme.com:7654. You might need to add Workato's IP address to the allowlist to connect. Refer to IP allowlists for more information.
Enter your Email and API token.
Click Connect.
OAuth 2.0 authentication
You must generate a client ID and secret to use OAuth 2.0 authentication.
Confluence setup for OAuth 2.0 authentication
View generate client ID and secret steps
Complete the following steps to generate a client ID and secret in Confluence:
Log in to the Atlassian Developer Console.
Click Create > OAuth 2.0 integration.
Enter a Name.
Agree to the terms.
Click Create.
Click Authorization and then click Add.
Enter https://www.workato.com/oauth/callback in the Callback URL field and then click Save changes.
Click Permissions.
Click Add for the Confluence API.
Click Configure.
Click Edit Scopes under Classic scopes.
Select the following scopes:
manage:confluence-configurationread:confluence-groupsread:confluence-content.allread:confluence-content.permissionread:confluence-content.summaryread:confluence-propsread:confluence-space.summaryread:confluence-userread:page:confluencereadonly:content.attachment:confluencesearch:confluencewrite:confluence-contentwrite:confluence-filewrite:confluence-groupswrite:confluence-space
Click Save.
Select Settings.
Copy and save the Client ID and Secret for use in Workato.
Connect to Confluence with OAuth 2.0 authentication
View connect to Confluence with OAuth 2.0 authentication steps
Complete the following steps to set up an OAuth 2.0 connection to Confluence in Workato:
Click Create > Connection.
Search for Confluence and select it as your app.
Enter a name for your connection in the Connection name field.
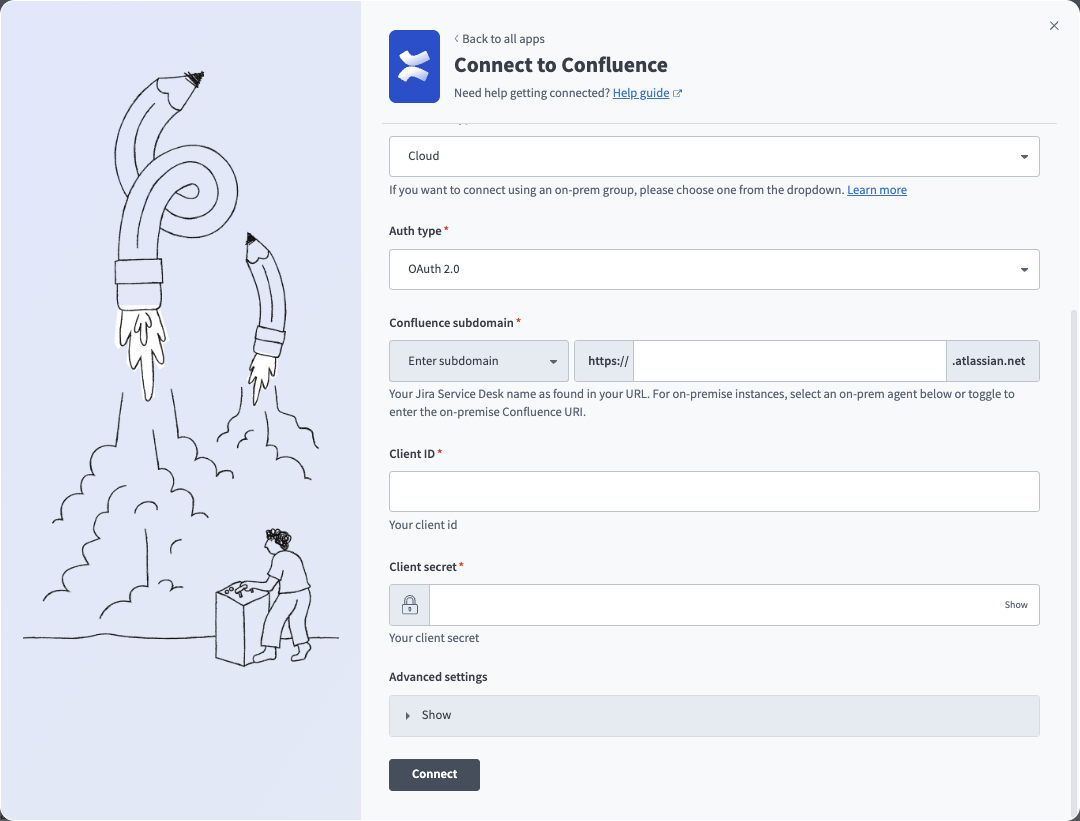 OAuth connection
Use the Location drop-down menu to select the project where you plan to store the connection.
Use the Connection type drop-down menu to select Cloud for Confluence cloud instances or the corresponding option for on-prem connections. Refer to Connections using an on-prem agent for more information.
Use the Auth type drop-down menu to select OAuth 2.0.
Enter your subdomain for cloud instances in the Confluence subdomain field. This is typically found in the Confluence URL. For example, your subdomain is acme if your URL is https://acme.atlassian.net.
Optionally, select Enter on-prem URI from the drop-down menu and enter your Confluence URI in the Confluence domain field. This is the root URI of your on-prem Confluence host. For example, https://confluence.intranet.acme.com:7654. You might need to add Workato's IP address to the allowlist to connect. Refer to IP allowlists for more information.
Enter the Client ID and Client secret.
Optionally, expand Advanced settings and select Classic scopes or Granular scopes.
Click Connect.
Choose a site from the Use app on drop-down menu. This is the Atlassian account your app accesses.
Click Accept.
PagerDuty connection setup
View PagerDuty connection setup steps
The PagerDuty connector uses API key authentication.
Create an API key
View create API key steps
You must create an API key (PagerDuty integration key) to connect to Workato. PagerDuty supports the following types of API keys:
- General access API key: This API key has access to all objects in your PagerDuty instance.
- Personal API key: This API key is restricted according to the user's permissions. This requires PagerDuty advanced permissions.
Complete the following steps to create a PagerDuty API key:
Go to Integrations > Developer Tools > API Access Keys and click Create New API Key.
Alternatively, go to Profile > User settings to create a Personal API key.
Enter a description that helps identify the key, such as Workato integration key. Ensure that you don't select Read-only API Key. This connection requires read and write permissions to function properly.
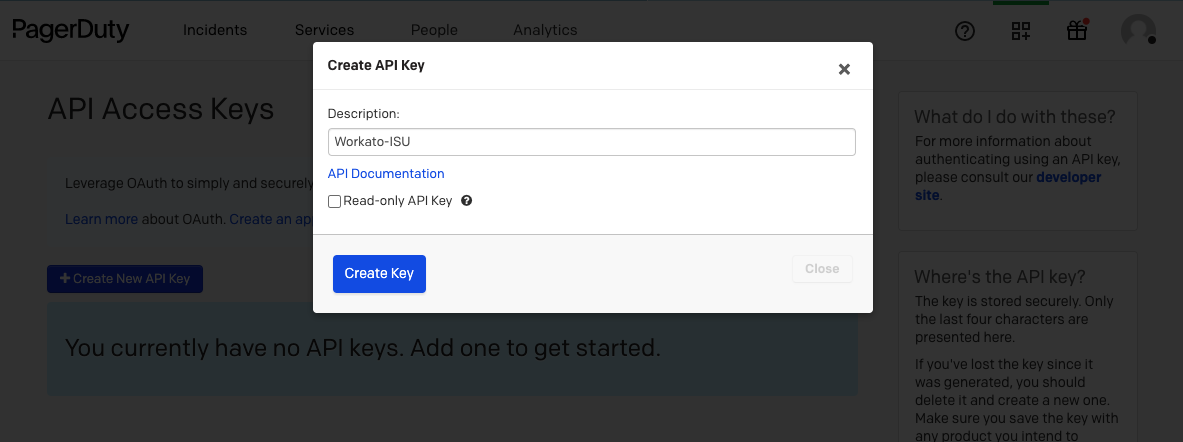 Provide the API key with write permissions
Store the API key in a secure location. Use this API key to authenticate with Workato.
Connect to PagerDuty on Workato
View connect to PagerDuty steps
Complete the following steps to connect to PagerDuty in Workato:
Select Create > Connection or press C twice.
Search for PagerDuty on the New connection page and select it.
Enter a name in the Connection name field.
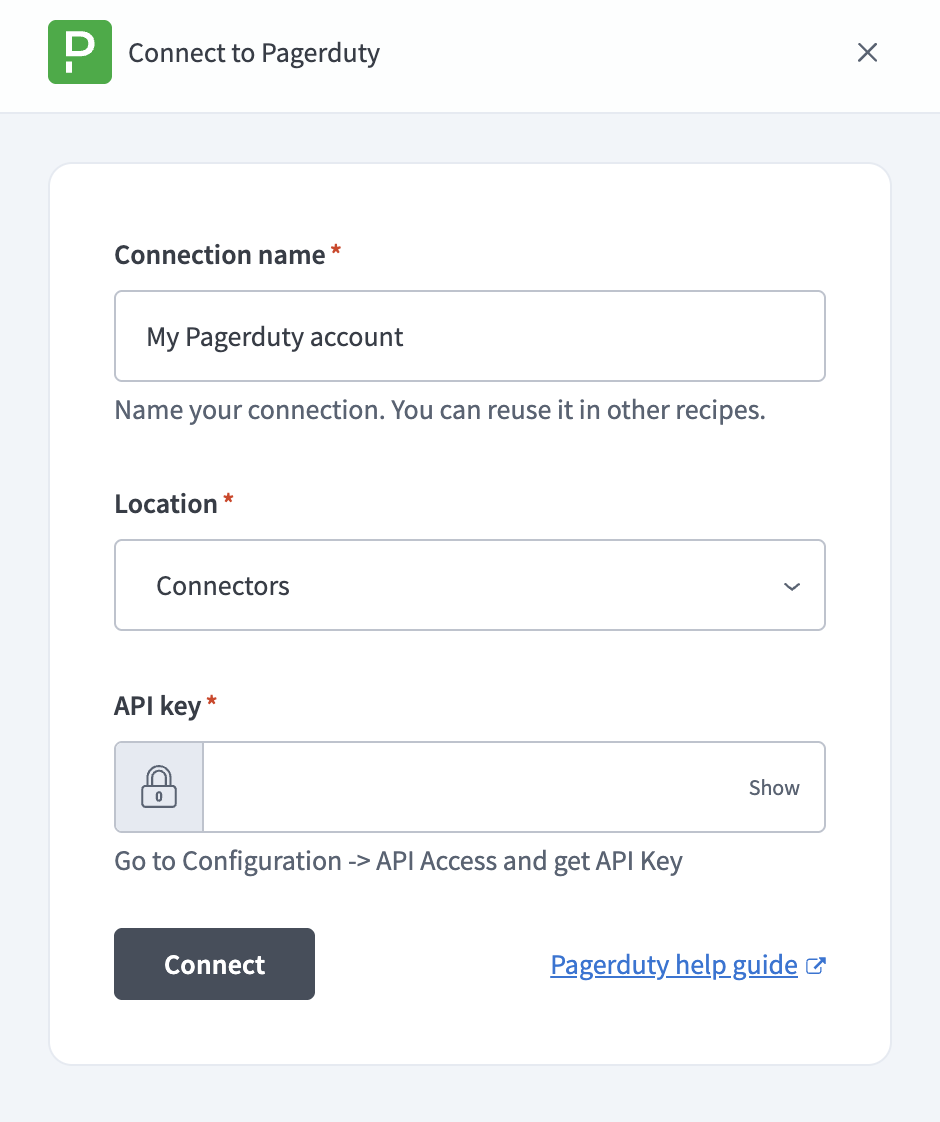 Connect to PagerDuty
Use the Location drop-down menu to select the project where you plan to store the connection.
Enter the API key you generated in the API key field.
Select Connect to verify and save the connection. Workato displays a success message when the connection is established.
Case Intake & Triage role requirements
Each tool's availability depends on the permissions of the connected account. Calling a tool without the required permission returns a permission_denied outcome rather than a partial result.
Jira Service Desk requires the project-level Browse Users and Groups or Assign Issues permission and the following scopes at a minimum:
read:servicedesk-requestread:jira-workwrite:jira-workread:jira-user
Refer to Scopes for OAuth 2.0 (3LO) and Forge apps for the complete list of scopes.
Salesforce requires read access to the following objects:
- Account
- Entitlement
- Contact, only when account_match_rule is
contact_email_lookup - Any configured escalation object
Confluence requires read access to the spaces you set in confluence.space_keys.
PagerDuty requires rights to the service set in pagerduty.service_id.
Data table configuration
The Case Intake & Triage MCP server contains the following data tables that configure behavior and defaults:
triage_matrix: Define the priority matrix. Create a row for everyseverity,impact, andtiercombination, including the configuredunknown_customer_tier, with the resultingpriority(P1–P4).suggested_routing_map: Map eachseverity,impact, andtiercombination to arouting_value. Required whenjsm.assignment_modeisrouting_field.suggested_assignee_map: Map eachseverity,impact, andtiercombination to anaccount_id. Required whenjsm.assignment_modeisspecific_agent.severity_value_map: Map each raw JSM severity field value (raw_value) to amapped_valueoflow,medium,high, orcritical. Every raw value on a ticket must have a row. An unmapped value returnsclassification_required, an outcome that blocks the triage write until someone sets the field on the ticket.impact_value_map: Map each raw JSM impact field value tosingle_user,multi_user,department, ororg_wide.routing_value_map: Map each raw JSM routing field value to a normalized routing value.org_mapping: Map a customer domain or identifier pattern (pattern) to a Salesforce Account ID (account_id). Required whensalesforce.account_match_ruleisorganization_mapping_table.entitlement_tier_derivation: Map a Salesforce entitlement process (SlaProcess) name or ID (sla_process_key) to this server's tier values (tier). Required whensalesforce.tier_sourceisactive_entitlement.case_intake_configcontains the following keys:
| Key | Description |
|---|---|
jsm.cloud_id | Enter the Atlassian cloud ID for this deployment. Used as part of the workflow-state key. |
jsm.default_project_key | Enter the default Jira Service Desk project key. |
jsm.severity_field.id | Enter the Jira custom field ID that carries severity. |
jsm.impact_field.id | Enter the Jira custom field ID that carries impact. |
jsm.routing_field.id | Enter the Jira custom field ID that drives queue placement. Required when jsm.assignment_mode is routing_field. |
jsm.assignment_mode | Choose routing_field (default) or specific_agent. |
jsm.priority_mapping.P1 / .P2 / .P3 / .P4 | Map this server's P1–P4 priorities to the JSM instance's native priority names. |
salesforce.tier_source | Choose account_field or active_entitlement. |
salesforce.tier_field | Enter the Account custom field that holds the customer's tier. Required when tier_source is account_field. |
salesforce.account_match_rule | Choose one of direct_account_id_field, contact_email_lookup, custom_account_domain_field, or organization_mapping_table. |
salesforce.direct_account_id_field | Enter the JSM custom field holding the Salesforce Account ID. Required when account_match_rule is direct_account_id_field. |
salesforce.custom_account_domain_field | Enter the Account custom field holding the customer's domain. Required when account_match_rule is custom_account_domain_field. |
salesforce.unknown_customer_tier | Enter the fallback tier used when no Account matches the ticket. |
salesforce.health_field | Optional. Enter an Account field to surface as context. This field doesn't feed the priority matrix. |
salesforce.escalation_object.api_name / .account_relationship_field / .status_field / .open_status_values / .returned_fields | Optional. Enter the values needed to surface a customer's open escalations as context. |
confluence.enabled | Enable the search_known_issues tool. |
confluence.space_keys | Enter the Confluence spaces to search for runbooks. |
confluence.max_results | Specify the default number of runbook search results to return. Defaults to 5, capped by server_limits.max_kb_results. |
pagerduty.enabled | Enable P1 on-call escalation through the trigger_p1_escalation tool. |
pagerduty.service_id | Enter the PagerDuty service to page for P1 escalations. |
pagerduty.escalation_policy_id | Optional. Enter an escalation policy to override the service's default. |
pagerduty.priority_mapping.P1 | Map this server's P1 priority to a PagerDuty priority ID. |
pagerduty.from_email | Enter the PagerDuty user email required by the incident's From header. |
pagerduty.approval_token_ttl_seconds | Specify how long a P1 escalation approval token remains valid. Defaults to 120. |
server_limits.max_kb_results | Specify the hard cap on Confluence runbook search results. Defaults to 10. |
server_limits.max_assignable_results | Specify the maximum assignable-agent results returned in a single page. Defaults to 50, subject to the Jira Service Desk 1000-user endpoint cap. |
server_limits.snapshot_ttl_seconds | Specify how long a customer context snapshot remains valid. Defaults to 600. |
server_limits.payload_max_chars | Specify the field-level character caps applied when sanitizing ticket text for the PagerDuty payload. |
triage_matrix_version | Enter a version identifier for the triage matrix. Every preview and audit record includes this value. |
audit.log_retention_days | Specify how many days to retain audit records. Defaults to 365. |
View data table configuration steps
Complete the following steps to configure settings using the MCP's data tables:
Sign in to your Workato account and go to Projects.
Go to the project that contains your MCP server.
Open the Case Intake & Triage folder.
Select the data table to update, such as triage_matrix or case_intake_config.
How to use Case Intake & Triage MCP server tools
Refer to the following sections for detailed information on available tools.
get_case_context tool
The get_case_context tool fetches a ticket's request state and classification fields, and establishes the workflow for the case. Your LLM uses this tool before any other tool in the sequence, since every downstream tool requires the workflow_id it returns.
Try asking:
Triage HELPDESK-1234Pull up ticket HELPDESK-1234What's the status of HELPDESK-1234?
get_customer_account_context tool
The get_customer_account_context tool resolves the ticket's Salesforce account and returns the customer's tier and active entitlements for the triage matrix. Your LLM uses this tool right after get_case_context, since apply_triage_to_case requires the context_snapshot_id it returns.
Try asking:
What tier is the customer on ticket HELPDESK-1234?Does this customer have an active entitlement?Triage HELPDESK-1234
search_known_issues tool
The search_known_issues tool searches configured Confluence spaces for a runbook matching the ticket. Your LLM uses this tool to find documentation related to a ticket's issue. The server derives the search terms from the ticket's subject and description, and only adds a topic you explicitly name as a hint.
Try asking:
Find a runbook that matches this ticketSearch Confluence for a runbook about database timeoutsIs there a known issue for this?
apply_triage_to_case tool
The apply_triage_to_case tool runs the ticket through the triage matrix and writes the resulting priority and routing to the ticket. Your LLM calls this tool once to preview the plan, then calls it again to apply it.
Try asking:
Triage HELPDESK-1234Prioritize this ticketShow me the triage plan before you apply itRe-triage HELPDESK-1234 now that the impact has changed
trigger_p1_escalation tool
The trigger_p1_escalation tool notifies the on-call PagerDuty responder for a ticket triaged as P1. Your LLM only uses this tool when the committed priority is P1. It calls the tool once to preview the on-call target and request a single-use approval token, then calls it again with that token after you approve it to send a page.
Try asking:
Prioritize this ticket and page on-call if it's P1Page on-call for HELPDESK-1234Who's currently on-call for this escalation policy?
list_assignable_agents tool
The list_assignable_agents tool lists the users eligible for assignment to a ticket. Your LLM uses this tool to find who could work on a ticket, or to suggest an alternative to the matrix-suggested assignee.
Try asking:
Who could work on HELPDESK-1234?Reassign HELPDESK-1234 to a different agentShow me other agents who could take this ticket
Getting started
View and manage your MCP server tools in the Details tab Tools section. Tool management provides the following capabilities:
TOOLS MUST BE STARTED
Your LLM can only access active tools in your MCP server connector.
Last updated: