Remote Model Context Protocol (MCP) servers are hosted externally and accessed by AI assistants over the network instead of running tools and integrations locally. This means a single MCP server can serve multiple users and multiple AI platforms, such as Claude, ChatGPT, Microsoft Copilot, or Cursor. You can update and maintain remote MCP servers centrally without requiring changes to your client configurations.
FEATURE AVAILABILITY
MCP is available to all users in the US, EU, AU, JP, and SG data centers. MCP servers are hosted in the US, EU, and APAC regions and respect data residency requirements where possible. MCP isn't available to workspaces in the CN data center. This reflects local regulatory requirements and Workato's commitment to data sovereignty and applies to our multi-tenant and Virtual Private Workato (VPW) offerings.
Contact your Customer Success representative if you're interested in using MCP or require additional information.
You can install a remote MCP with a URL that authenticates with a token or through Workato Identity after you create an MCP server. The configurations in this section use Cursor and Claude Desktop.
NEED AN EXAMPLE?
Review the LLM, GitHub, and Workato Developer API use case for steps to create an MCP server integration that lets you create GitHub issues with natural-language commands in ChatGPT, Claude, or Cursor.
Complete the following steps to install the MCP remote server with a URL:
1
Sign in to Workato.
2
Configure your MCP integration:
Cursor MCP remote server configuration with token authentication
Complete the following steps to configure an MCP integration in Cursor that authenticates using a token:
1
Go to AI Hub and select the MCP servers tab.
2
Click the MCP server you plan to use for your MCP remote server integration.
3
Click the User access tab.
4
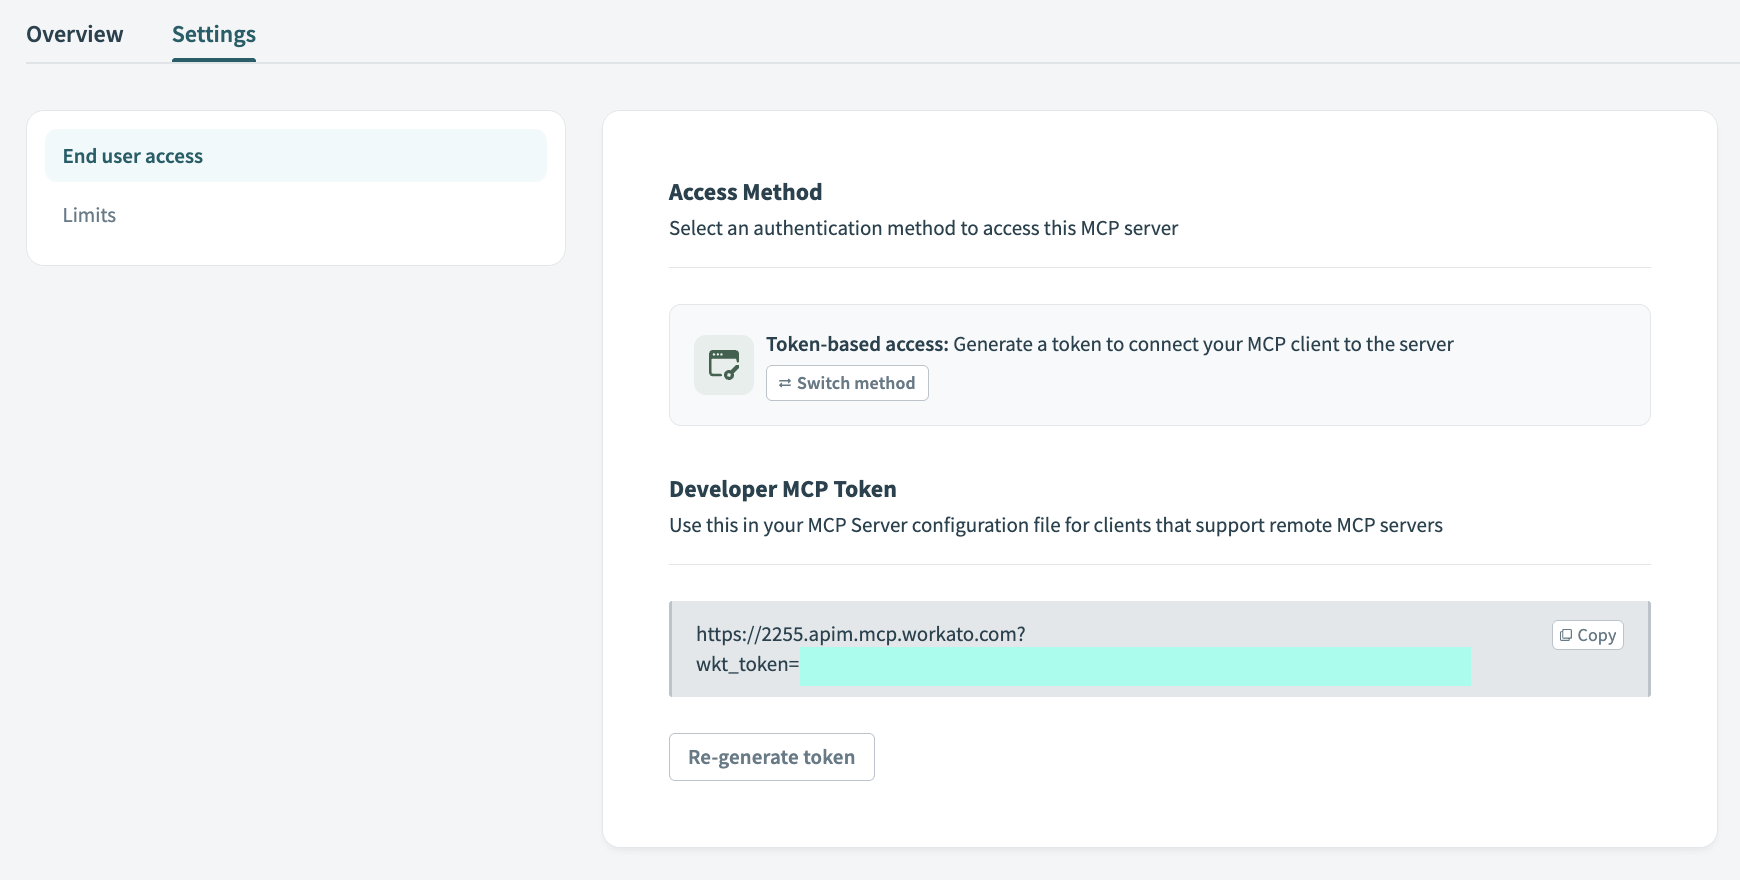
Go to the Access Method section and ensure that Token-based access is selected.
5
Go to the Developer MCP Token section and click Copy.
Copy the MCP URL and token
6
Sign in to Cursor.
7
Go to Settings > Cursor settings.
8
Click MCP & Integrations in the sidebar.
9
Click + New MCP Server to open the mcp.json file.
Click + New MCP Server
10
Update the configuration to use the MCP URL and token you copied in the preceding steps. Your MCP URL must begin with https. For example:
Create a new chat with your Cursor agent to use the tools you added.
You must start a new chat with your agent. Cursor agents only have access to the tools and capabilities available when a chat begins. Agents can't detect or use new MCP configurations, servers, or tools added after starting a chat.
Cursor MCP remote server configuration with Workato Identity authentication
Complete the following steps to configure a Cursor MCP integration that authenticates using Workato Identity:
1
Go to AI Hub and select the MCP servers tab.
2
Click the MCP server you plan to use for your remote integration.
3
Click the User access tab.
4
Go to the Access Method section and ensure that Workato Identity is selected.
5
Click Add user groups.
Click Add user groups
6
Use the User groups drop-down menu to select the user groups you plan to provide with access to the MCP server.
7
Click the Overview tab.
8
Go to the Remote MCP URL section and click Copy URL.
Copy your remote MCP URL
9
Sign in to Cursor.
10
Go to Settings > Cursor settings.
11
Click MCP & Integrations in the sidebar.
12
Click + New MCP Server to open the mcp.json file.
Click + New MCP Server
13
Update the configuration to use the MCP URL you copied in the preceding steps. For example:
Go to Settings > Cursor settings > MCP & Integrations in Cursor.
17
Locate the MCP tools you added and click Connect. Tools that require authentication are labeled with Needs authentication.
Click Connect
18
Click Open when Cursor prompts Do you want Cursor to open the external website?. This opens your organization's SSO login page.
Click Open
19
Sign in to your organization's SSO provider.
20
Click Open Cursor when prompted.
21
Create a new chat with your Cursor agent to use the tools you added.
You must start a new chat with your agent. Cursor agents only have access to the tools and capabilities available when a chat begins. Agents can't detect or use new MCP configurations, servers, or tools added after starting a chat.
Create a new chat with your Cursor agent to use your MCP tools.
You must start a new chat with your agent. Cursor agents only have access to the tools and capabilities available when a chat begins. Agents can't detect or use new MCP configurations, servers, or tools added after starting a chat.
Microsoft Copilot supports OAuth authentication and API-based access for MCP servers. Refer to the Microsoft Copilot MCP server configuration documentation for more information.
Complete the following steps to add your MCP server to Microsoft Copilot:
1
Sign in to your Microsoft Copilot Studio account.
2
Select Agent in the sidebar and create a new agent.
3
Provide a name for your agent in the Name field.
4
Optional. Provide a description for your agent in the Description field.
5
Add your MCP server as a tool. Steps for adding an MCP server vary based on your authentication method:
Go to the Tools section and click + Add tool > Custom connector. Microsoft redirects you to Power Apps to create the new connector.
2
Click + New custom connector and select Import an OpenAPI file.
3
Import the following YAML file, replacing <MCP Server Name>, <MCP Server Description>, <MCP Server Path>, and <WKT_TOKEN> with your MCP server configuration information:
yml
swagger: '2.0'info: title: <MCP Server Name> #Change name here description: <MCP Server Description> #Change description here version: 1.0.0host: 558.apim.mcp.workato.combasePath: /schemes: - httpspaths: <MCP Server Path>: #change path here, for example:/gregf247/github-jira-cursor-tools-v1 post: summary: <MCP Server Name> #Change name here description: <MCP Server Description> #Change description here operationId: InvokeServer x-ms-agentic-protocol: mcp-streamable-1.0 parameters: - name: wkt_token in: query required: true type: string enum: - <WKT_TOKEN> # Add wkt_token from Workato here default: <WKT_TOKEN> # Add wkt_token from Workato here responses: '200': description: Immediate ResponsesecurityDefinitions: {}security: []
6
Return to Microsoft Copilot Studio and connect to the newly created MCP server.
 Copy the MCP URL and token
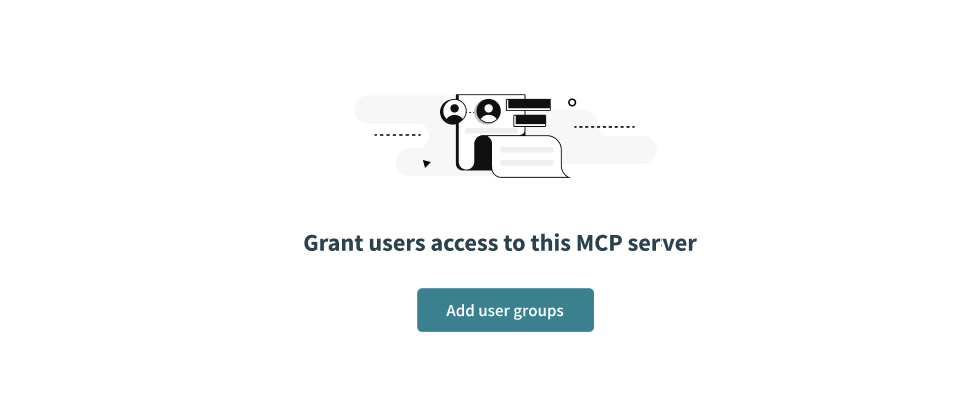 Click Add user groups
 Copy your remote MCP URL
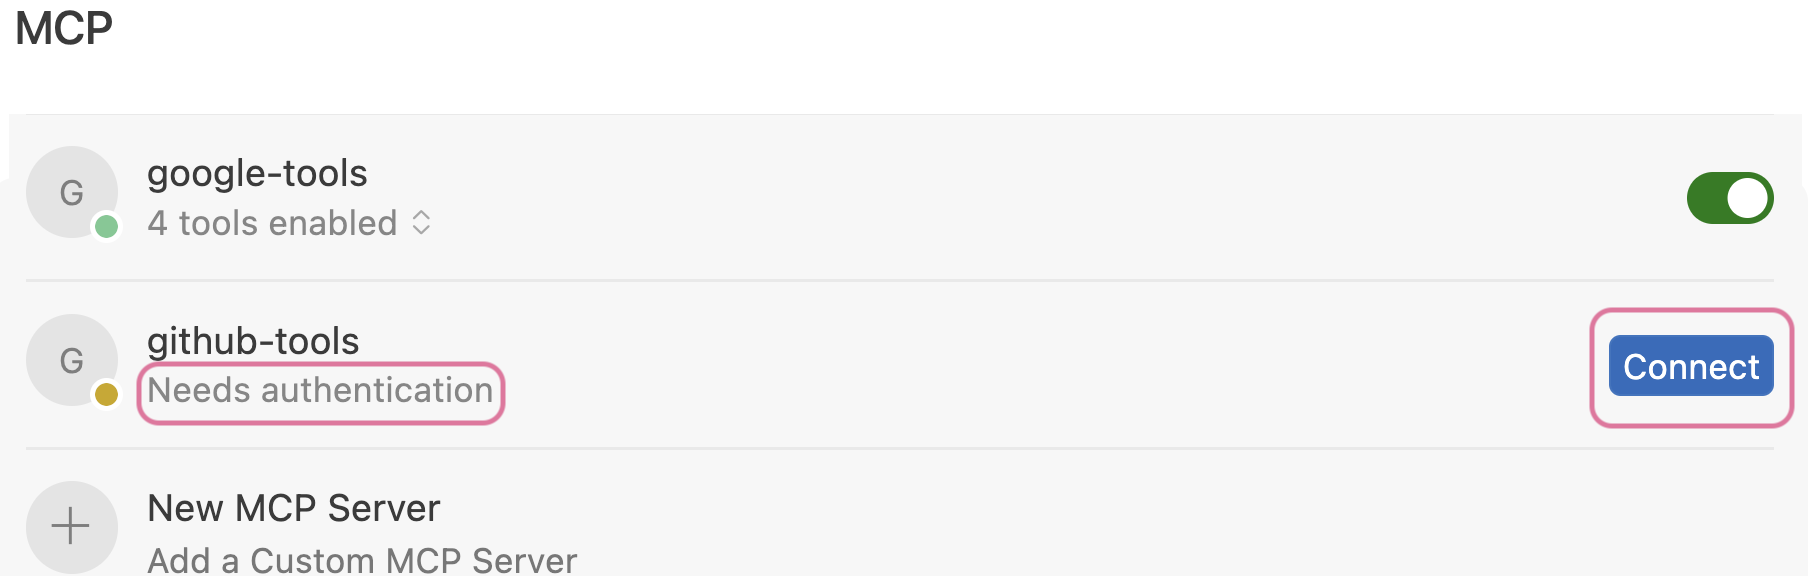 Click Connect
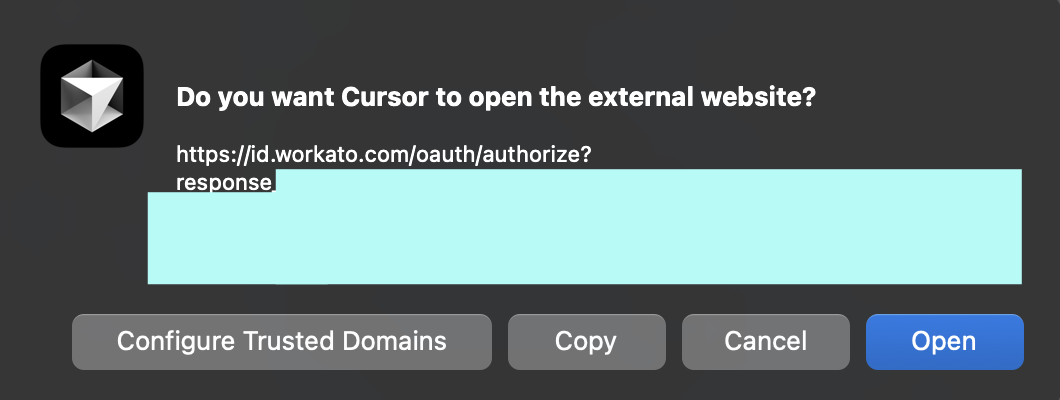 Click Open
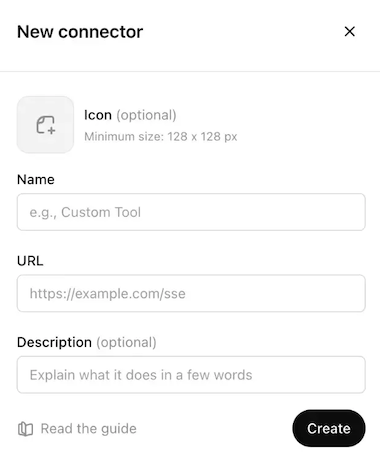 Configure your ChatGPT MCP connector
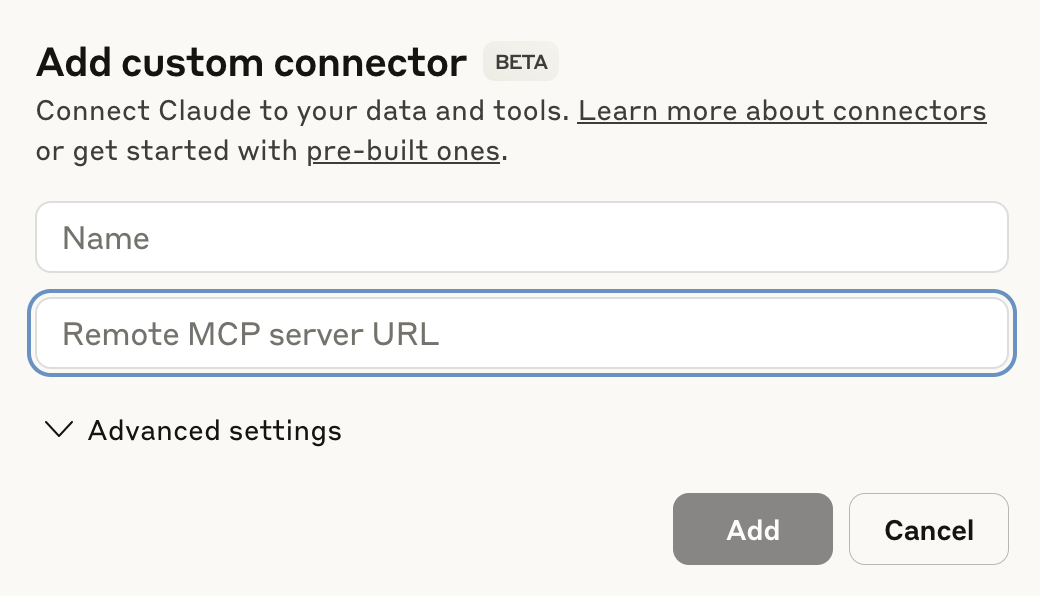 Configure your Claude MCP connector
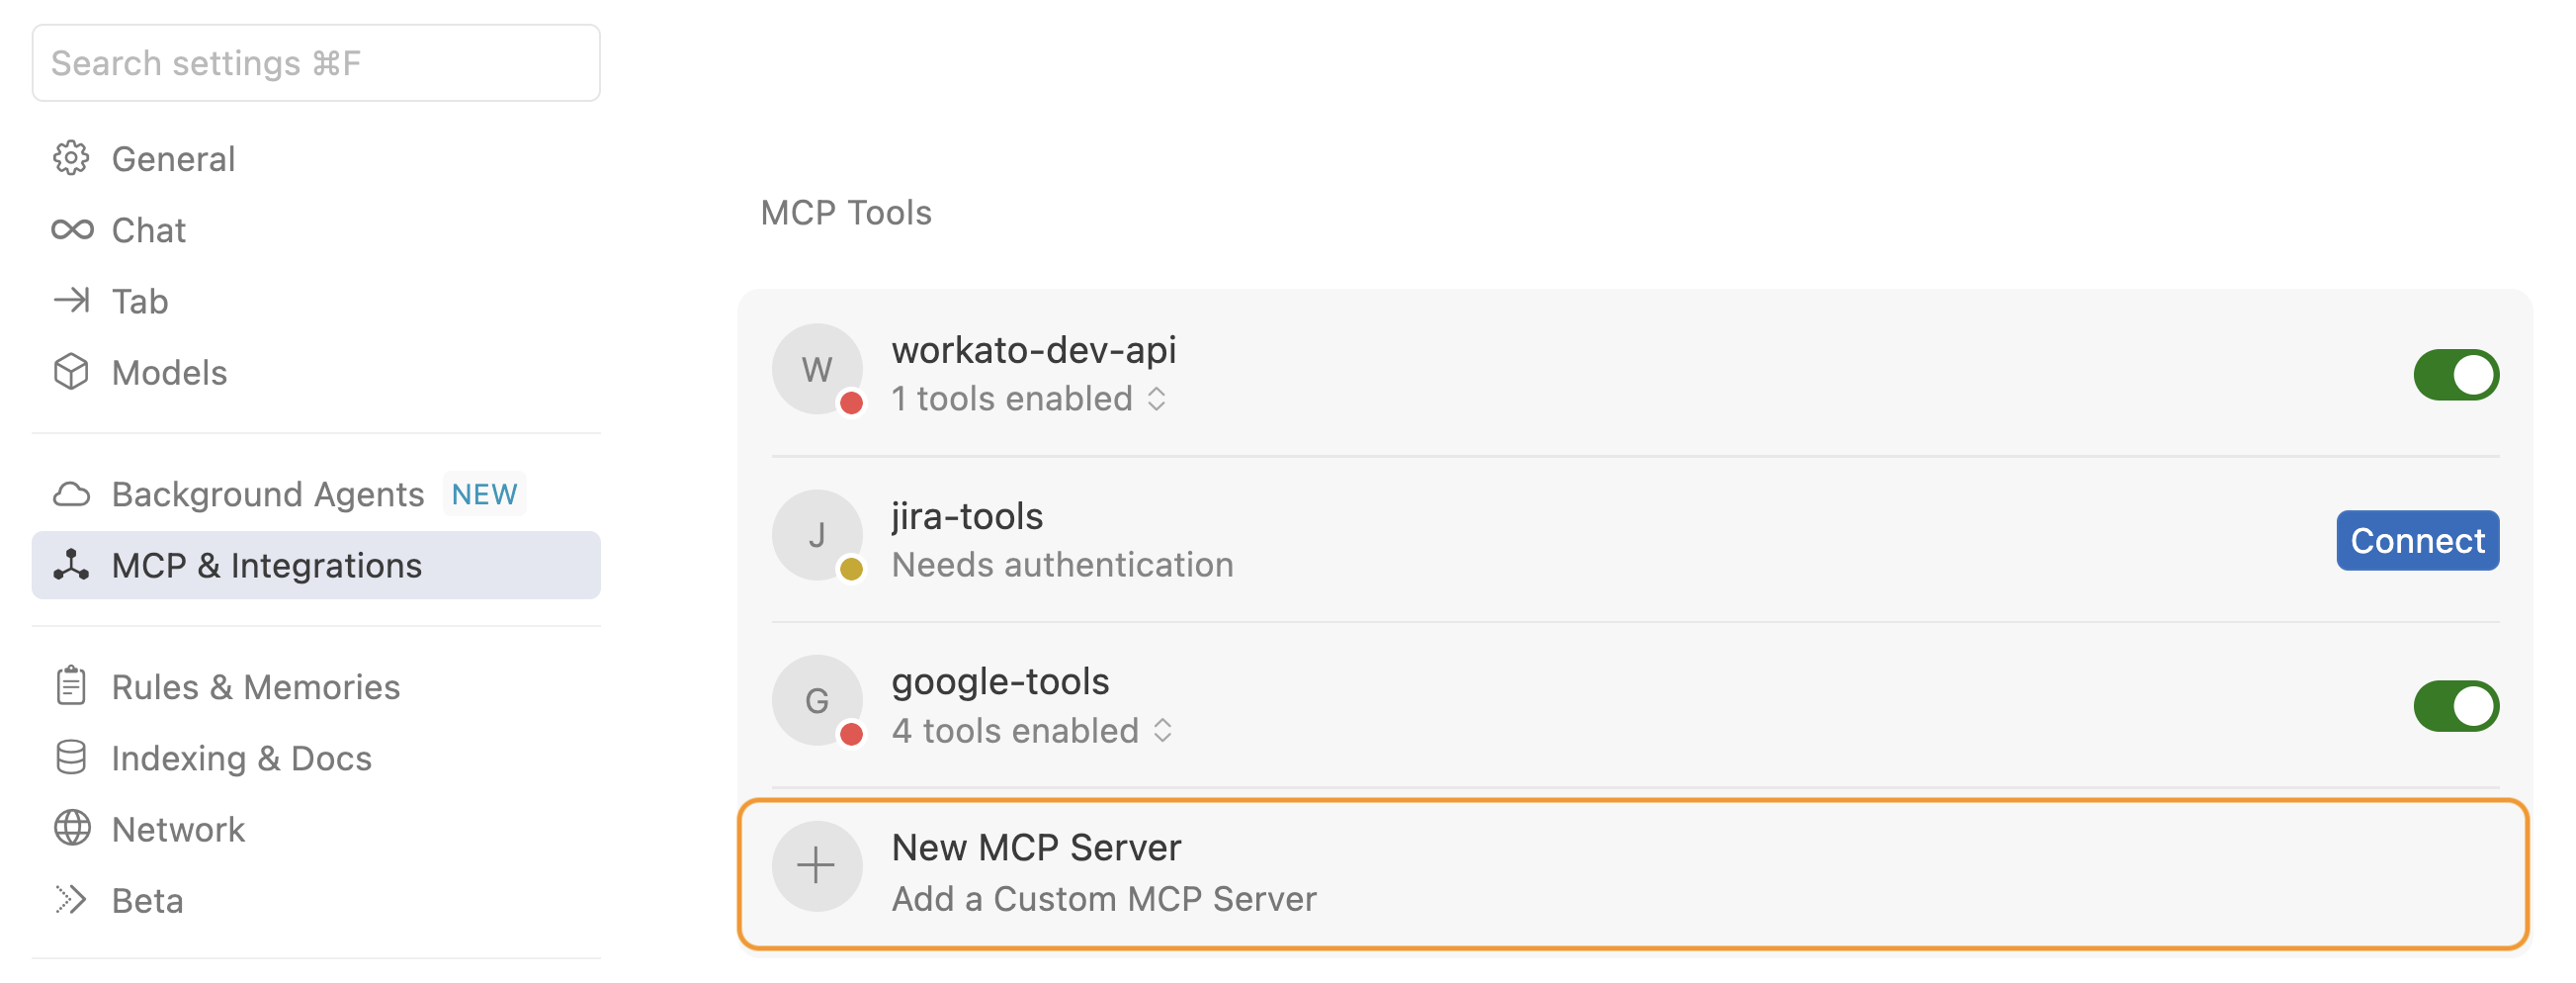 Click + New MCP Server
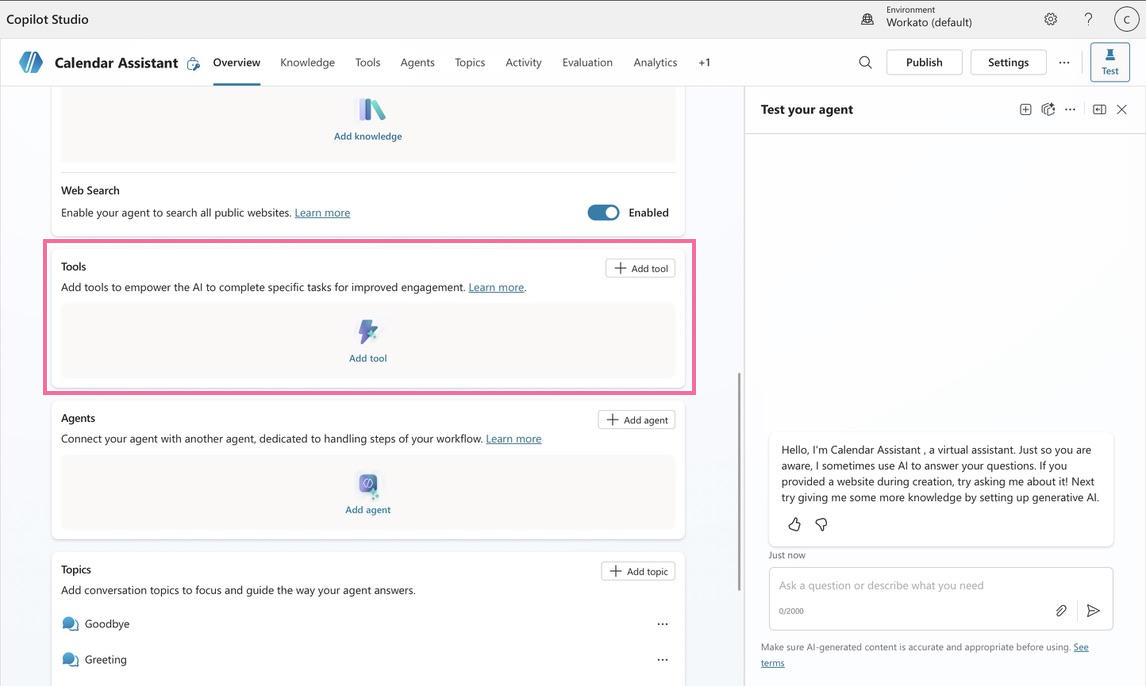 Add tools