Audit log streaming destinations
Before you begin, refer to our set up audit log streaming guide for instructions on enabling audit log streaming in your workspace.
Workato supports cloud connections to the following audit log streaming destinations:
- Amazon S3 Bucket
- Azure Monitor
- Azure Blob Storage
- Cloud based logging services
- Google Cloud Storage Bucket
Amazon S3 Bucket
To stream your audit logs to Amazon S3, select an existing Amazon S3 connection or create one that has a region and bucket set up. This connection must be assigned an IAM role with the following policy permissions:
ListAllMyBuckets: This list permission allows Workato to list all buckets belonging to your S3 account. This permission is required even if your connection is restricted to one bucket within S3.PutObject: This write permission allows Workato to stream your activity audit logs to the bucket you specify during setup.
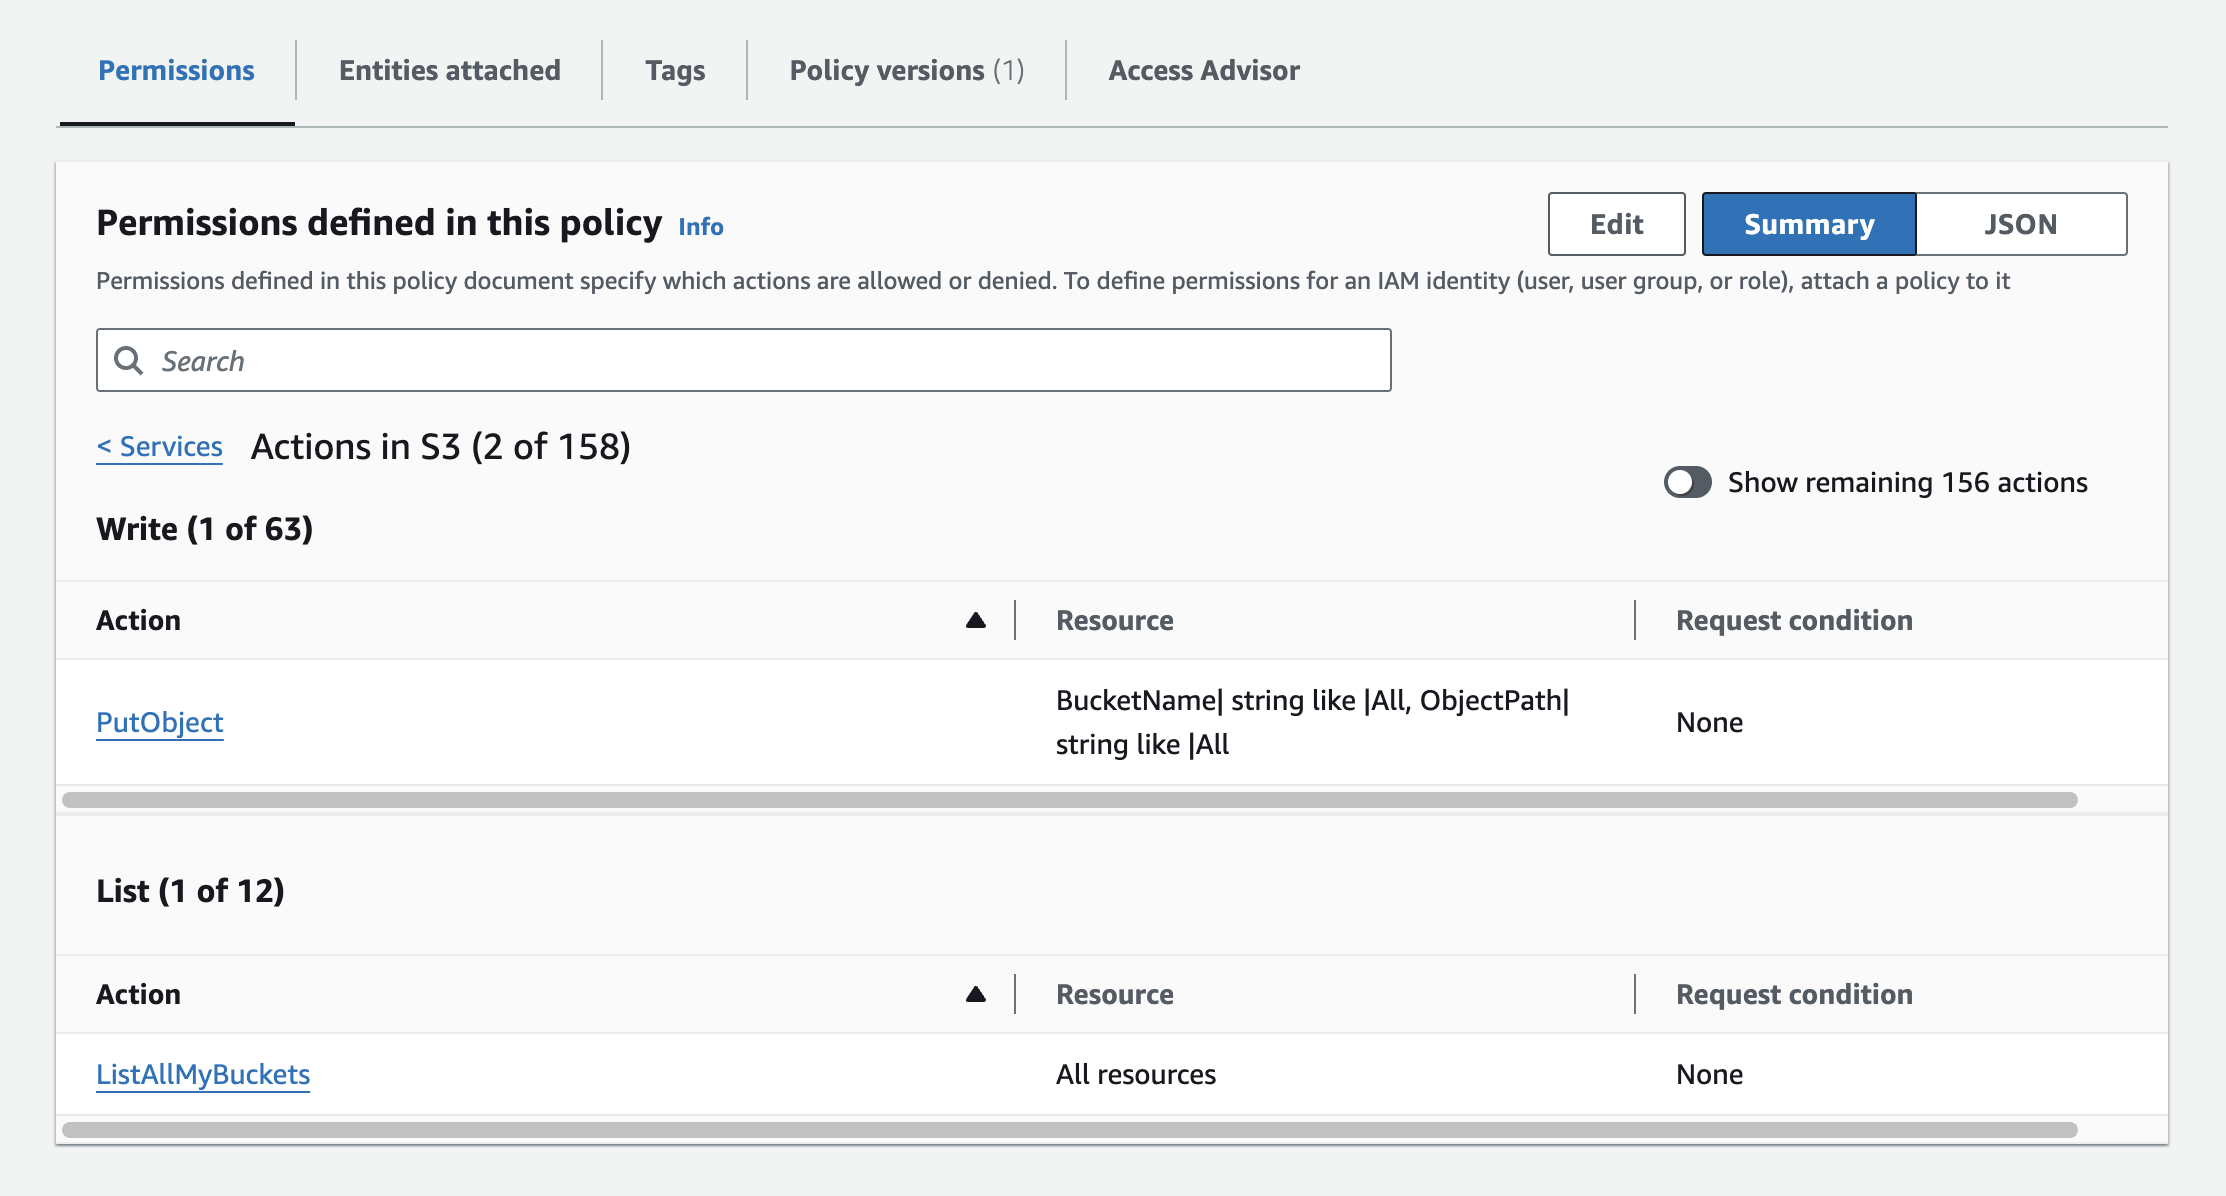 Minimum permissions for audit log streaming to S3
To ensure the audit logs are streamed successfully, confirm that your Amazon S3 connection meets the following requirements:
- The specified S3 bucket must exist.
- The region specified in the S3 connection must match the region of the selected bucket.
- The IAM role ARN (Amazon Resource Name) associated with the S3 connection must be valid.
- The IAM role must have the
ListAllMyBucketsandPutObjectpermissions. - Use a cloud connection, not an on-prem connection.
- Allowlist Workato's data center IP addresses if you use an IP allowlist to secure your storage.
Learn more about setting up an IAM role and permissions policy in our IAM role-based authentication documentation.
IAM ROLE PERMISSIONS
When you update your IAM role bucket permissions, you must disconnect and re-establish your S3 connection in Workato before you can continue using S3 as a streaming destination. This is a security feature designed to help you manage secure access to your resources.
Additionally, if you plan to restrict access to a specific bucket within S3, you must configure this setting when you set up your S3 connection.
The IAM role must be configured at the bucket level and not at the bucket/object level.
Azure Monitor
Complete the following steps to stream your audit logs to Azure Monitor:
SHARED KEY DEPRECATED
Shared key authentication method uses the legacy HTTP Data Collector API, which is deprecated and will stop working in September 2026. Migrate to client credentials authentication instead.
Use the Audit log destination drop-down menu to select Azure Monitor.
Click Set up connection.
Optional. Enter a Resource ID to associate the logs with a specific Azure resource.
Select the events to stream:
- Job status only: Logs whether a job succeeded or failed.
- Full job details: Logs job details, including status and data for each line action.
- User activity: Logs all user activity in the workspace.
- API platform logs: Logs all API requests handled by the API platform.
- Workato Log events: Logs all messages sent to the Workato logging service.
- Genie conversations: Logs the full details of genie conversations, including data for every response.
Additionally, select the Log types and Log levels to include if you plan to stream events from the Workato logging service.
Optional. Enter the logging message you plan to use in the Customize log message field. Refer to the Custom log messages guide for more information.
Click Save to apply your audit log streaming settings.
Ensure your Azure Monitor Workspace receives the audit logs by querying the specified log type.
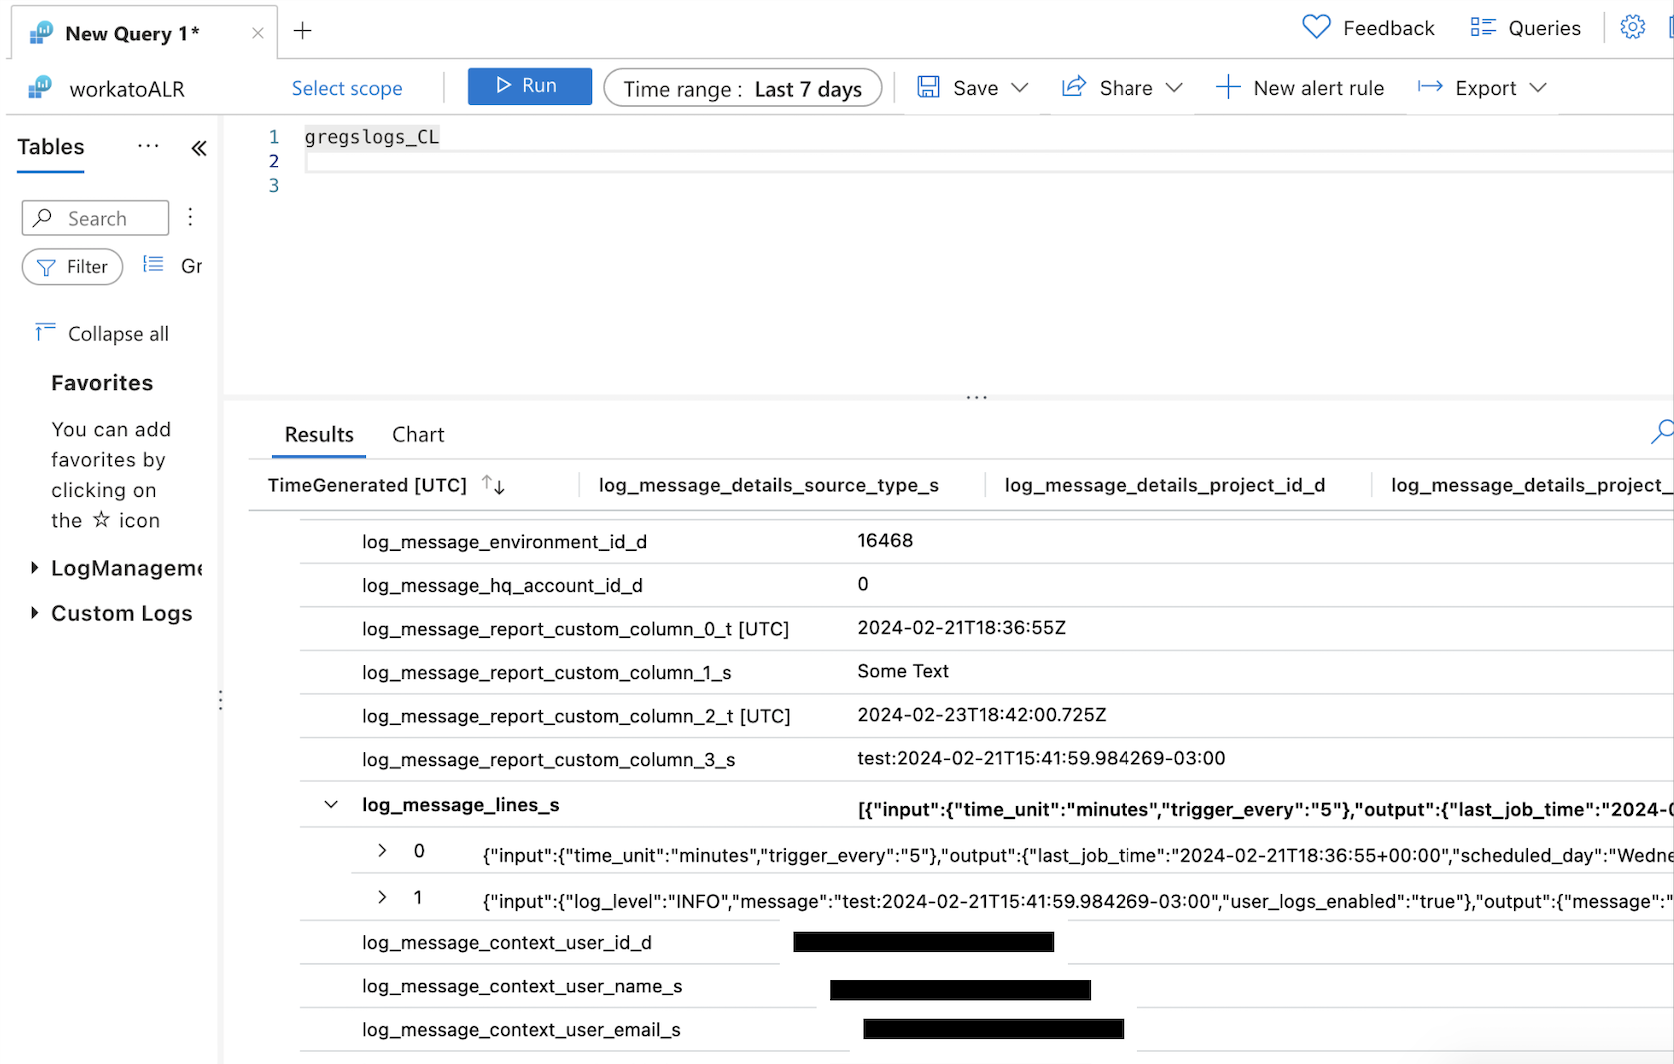 Verify your audit logs
Azure Blob Storage
Select an Azure Blob connection that has containers set up. The connection should have read/write access to the containers. Reference our Azure blob documentation to learn how to change role access of the Integration System User (ISU) in Microsoft Entra ID. Azure charges additional fees for every 10,000 logs streamed to Azure Blob.
CONNECTION REQUIREMENTS
Ensure the connection to Azure Blob Storage meets the following requirements:
- Use a cloud connection, not an on-prem connection.
- Allowlist Workato's data center IP addresses if you use an IP allowlist to secure your storage.
Cloud based logging services
You can use any log service provider (such as Sumo Logic, Datadog, or Splunk) as a streaming destination. Learn more about configuring an HTTP based log collection using Sumo Logic or Datadog.
How to use a cloud based logging service destination
Go to the Destination URL field and enter the HTTP URL from your cloud-based logging service provider. Workato audit log streaming posts the audit log events in real-time to this URL.
If your log service provider requires authentication to send HTTP requests, enable the Requires authentication slider, then select the Link your account button to specify an HTTP connection with your authentication information. You can create a new HTTP connection or link to an existing connection.
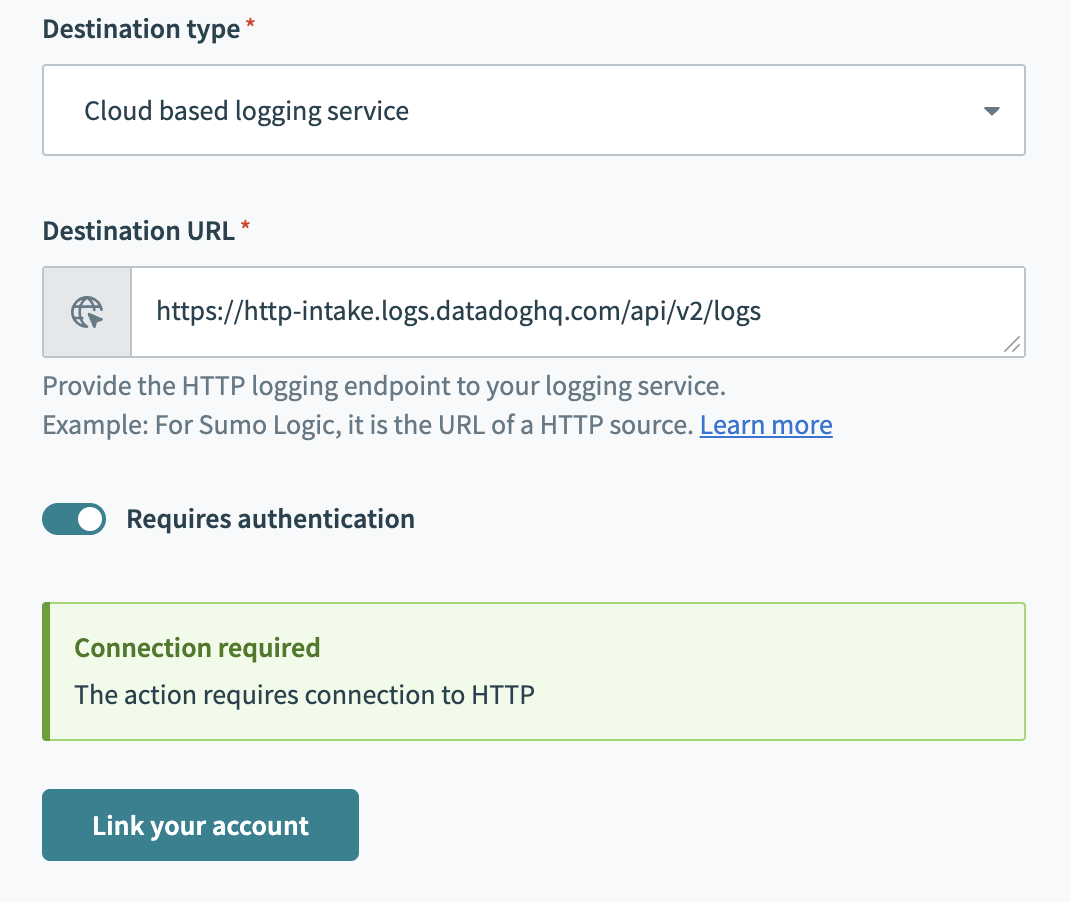 Link to an HTTP connection
SUPPORTED AUTHENTICATION METHODS FOR HTTP CONNECTIONS
When setting up the HTTP connector for log streaming, ensure that you use one of the following authentication methods:
- Basic
- Query
oauth2_auth_code_grantoauth2_client_credentials_grant- Custom
Note that audit log streaming to REST-based destinations is only compatible with the preceding listed authentication methods. You will not be able to successfully configure streaming if you use another authentication method.
 Validation failed
Google Cloud Storage Buckets
You can stream your audit logs from Workato to a Google Cloud Storage Bucket. Complete the steps in the following sections to configure the log streaming connection.
Prerequisites
You must have the following features and access:
- A Workato account with the Audit Log Streaming feature enabled
- Access to the following Google Cloud products and services:
- Cloud Logging
- Google Cloud Storage Buckets
- Roles & IAM
- API’s & Services
- Google Oauth2 playground (for troubleshooting)
- Use a cloud connection, not an on-prem connection.
- Allowlist Workato's data center IP addresses if you use an IP allowlist to secure your storage.
Enable Google Cloud Logging API
You must enable the following API to send logs to a Google Cloud Platform (GCP) instance. Refer to the Google documentation on how to enable an API for more information.
Complete the following steps to enable Cloud Logging API:
Sign in to your Google Cloud Console.
Go to Enabled API's & Services.
Search for Cloud Logging API and ensure that is enabled.
Create a user account
You must create a connection to your GCP instance using a shared user account or assign an individual with permissions to write logs to your Google Cloud Storage Bucket. This user must be in your organization’s directory with a valid email address. Use this account to authenticate the integration between Workato and GCP in the OAuth 2.0 workflow. Refer to the Google documentation on how to add users for more information.
Assign user account role permissions
The user account you plan to use for authentication must be granted the required roles and permissions. Refer to the Google documentation on how to grant a role for more information.
Complete the following steps to assign required permissions to your user account:
Sign in to your Google Cloud Console.
Go to Google Cloud Logging > Permissions > Assign Principal.
Select the account you created in the previous section, then assign the Logging Admin role.
Go to Google Cloud Buckets and select the bucket in which you plan to store Workato logs, or create a new bucket if necessary.
Go to Permissions > Assign Principal, select the user account, and then assign the Storage Object Admin role.
Configure an OAuth consent screen
You must configure an OAuth consent screen before you create your OAuth application.
Complete the following steps to configure your OAuth consent screen:
Sign in to your Google Cloud Console.
Select the project ID in which you plan to stream your activity logs.
Go to APIs & Services.
Go to the OAuth Consent Screen configuration page and select Credentials.
Go to Authorized domains > click Add Domain > and enter workato.com.
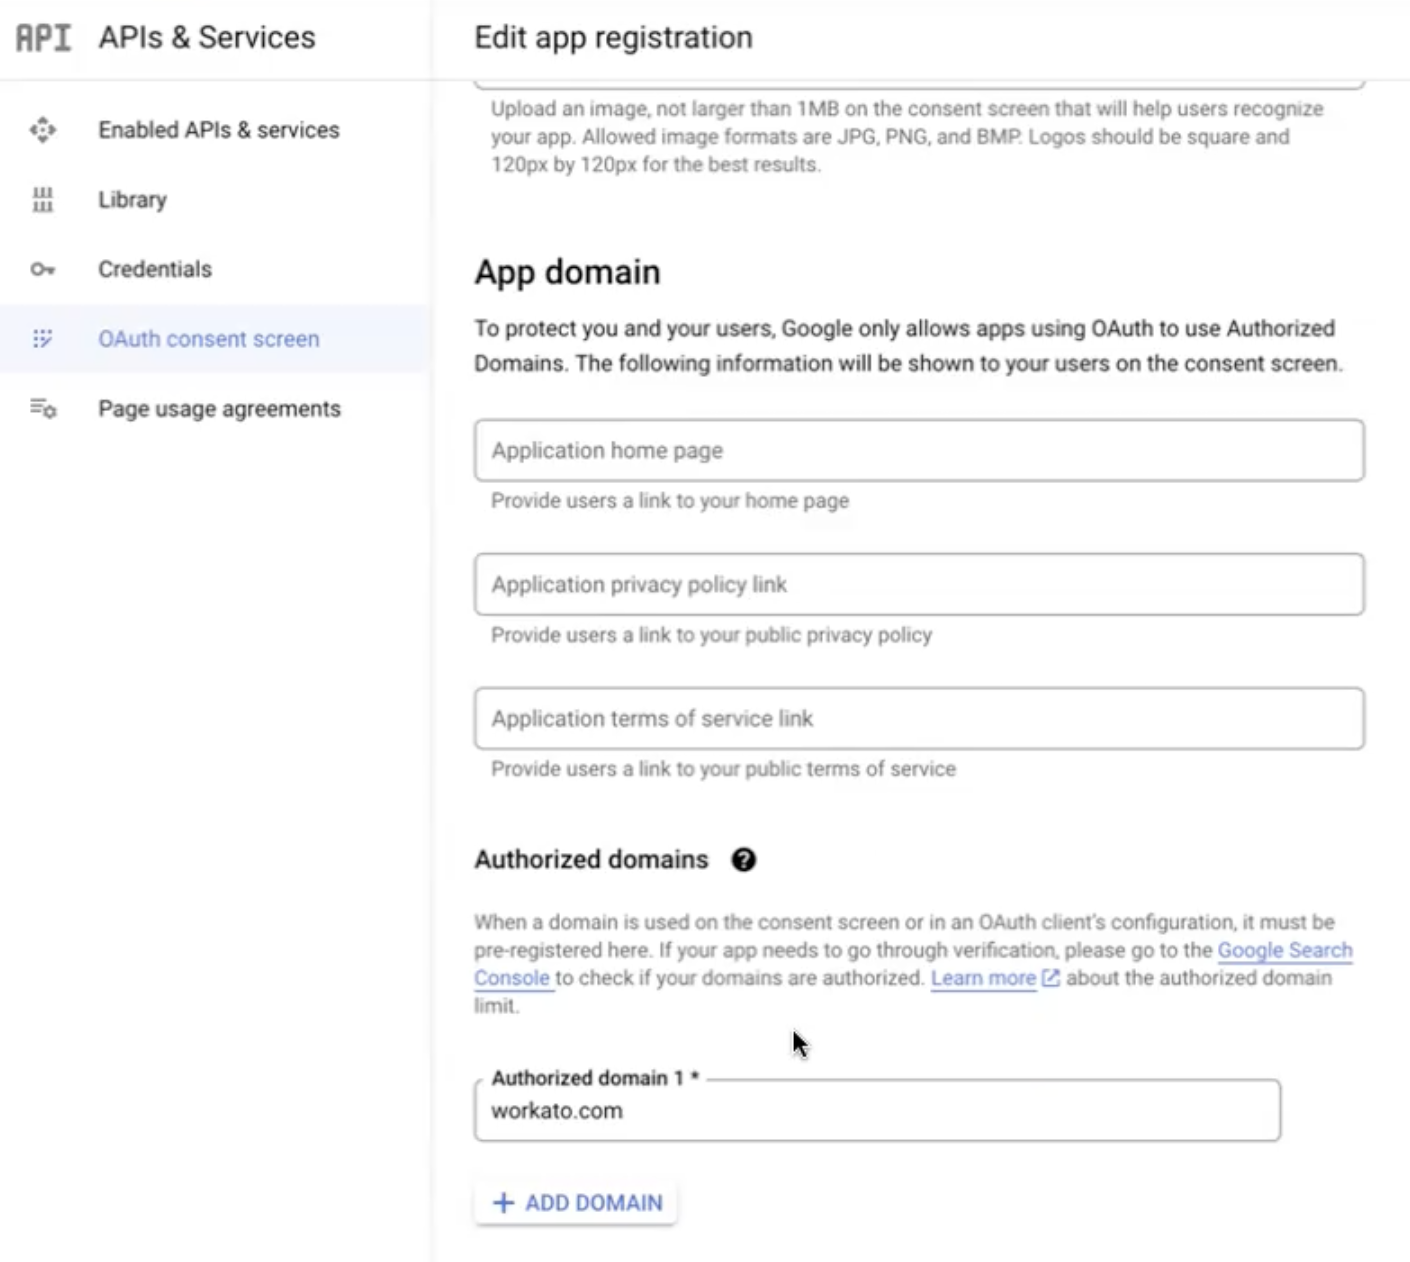 Add the Workato domain
Select Scopes for Google APIs.
Click Add scope.
Ensure that you have the following Cloud Logging API scopes:
.../auth/logging.admin.../auth/logging.read.../auth/logging.write
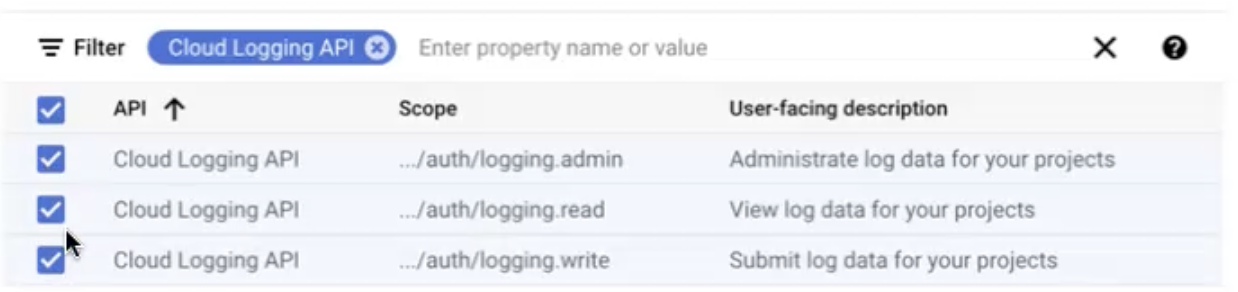 Required API scopes
Click Add > Submit for verification.
Create an external OAuth app
You must create an OAuth application in your GCP instance to generate a clientID and clientSecret. This enables Workato to use the Google Cloud Logging APIs you enabled in the previous section.
Complete the following steps to create an external OAuth app:
Sign in to your Google Cloud Console.
Go to APIs & Services > Credentials > Create Credentials > OAuth Client ID.
Select Application Type, then enter a name for the app. We recommend that you name your app Workato - GCP Integration - US.
Enter the following as the authorized redirect URI: https://www.workato.com/oauth/callback.
Click Create. A clientID and clientSecret are automatically generated after your app is created. We recommend that you download the JSON file for safekeeping.
Go to APIs & Services > OAuth Consent Screen.
Use the form to register the app and include workato.com in the list of authorized domains. Note that you can use any user account for the developer contact information.
Click Save and Continue.
Create a HTTP connection with OAuth2 authorization code grant
Complete the following steps to create an HTTP connection with OAuth2 authorization code grant:
Sign in to your Workato account.
Go to Projects > Connections.
Click Create > Connection (or press C twice), then search for and select HTTP as your connector.
Provide a name for your connection in the Connection name field.
Use the Location drop-down menu to select the project where you plan to store the connection.
Use the Connection type drop-down menu to select Cloud. On-prem HTTP connections don't support log streaming.
Use the Authentication type drop-down menu to select OAuth2 authorization code grant.
Enter the following URL in the OAuth2 authorization URL field: https://accounts.google.com/o/oauth2/token and input the authorization URL: https://accounts.google.com/o/oauth2/auth?response_type=code&scope=https://www.googleapis.com/auth/cloud-platform&access_type=offline&prompt=consent
Enter the OAuth2 Client ID that you generated in the preceding section.
Enter the OAuth2 Client Secret that you generated in the preceding section.
Use the How does the API require credentials to be sent to request a token? drop-down menu to select Header.
Click Connect. An OAuth consent dialogue box opens and prompts you to authenticate your request.
Click Continue.
Enter the user account email address and password.
Select Allow to enable Workato to connect to your Google Cloud Logging instance.
Configure audit log streaming
Complete the following steps to stream your audit logs to Google Cloud:
Sign in to your Workato account.
Go to Workspace admin > Settings > Debug and logs > Log streaming.
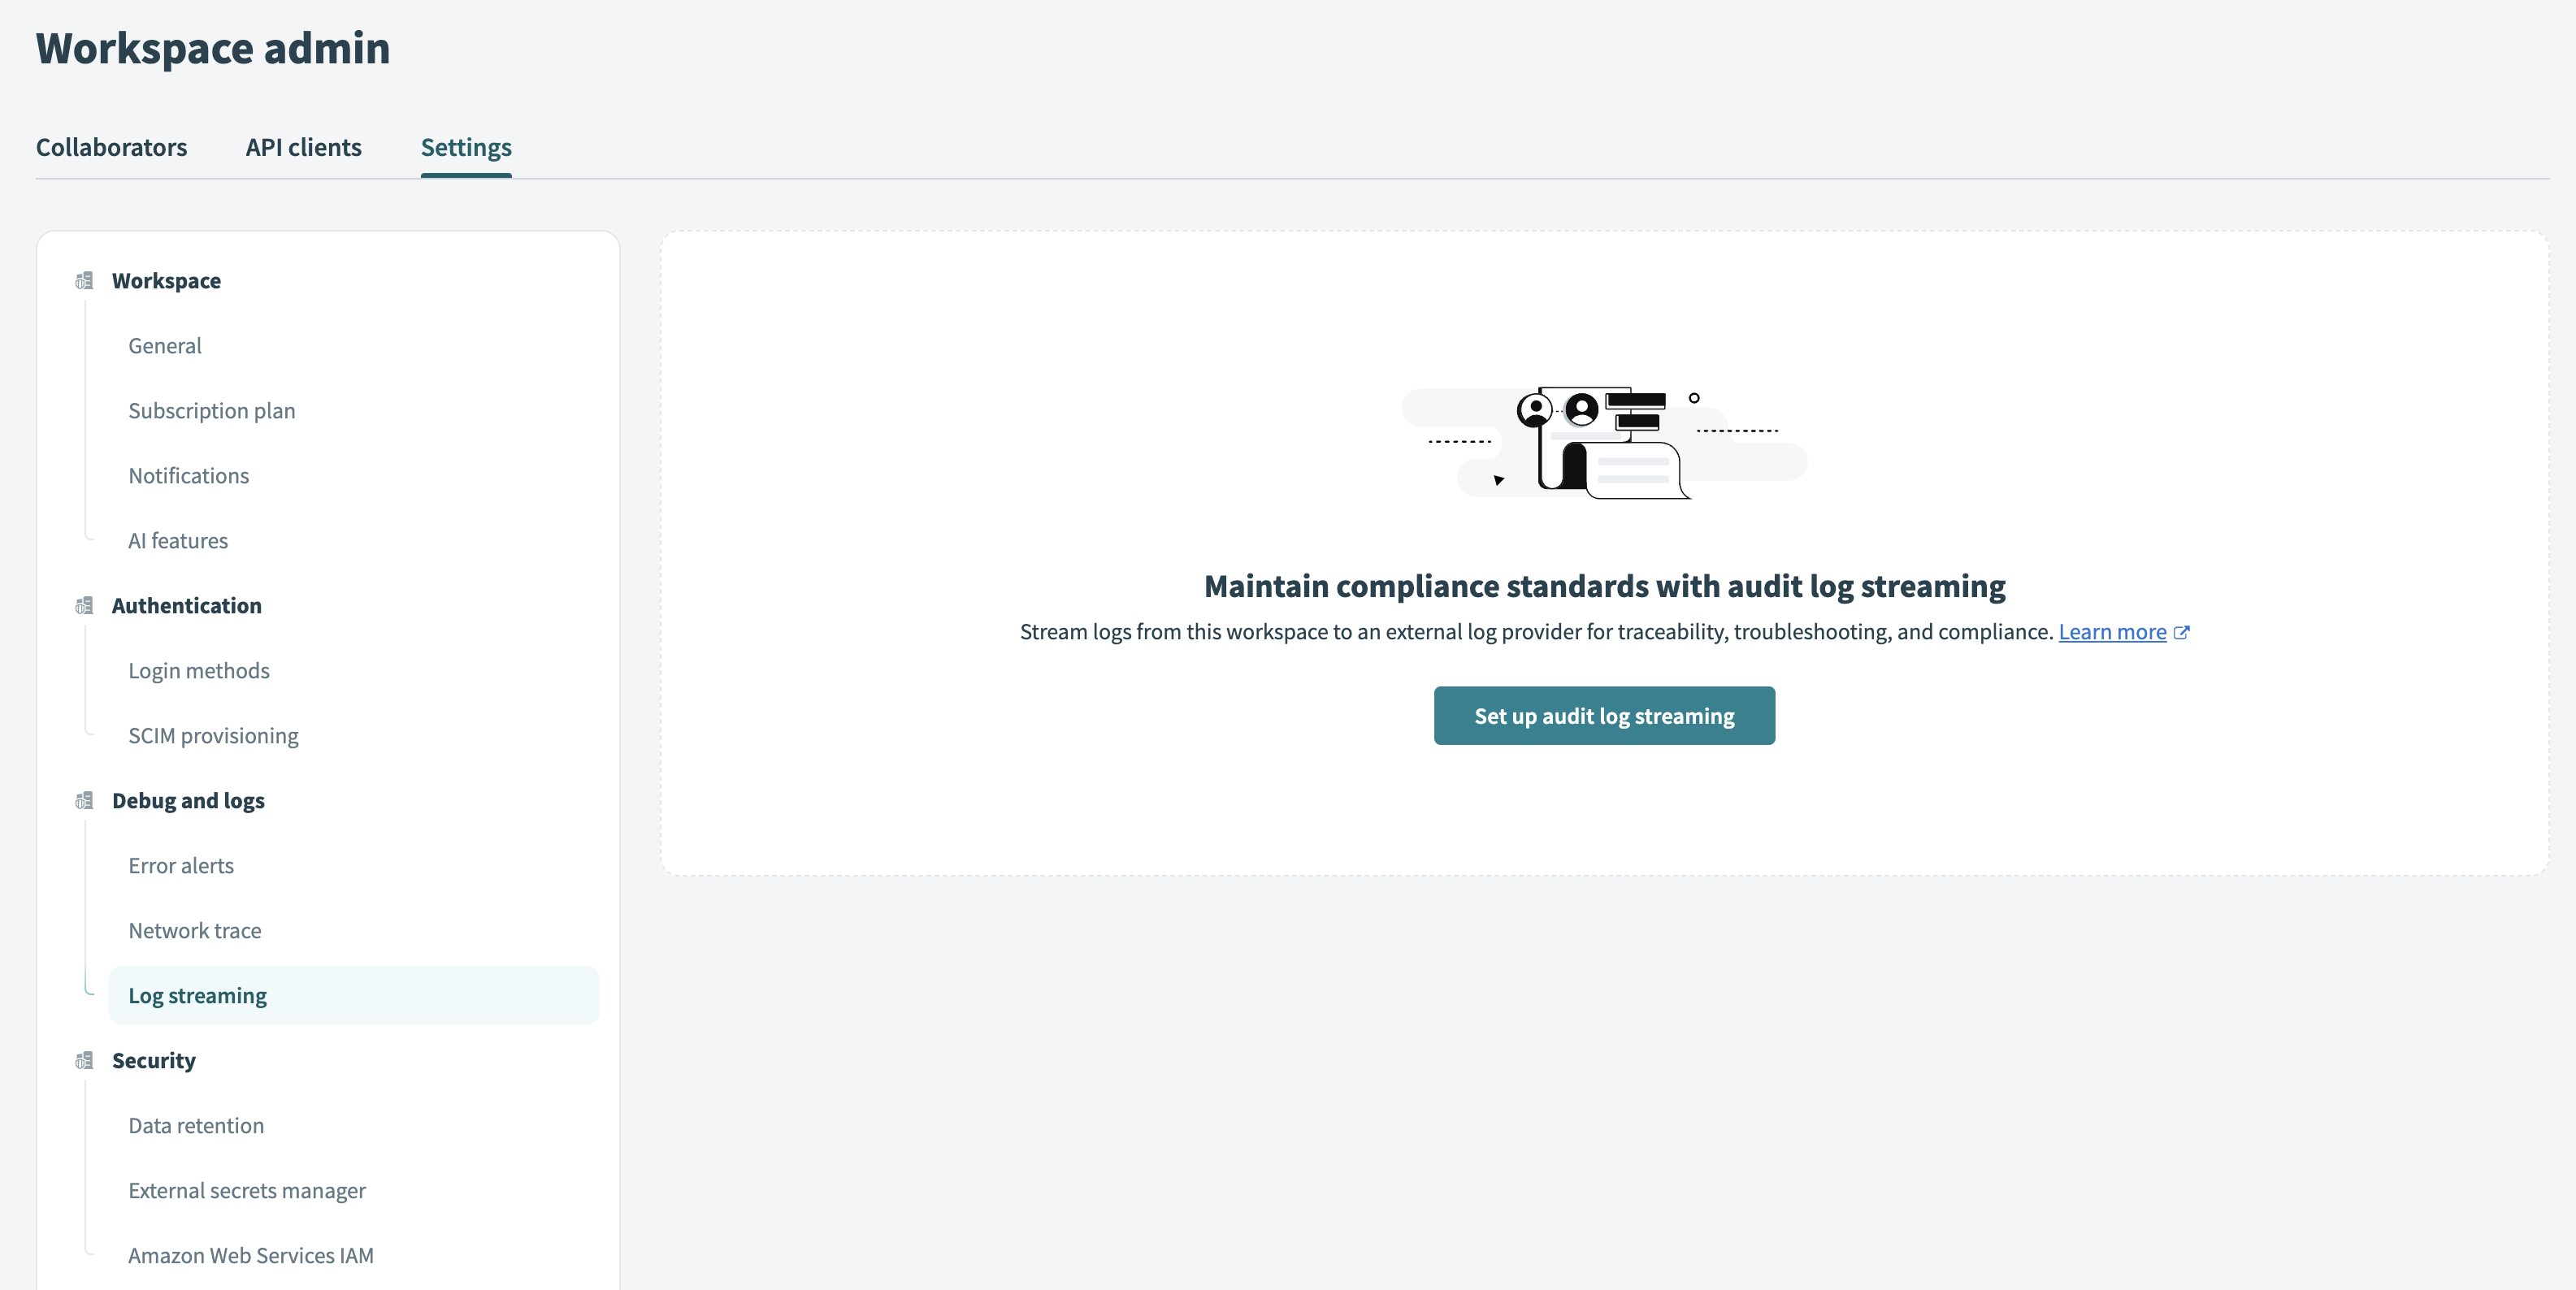 Go to Log streaming
Click Set up audit log streaming.
Use the Audit log destination drop-down menu to select Cloud based logging service.
 Configure your logs to stream to an external log provider
Enter the following URL as your Audit log destination: https://logging.googleapis.com/v2/entries:write.
Select the Requires authentication toggle.
Click Set up connection, then use the Existing connections drop-down menu to select the connection you set up in the preceding section.
Select the connection from Existing connections
Go to the Choose events to stream section and select the checkboxes for the events you plan to stream.
Enter the logging message you plan to use in the Customize log message field.
REQUIRED FORMAT
Google Cloud Logging expects JSON payloads in a specific format. We recommend that you include the following message format in your log message. Replace the project name and the log name with your own values.
{
  "logName" : "projects/your-project-name/logs/workato-logs",
  "resource": { "type": "gce_instance"},
 "entries": [
  {
   "jsonPayload": {
    "data": {{{ log_message }}}
   }
  }
 ]
}Click Save. Your logs are now configured to flow into your default bucket.
Create a log sink to route logs to a specific GCP Bucket
You must create a log sink to route logs to a specific GCP bucket.
HOURLY BATCH PROCESSING FOR LOGS
Logs are routed from the default cloud logging to the destination in hourly batches.
Complete the following steps to create a log sink:
Sign in to your Google Cloud Console.
Go to Cloud Logging Explorer > Log Router > Create Sink.
Provide a Sink name, such as Workato to GCP, then click Next.
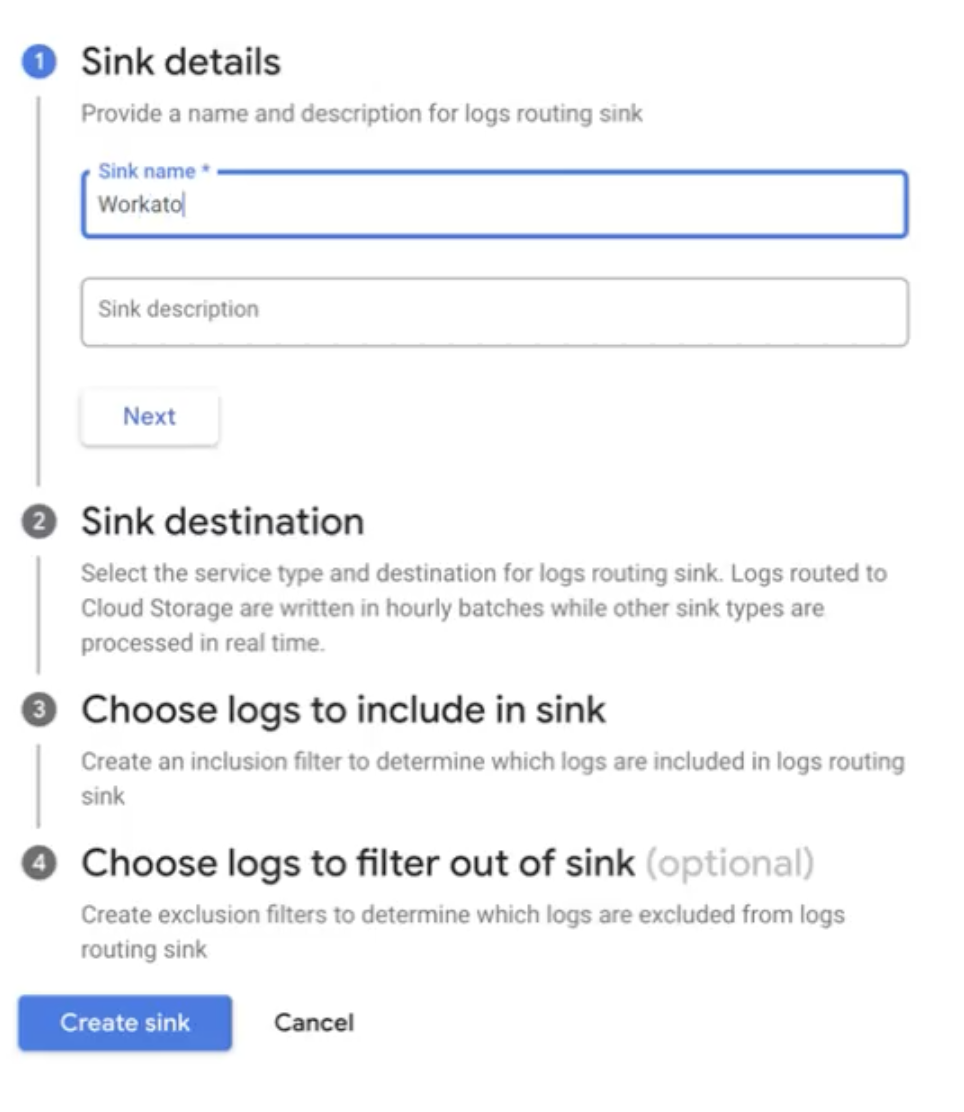 Create a sink
Use the Select sink service drop-down menu to select Google Cloud Bucket.
Click Browse to locate and select the Google Cloud Bucket you plan to use, then click Next.
Choose the logs you plan to include in the router by entering the log name in the Inclusion filter field and then click Next.
Click Create Sink.
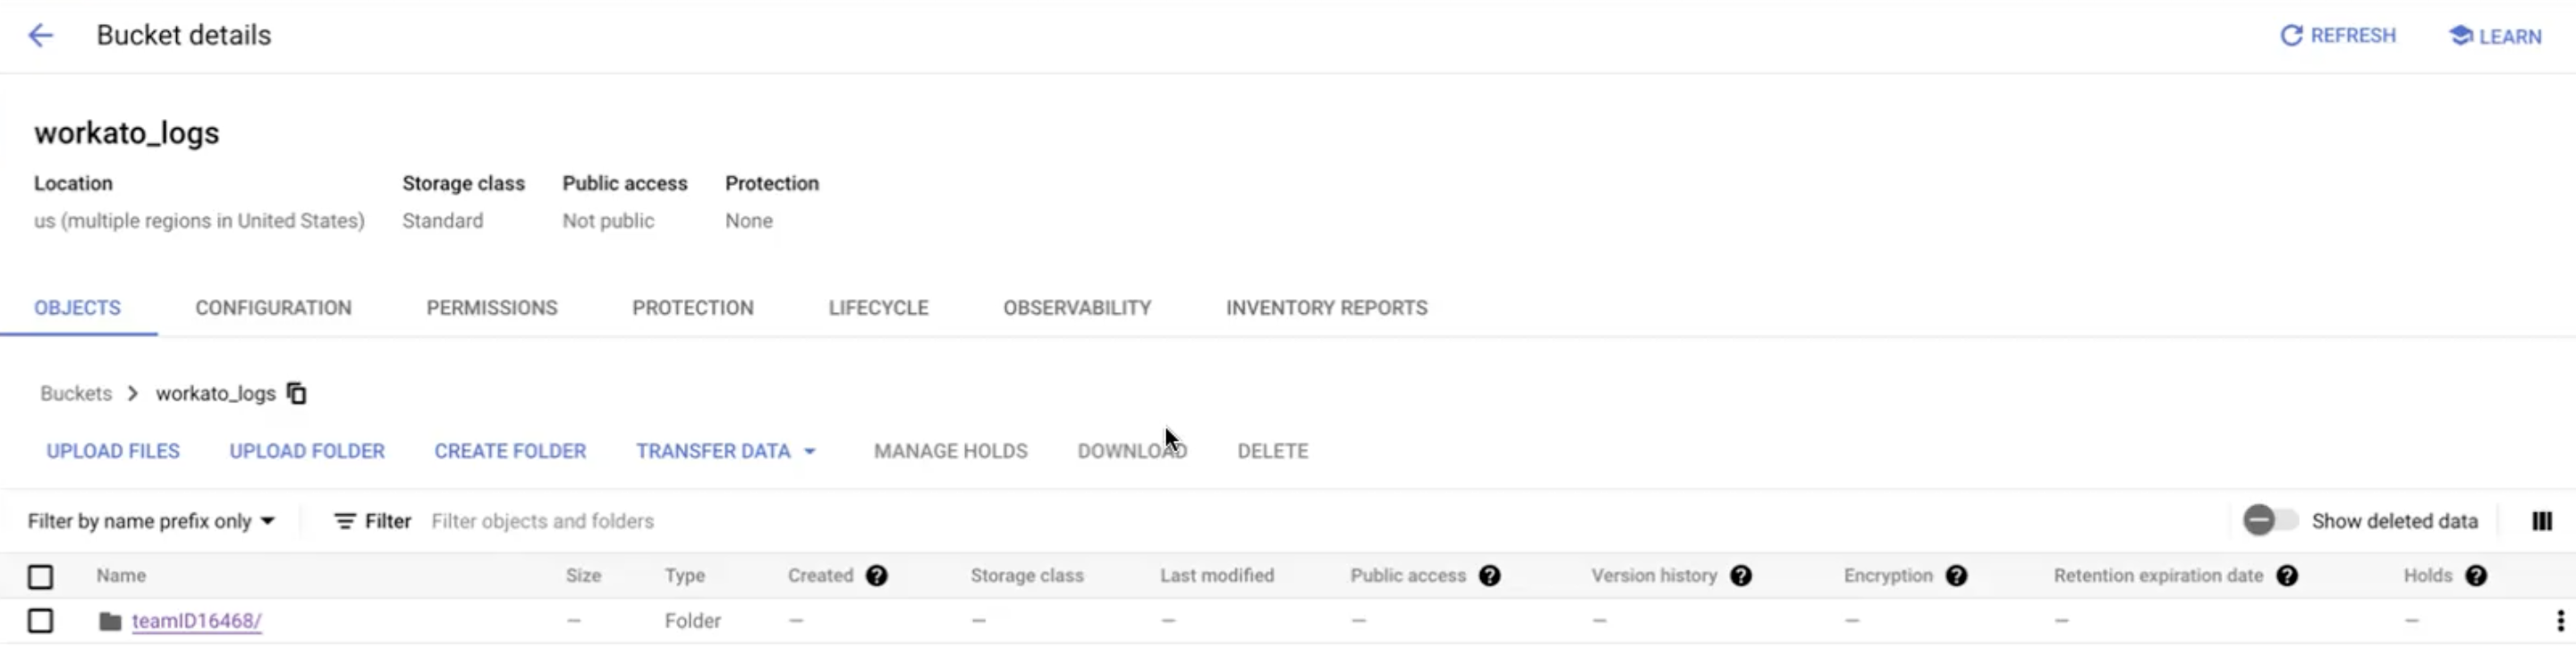 Google Cloud Bucket details
Troubleshooting
Complete the following steps to troubleshoot your log streaming:
Find and authorize Cloud Logging API v2.
Sign in using the user account credentials for your Google Cloud Bucket. This automatically generates an access token.
Configure the POST request with the following message format, replacing the names with your GCP instance values:
{

  "logName" : "projects/your-project-name/logs/your-log-name",

  "resource": { "type": "gce_instance"},

 "entries": [

  {

   "jsonPayload": {

    "data": "hello world"

   }

  }

 ]

}Go to Google Logs Explorer and run a query to check for logName = {your-log-name}, replacing the values with the GCP information you configured.
LOG MISSING
If you do not see a log, the POST request may have failed. Check the error response code in your POST request to view the exact error. If you receive a permissions error, check that your user account has the required permissions.
ADDITIONAL TROUBLESHOOTING
Ensure the connection to your streaming destination meets the following requirements:
- Use a cloud connection, not an on-prem connection.
- Allowlist Workato's data center IP addresses if you use an IP allowlist to secure your storage.
Last updated: