Configure SCIM in Okta
Workato supports the SCIM 2.0 protocol with the Okta identity provider:
- SCIM handles user lifecycle management (create, update, deactivate).
- SAML handles roles and group assignments (environment roles and collaborator groups).
SUPPORTED CONFIGURATIONS
Workato's new permission model supports two valid configurations:
- Hybrid: SCIM handles user lifecycle management (create, update, deactivate), and SAML handles roles and group assignments dynamically at login.
- SCIM-only role provisioning: Some organizations continue to provision environment roles through SCIM. To support this, include the External Namespace value
urn:ietf:params:scim:schemas:workato:1.0:WorkatoRolewhen you configure environment role attributes such asworkato_role,workato_role_test, orworkato_role_prod.
Prerequisites
- Your organization must have the Data Monitoring/Advanced Security & Compliance capability.
- You must have SAML SSO successfully set up with your identity provider.
- You must have already configured SCIM in Workato.
Configure SCIM
Log in to your Okta admin dashboard.
If you have already configured your Workato SAML app on Okta, locate the Workato SAML Application, and navigate there.
If you have not configured your Workato SAML app on Okta yet, create a new SAML 2.0 app before proceeding.
In the General tab, under App Settings, find the Provisioning field.
Select Enable SCIM Provisioning, and Save.
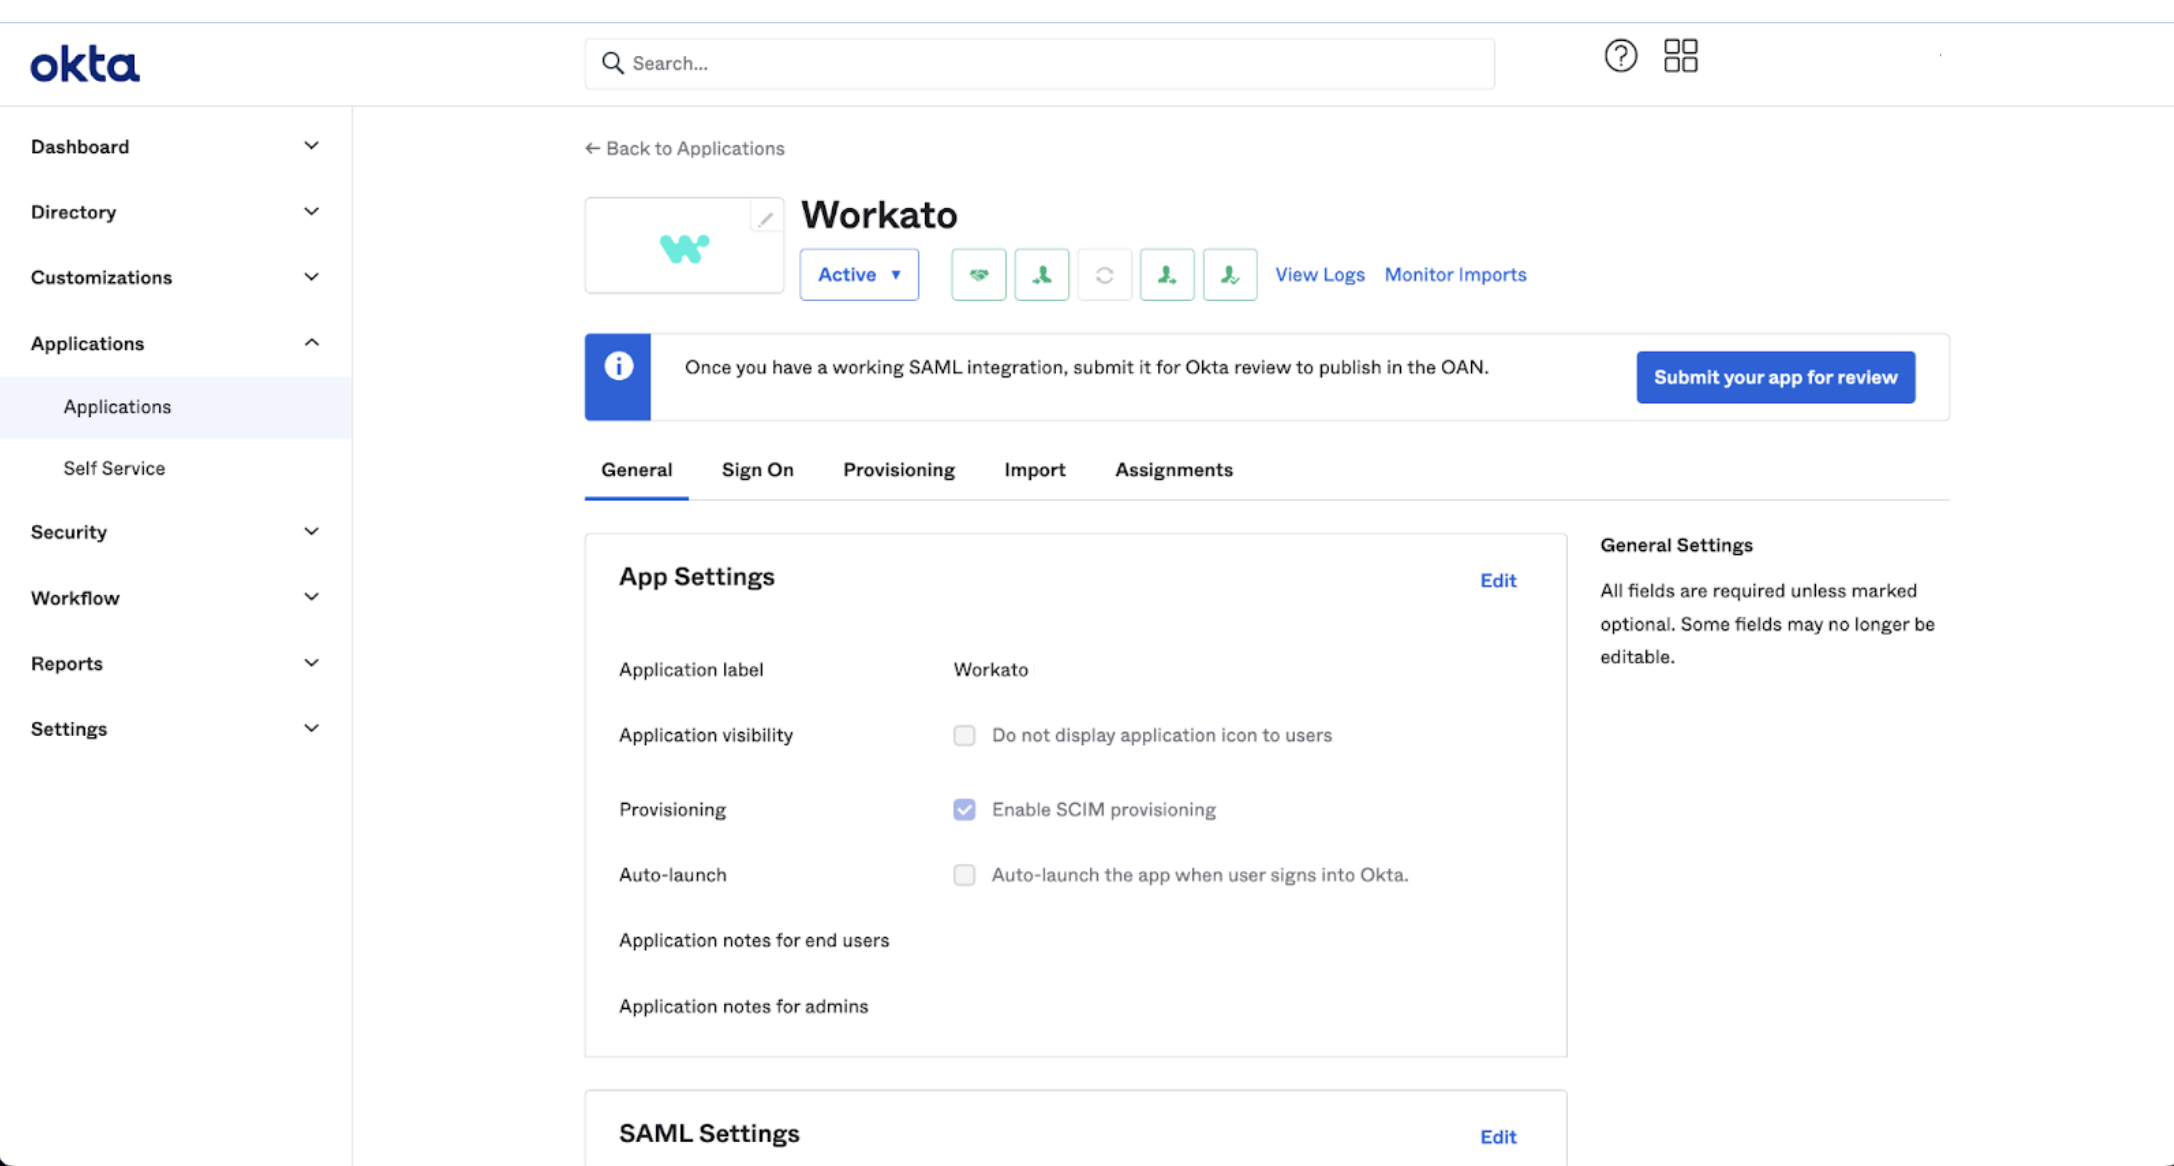 Enable SCIM provisioning
You can now see the new Provisioning tab on Okta.
In the SCIM Connection interface, specify the following:
- SCIM connector base URL
- This is the Base URL of the Workato SCIM API endpoint, that you copied when configuring SCIM in Workato.
- In this example, we use
https://workato.com/scim/v2. - Unique identifier field for users
- This is how we identify users both in Workato and in Okta.
- Here, we set the
userNamein Okta to contain the user’s email. - Supported provisioning actions
- Select the following actions:
- Import New Users and Profile Updates
- Push New Users
- Push Profile Updates
- Authentication Mode
- Select HTTP Header.
- Authorization
- Set the Bearer field by pasting the SCIM token you copied when configuring SCIM in Workato.
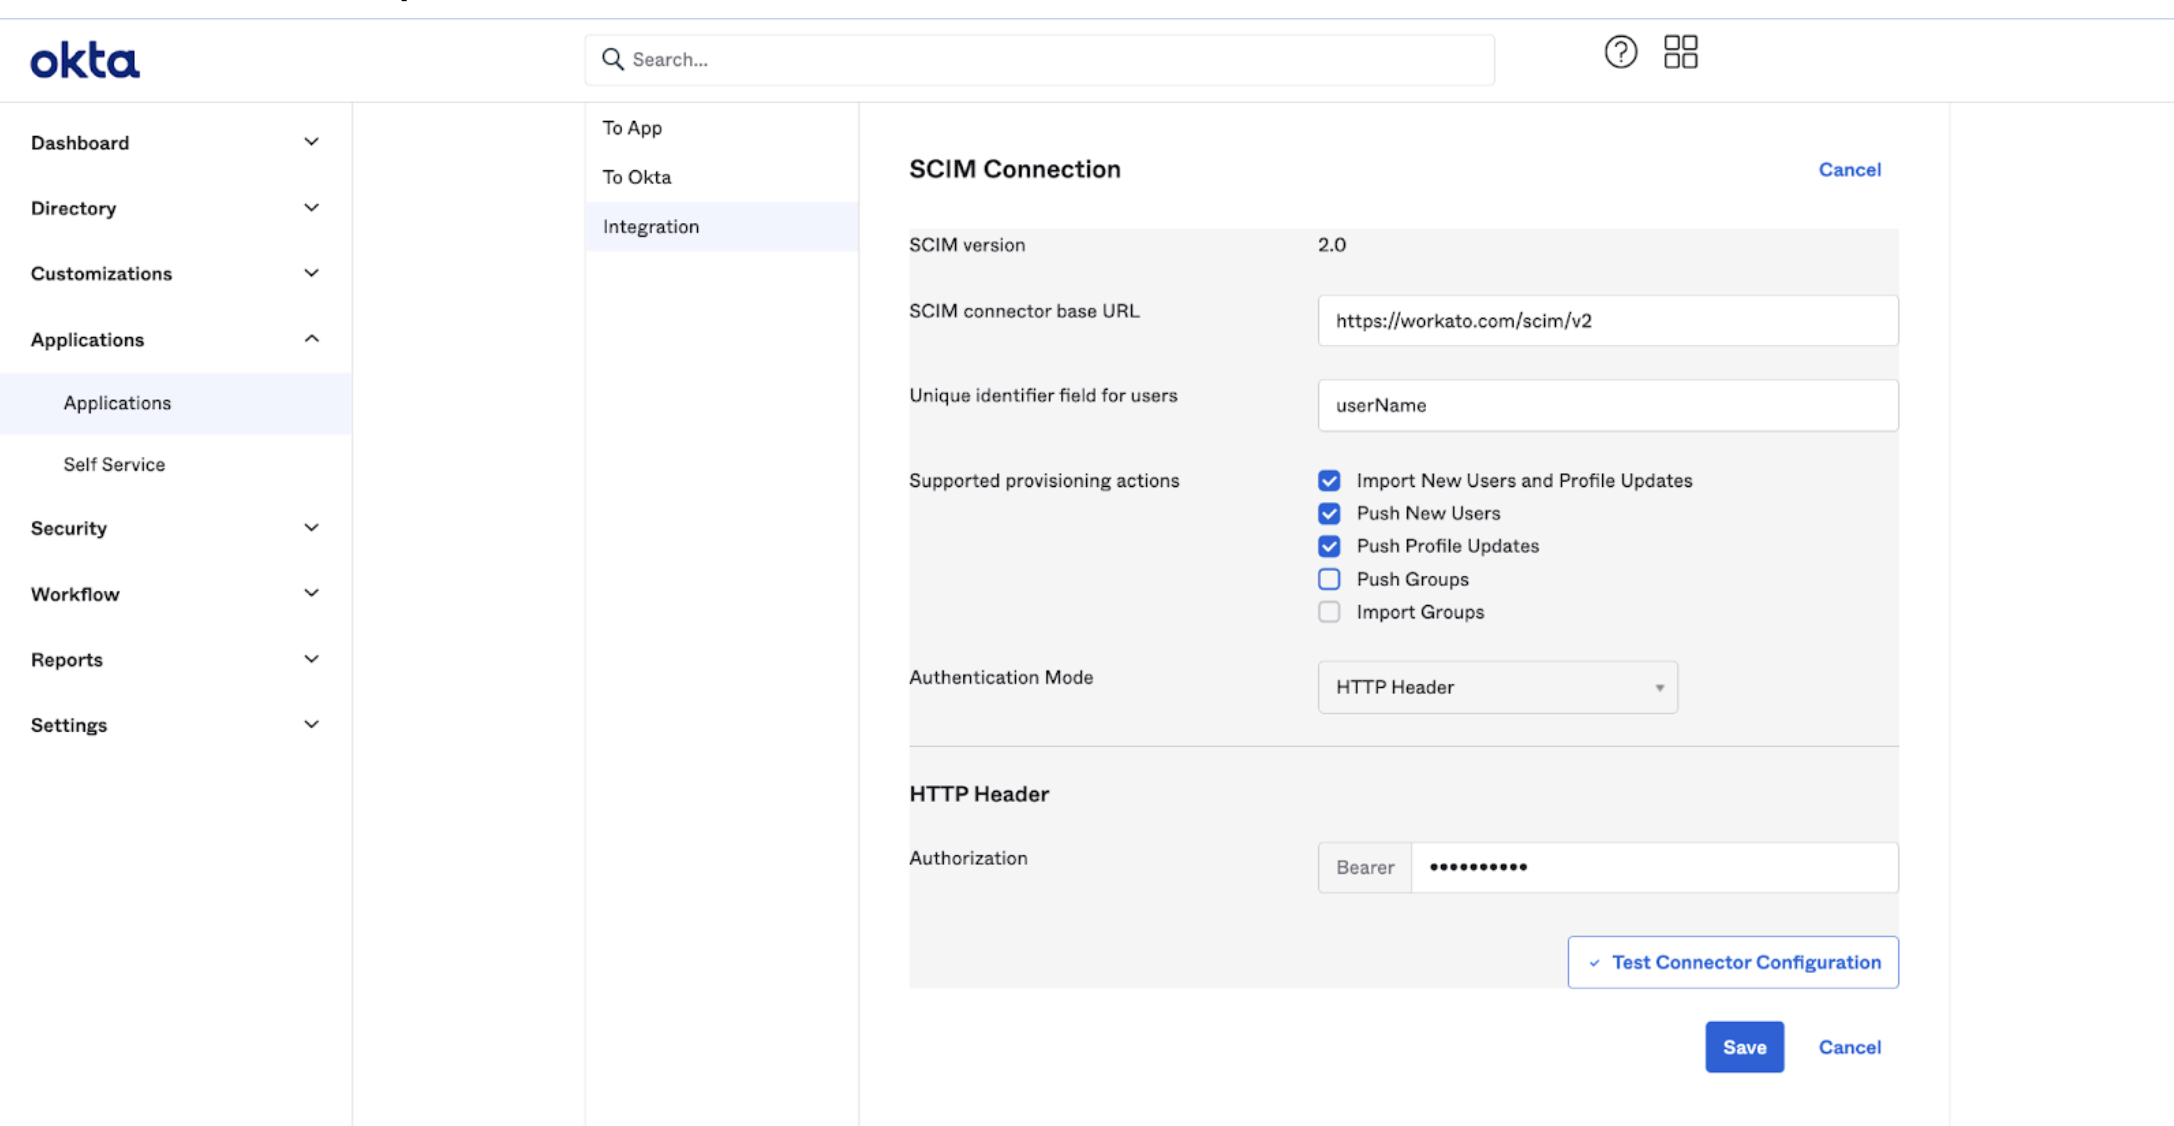 SCIM setup details
Click Test Connector Configuration to determine if your setup is correct.
When the test runs successfully, Okta displays the status of the connection and the supported SCIM provisioning actions.
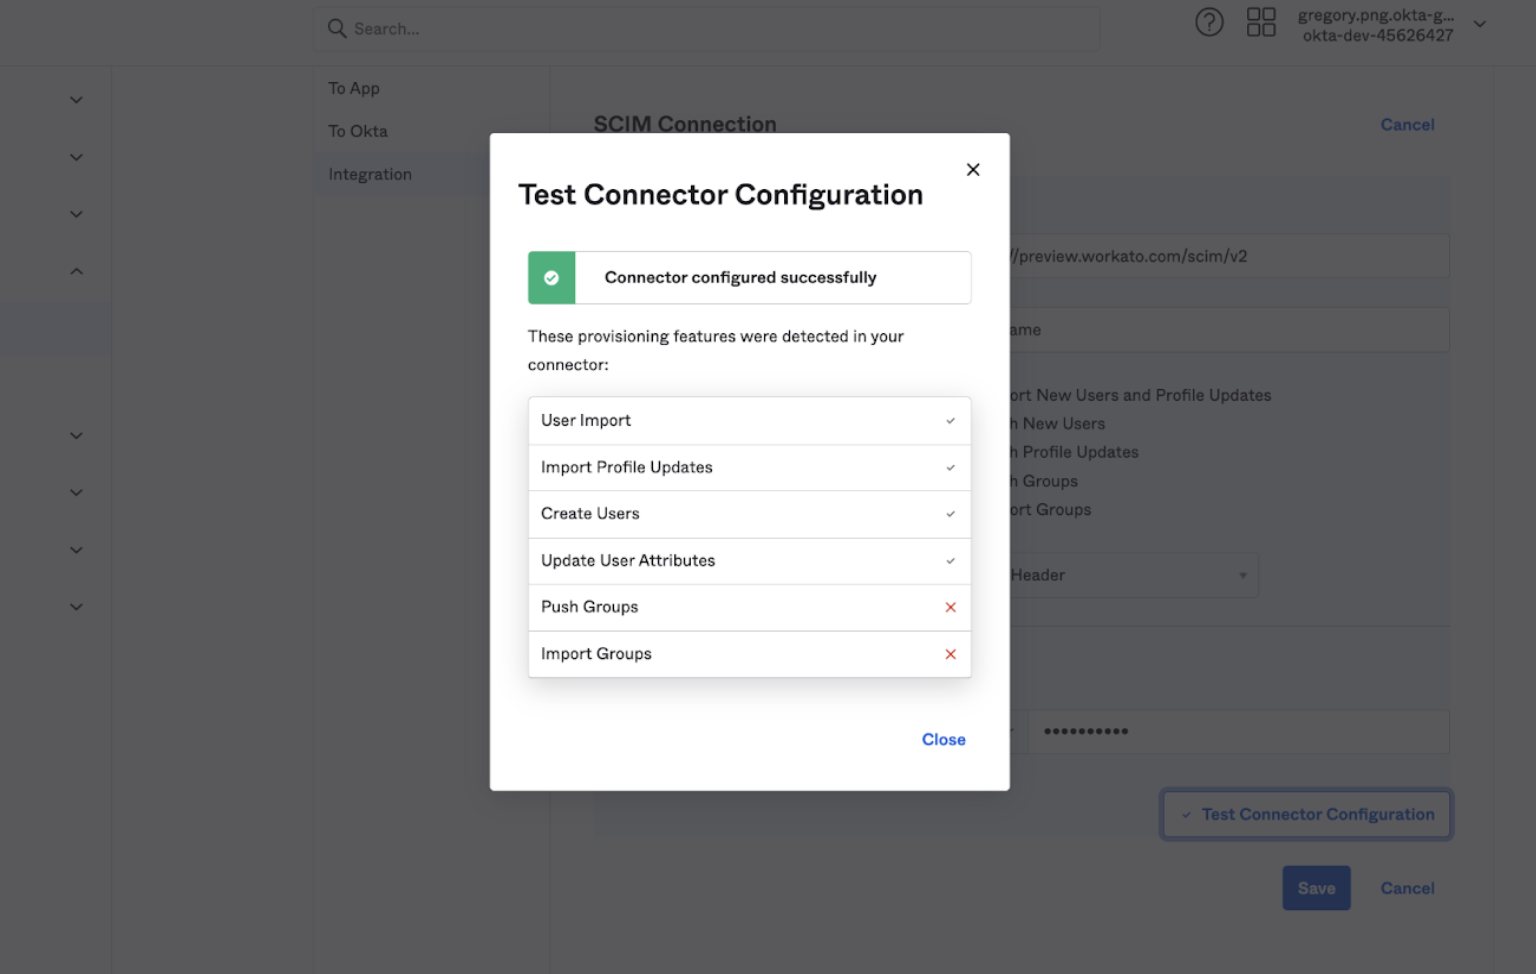 Successful SCIM setup in Okta
Configure SCIM attribute mappings
You can configure attribute mappings after you successfully configure and test the SCIM connection.
Complete the following steps to set up attribute mappings:
Go to Provisioning > To App > Attribute Mappings. 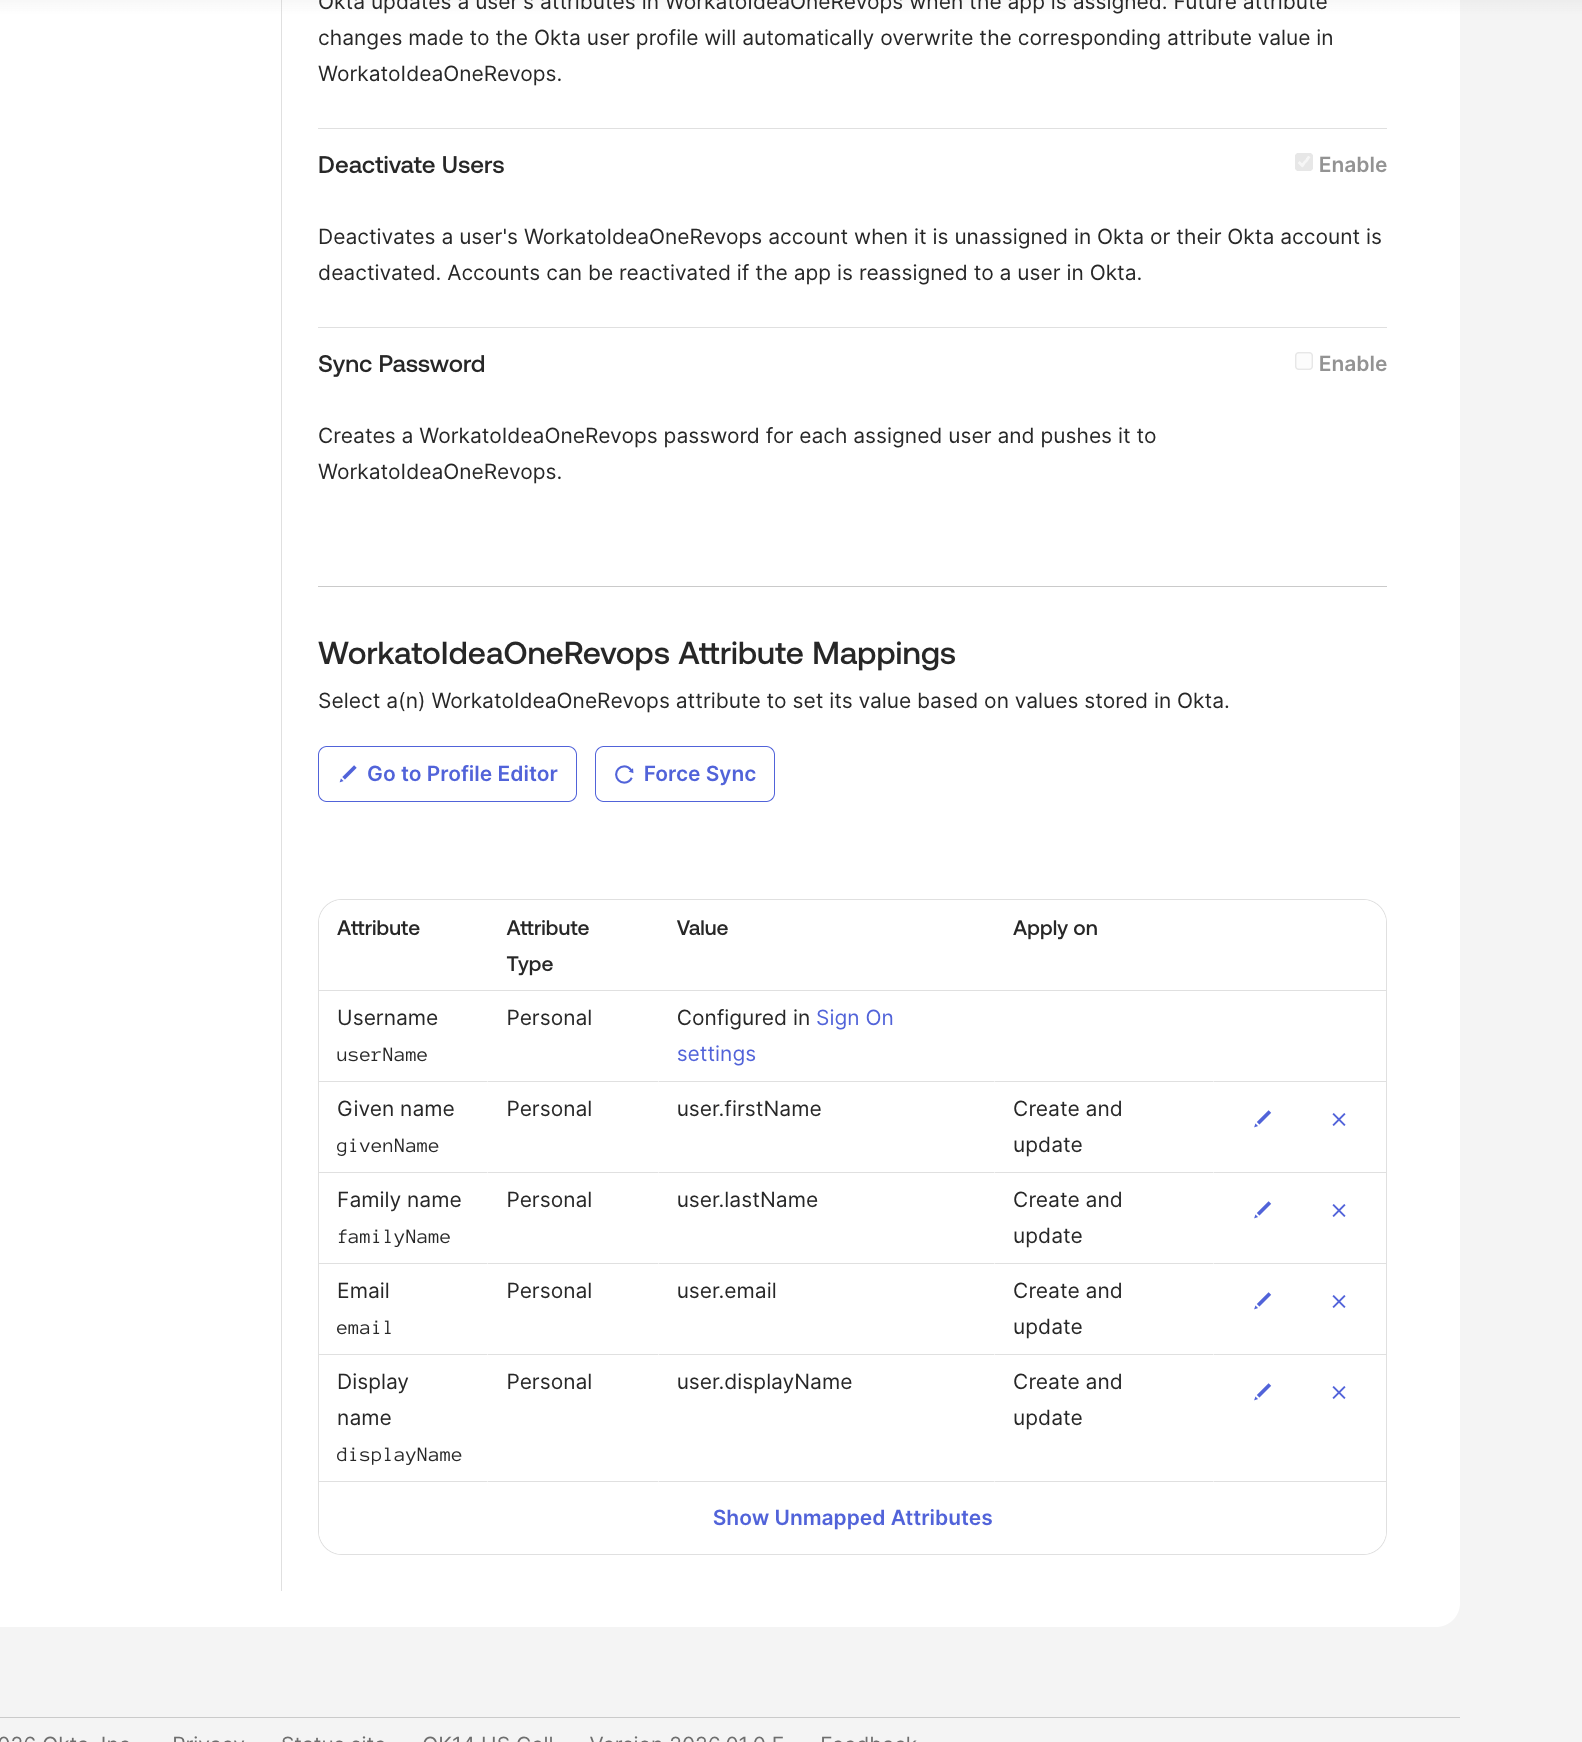 SCIM provisioning setup in Okta
Use the following configuration:
| Workato attribute | Okta value | Applies on |
|---|---|---|
userName | Configured in Sign On settings | N/A |
givenName | user.firstName | Create and update |
familyName | user.lastName | Create and update |
email | user.email | Create and update |
displayName | user.displayName | Create and update |
You don't need to create custom SCIM attributes for this step. These mappings define how Okta passes user profile values to Workato during provisioning.
ENVIRONMENT ROLES AND GROUP MANAGEMENT
We recommend mapping environment role attributes (workato_role, workato_role_test, workato_role_prod) through SCIM and managing collaborator groups (workato_user_groups) through SAML.
This allows you to provision and deprovision users with SCIM while dynamically assigning them to groups during SAML authentication.
Configure Workato role attributes for SCIM
Workato's hybrid integration with Okta uses SCIM for user lifecycle management and SAML for role and group assignments. However, some organizations choose to provision environment roles (such as workato_role, workato_role_test, and workato_role_prod) through SCIM. This configuration remains supported but requires the correct External Namespace setting.
Use this configuration if your organization provisions environment roles through SCIM instead of SAML. If you rely on SAML for role assignment, you can skip this section.
Go to your Workato application > Provisioning > To App tab in the Okta Admin Console.
Enable the following SCIM actions so that Okta can create and update user attributes in Workato:
- Create Users
- Update User Attributes
- Deactivate Users
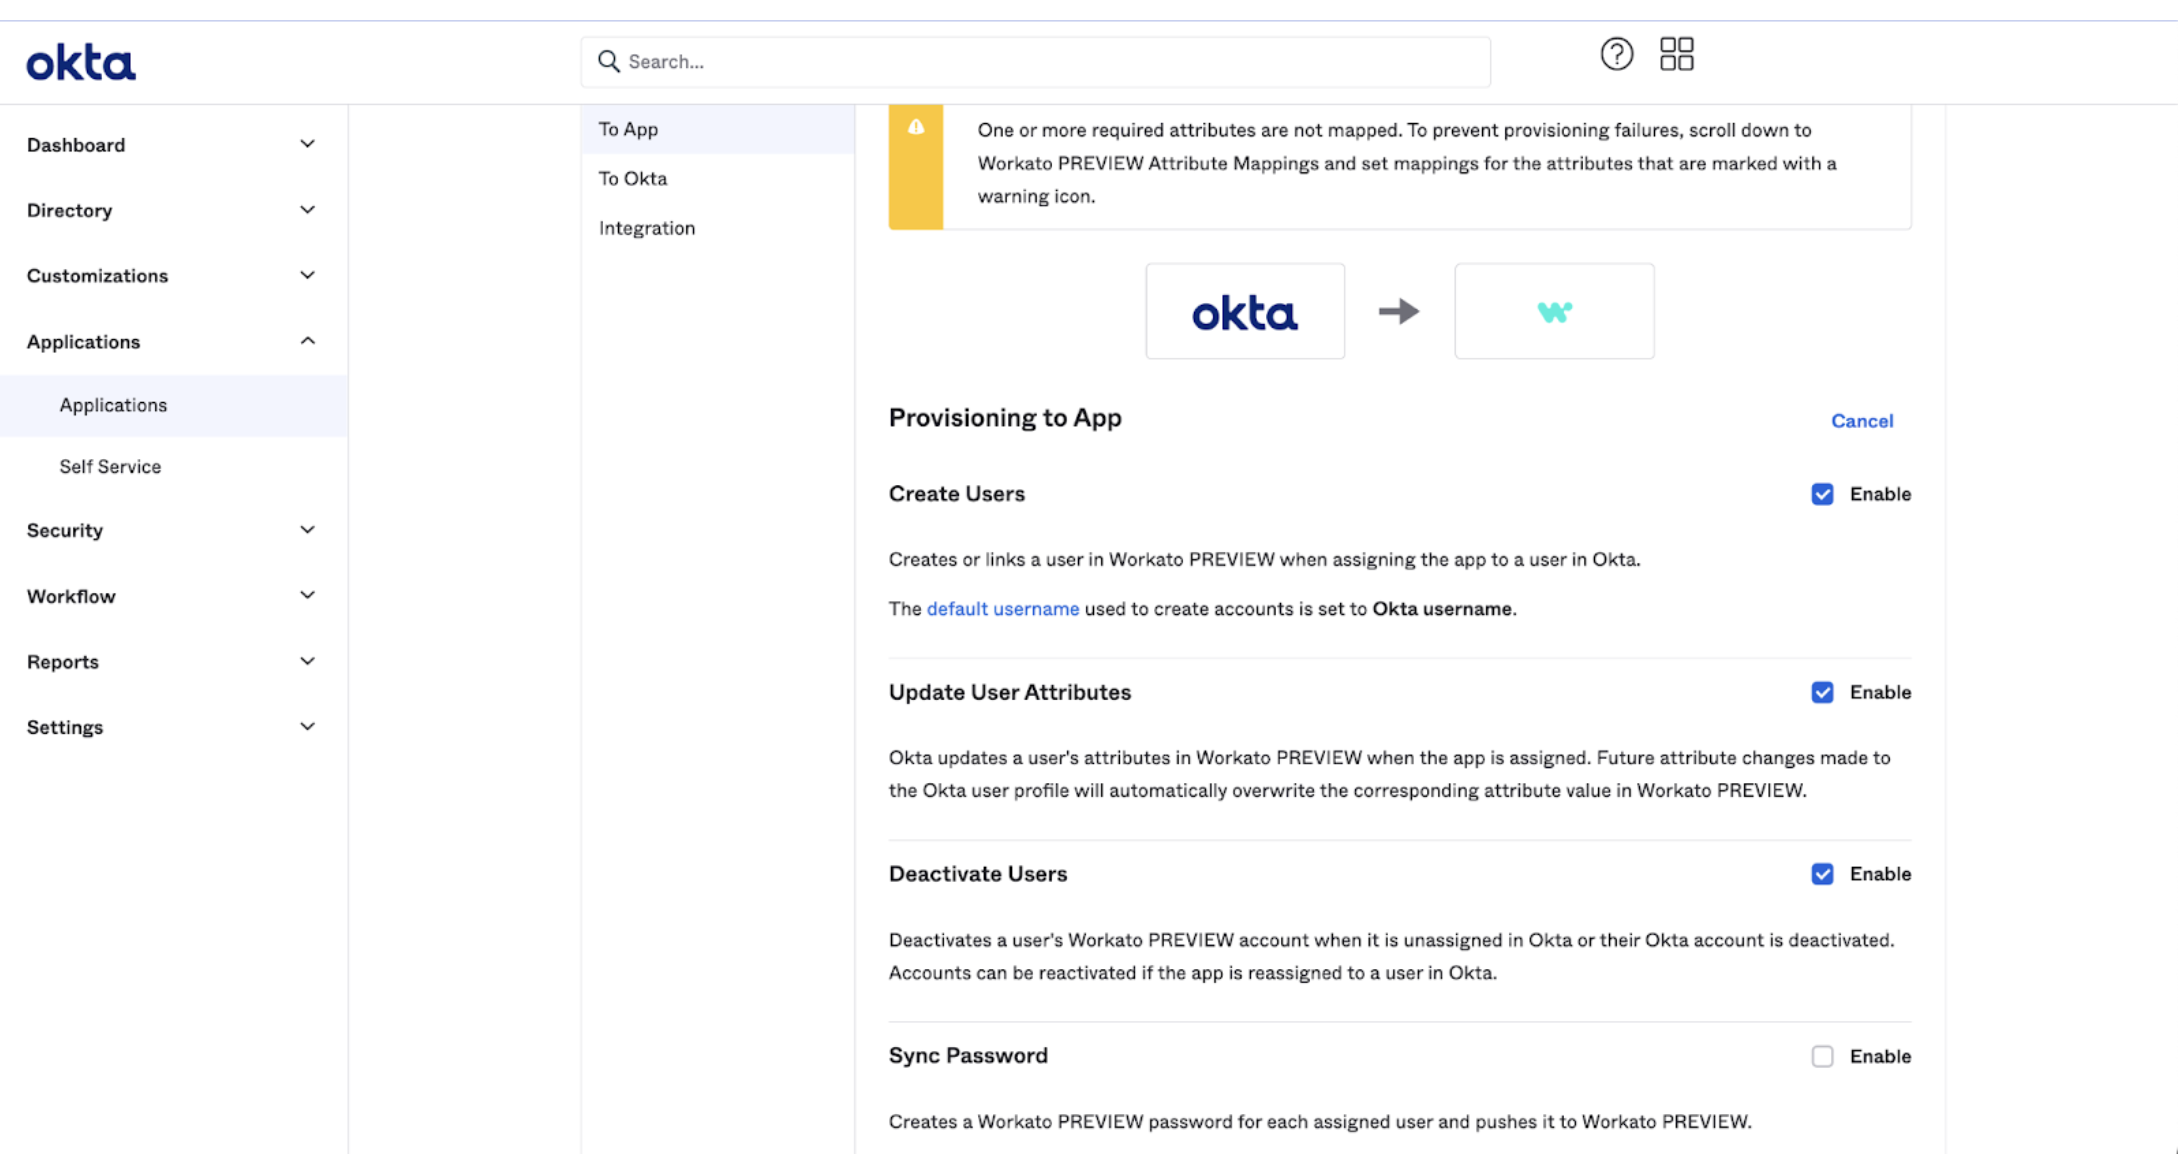 To App actions
Go to Directory > Profile Editor > Workato App User Profile > + Add Attribute.
If your organization already has existing workato_role, workato_role_test, or workato_role_prod attributes from a previous configuration, edit them instead of creating new ones. Ensure that each includes the required External Namespace setting so Okta can continue to update these attributes through SCIM.
Set the following values for each environment role attribute you plan to provision through SCIM:
| Field | Value |
|---|---|
| Data type | String |
| Display name | workato_role (or environment-specific equivalent, for example workato_role_test, workato_role_prod) |
| Variable name | Same as the display name |
| External name | Same as the display name |
| External namespace | urn:ietf:params:scim:schemas:workato:1.0:WorkatoRole |
This ensures that Okta correctly passes these environment role attributes through SCIM.
Select the Define enumerated list of values checkbox and add your environment role values under Attribute members:
| Display name | Value |
|---|---|
| Environment admin | Environment admin |
| Environment manager | Environment manager |
| Member | Member |
| NoAccess | NoAccess |
Values are case sensitive.
Click Save. Your configuration should resemble the following example:
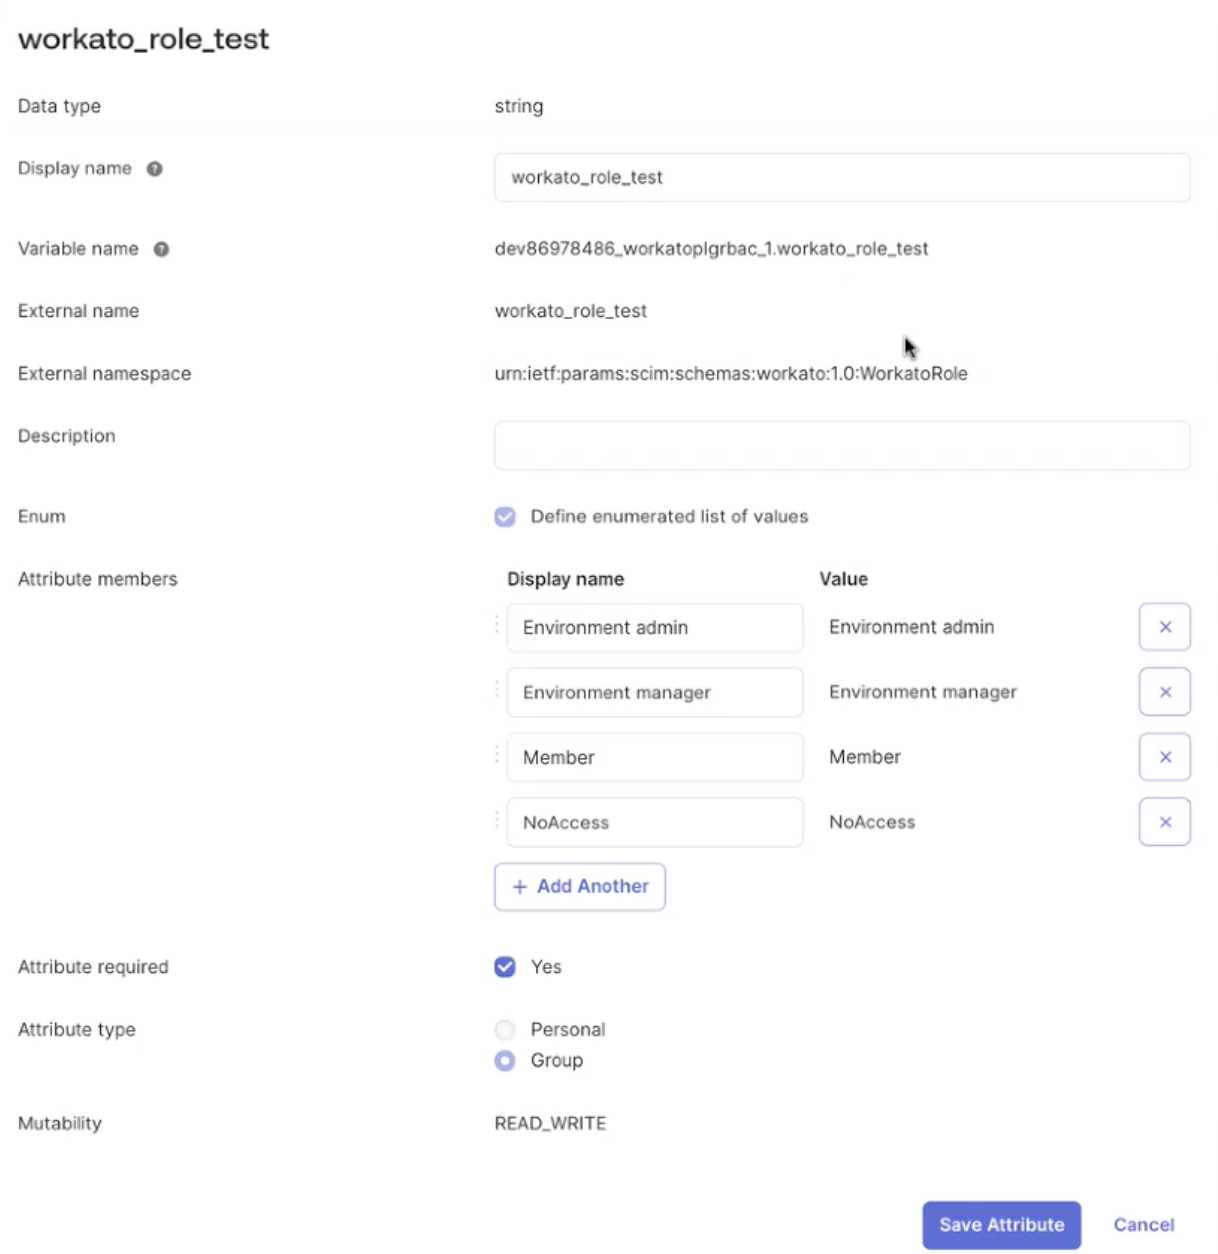 Complete configuration
Provision users
If you already assigned users to your Workato application for SAML SSO, you can trigger a provisioning job to sync your existing users between Okta and Workato. This ensures that you don't unintentionally create duplicate accounts on your Workato workspace.
Users provisioned through SCIM exist in Workato immediately, but they don’t receive roles or collaborator group memberships until they log in through SAML.
In the Assignments interface, Okta denotes the users that existed before you configured SCIM with a red exclamation mark icon.
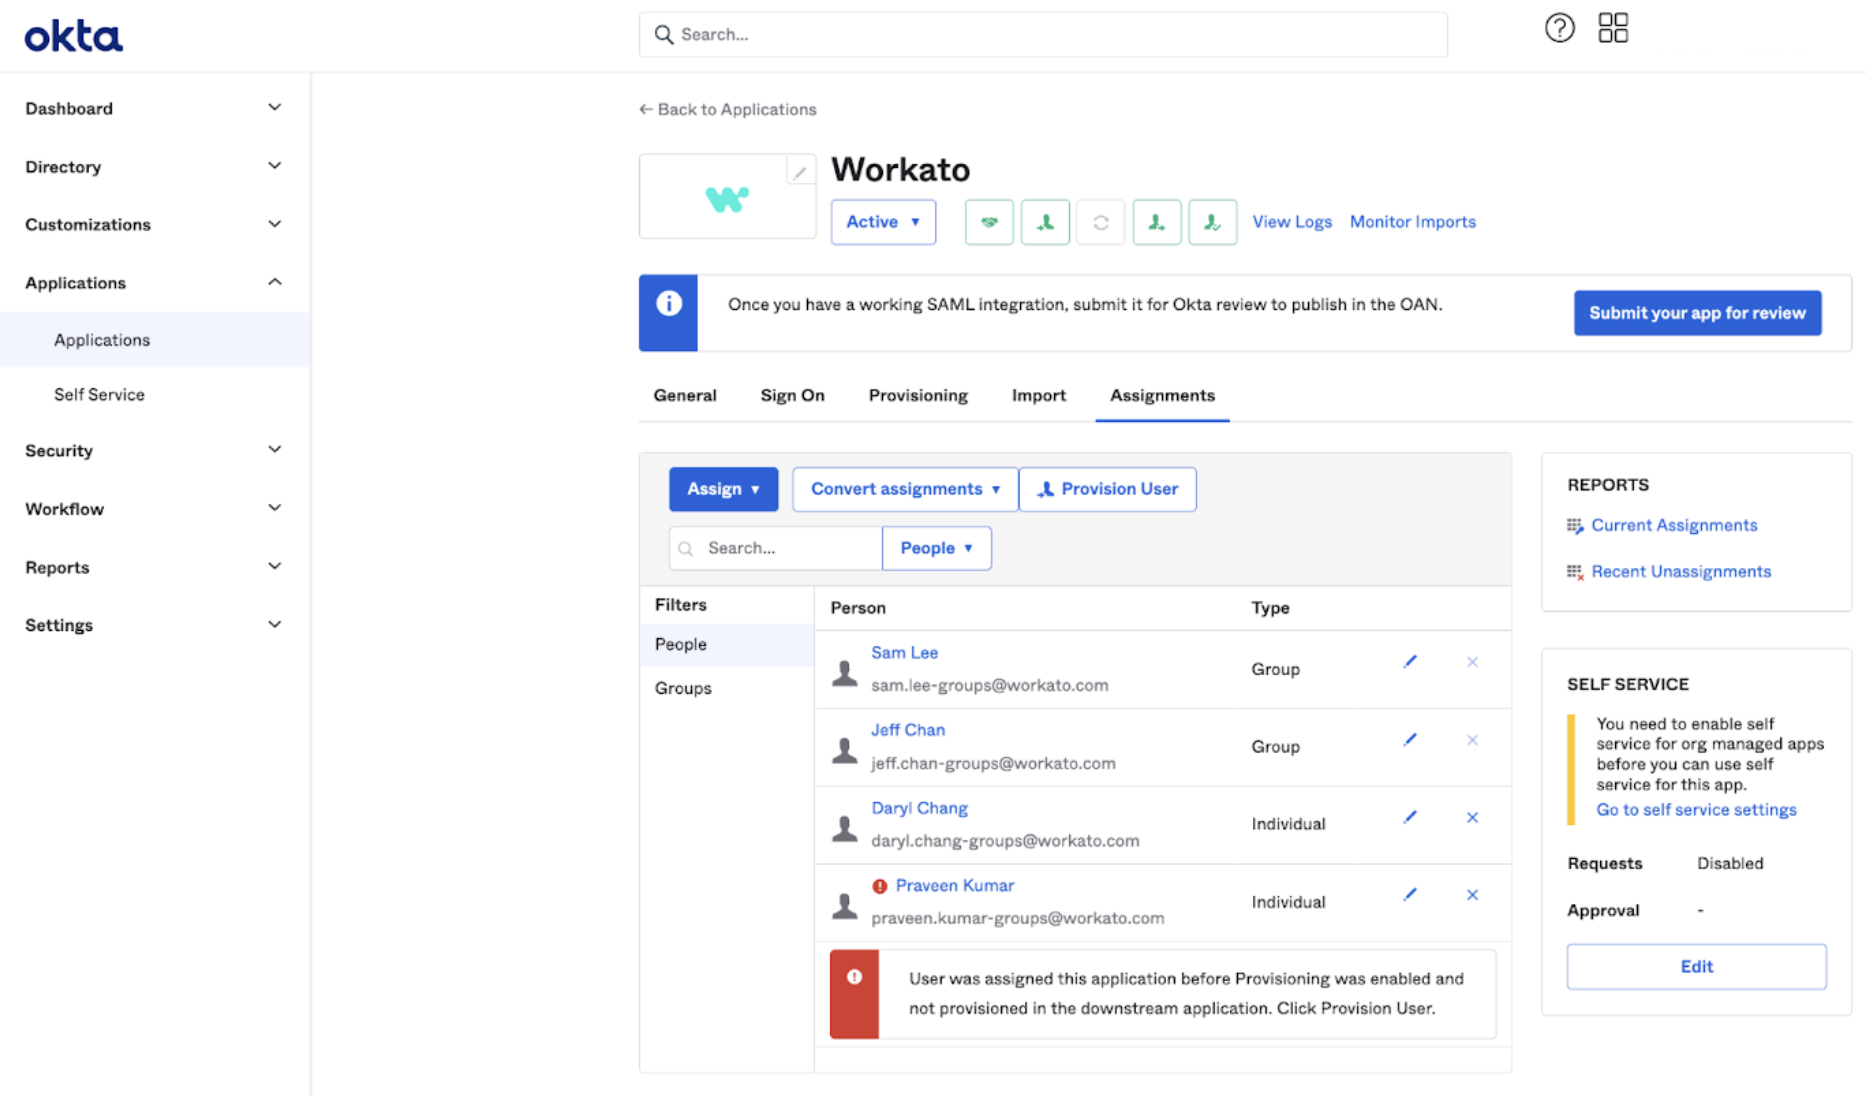 Existing users are not provisioned by SCIM
Click Provision User to sync users. Okta displays a notification that it will provision the user to Workato.
Click OK.
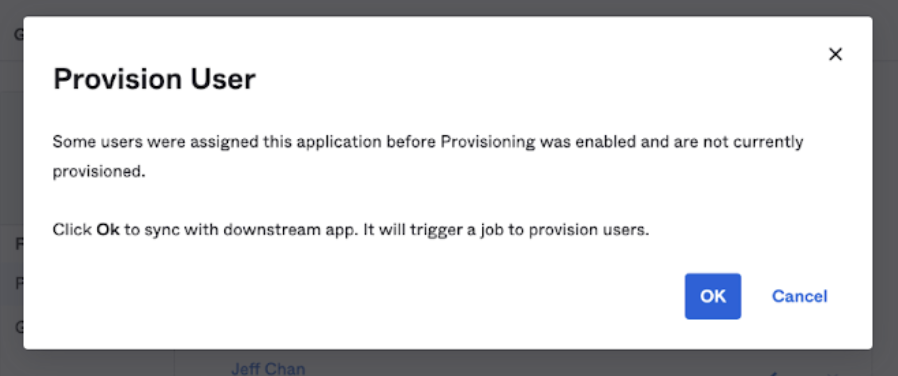 Confirm provisioning
Go to Groups > Application > Assign Workato.
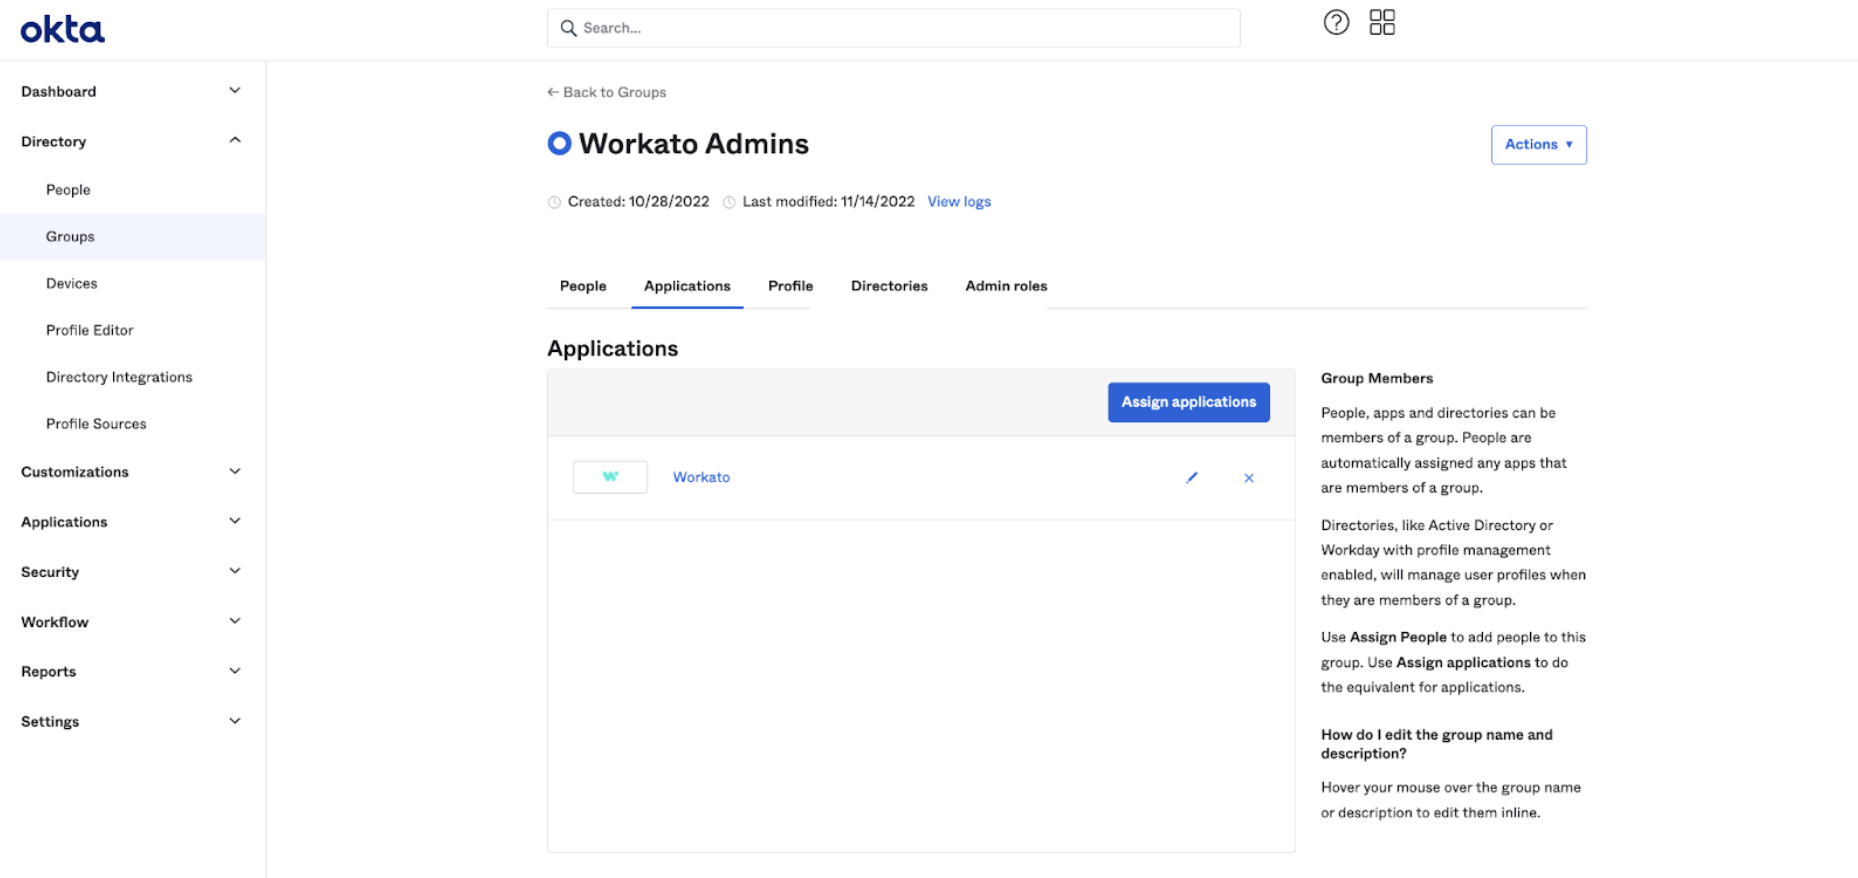 Configure groups
Assign the Workato application to individuals or groups in Okta for new users. SCIM provisions the account in Workato, while environment roles and collaborator group memberships are evaluated dynamically through SAML at login.
Workato sends an email invitation to provisioned users. Instruct them to click the link in the email to verify their email address.
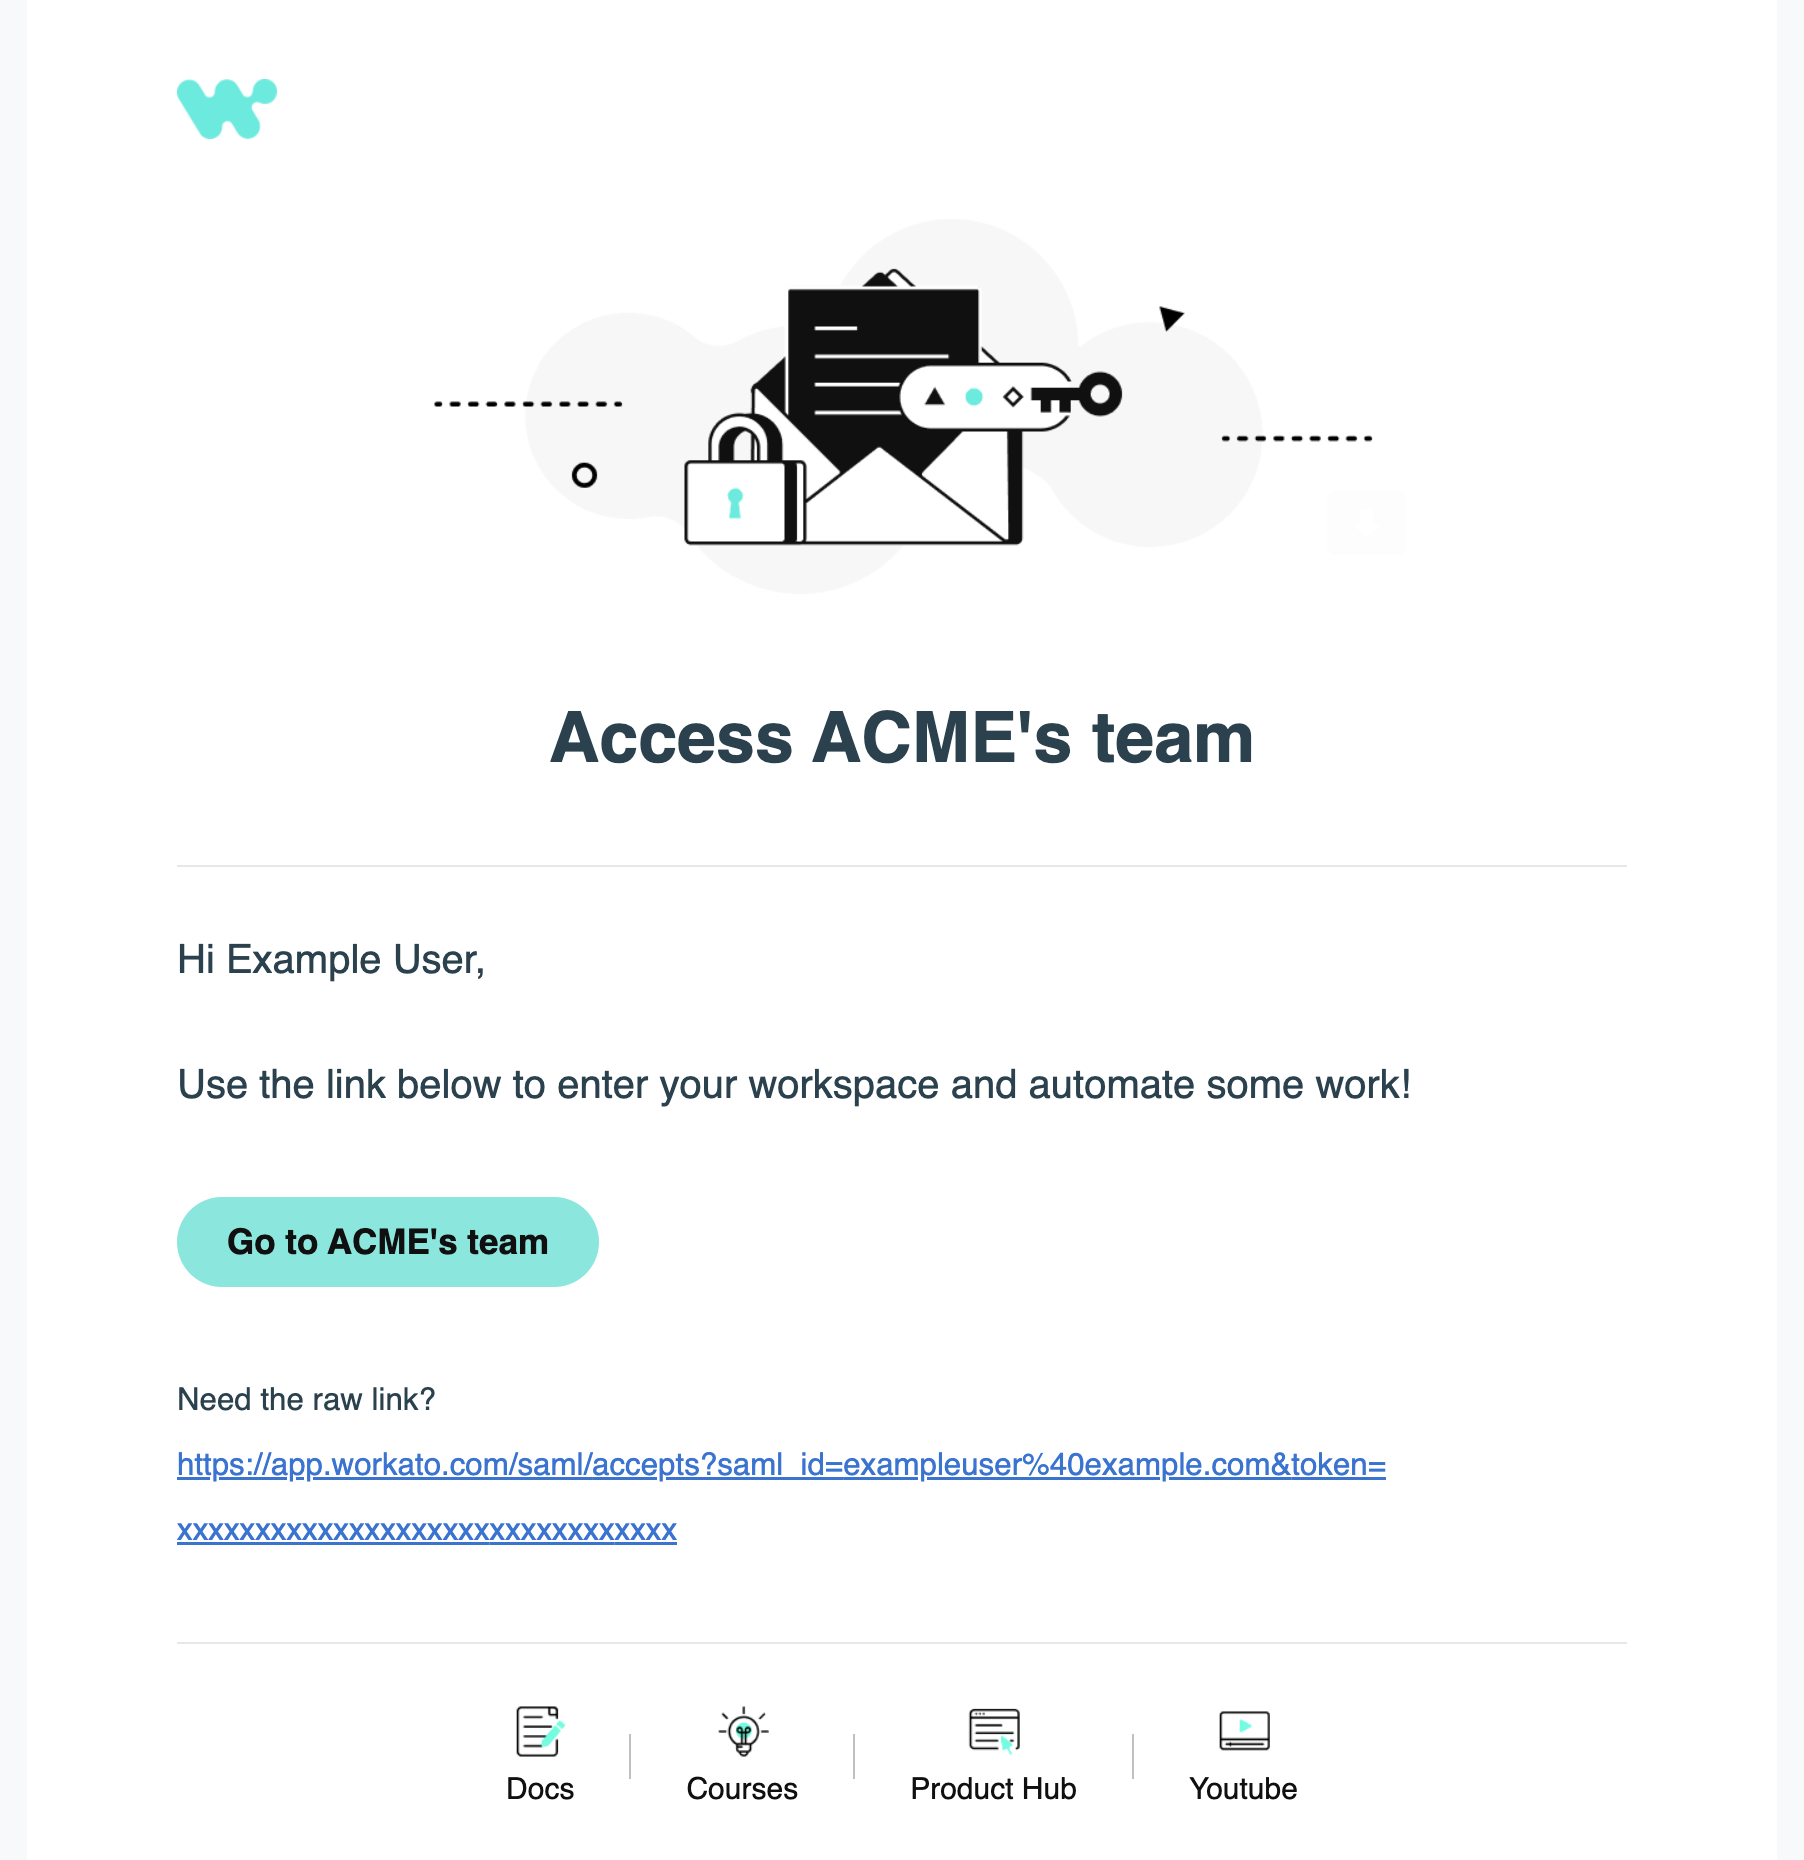 Email invitation to join a workspace
After verification, users can sign in with the environment roles and collaborator groups assigned through SAML.
TROUBLESHOOTING
If clicking on the invitation email redirects you to the Workato login page instead of your organization’s workspace, it is likely that you already have a Workato account associated with the same email. If you have forgotten your login credentials, reset your password.
You can check the Workato activity audit log to confirm the addition of the user:
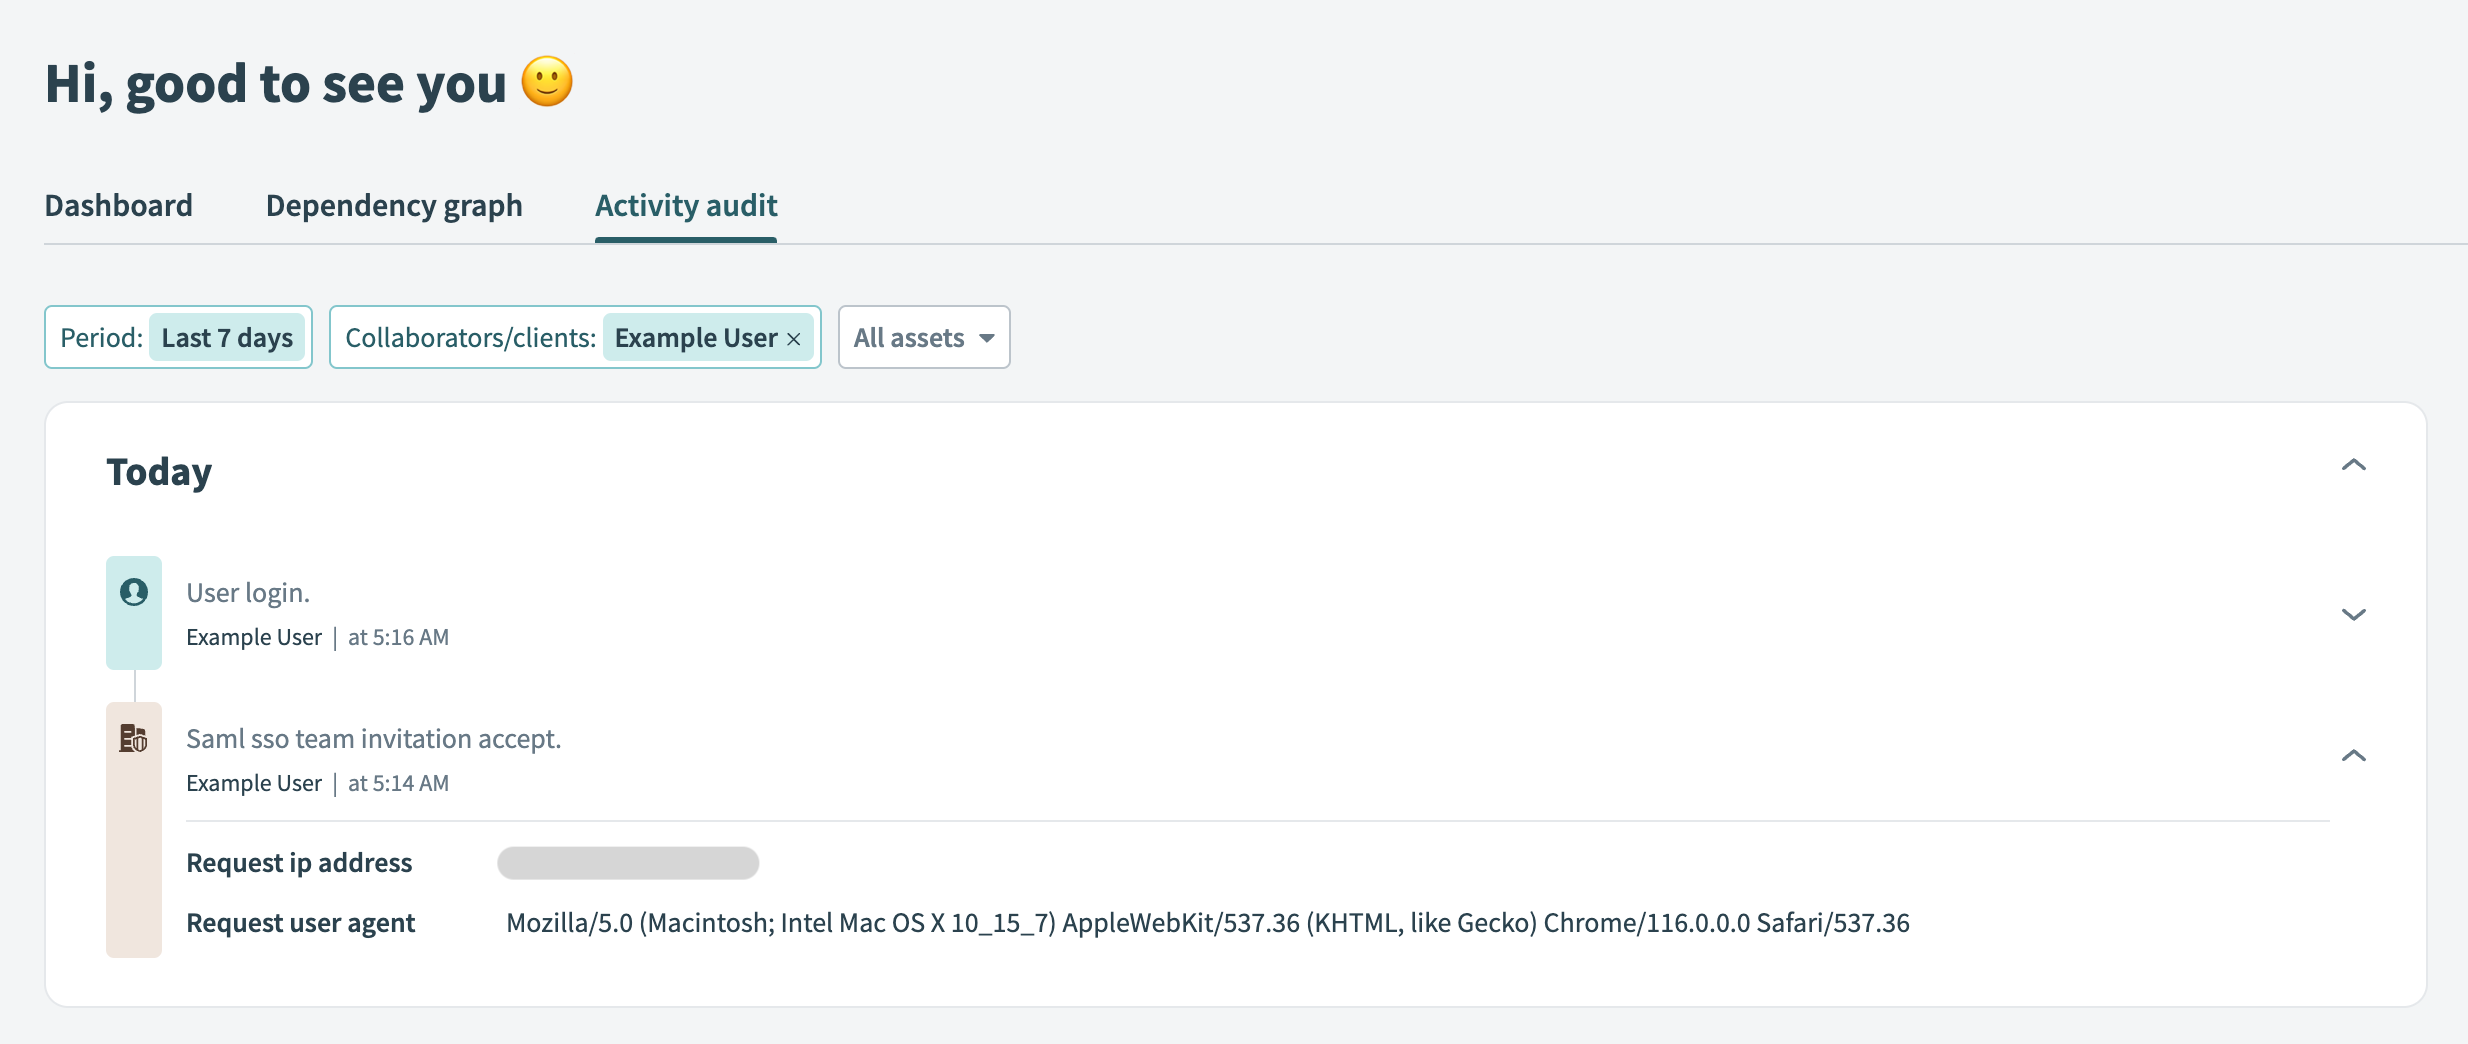 Activity audit log showing that a user has accepted an invitation
Convert user assignments to group assignments
If you previously assigned users directly to the Workato application, you can convert them to group-based assignments. Group assignments ensure environment roles and collaborator groups are evaluated dynamically through SAML at login.
Go to Applications > Workato > Assignments and go to the Workato application.
Select Convert Assignments.
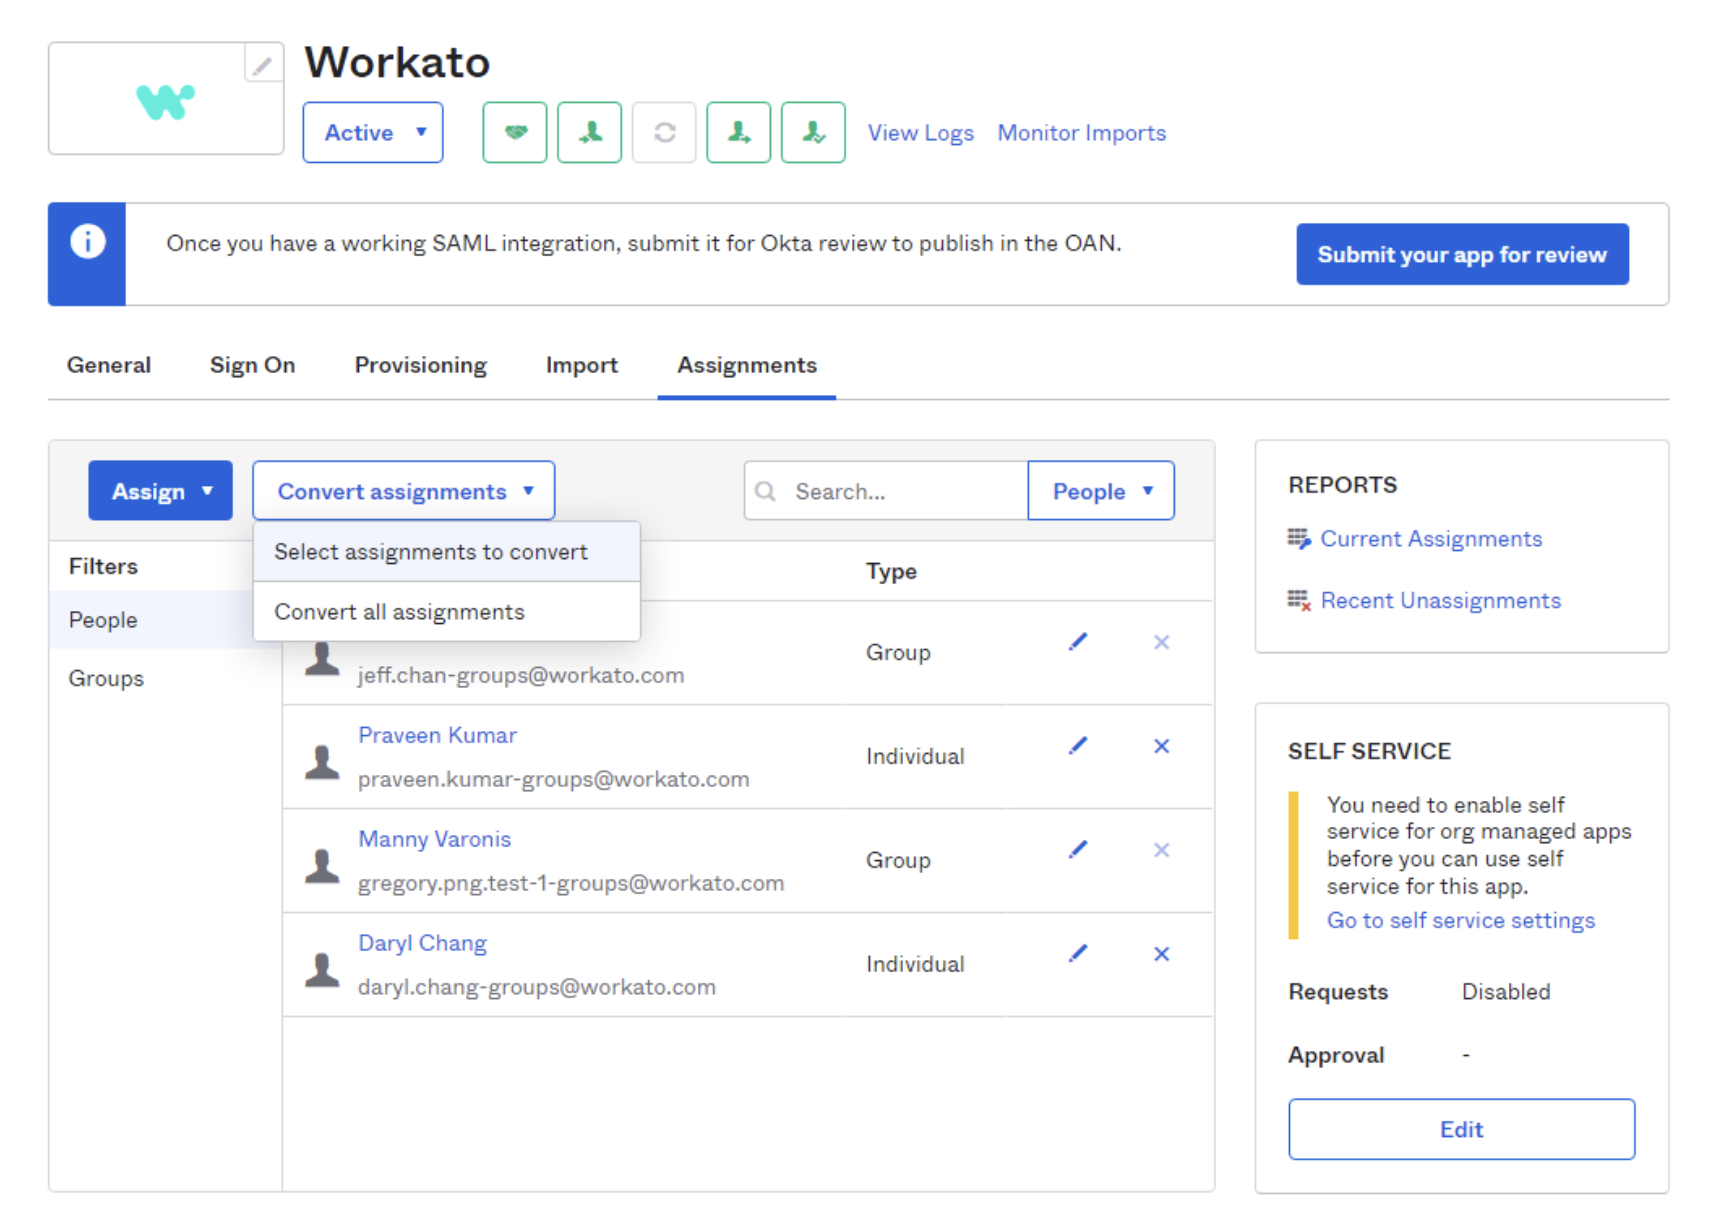 Convert assignments from user to group
Select the individual user that you plan to convert from user to group management in the Select assignments to convert interface.
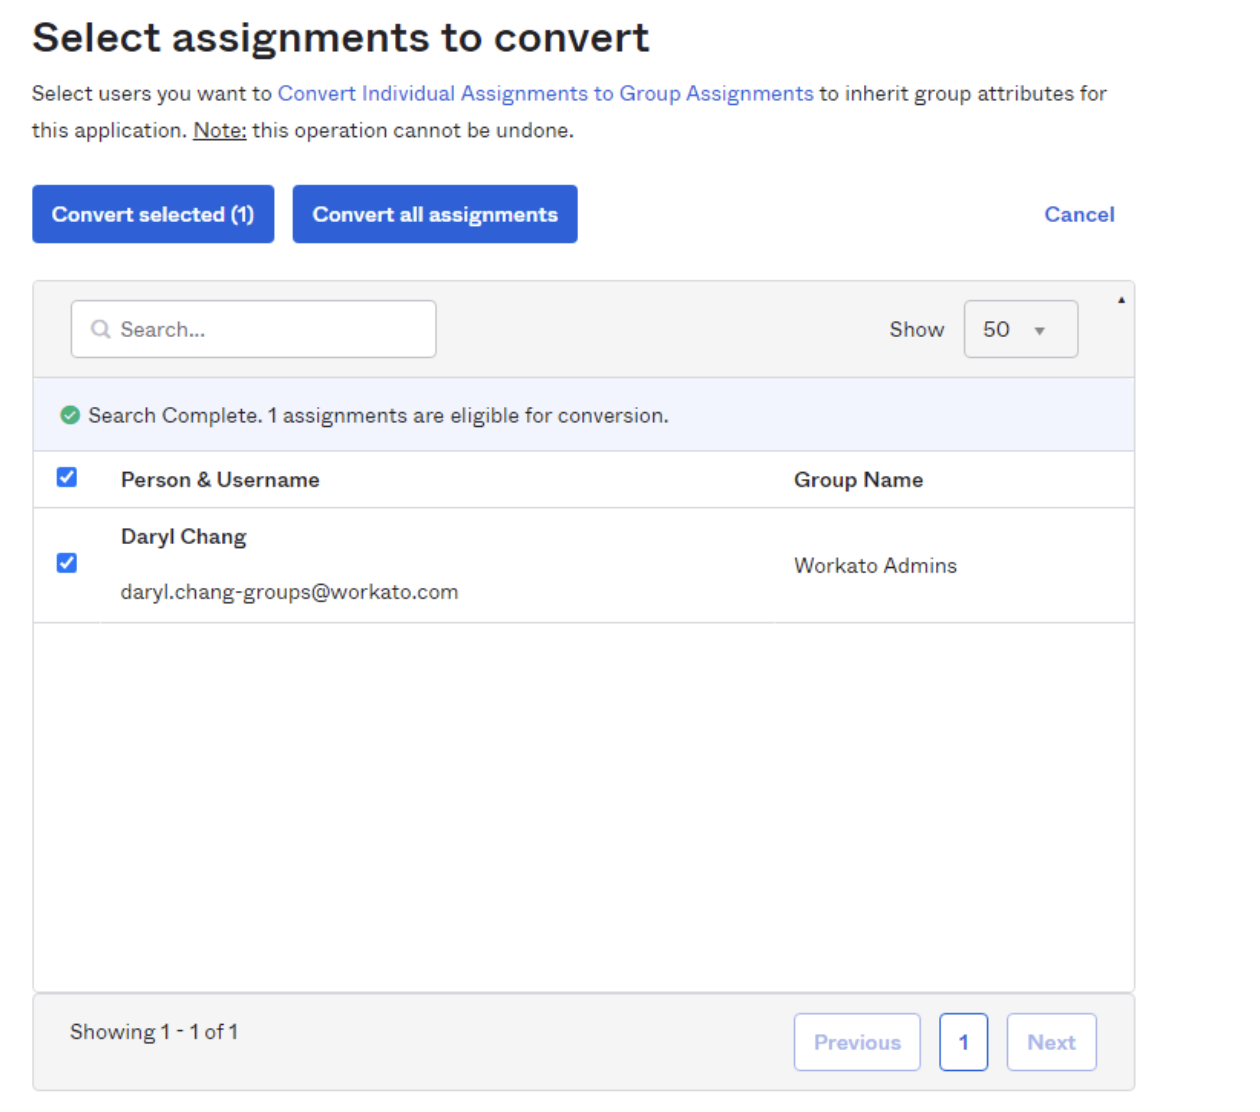 Select the user to convert to group management
Click Convert selected.
Okta displays a successful conversion message when the conversion completes. The user is now managed through group assignment. Environment roles and collaborator group memberships apply dynamically through SAML at login.
Update users
SCIM provisions lifecycle changes such as user profile updates, status changes, or deactivation. Environment roles and collaborator group memberships are managed through SAML and take effect the next time the user signs in.
Update user attributes such as email, display name, or status, and click Save. This action triggers a user update call to Workato through SCIM and immediately updates the user in Workato.
Click Save. This action triggers a user update call to Workato through SCIM.
To verify new members on Workato after provisioning them through SCIM, you can check the collaborators team list.
You can also examine the activity-audit logs dashboard.
We denote changes made through SCIM as scim_auto_sync.
Deprovision users
You can deprovision users directly in the Okta admin dashboard.
In Okta, a deprovisioning event can be any of the following actions:
- User suspension
- User deactivation
- App access removed
In Workato, a user is deprovisioned from your Workato workspace in any of the following scenarios:
- User is suspended in Okta
- User is deactivated in Okta
- Workato app is removed from the user
In all these situations, the user cannot access the Workato workspace. The user’s recipes and connections remain available to the rest of the team.
The user may be re-provisioned from Okta at a later time, and would retain their earlier privileges.
Disable SCIM
To disable SCIM, follow these steps in Okta. Alternatively, you can disable SCIM in Workato.:
In Okta, find the Workato application.
Navigate to General.
Disable SCIM by unselecting the Enable SCIM provisioning option, and then Confirm your action.
This action breaks your SCIM connection. User data cannot be synced between Okta and Workato.
Last updated: