Shopify Orders and Fulfillment MCP server
The Shopify Orders and Fulfillment MCP server enables LLMs to interact with Shopify stores for order management and fulfillment operations through natural conversation. It provides tools to retrieve order information, search orders, manage fulfillment status, and handle order cancellations without requiring direct interaction with the Shopify Admin interface.
Uses
Use the Shopify Orders and Fulfillment MCP server when you plan to perform the following actions:
- Look up complete order details by order number, ID, or customer email
- Search for orders by customer email, status, or date range
- View unfulfilled orders in the fulfillment queue
- Mark orders as fulfilled with tracking information
- Cancel orders with optional refund and restock
- Add internal staff notes to orders for documentation
Example prompts
Use the following example prompts to invoke Shopify Orders and Fulfillment MCP server tools:
Get the details for order #1234.Find all orders from [email protected].Show me orders that are paid but not yet shipped.What orders need to ship today?Mark order #5678 as fulfilled with tracking number 1Z999AA10123456789.Cancel order #9012 and refund the customer.Add a note to order #3456 about the customer's request.
Shopify Orders and Fulfillment MCP server tools
The Shopify Orders and Fulfillment MCP server provides the following tools:
| Tool | Description |
|---|---|
| get_order | Retrieves complete details for a single order given an order identifier. |
| search_orders | Searches orders matching specified filter criteria. |
| list_unfulfilled_orders | Retrieves orders with unfulfilled or partially fulfilled status. |
| fulfill_order | Creates a fulfillment record for an order, marking items as shipped. |
| cancel_order | Cancels an order that has not been fulfilled. |
| update_order_note | Adds or updates the internal staff note on an order. |
Install the Shopify Orders and Fulfillment MCP server
Complete the following steps to install a prebuilt MCP server to your project:
Sign in to your Workato account.
Go to AI Hub > MCP servers.
Click + Create MCP server.
Go to the Start with pre-built MCP Servers using your connected apps section and select the prebuilt MCP server you plan to use.
Click Use this server.
Provide a name for your MCP server in the Server name field.
Use the Location drop-down menu to select the project for the MCP server.
Go to the Connections section and connect to your app account.
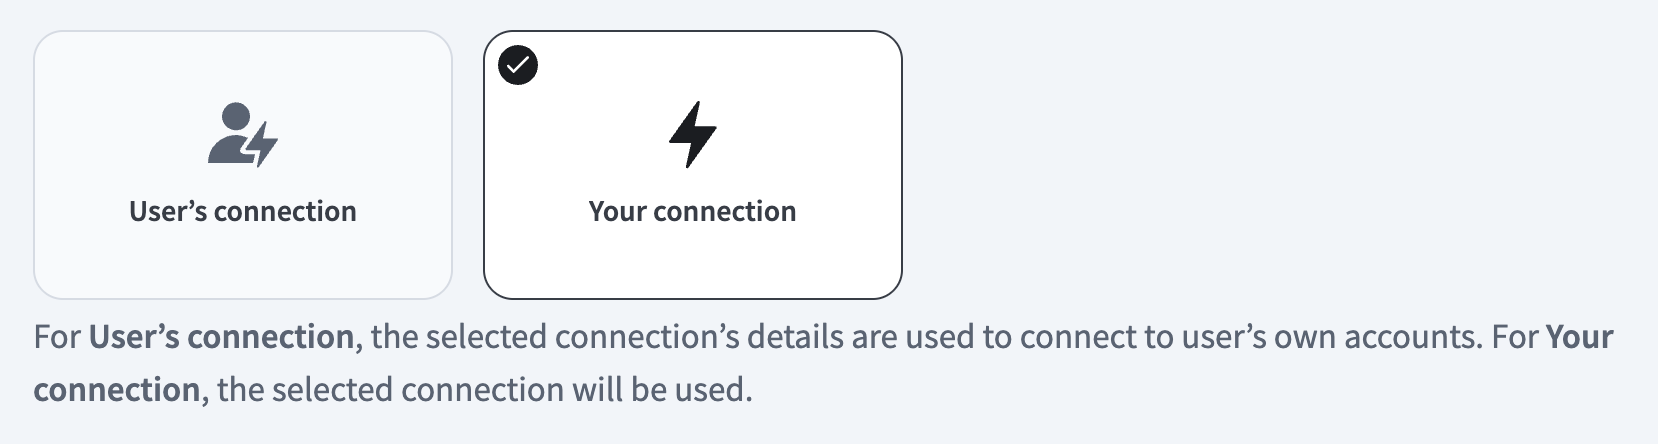
Select the connection type you plan to use for the MCP server template.
- User's connection: MCP server tools perform actions based on the identity and permissions of the user who connects to the application. Users authenticate with their own credentials to execute the skill.
- Your connection: This option uses the connection established by the recipe builder and follows the same principles as normal app connections.
 Select your connection type
VERIFIED USER ACCESS AUTHENTICATION REQUIREMENTS
Only app connections that use OAuth 2.0 authorization code grant are available for user's connection. Refer to Verified user access for more information.
Complete the app-specific connection setup steps in the following section.
Shopify connection setup
View Shopify connection setup steps
You must have a Shopify Partner account to connect to Shopify in Workato. Refer to the Shopify Create an account documentation for more information.
Shopify supports the following authentication types:
OAuth 2.0 authentication
View OAuth 2.0 authentication setup steps
You must create an OAuth profile to use OAuth 2.0 authentication. Refer to Create an OAuth profile for more information.
Minimum and default scopes
View minimum and default scopes
Workato requests the following scopes by default when setting up a connection to Shopify:
read_customerswrite_customersread_inventorywrite_inventoryread_productswrite_productsread_orderswrite_ordersread_draft_orderswrite_draft_orders
You can grant Workato access to the following scopes in addition to the default scopes:
write_reportsread_reportswrite_payment_termsread_payment_termsread_product_listingsread_assigned_fulfillment_orderswrite_assigned_fulfillment_ordersread_merchant_managed_fulfillment_orderswrite_merchant_managed_fulfillment_ordersread_third_party_fulfillment_orderswrite_third_party_fulfillment_ordersread_all_orders
The minimum scope required to establish a connection is read_products.
Create an OAuth profile
View create an OAuth profile steps
Workato requires a custom OAuth profile to connect to Shopify using OAuth 2.0. Complete the following steps to create a custom OAuth 2.0 profile:
Sign in to the Shopify Dev Dashboard with a Partner account.
Click Create app.
Enter a name for your app in the Start from Dev Dashboard section, then click Create.
Enter the following URL in the App URL field:
https://www.workato.comEnter the following URL in the Redirect URLs field:
https://www.workato.com/oauth/callbackGo to Settings.
Copy and save the Client ID and Secret for use in Workato.
Go to Your app name.
Click Install app.
 Click Install app.
Select the store where you plan to install the app, then click Install.
Open Workato and go to Tools > Custom OAuth profiles.
Click + New custom profile.
Search for Shopify and select it as your app.
Enter a Name for the account.
Click Create new app.
Enter the Client ID and Client secret from Shopify.
Click Done.
The custom OAuth profile is successfully configured. Refer to Connect to Shopify with OAuth 2.0 authentication to perform the remaining connection steps or to the Shopify OAuth apps documentation for more information.
Version 2022-10 and later releases require published public custom apps to satisfy Shopify's data protection policy to process customer data. Refer to the Shopify Requirements documentation for more information. You must have approval to access customer protected data if you are connecting through a published public custom app. Refer to the Shopify Request access to protected customer data documentation for more information.
This requirement doesn't apply if you connect through custom apps using access token authentication or unpublished custom apps. Refer to Access token authentication for more information.
Connect to Shopify with OAuth 2.0 authentication
View connect to Shopify with OAuth 2.0 authentication steps
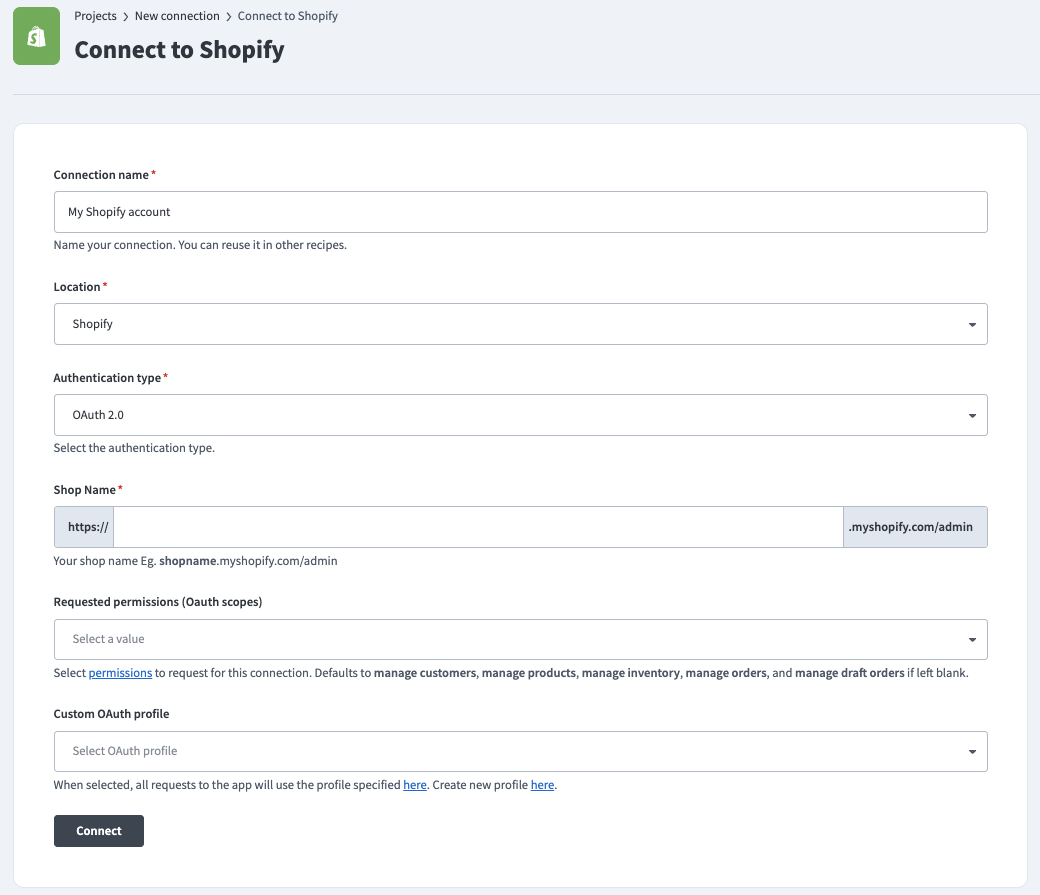
Complete the following steps to set up an OAuth 2.0 connection to Shopify in Workato:
Click Create > Connection or press C twice.
Search for Shopify and select it as your app.
Enter a name for your connection in the Connection name field.
 Shopify Connection
Use the Location drop-down menu to select the project where you plan to store the connection.
Use the Authentication type drop-down menu to select OAuth 2.0.
Enter the Shop Name. You can find this value in the URL for your Shopify account. For example, the shop name is shopname if the URL is shopname.myshopify.com/admin.
Optional. Use the Requested permissions (OAuth scopes) drop-down menu to select the permissions to request for this connection. Refer to the Minimum and default scopes section for more information.
Select the Custom OAuth profile to use for the connection. Refer to Create an OAuth profile for more information.
Click Connect and sign in to Shopify if prompted.
Click Install to complete the connection.
Access token authentication
View access token authentication setup steps
You must complete the following configurations to use access token authentication:
Create a Shopify integration app
View Create a Shopify integration app steps
Complete the following steps to create a custom Shopify integration app:
Sign in to the Shopify Admin page with a Partner account.
Go to Settings > Apps.
Click Develop apps.
Click Build apps in Dev Dashboard.
Click Create app.
Enter an App name and click Create app.
Enter the following URL in the App URL field:
https://www.workato.comClick Select scopes and select the scopes to provide Workato.
Access token authentication requires at least the read_products permission to successfully connect Workato to Shopify.
The recommended set of scopes are:
read_customerswrite_customersread_inventorywrite_inventoryread_productswrite_productsread_orderswrite_ordersread_draft_orderswrite_draft_orders
Click Done.
Enter the following URL in the Redirect URLs field:
https://www.workato.com/oauth/callbackClick Release.
Optional. Enter a Version name and Version message.
Click Release.
Go to Settings.
Copy and save the Client ID and Secret for use in Workato.
Go to Your app name.
Click Install app.
Click Install app
Select the store where you plan to install the app, then click Install.
Use the client credentials grant flow to programmatically request an access token. Refer to the Shopify Using the client credentials grant documentation for more information.
The custom app is successfully configured in Shopify. Refer to the Shopify Apps for your Shopify store documentation for more information.
Optional. Refer to Create an OAuth profile to manage permissions and credentials using a custom profile.
Create an OAuth profile
View Create an OAuth profile steps
Optionally, complete the following steps to create a custom OAuth profile that manages permissions and credentials for your connection:
Open Workato and go to Tools > Custom OAuth profiles.
Click + New custom profile.
Search for Shopify and select it as your app.
Enter a Name for the account.
Click Create new app.
Enter the Client ID and Client secret from Shopify.
Click Done.
Connect to Shopify with access token authentication
View Connect to Shopify with access token authentication steps
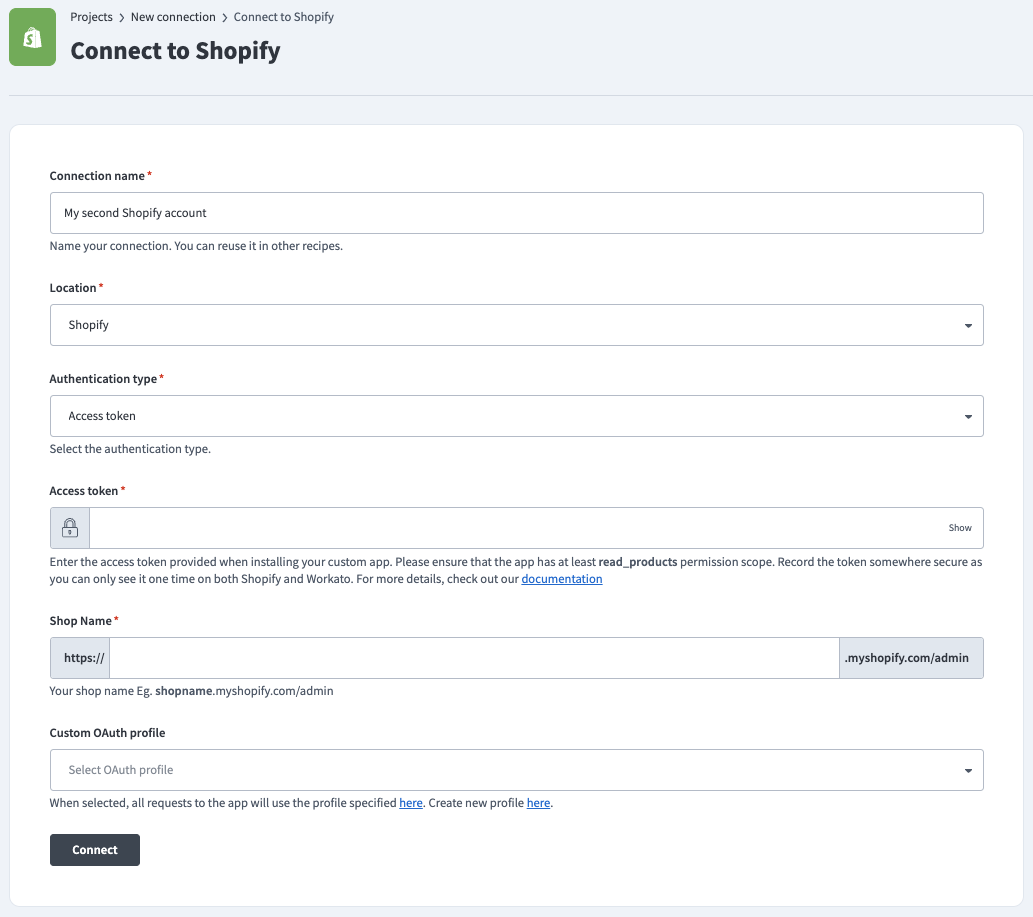
Complete the following steps to set up an access token authentication connection to Shopify in Workato:
Click Create > Connection or press C twice.
Search for Shopify and select it as your app.
Enter a name for your connection in the Connection name field.
 Shopify Connection
Use the Location drop-down menu to select the project where you plan to store the connection.
Use the Authentication type drop-down menu to select Access token.
Enter the Access token from Shopify.
Enter the Shop Name. You can find this value in the URL for your Shopify account. For example, if the URL is shopname.myshopify.com/admin, the shop name is shopname.
Optional. Select the Custom OAuth profile to use for the connection. Refer to Create an OAuth profile for more information.
Click Connect.
How to use Shopify Orders and Fulfillment MCP server tools
Refer to the following sections for detailed information on available tools:
get_order tool
The get_order tool retrieves complete details for a single order given an order identifier. Your LLM uses this tool to retrieve comprehensive order information including line items, shipping address, payment status, fulfillment status, and tracking information.
Try asking:
Get the details for order #1234.Show me the complete information for order 5678.Look up order #9012 and tell me its status.What items are in order #3456?
search_orders tool
The search_orders tool searches orders matching the filter criteria you specify including customer email, fulfillment status, financial status, date range, and tags. Your LLM uses this tool to find orders matching specific criteria rather than looking up one specific order.
Try asking:
Find all orders from [email protected].Show me paid but unfulfilled orders.Search for orders from last week.Find orders tagged 'wholesale'.
list_unfulfilled_orders tool
The list_unfulfilled_orders tool retrieves orders with unfulfilled or partially fulfilled status, optimized for fulfillment queue management. Your LLM uses this tool to retrieve orders that haven't shipped. Results are sorted by creation date in ascending order (oldest first) to support fulfillment workflows.
Try asking:
What orders need to ship?Show me unfulfilled orders.What's in the fulfillment queue?What orders are pending shipment?
fulfill_order tool
The fulfill_order tool creates a fulfillment record for an order, marking items as shipped with tracking information. Your LLM uses this tool to mark orders as shipped and associate tracking numbers. This tool fulfills one location per call.
Try asking:
Mark order #1234 as fulfilled with tracking number 1Z000000010123456789.Fulfill order #5678 and use UPS as the carrier.Ship order #9012 with FedEx tracking 773189420346.Mark order #3456 as shipped.
cancel_order tool
The cancel_order tool cancels an order that hasn't been fulfilled. Your LLM uses this tool to cancel orders with options for refunding to the original payment method, restocking inventory, and notifying the customer. This tool requires a cancellation reason for record-keeping.
Try asking:
Cancel order #1234 and refund the customer.Cancel order #5678 due to customer request.Cancel this order and restock the inventory.Process a cancellation for order #9012 with a refund.
update_order_note tool
The update_order_note tool adds or updates the internal staff note on an order. Your LLM uses this tool to document customer interactions, special handling instructions, issue resolution, or internal communication. Notes are visible to staff in Shopify Admin but aren't visible to customers.
Try asking:
Add a note to order #1234 about the customer's delivery request.Document on order #5678 that the customer called about shipping.Update the internal note for order #9012 with resolution details.Add a staff note to order #3456 for special handling.
Getting started
View and manage your MCP server tools in the Overview page Tools section. Tool management provides the following capabilities:
TOOLS MUST BE STARTED
Your LLM can only access active tools in your MCP server connector.
Last updated: