Workato actions for Microsoft Teams
Workbot actions allow you to post messages and replies to users or channels as Workbot.
Additionally, Workbot also includes custom actions. This action allows you to use Microsoft Graph APIs (v1.0).
Workbot supports multiple actions:
- Post reply
- Post simple reply
- Post message
- Post simple message
- Delete message
- Get user info by User Principal Name
- Show Tab using Adaptive Cards
- Custom action
Post reply and Post simple reply
The Post reply actions allow you to post a reply message to a user when a Workbot command is invoked. Replies can be posted directly to the user or within a channel, depending on where the command is invoked. You can optionally include the following in your reply:
- One fact set consisting of a name-value pair
- One picklist
- Buttons
- Images
 Example of a post reply listing open opportunities from Salesforce
POST REPLY REQUIREMENTS
Post reply must always be paired with a Workbot command.
Your reply can be a simple text message about a task's completion, or a more advanced message. Use the Post reply action if:
You plan to post a reply only where the Workbot command is invoked.
You plan to prompt users with subsequent actions.
You plan to wait for a user to click a button before the recipe continues to run. The wait for a user action feature enables you to specify multiple steps of user interaction with Workbot for Microsoft Teams in one recipe. Note that the default behavior for the Post reply action is to wait for the user to click a button.
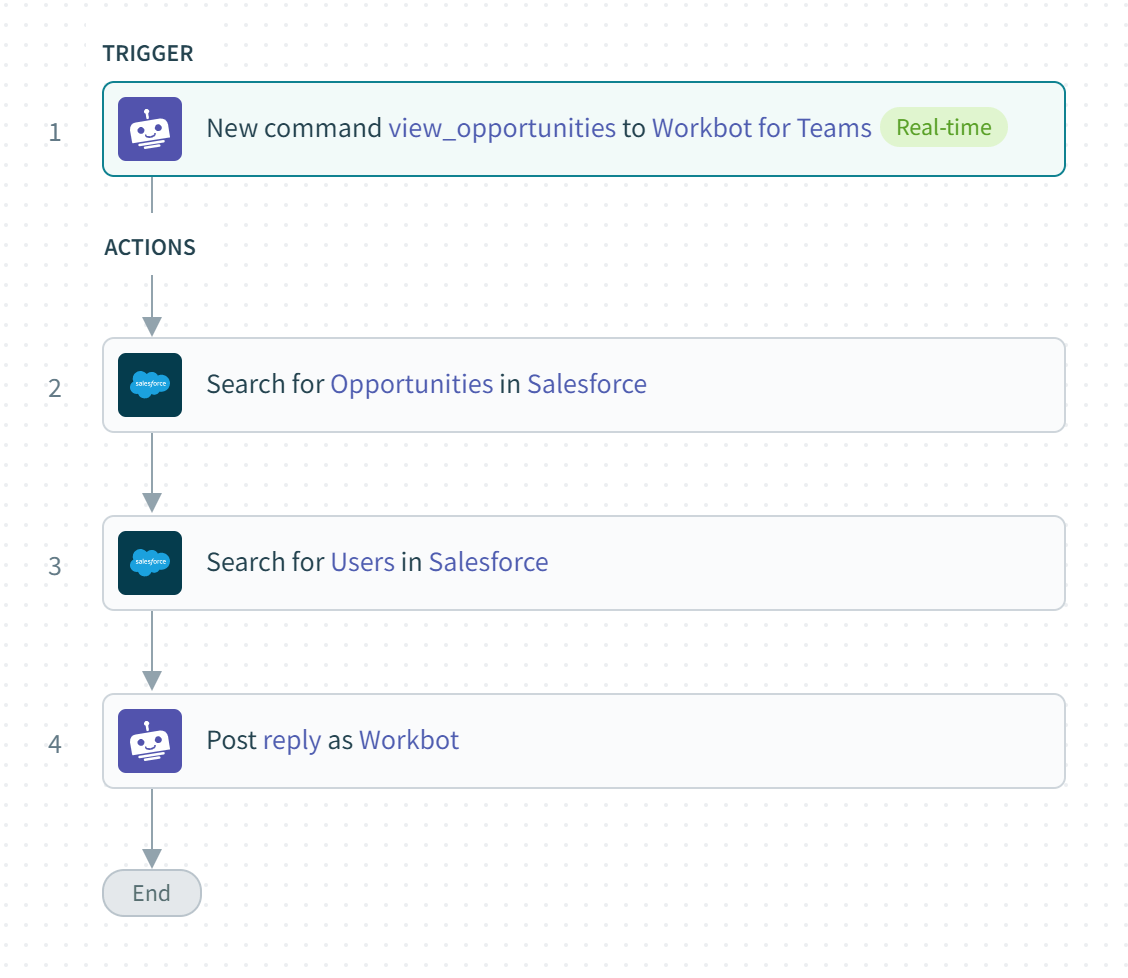 Recipe perspective of the post reply example above
Post reply configuration
Complete the following steps to configure a Post reply action.
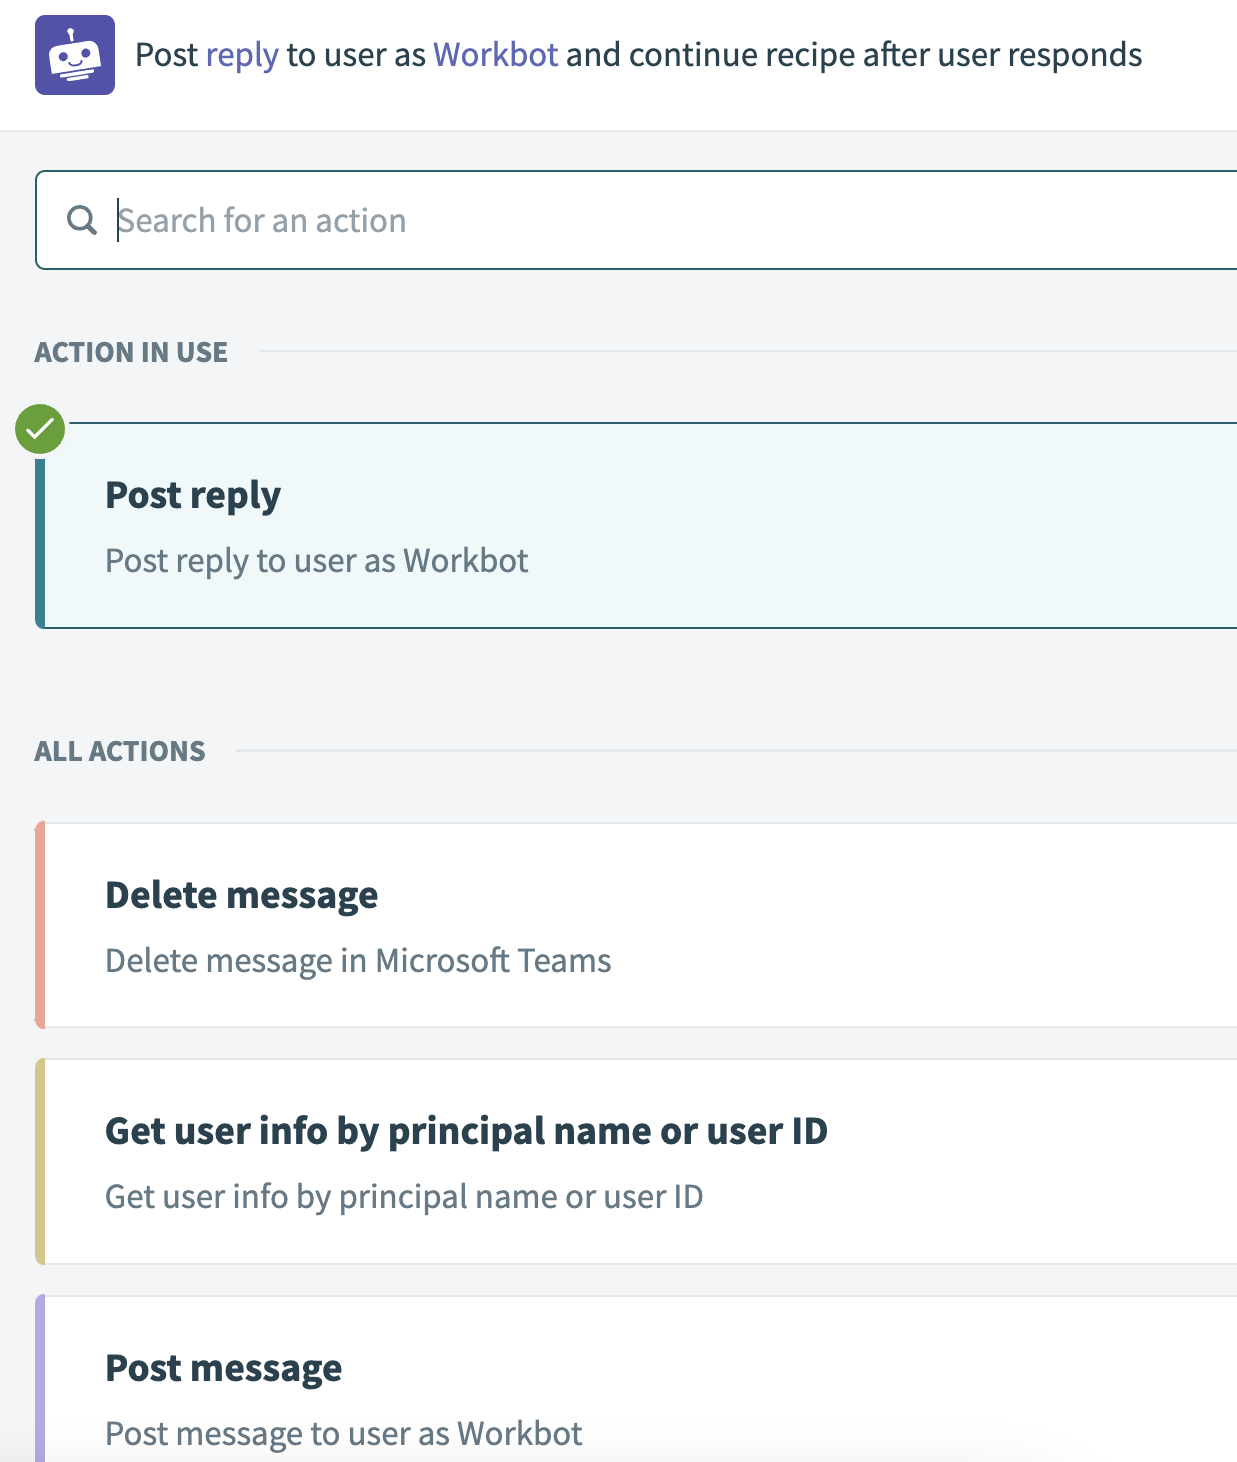
Select Post reply as the action in your recipe.
Post reply action
Click the Show button under Message to add a rich message block, such as a text block, toggle, button, or image to your reply.
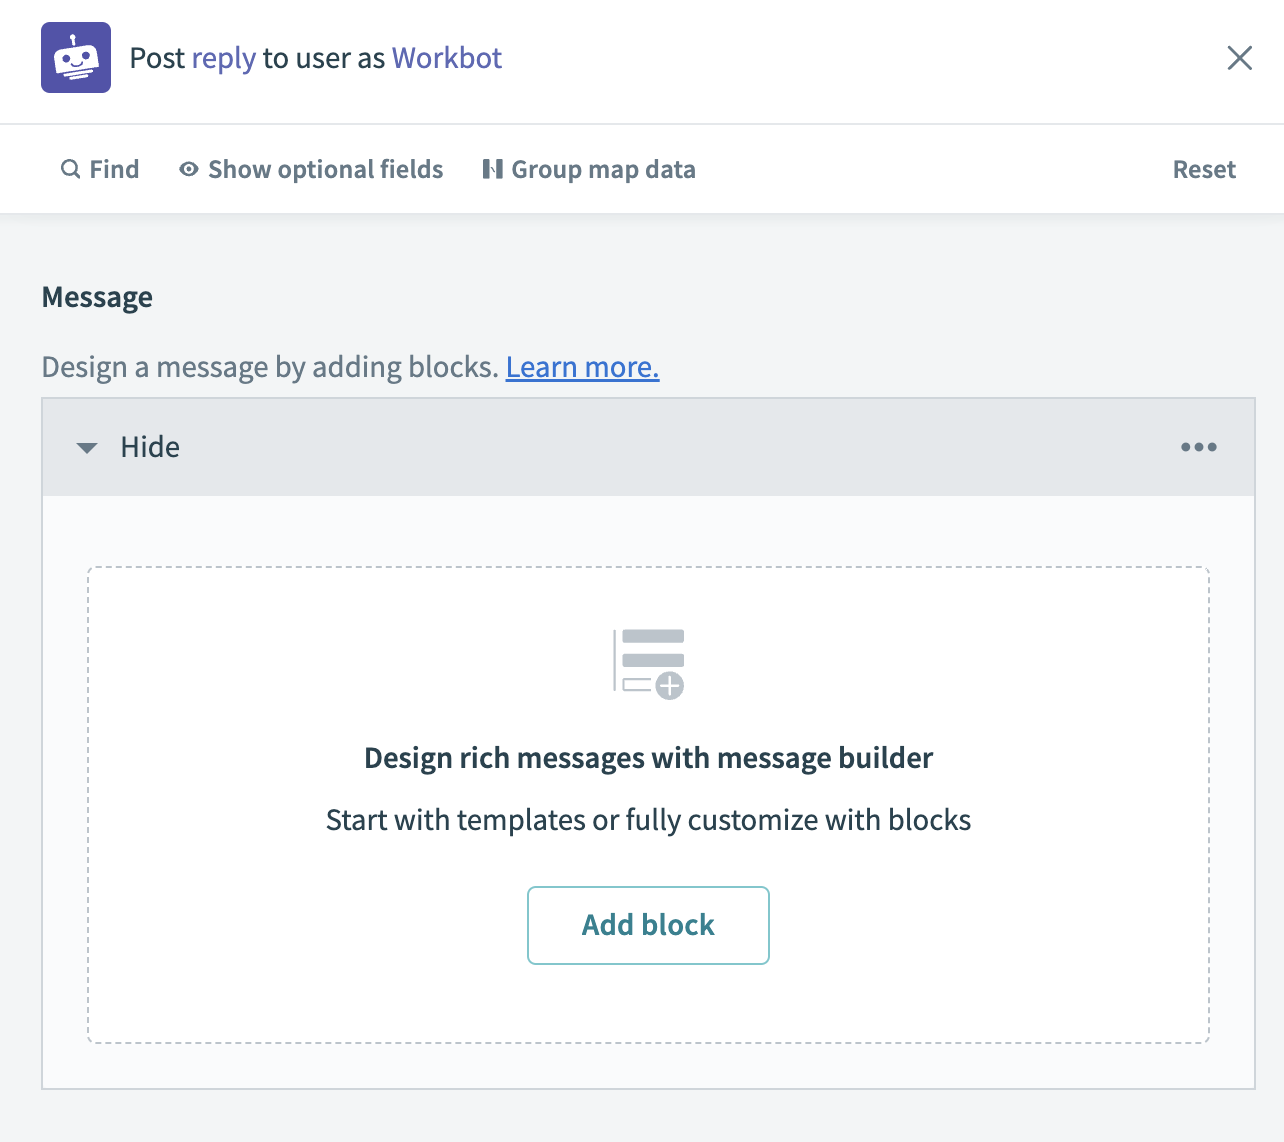 Post reply message block
You can configure your reply to wait for a user action in this section by completing the following steps:
Select Text with button, Text with button & thumbnail, or Action set from the Type drop-down menu.
Optional. Provide a Header text and/or Block text to display to users.
Provide a name for your button in the Button title field.
Click the Button type drop-down menu if you selected Text with button or Text with button & thumbnail to select the button type you plan to use.
Continue recipe
- Use this option when the conversation flow continues after the user clicks the button. This button can only be clicked once. For example, you can present Approve and Reject buttons to the user and configure Workbot to perform other actions after the user provides a response. When you select Continue recipe, additional datapills (Selected button and Selected Block ID) are available in recipe data for use in subsequent steps.
CONTINUE RECIPE BUTTON BEHAVIOR
When a user clicks the Continue recipe button, Workbot deletes the current message to prevent the user from clicking the same button multiple times. If you plan to continuously display some information to the user after the button is clicked, consider splitting the message into two parts. For example, you can have one message with the information that must remain and one message with the Continue recipe button.
Run bot command
- Use this option when the button starts a separate flow outside of the main conversation. For example, you can present a Refresh data button to the user that loads the data from an external service and updates the message. Typically, users can click this type of button multiple times.
Open URL
- Use this option to open a URL in a web browser after the user performs an action.
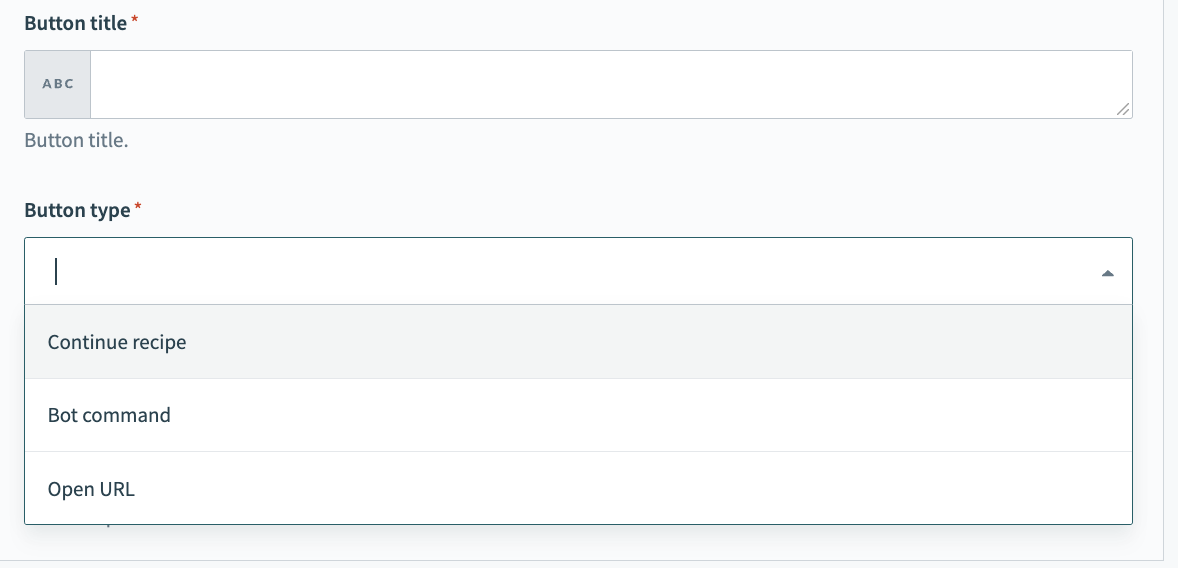 Select Button type
If you selected Action set, use the Action type drop-down menu to select Continue recipe. This option uses the same logic as Continue recipe for Text with button and Text with button & thumbnail, in which the recipe is suspended and continues only after the user clicks a button.
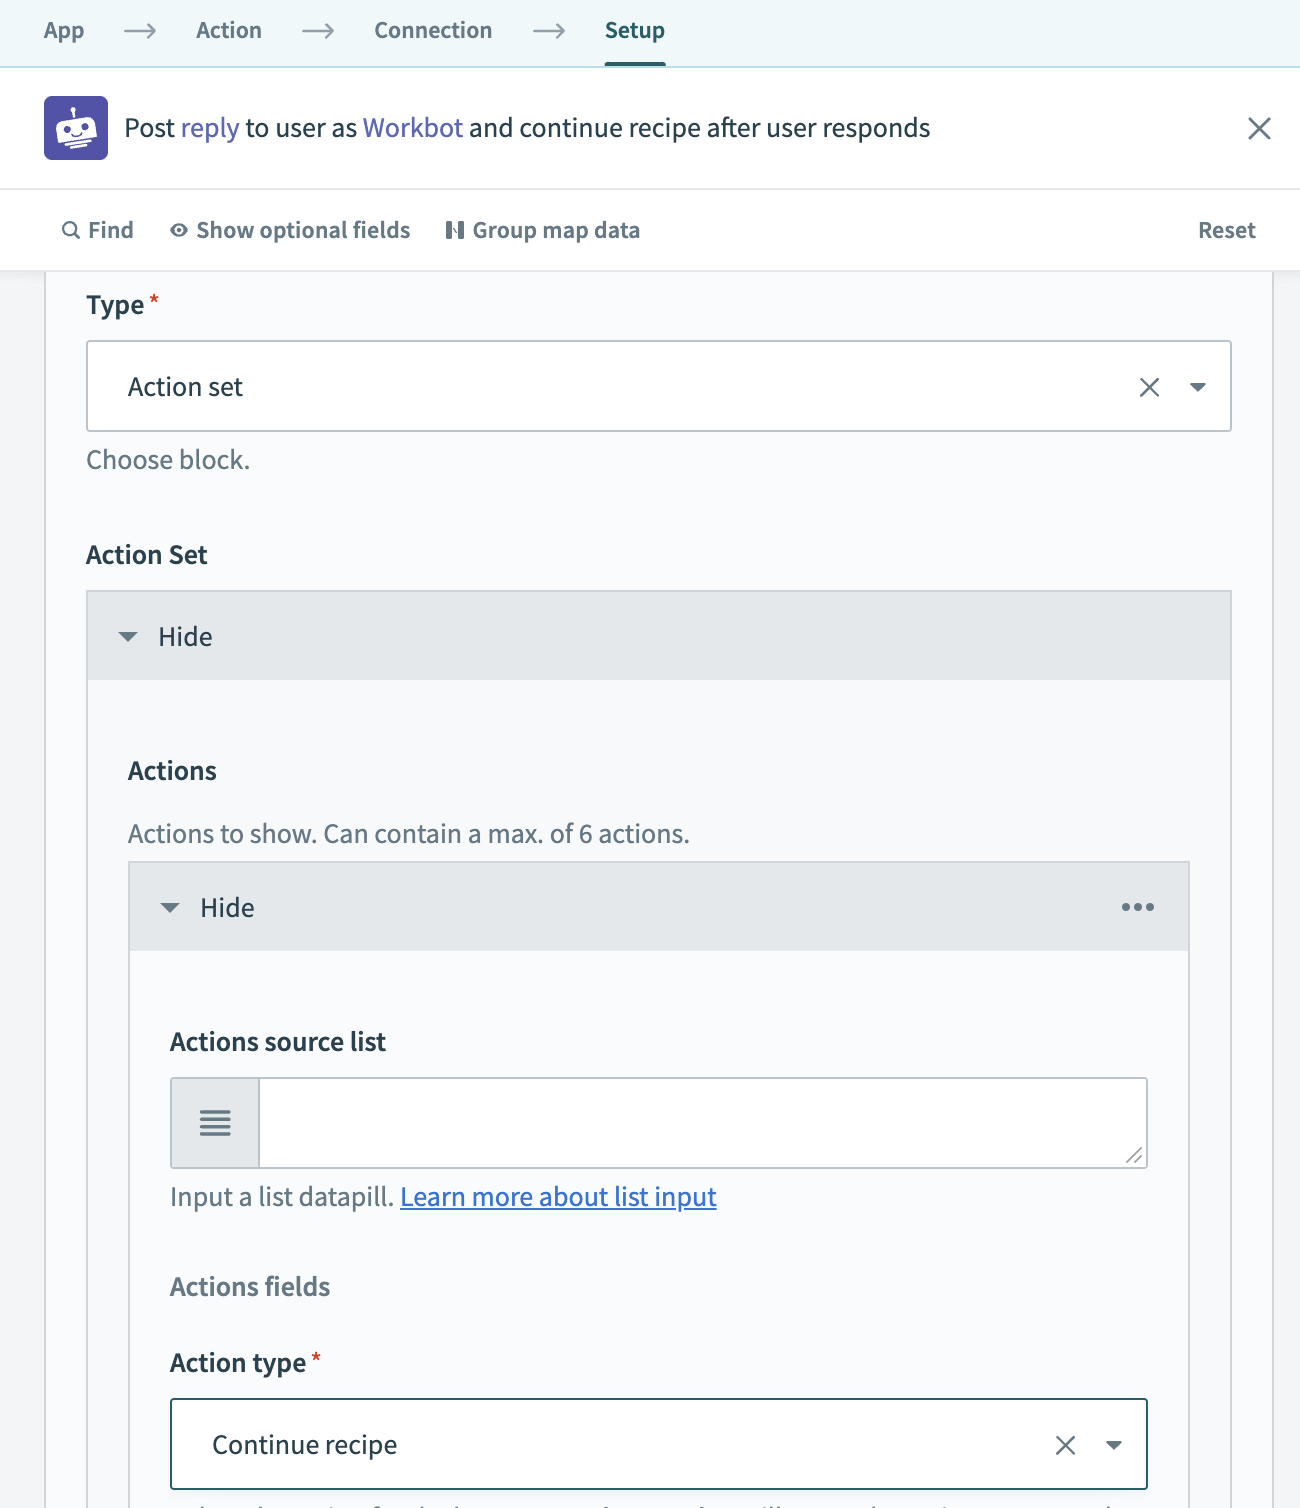 Action set > Continue recipe
Click the Show button under Mentions to mention a specific team member in your reply. You can mention multiple users in your bot message. Note that mentions work on the Post message and Post reply actions only.
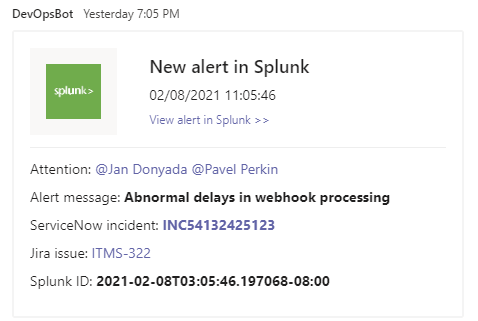 DevOpsBot mentioning two users in Microsoft Teams
Add the user IDs of the users you plan to mention in your message in the User ID of user to mention field. By default, you can add users one-by-one. To add a dynamic list of users, switch the input mode to Dynamic list by clicking the horizontal ellipsis. You can obtain user ID pills from the New command trigger and/or a Get user by User Principal Name action. Alternatively, you can enter user IDs manually.
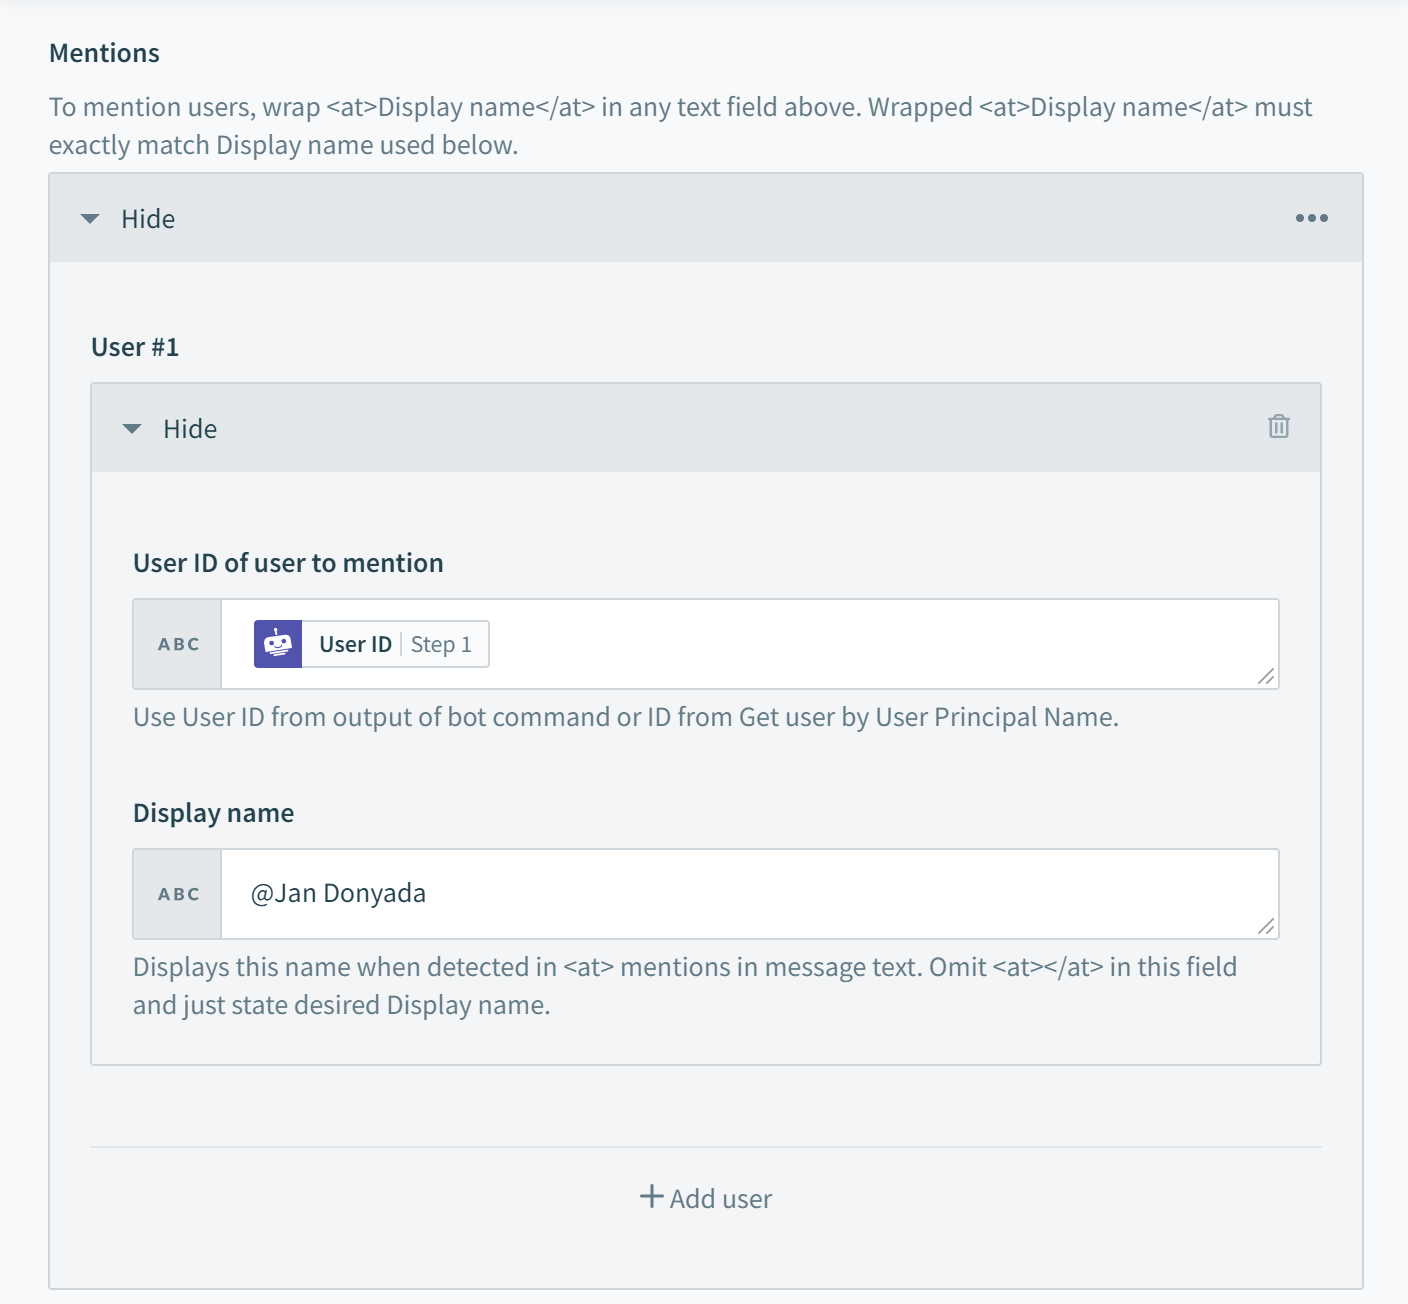 User IDs
Enter the display name of the user you plan to mention in the Display name field. Do not wrap the display name with <at></at>. The display name serves as a reference for users mentioned in the message itself. The text fields in your message are scanned for exact matches to this reference display name (including character case). For example, the same user can be mentioned multiple times throughout a message if the display name is found in multiple places. Display names found in the text fields are formatted into a mention with purple text.
Reference users by their exact display name within the message. For example, to reference users in the text fields of the message, wrap their display name with <at></at>, such as <at>@John Barnaby</at>. The wrapped display name must exactly match the display name used in the Mentions section.
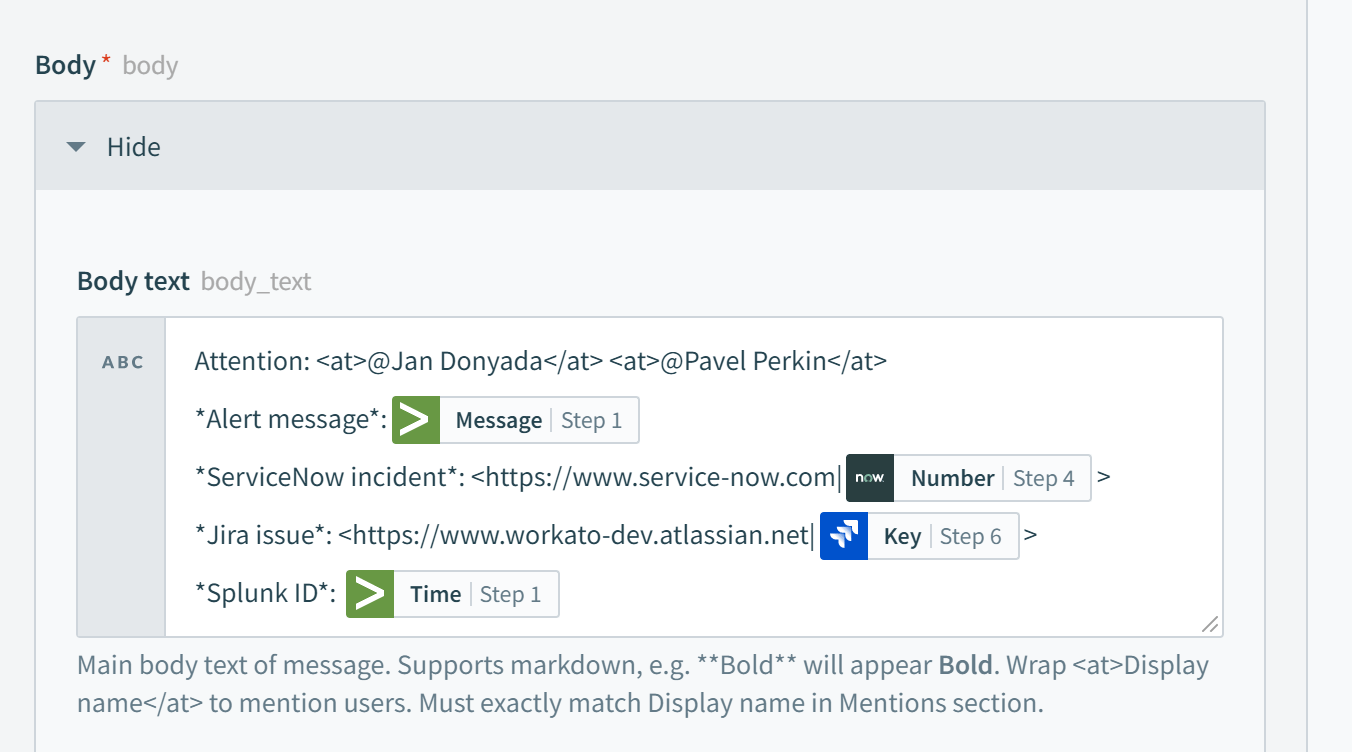 Reference example
Select the timeout period after which the user can no longer click the button and the recipe stops waiting for a response under Continue recipe if user does not click the button within.
Post simple reply configuration
The Post simple reply action allows you to reply to Microsoft Teams users or to a group chat. The Post simple reply action does not support rich messaging, but does support Markdown formatting.
Select Post simple reply as the action in your recipe.
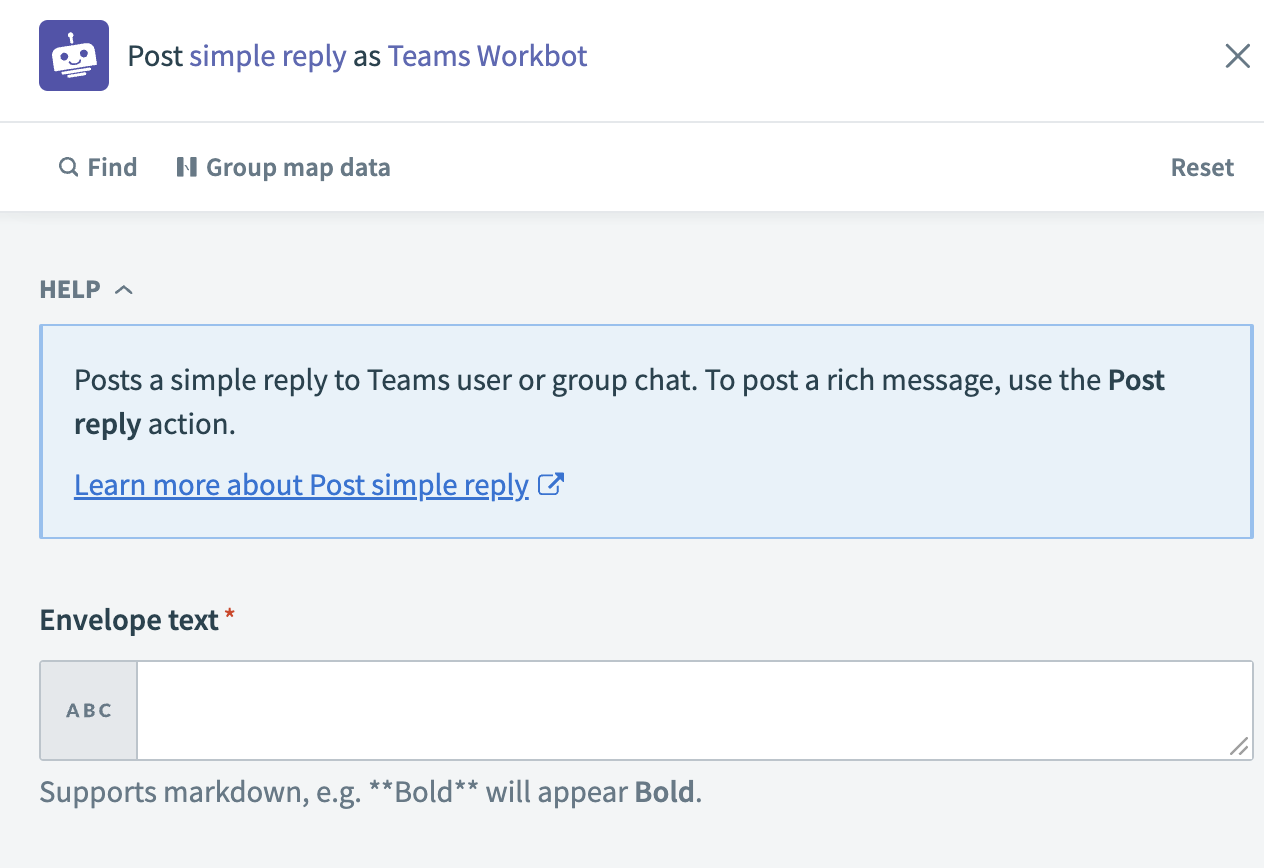 Post simple reply action
Enter the text you plan to use in your reply in the Envelope text field.
Post message and Post simple message
The post message actions allow you to post a message to a user or a channel. It is similar to Post reply, but with an additional field called Message recipient. This field allows you to specify where to post the message, such as directly to the user or to a channel.
Use the Post message action if you:
Plan to use Workbot to post event notifications from another application, for example, the New or updated incident trigger in ServiceNow. You can use Post message to specify the
Message recipientfor the event trigger even though it is not a Workbot command.Plan to post your message somewhere other than where the Workbot command was invoked, which is the default behavior for Post reply.
Plan to use advanced features like updating a previous message.
Plan to create a recipe that waits for a user to click a button before continuing to run with Post message wait for user action. This enables you to specify multiple steps of user interaction with Workbot for Microsoft Teams in one recipe. The Wait for user action feature improves logic, reduces the number of recipes, and helps prevent redundant Workbot commands.
Post message configuration
Complete the following steps to configure a Post message action.
Select Post message as the action in your recipe.
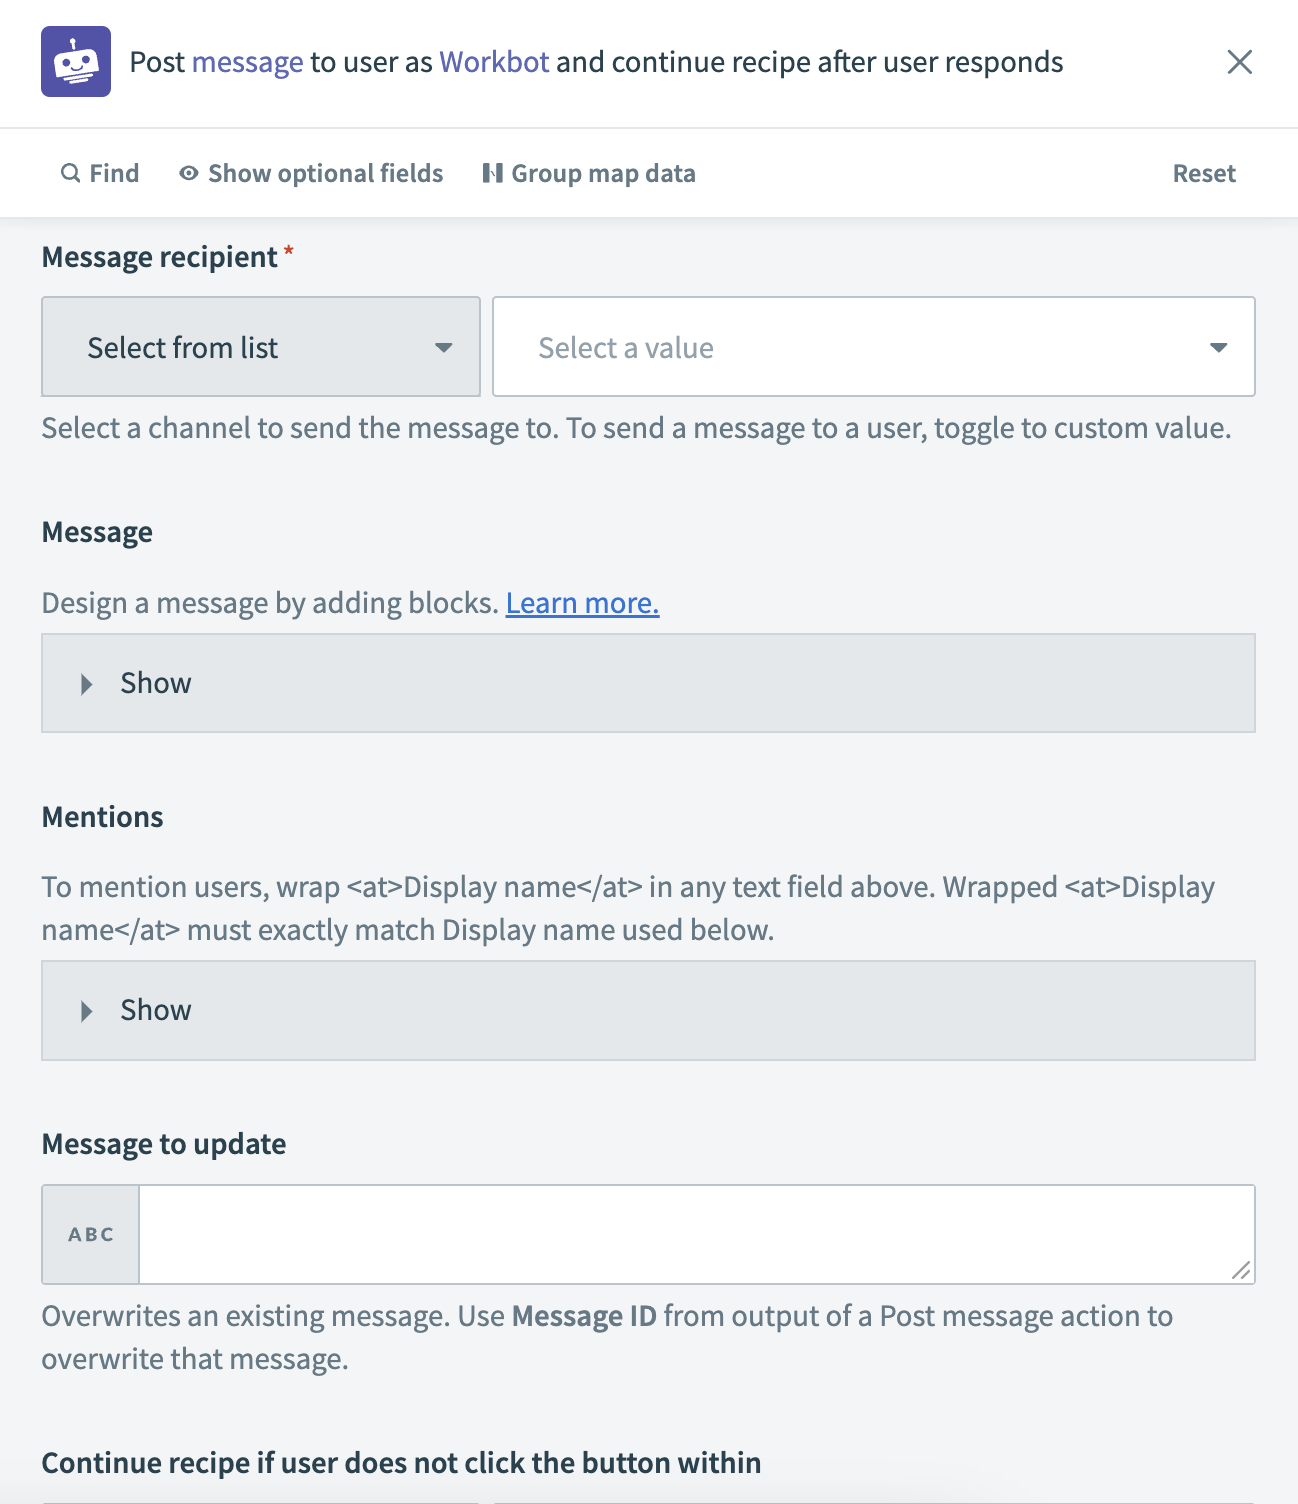 Post message action
Navigate to Message recipient and select the recipient(s) you plan to message. Message recipient allows you to post a message directly to a user or to a channel.
To dynamically assign message recipients at runtime:
Toggle to custom value and use the IDStep 1 datapill under Conversation to use the output of a Workbot command (if the recipe uses a bot command).
- Use the IDStep 1 datapill from the output of a preceding Get user info by User Principal Name action for all other triggers.
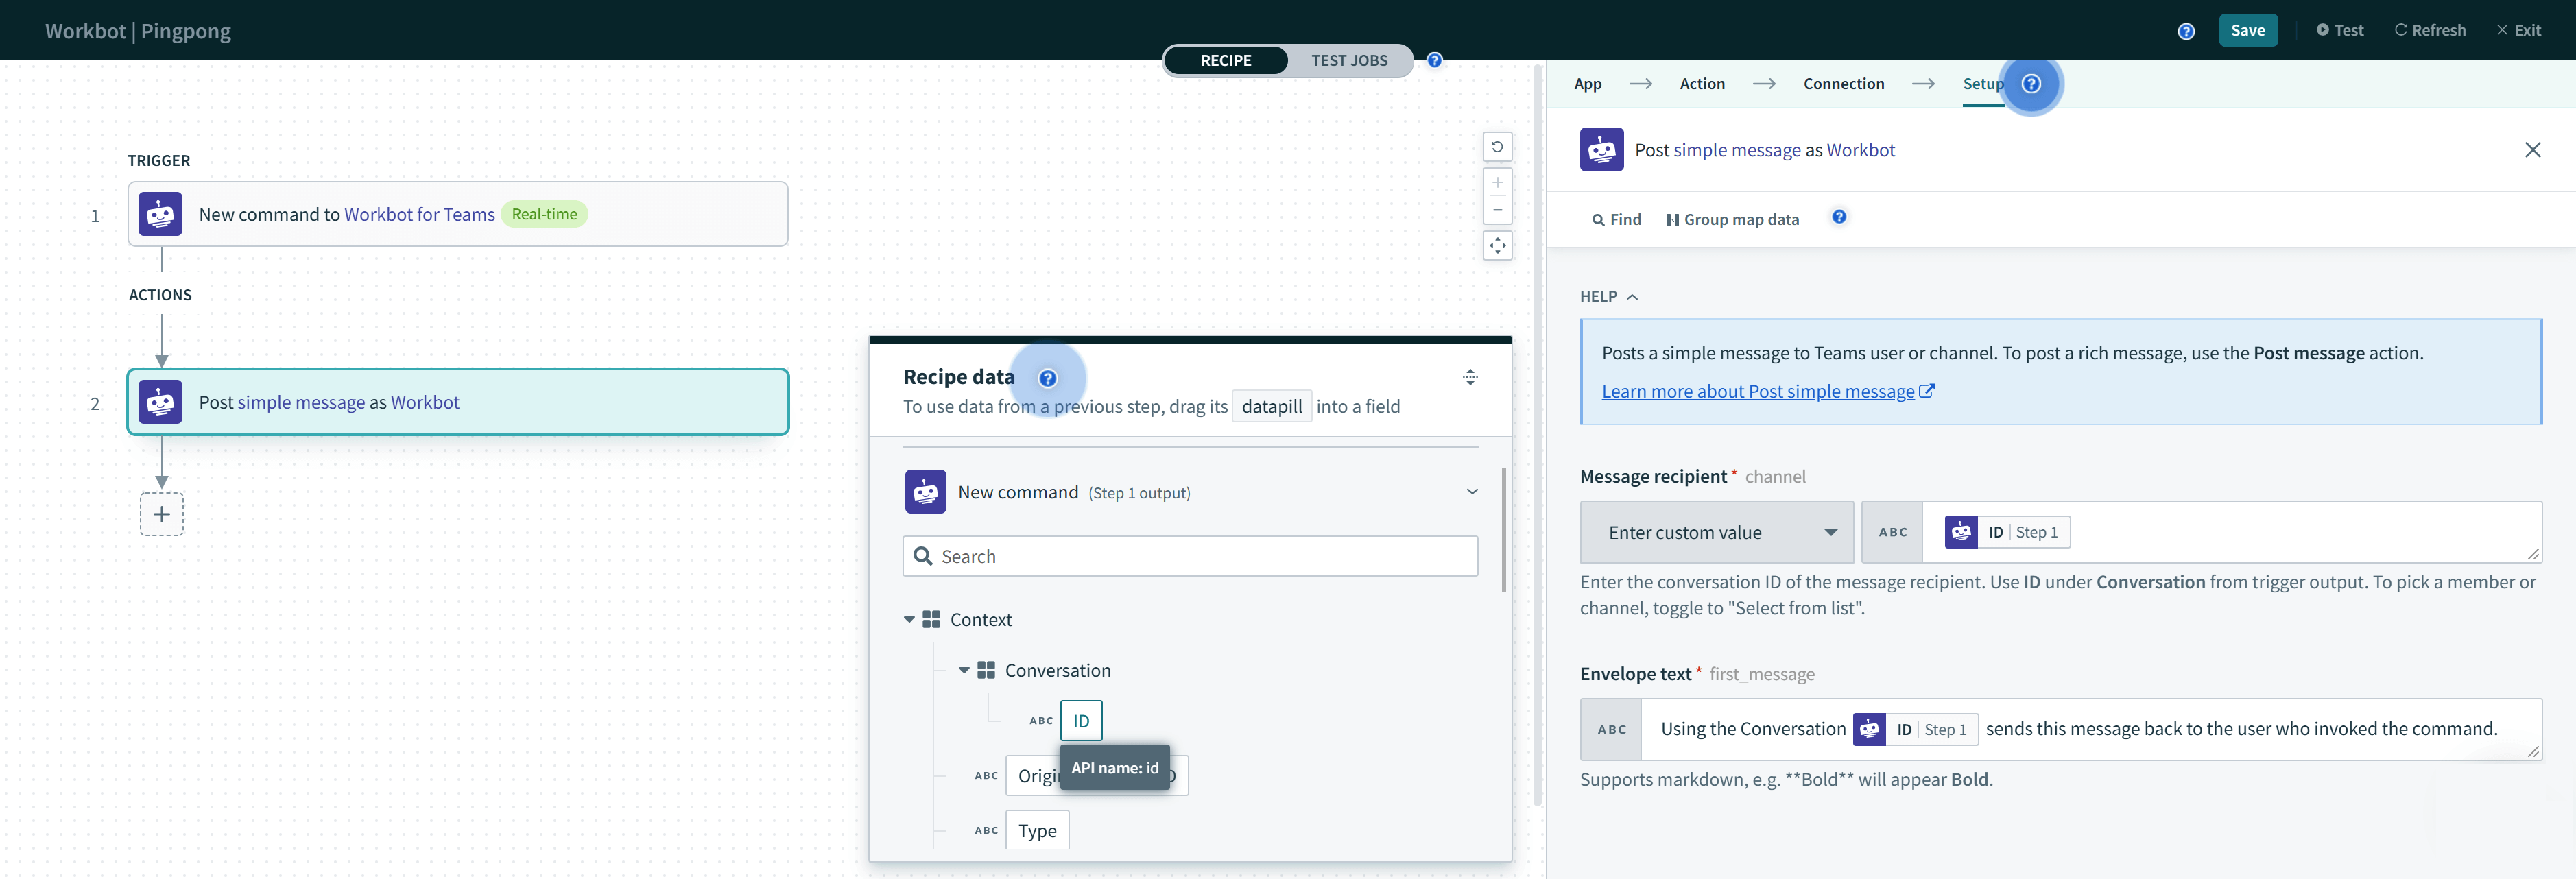 Posting a message with the IDStep 1 datapill obtained from the output of a command
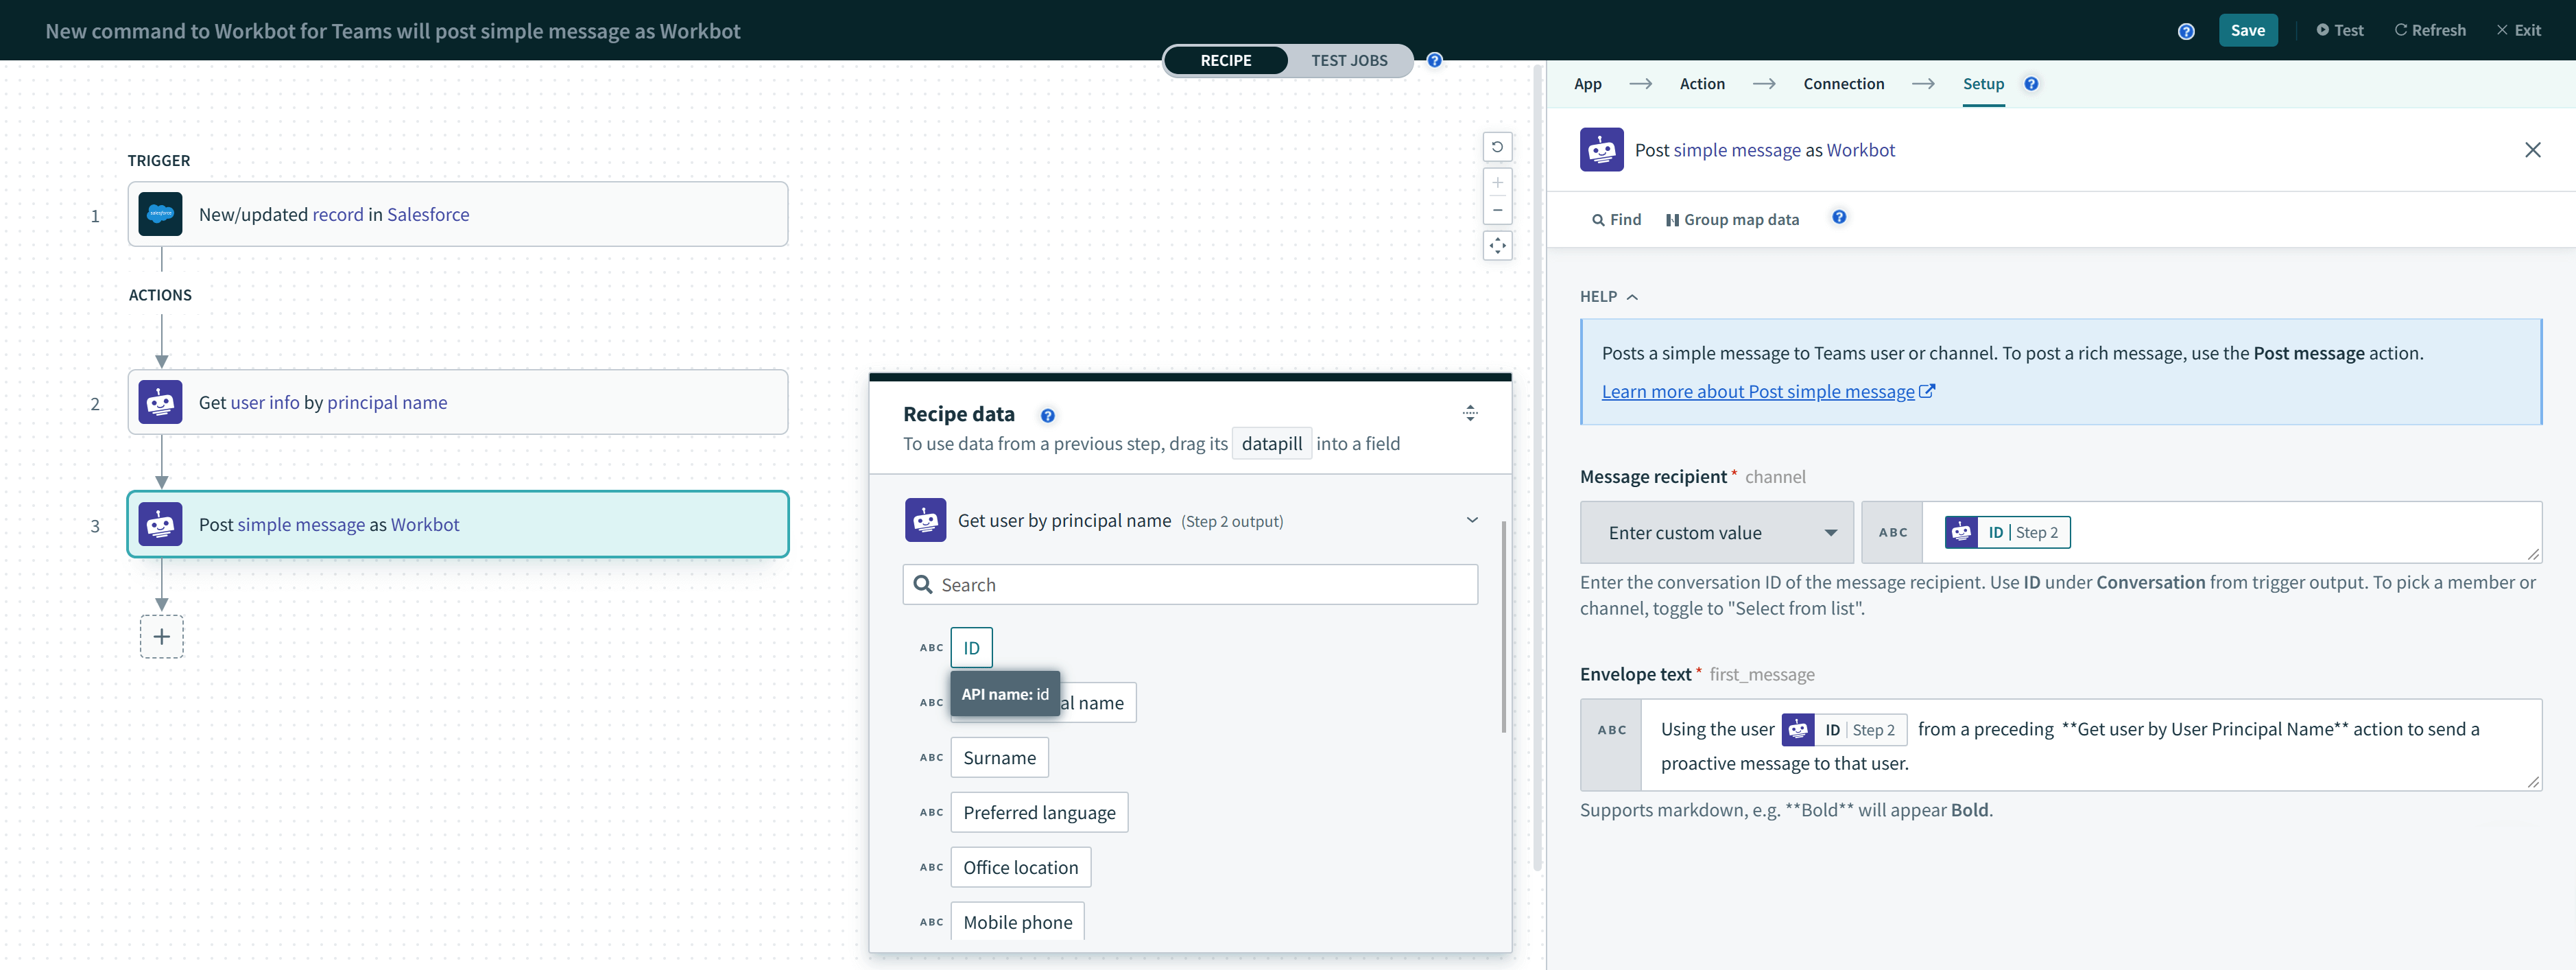 Posting a message with the IDStep 1 datapill obtained from the output of a preceding get user info action
Optional. Toggle to Select from list to select from a list of channels instead.
 Select a channel to post to
Click the Show button under Message to add a message block, such as a text block, toggle, button, or image using Adaptive Card blocks. View a complete list of supported blocks. You can add users one-by-one. To add a dynamic list of users, switch the input mode to Dynamic list by clicking the horizontal ellipsis.
Post message block
You can configure your reply to wait for a user action in this section by completing the following steps:
Select Text with button, Text with button & thumbnail, or Action set from the Type drop-down menu.
Optional. Provide a Header text and/or Block text to display to users.
Provide a name for your button in the Button title field.
Click the Button type drop-down menu if you selected Text with button or Text with button & thumbnail to select the button type you plan to use.
Continue recipe
- Use this option when the conversation flow continues after the user clicks the button. This button can only be clicked once. For example, you can present Approve and Reject buttons to the user and configure Workbot to perform other actions after the user provides a response. When you select Continue recipe, additional datapills (Selected button and Selected Block ID) are available in recipe data for use in subsequent steps.
CONTINUE RECIPE BUTTON BEHAVIOR
When a user clicks the Continue recipe button, Workbot deletes the current message to prevent the user from clicking the same button multiple times. If you plan to continuously display some information to the user after the button is clicked, consider splitting the message into two parts. For example, you can have one message with the information that must remain and one message with the Continue recipe button.
Run bot command
- Use this option when the button starts a separate flow outside of the main conversation. For example, you can present a Refresh data button to the user that loads the data from an external service and updates the message. Typically, users can click this type of button multiple times.
Open URL
- Use this option to open a URL in a web browser after the user performs an action.
Select Button type
If you selected Action set, use the Action type drop-down menu to select Continue recipe. This option uses the same logic as Continue recipe for Text with button and Text with button & thumbnail, in which the recipe is suspended and continues only after the user clicks a button.
 Action set > Continue recipe
Click the Show button under Mentions to mention a specific team member in your reply. You can mention multiple users in your bot message. Note that Mentions work with the Post message and Post reply actions only.
DevOpsBot mentioning two users in Microsoft Teams
Add the user IDs of the users you plan to mention in your message in the User ID of user to mention field. By default, you can add users one-by-one. To add a dynamic list of users, switch the input mode to Dynamic list by clicking the horizontal ellipsis. You can obtain user ID pills from the New command trigger and/or a Get user by User Principal Name action. Alternatively, you can enter user IDs manually.
User IDs
Enter the display name of the user you plan to mention in the Display name field. Do not wrap the display name with <at></at>. The display name serves as a reference for users mentioned in the message itself. The text fields in your message are scanned for exact matches to this reference display name (including character case). For example, the same user can be mentioned multiple times throughout a message if the display name is found in multiple places. Display names found in the text fields are formatted into a mention with purple text.
Reference users by their exact display name within the message. For example, to reference users in the text fields of the message, wrap their display name with <at></at>, such as <at>@John Barnaby</at>. The wrapped display name must exactly match the display name used in the Mentions section.
Reference example
Optional. Provide the message ID of the message you plan to update in the Message to update field to update the existing message with the new message. You can obtain the message ID from the output of a Post message action.
Select the timeout period after which the user can no longer click the button and the recipe stops waiting for a response under Continue recipe if user does not click the button within.
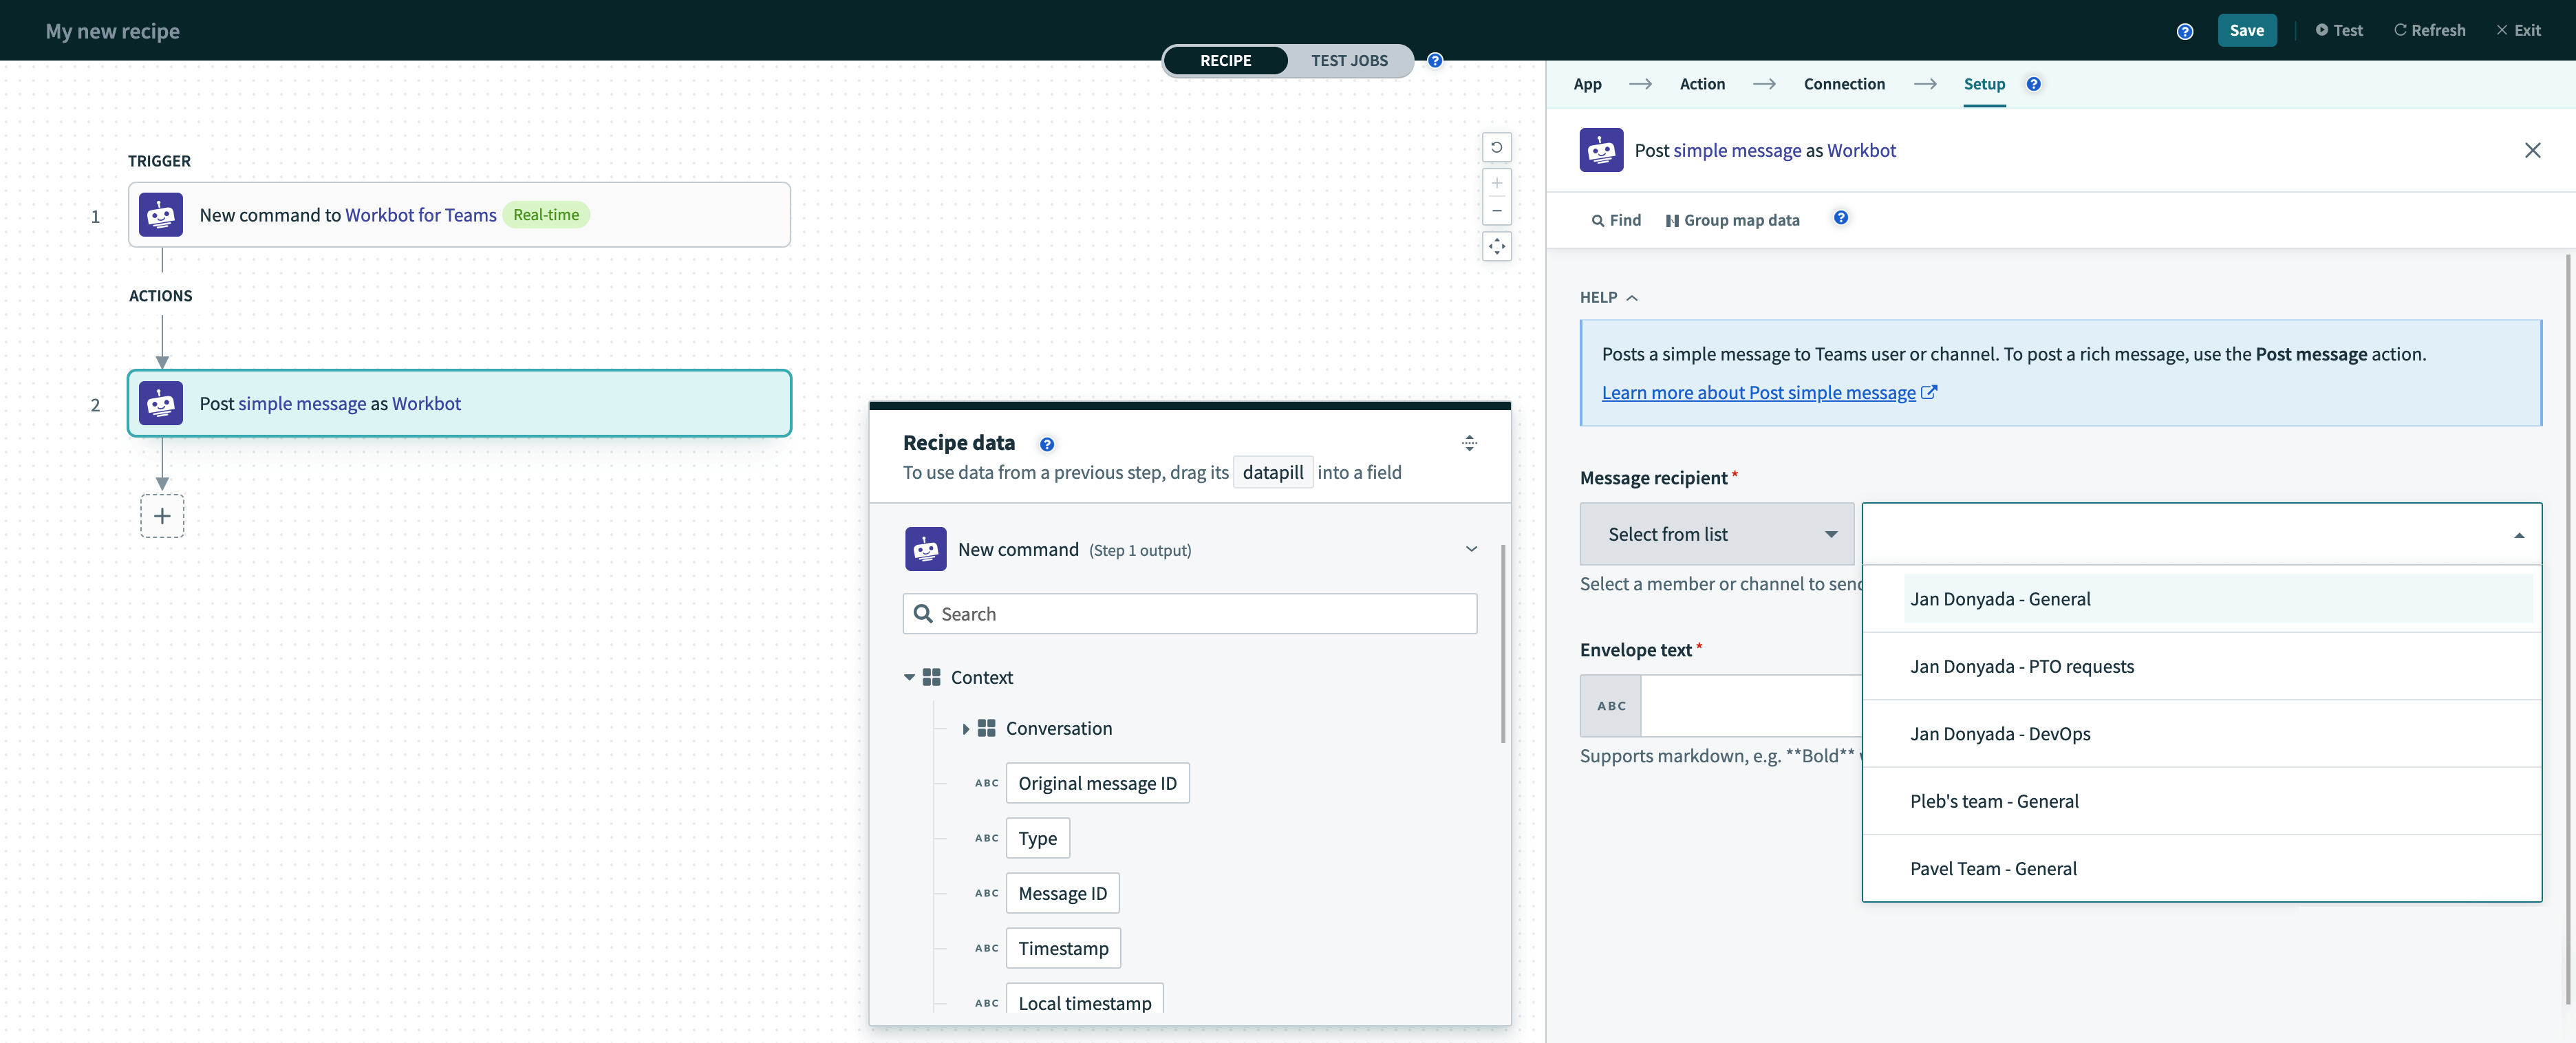
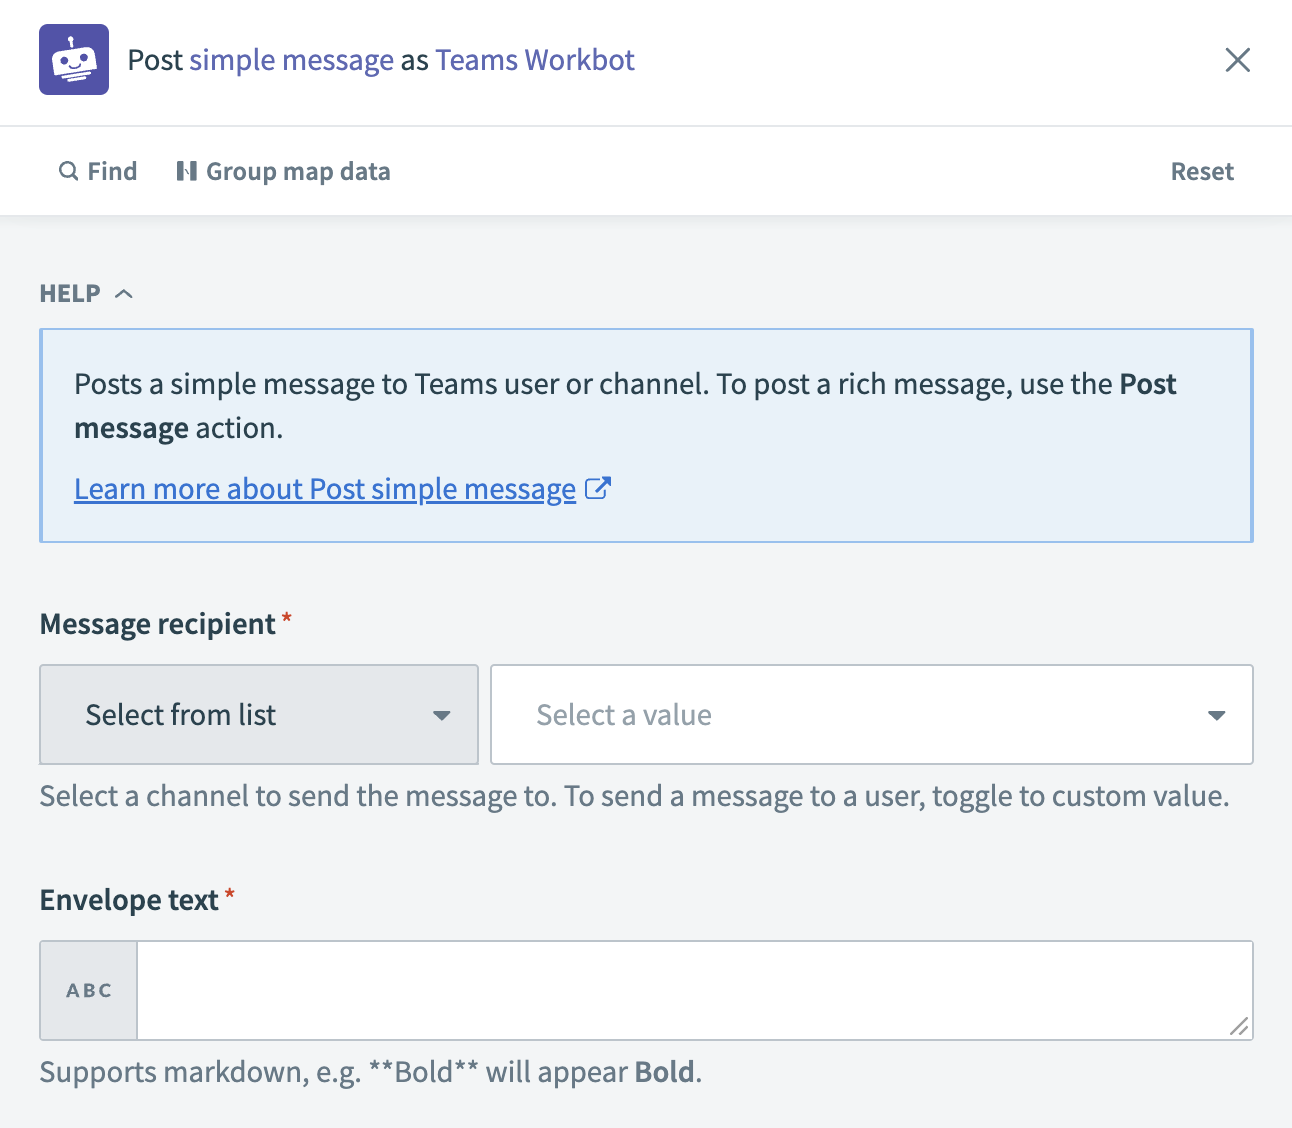
Post simple message configuration
The Post simple message action allows you to post a message to a Microsoft Teams user or to a channel.
Select Post simple message as the action in your recipe.
 Post simple message action
Navigate to Message recipient and select the recipient(s) you plan to message.
To dynamically assign message recipients at runtime:
Toggle to custom value and use the IDStep 1 datapill under Conversation to use the output of a Workbot command (if the recipe uses a bot command).
- Use the IDStep 1 datapill from the output of a preceding Get user info by User Principal Name action for all other triggers.
Posting a message with the IDStep 1 datapill obtained from the output of a command
Posting a message with the IDStep 1 datapill obtained from the output of a preceding get user info action
Optional. Toggle to Select from list to select from a list of channels instead.
Select a channel to post to
Enter the text you plan to use in your reply in the Envelope text field.
Post as raw JSON
This field is for advanced users who want to fully customize the message formatting. When set to Yes, all other fields will be hidden. Should include "type": "message", followed by "attachments", for example,
{
    "type": "message",
    "attachments": [
        {
            "contentType": "application/vnd.microsoft.card.adaptive",
            "content": {
                "type": "AdaptiveCard",
                "version": "1.0",
                "body": [
                    {
                        "type": "TextBlock",
                        "text": "Hello World!",
                        "size": "large"
                    }
                ]
            }
        }
    ]
}
For more details, refer to Microsoft's Adaptive Card Designer.
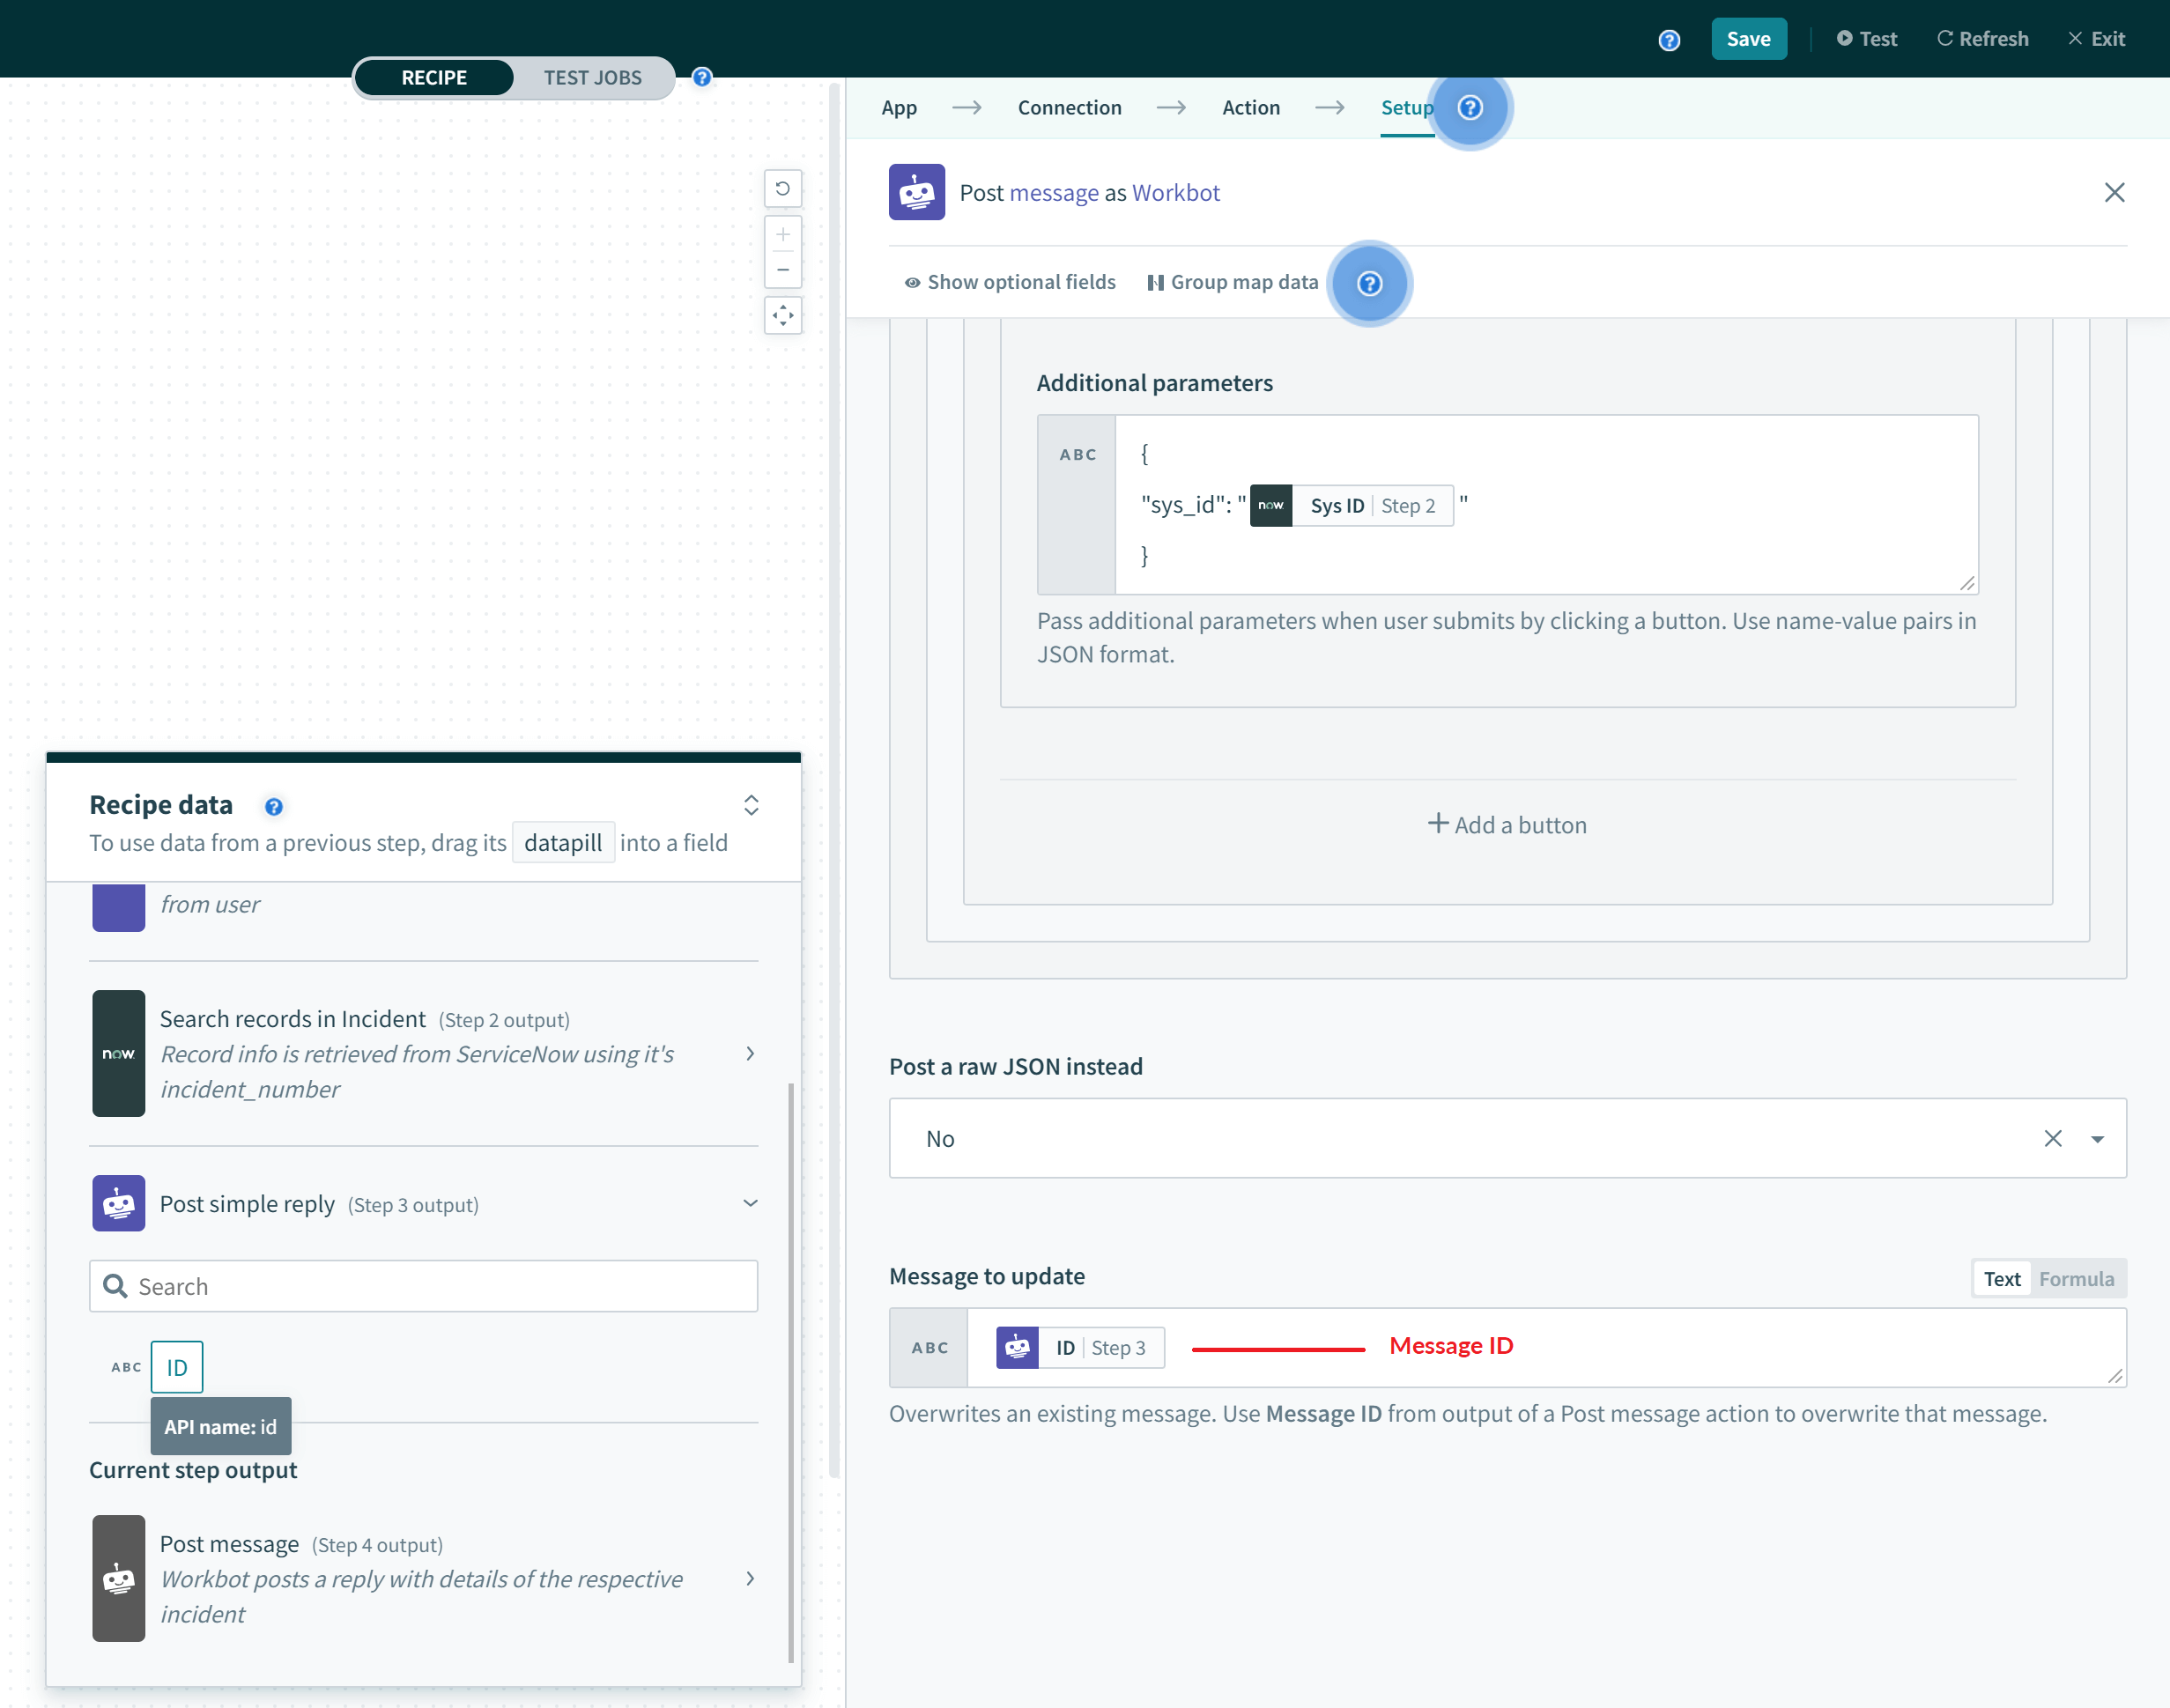
Message to update
Message to update allows you to overwrite a previously posted message from an earlier action step. Simply use the Original message IDStep 1 datapill (from the output of a Workbot command), or the IDStep 3 datapill (from the output of a Post message or Post reply action).
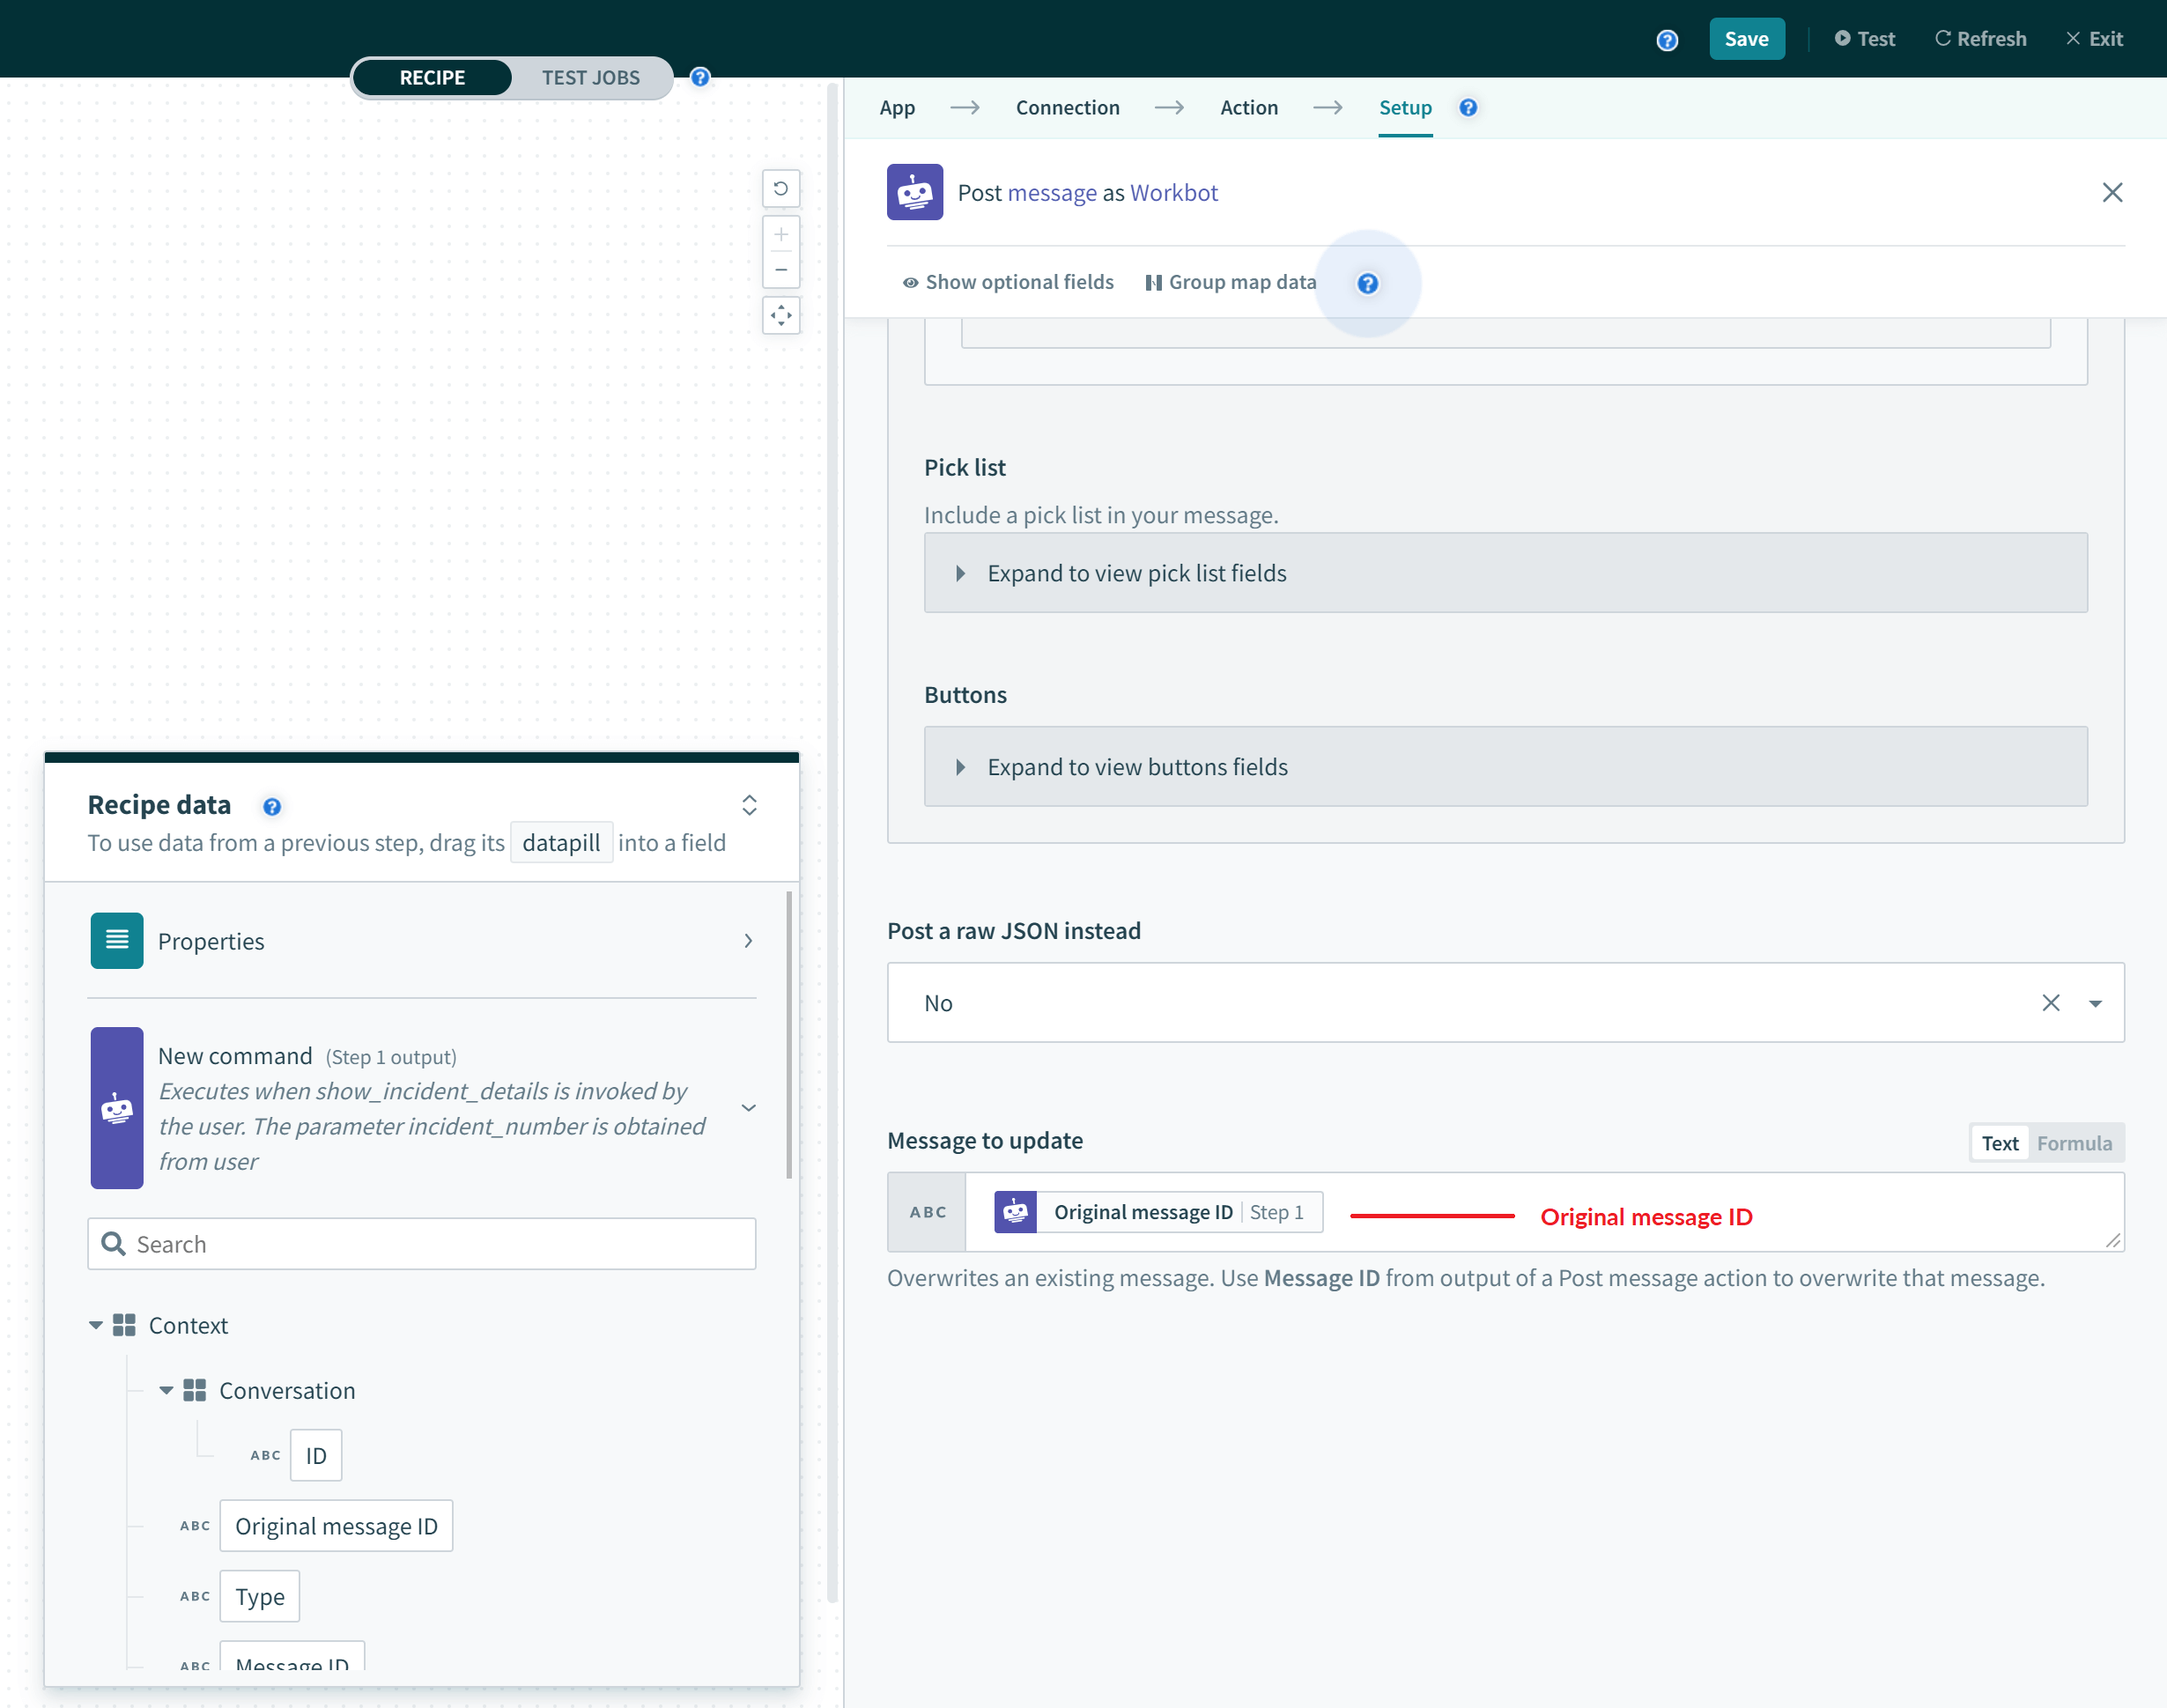 Original message ID
 Message to update
Delete message
This action allows you to delete a posted message.
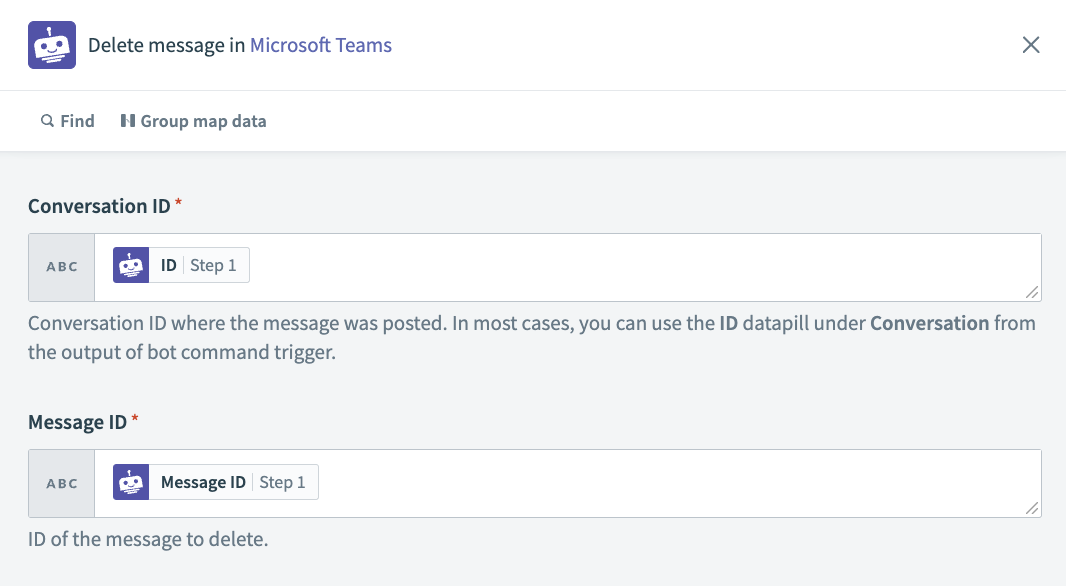 Delete message action
Input
| Input field | Description |
|---|---|
| Conversation ID | The Conversation ID of the posted message. |
| Message ID | The ID of the message you plan to delete. |
Get user info by User Principal Name
This action allows you to retrieve user info by using a user's User Principal Name. The User Principal Name is the login name of the user.
Input
| Input field | Description |
|---|---|
| User Principal Name | The User Principal Name is the login name of the user. |
Output
| Output field | Description |
|---|---|
| ID | User ID. Can be used in the Message recipient field of a Post message or Post simple message action. |
| User Principal Name | Login name of user. |
| Surname | The user's surname (family name or last name). |
| Preferred language | Preferred language of user. Follows ISO 639-1 Code; for example, "en-US". |
| Office location | The office location in the user's place of business. |
| Mobile phone | The primary cellular telephone number for the user. |
| The SMTP address for the user, for example "[email protected]". | |
| Job title | The user's job title. |
| Given name | The given (first name) of the user. |
| Display name | The name displayed in the address book for the user. This is usually the combination of the user's first name, middle initial and last name. |
| Business phones | The telephone numbers for the user. |
Using dynamic lists in action fields
Fact sets, pick lists, and buttons can be generated dynamically using a list datapill (for more information on lists, see the list management guide)
From the fields, select the horizontal ellipsis on the top-right and choose 'Dynamic list'. This should bring up the dynamic list option.
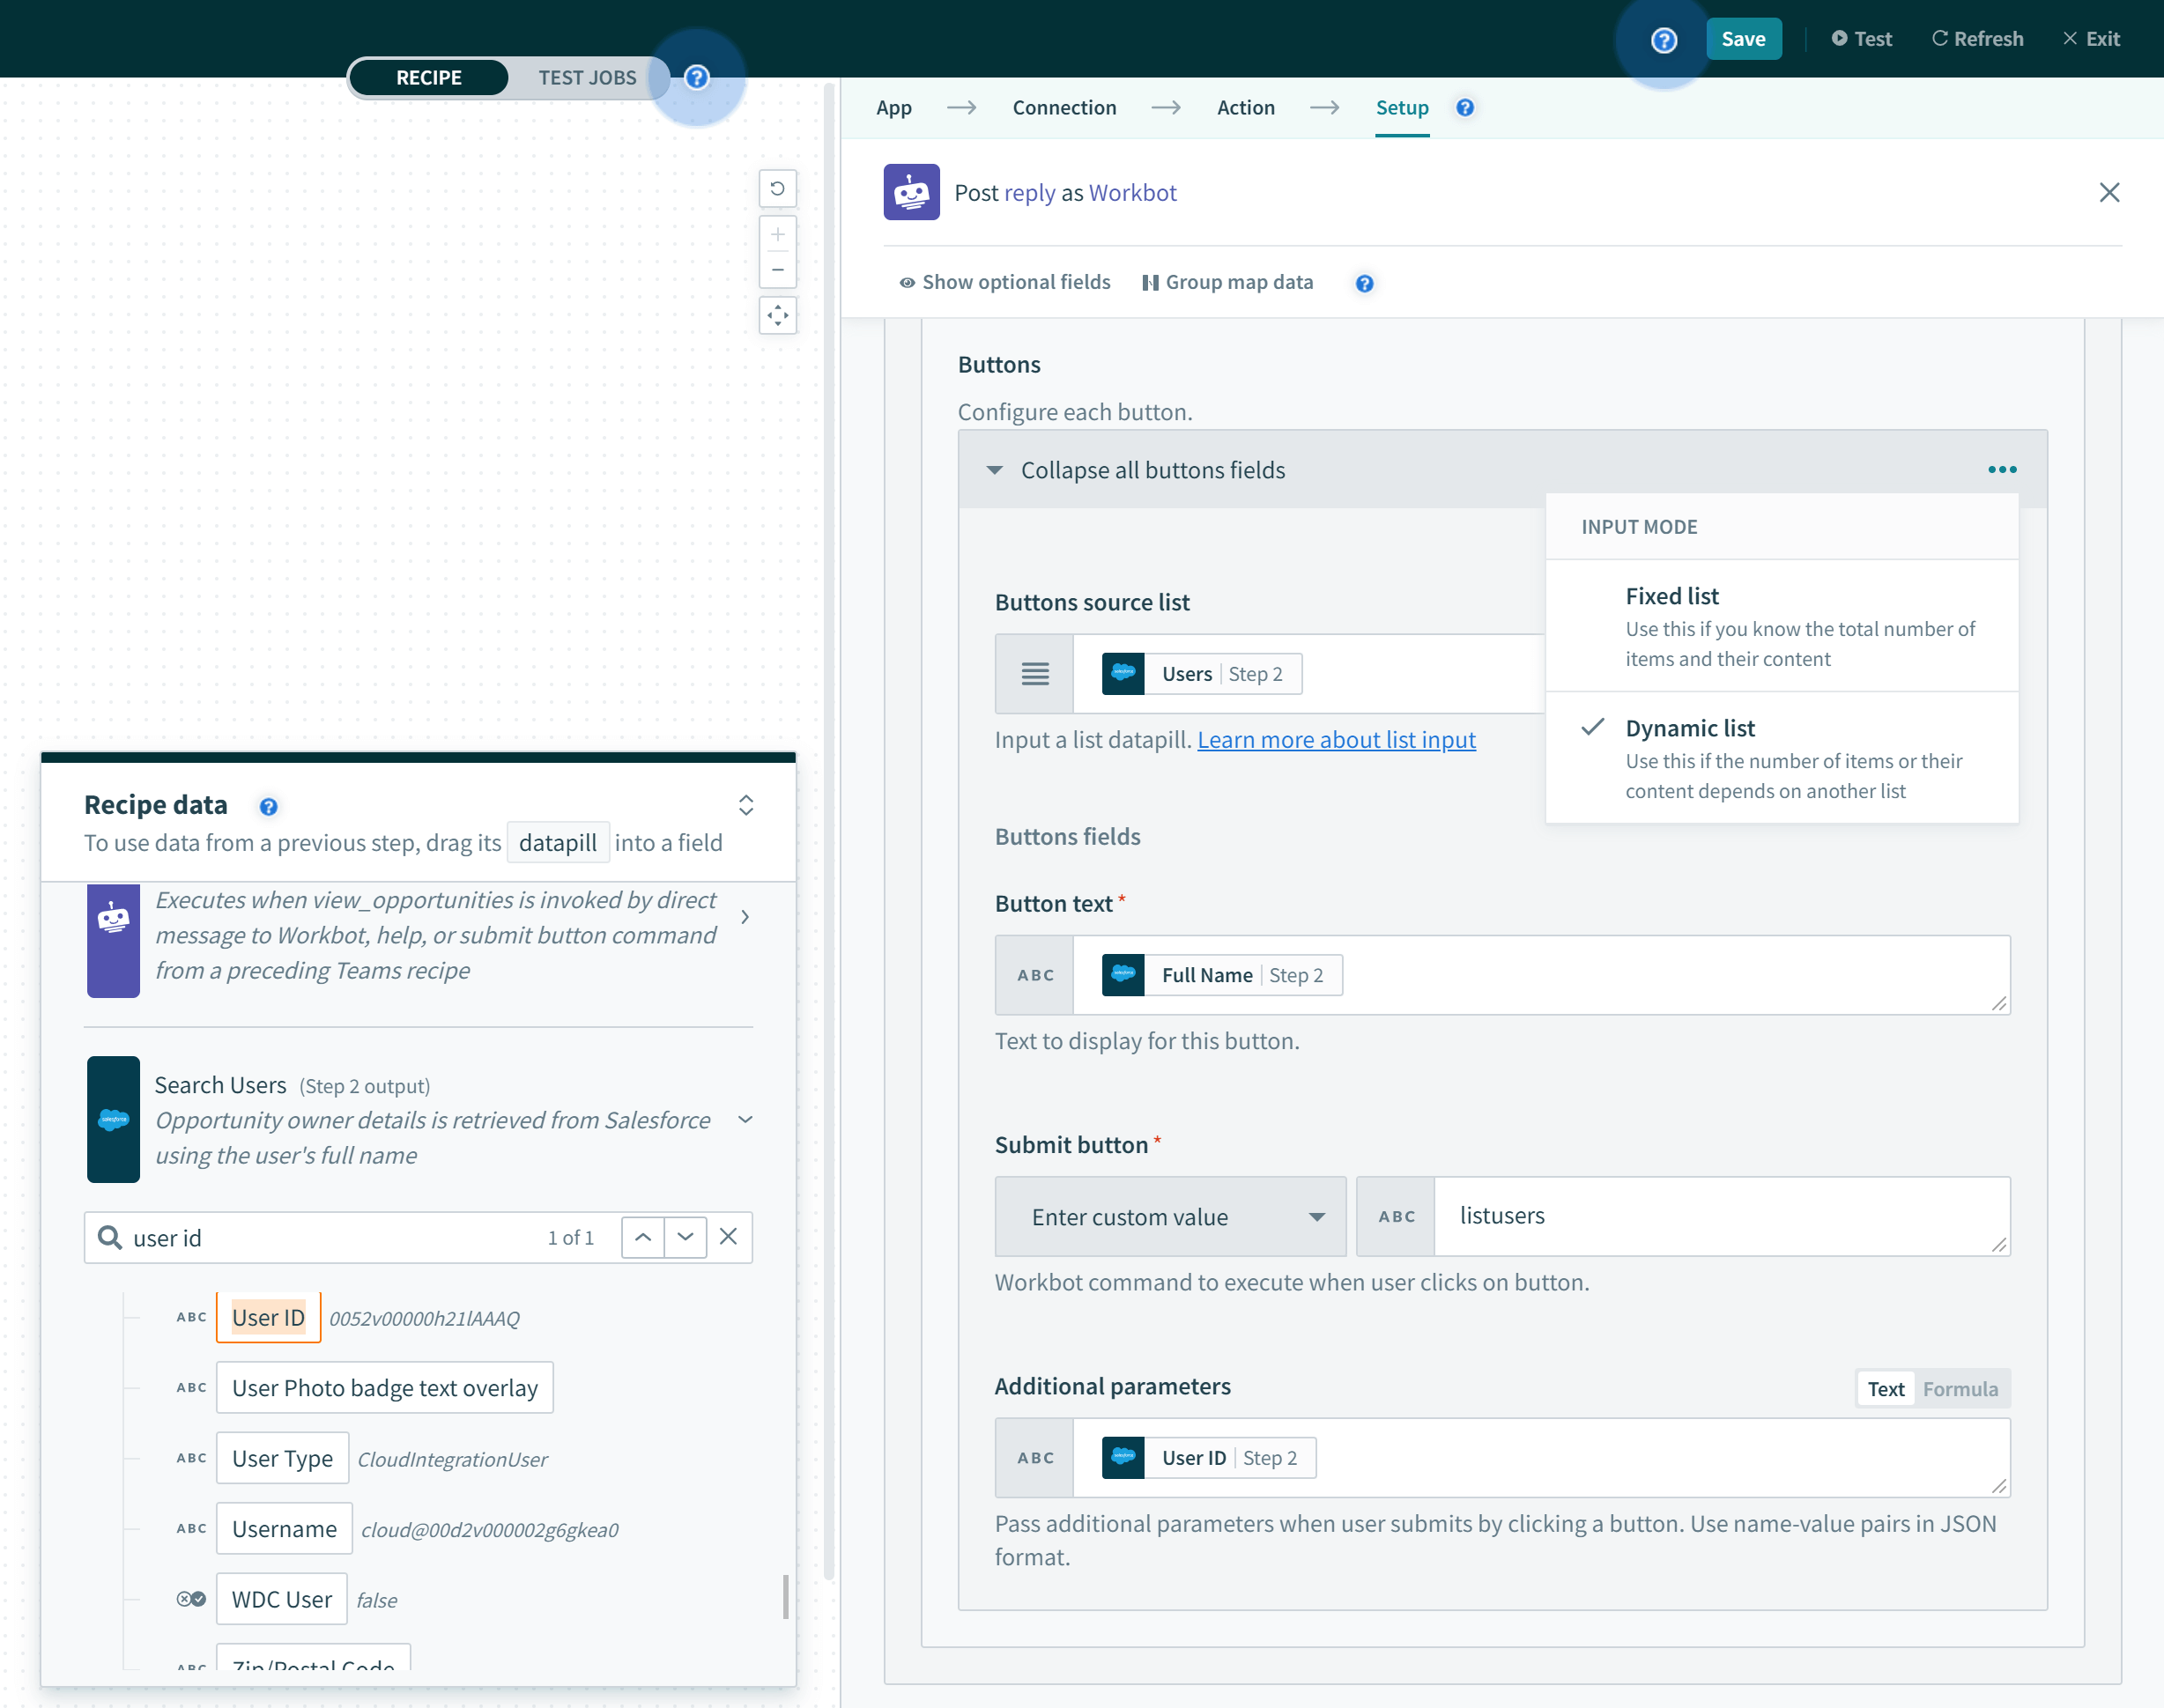
The following table shows what goes into the dynamic buttons fields:
| Input field | Description |
|---|---|
| Buttons source list | List datapills have a list icon next to them in the datatree, for example, Salesforce users: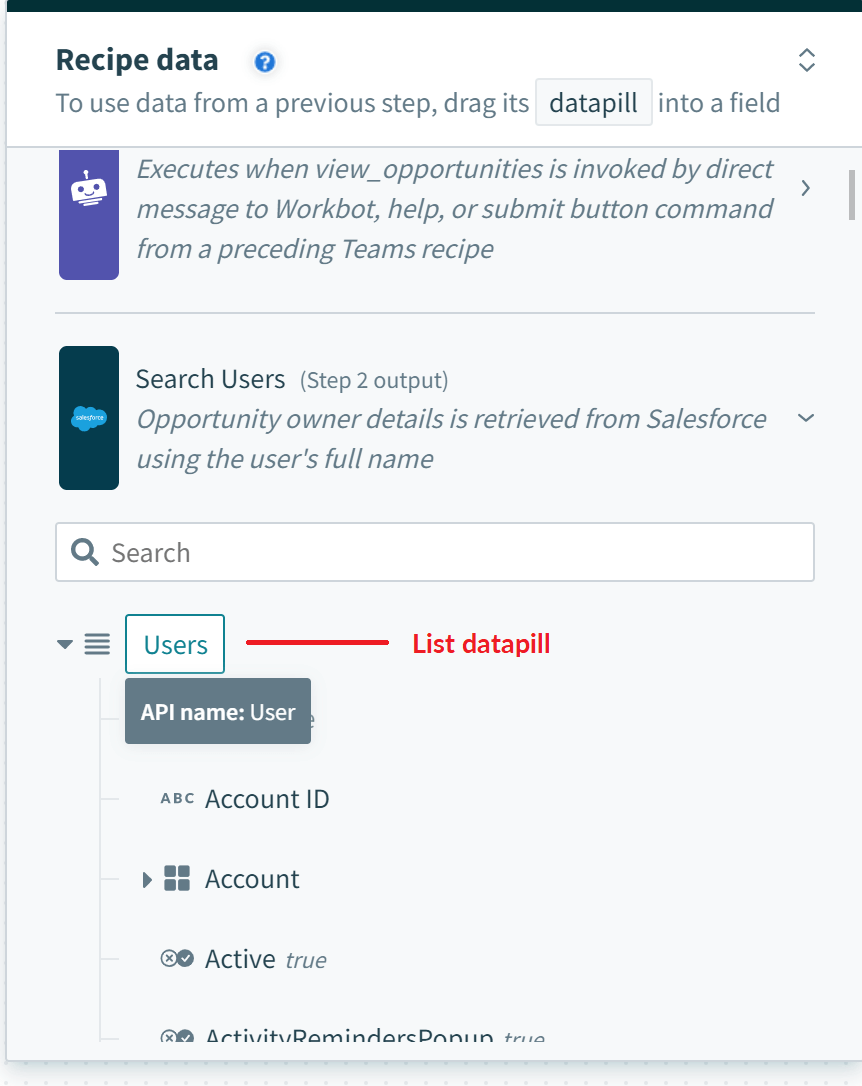 |
| Button text | The title of the button to be displayed. Typically, you want to use datapills from the list datapill, for example, Salesforce user name, a datapill from the Salesforce users list: 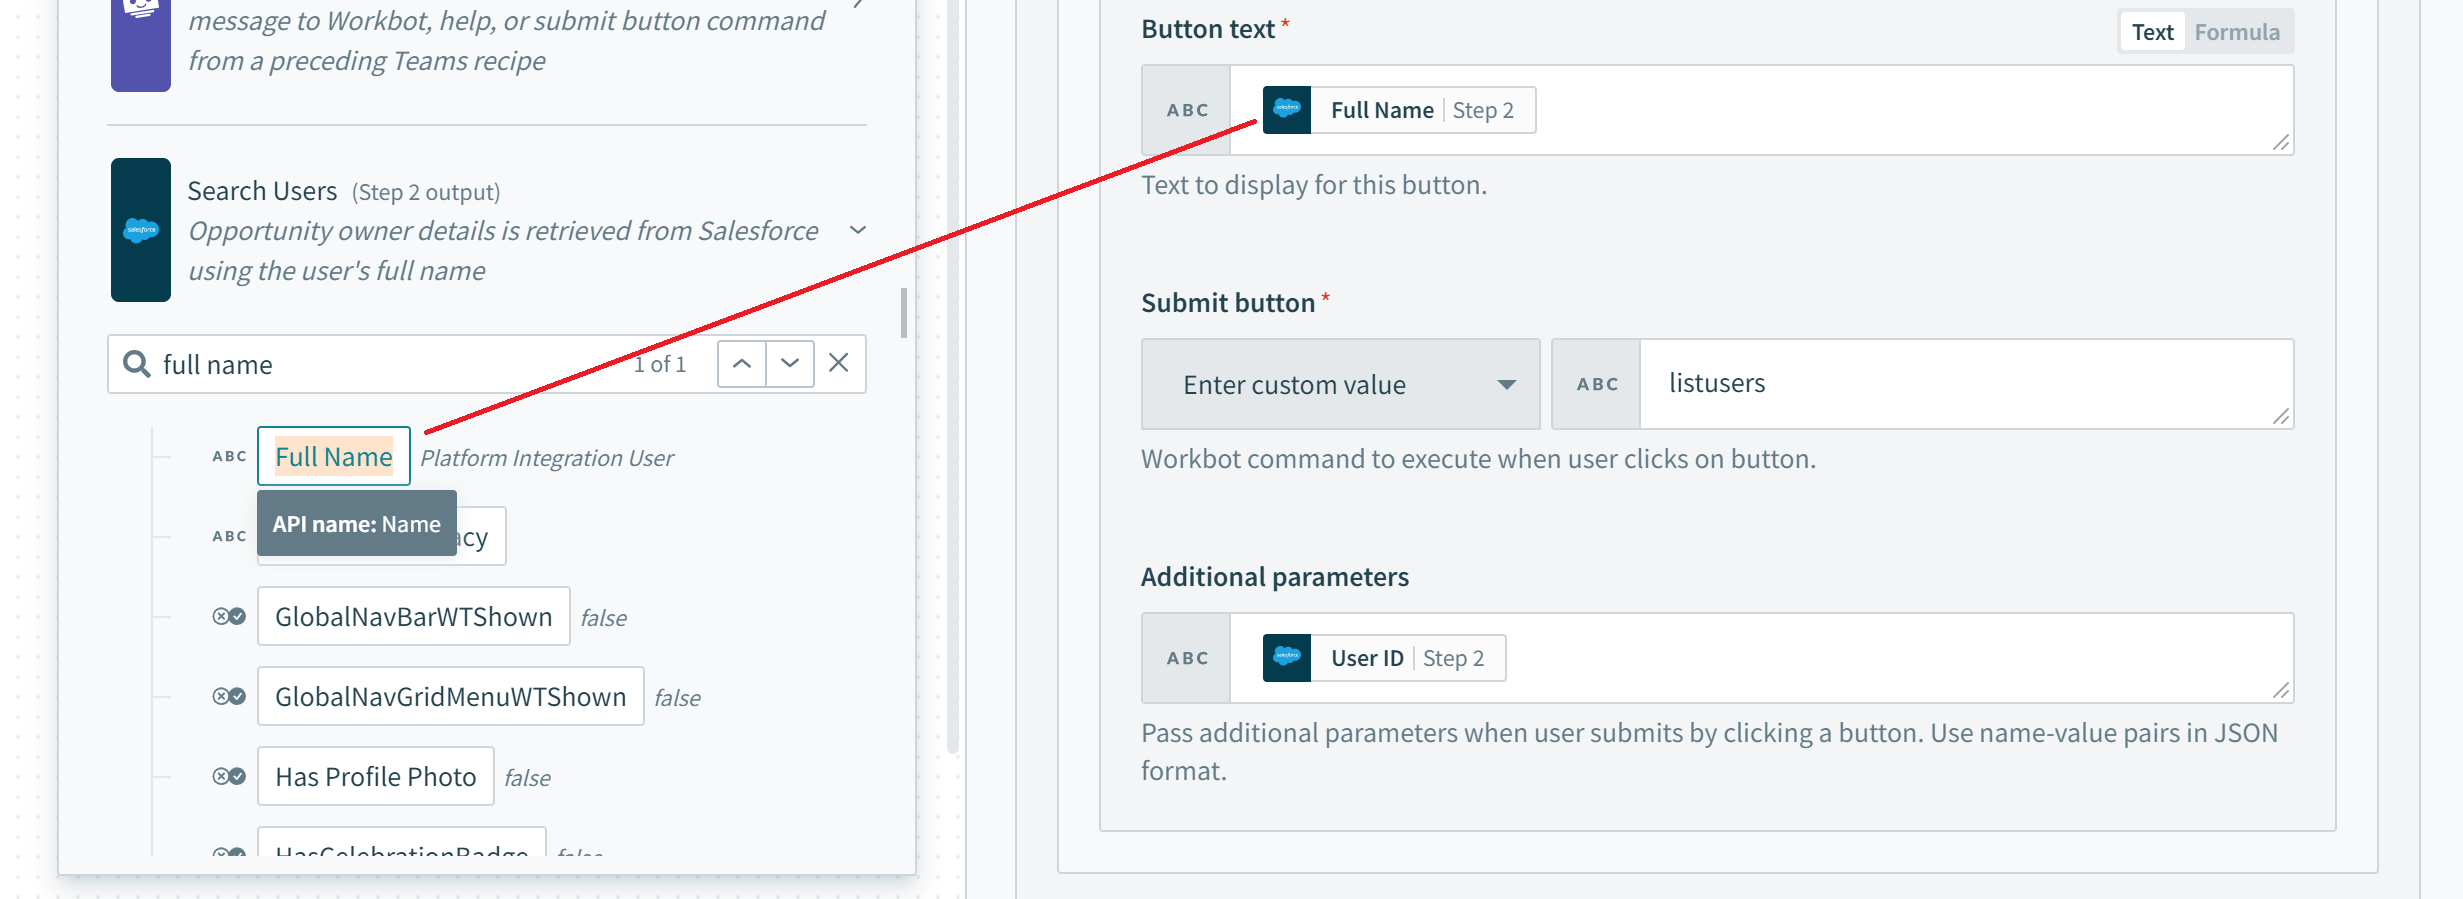 |
| Submit button command | Choose from a list of existing Workbot command recipes or key in a new command. Clicking on this button will trigger the recipe with the corresponding command trigger. |
| Additional parameters | Key in name-value pairs to pass onto the next recipe as additional parameters. Format should be JSON with name-value pairs, for example,{ Datapills need to be wrapped in double quotes and parameter names must be in all lowercase. Parameters can be user-specified, like the urgency of an issue in ServiceNow, or recipe information, like the Message ID of a previous Microsoft Teams message. |
Show tab using Adaptive Cards
In response to a Tab opened trigger event, you can show a tab using an array of Adaptive Cards. To learn more about how tabs work, see Tabs.

Learn more
Last updated: