# Configure Oracle as your data pipeline source
Set up Oracle as a data pipeline source to extract and sync records into your destination using the SuiteAnalytics Connect service. This guide includes connection setup, pipeline configuration, and key behavior for working with NetSuite2 as a source.
# Features supported
The following features are supported when using Oracle as a data pipeline source:
- Extract data from Oracle database tables
- Support for full and incremental sync
- Field-level selection for table extraction
- Schema drift detection and handling
- Field-level data masking
# Prerequisites
Ensure you have the following configuration before creating the Oracle connection:
Access to an Oracle database instance
A database user with read access to the tables used in the pipeline
The following connection details:
- Database host
- Database port (typically
1521) - Database name (SID or service name)
- Database username and password
Ensure an on-prem agent is configured and active if the Oracle database runs inside a private network.
# How to connect
Complete the following steps to create an Oracle connection:
# Step 1: Set up an Oracle database user
At a minimum, the database user account must have the SELECT permission for the database specified in the connection settings. Refer to the following example to set up permissions.
Click here to find out how to set up permissions
If we are trying to connect to a named schema (
HR_PROD) in an Oracle instance, using a new database userWORKATO, the following example queries can be used.First, create a new user dedicated to integration use cases with Workato.
CREATE USER WORKATO IDENTIFIED BY passwordNext, grant
CONNECTto this user.GRANT CONNECT TO WORKATO;This allows the user to have login access to the Oracle instance. However, this user does not have access to any tables.
The next step is to grant access to
SUPPLIERtable in theHR_PRODschema. In this example, we only wish to grantSELECTandINSERTpermissions.GRANT SELECT,INSERT ON HR_PROD.SUPPLIER TO WORKATO;Finally, check that this user has the necessary permissions. Run a query to see all grants.
SELECT * FROM DBA_ROLE_PRIVS WHERE GRANTEE = 'WORKATO';
SELECT * FROM DBA_TAB_PRIVS WHERE GRANTEE = 'WORKATO';
This should return the following minimum permission to create a Oracle connection on Workato.
+---------+--------------+--------------+--------------+
| GRANTEE | GRANTED_ROLE | ADMIN_OPTION | DEFAULT_ROLE |
+---------+--------------+--------------+--------------+
| WORKATO | CONNECT      | NO           | YES          |
+---------+--------------+--------------+--------------+>

+---------+---------+------------+---------+-----------+-----------+-----------+
| GRANTEE | OWNER   | TABLE_NAME | GRANTOR | PRIVILEGE | GRANTABLE | HIERARCHY |
+---------+---------+------------+---------+-----------+-----------+-----------+
| WORKATO | HR_PROD | SUPPLIER   | ROOT    | SELECT    | NO        | NO        |
| WORKATO | HR_PROD | SUPPLIER   | ROOT    | INSERT    | NO        | NO        |
+---------+---------+------------+---------+-----------+-----------+-----------+
3 rows in set (0.61 sec)
# Step 2: Connect Oracle to Workato
Complete the following steps to connect Oracle to Workato:
Workato supports the following Oracle connection types:
- Cloud connection: Use this option when your Oracle database is accessible over the public internet.
- On-prem agent connection: Use this option when your Oracle database runs in a private network and requires an On-prem agent (OPA) to establish connectivity.
# Cloud connection
Complete the following steps to connect to using a Cloud connection:
Click Create > Connection.
Search for and select on the New connection page.
Enter a name for your connection in the Connection name field.
Use the Location drop-down menu to select the project where you plan to store the connection.
Select Cloud in the Connection type field.
Enter the database host address in the Database host field.
Enter the number of the Database port the server is running on, typically 1521.
Enter the database user's User name from Step 1.
Enter the database user's Password.
Optional. Enter the database schema in the Schema field.
Optional. Expand Advanced settings to configure additional connection options.
Click Connect.
# On-prem agent connection
Use an on-prem agent connection when your Oracle database is located in a private network that can't be accessed directly from the internet.
Complete the following steps to connect to using an on-prem agent (OPA):
Click Create > Connection.
Search for and select on the New connection page.
Enter a name for your connection in the Connection name field.
Use the Location drop-down menu to select the project where you plan to store the connection.
Select your on-prem group in the Connection type field.
Select a Database type. Available options include Service name, SID, and TNS.
SID and TNS database types require On-prem agent version 27.1 or later.
Refer to the Database types section for more information.
Provide the following fields based on the Database type selected:
Complete the following fields if you selected Service name or SID as the Database type:
Enter the database host address in the Database host field.
Enter the number of the Database port the server is running on, typically 1521.
Enter the database user's User name from Step 1.
Enter the database user's Password.
Optional. Enter the database schema in the Schema field.
Optional. Expand Advanced settings to configure additional connection options.
Optional. Expand Pooling settings to configure Oracle database connection pooling.
Optional. Expand Additional properties for Oracle connection to add custom Oracle connection parameters.
Click Connect.
# Database types
Workato displays the Database type field only when you select an On-prem group in the Connection type field while creating an Oracle connection.
Refer to Step 2: Connect Oracle to Workato for instructions on configuring the connection.
Select one of the following Database type options when connecting through an On-prem agent (OPA).
# Service name
Use Service name to connect to a database service within an Oracle instance. For example, ORCLPDB1.
ORACLE 12C+ PDB ENVIRONMENTS
We recommend using Service name instead of SID in Oracle 12c and later environments that use multitenant architecture (CDB/PDB).
In these environments:
- SID connections may connect to the CDB root container
- Service name connections may connect to a specific pluggable database (PDB)
If a database user exists in a PDB, authentication can fail when connecting through the CDB root even if the username and password are correct.
Use Service name to ensure the connection targets the correct PDB.
Service names have the following characteristics:
- Map to database services registered with the Oracle listener
- Support Real Application Clusters and load balancing
- Identify logical database services rather than specific instances
Use this option for most modern Oracle deployments.
# SID
Use SID (System Identifier) to connect to a specific Oracle database instance. For example, ORCL.
SIDs have the following characteristics:
- Identify a single Oracle database instance
- Do not support load balancing
- Commonly appear in older Oracle deployments
Use this option when your DBA provides an SID instead of a service name.
# TNS
Use TNS when you have a full Oracle Net connect descriptor.
TNS definitions have the following characteristics:
- Reference connection entries defined in the
tnsnames.orafile - Abstract the underlying connection details
- May internally use a SID or Service name
- Support advanced configurations such as load balancing and high availability
Enter the full TNS descriptor in the TNS definition field. For example:
(DESCRIPTION=
(ADDRESS=(PROTOCOL=TCP)(HOST=db.example.com)(PORT=1521))
(CONNECT_DATA=
(SERVICE_NAME=ORCLPDB1)
)
)
# Configure the pipeline
Complete the following steps to configure Oracle as your data pipeline source:
Return to your Workato account.
Select Create > Data pipeline.
Provide a Name for the data pipeline.
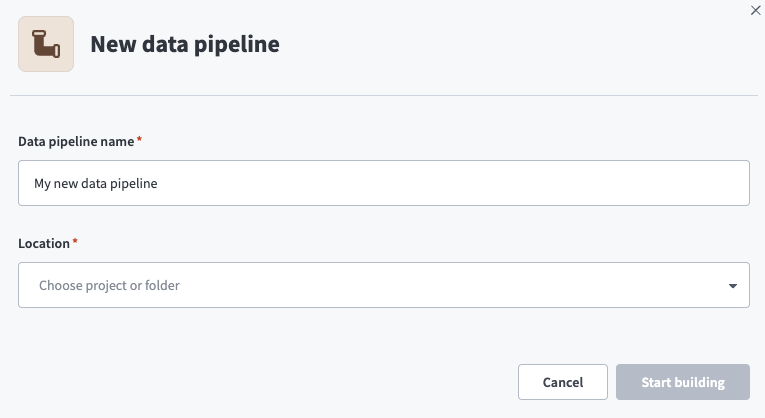 Data pipeline setup
Use the Location drop-down menu to select the project where you plan to store the data pipeline.
Click Start building.
Click the Extract new/updated records from source app trigger. This trigger defines how the pipeline retrieves data from the source application.
 Configure the Extract new/updated records from source app trigger
Use the Your Connected Source Apps drop-down menu to select Oracle.
Choose the Oracle connection you plan to use for this pipeline. Alternatively, click + New connection to create a new connection.
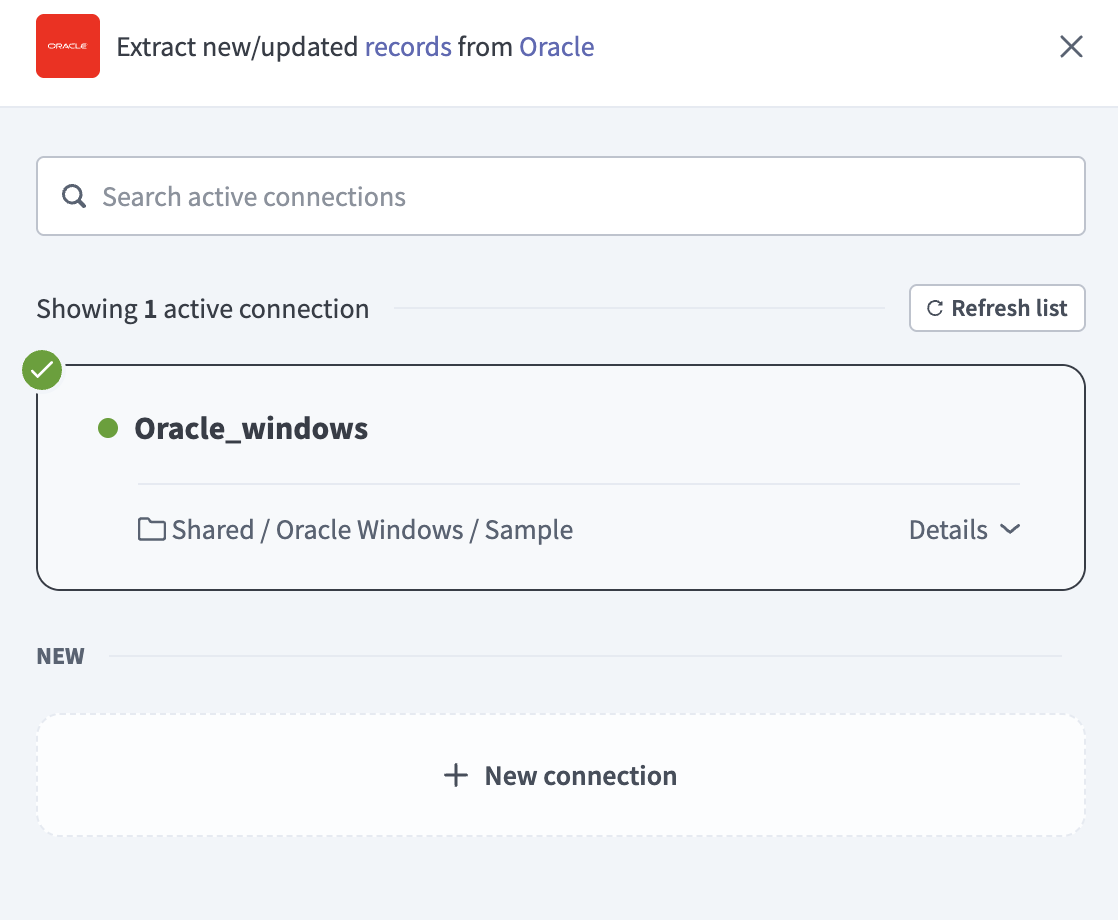 Choose a Oracle connection
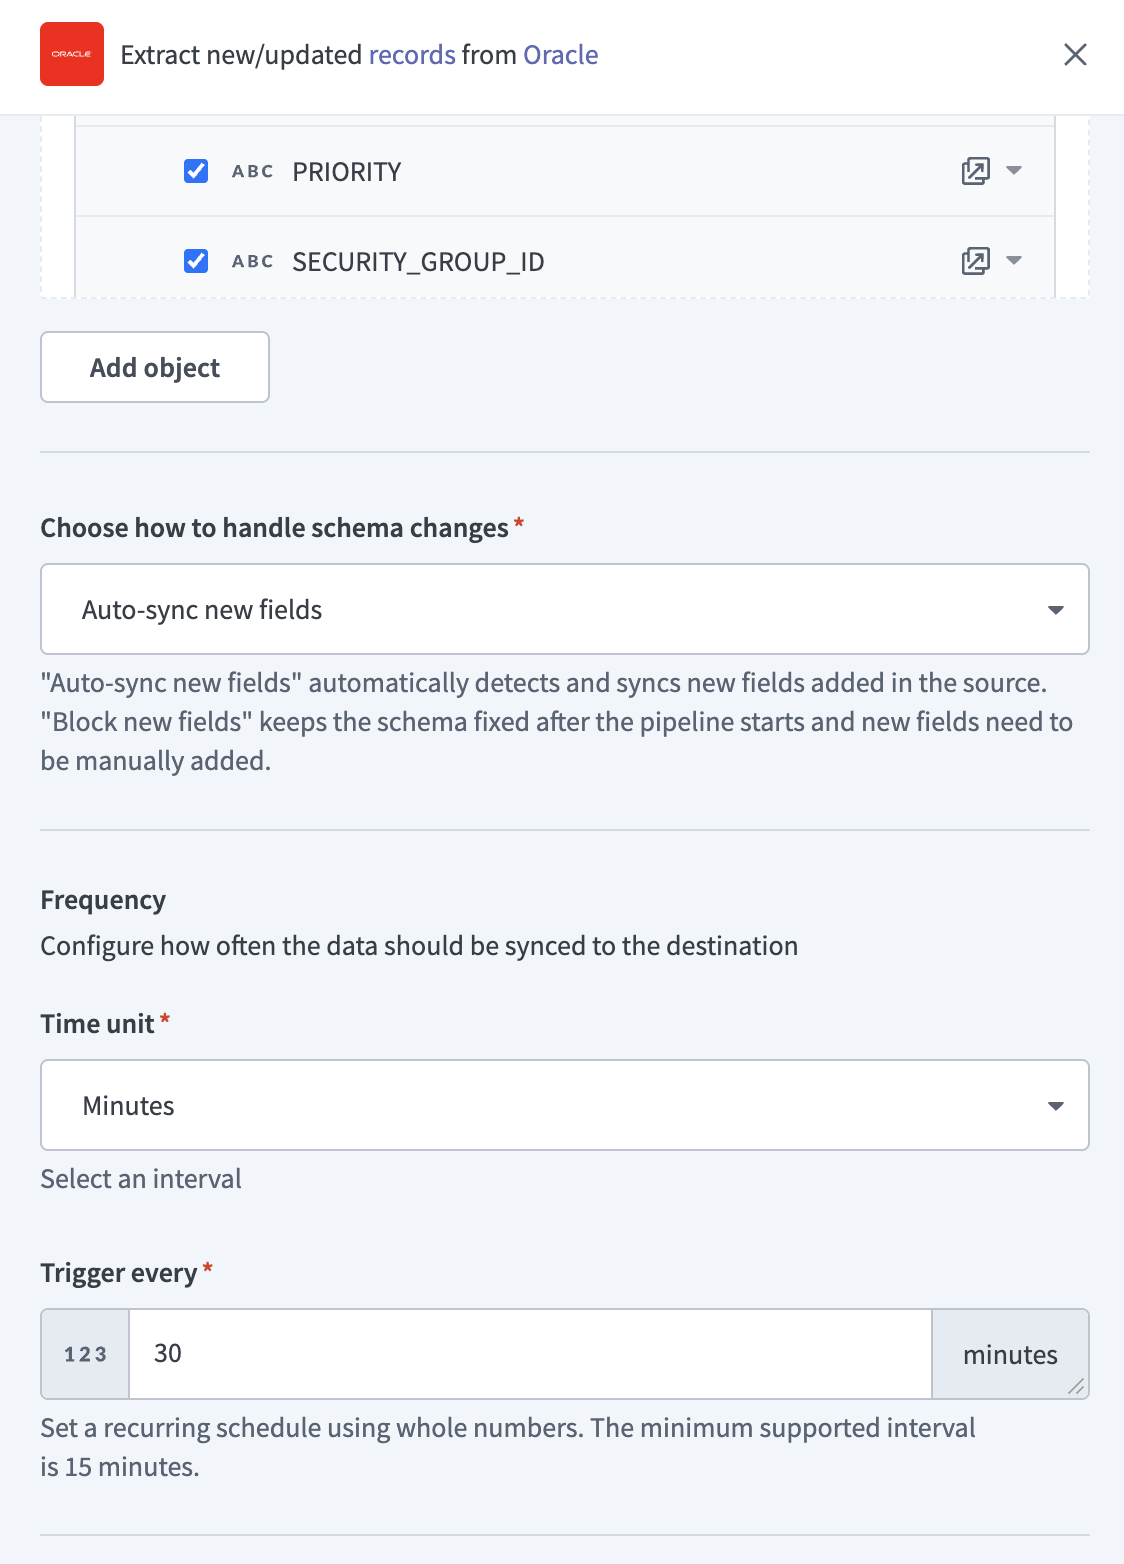
Click Add object to open the object modal.
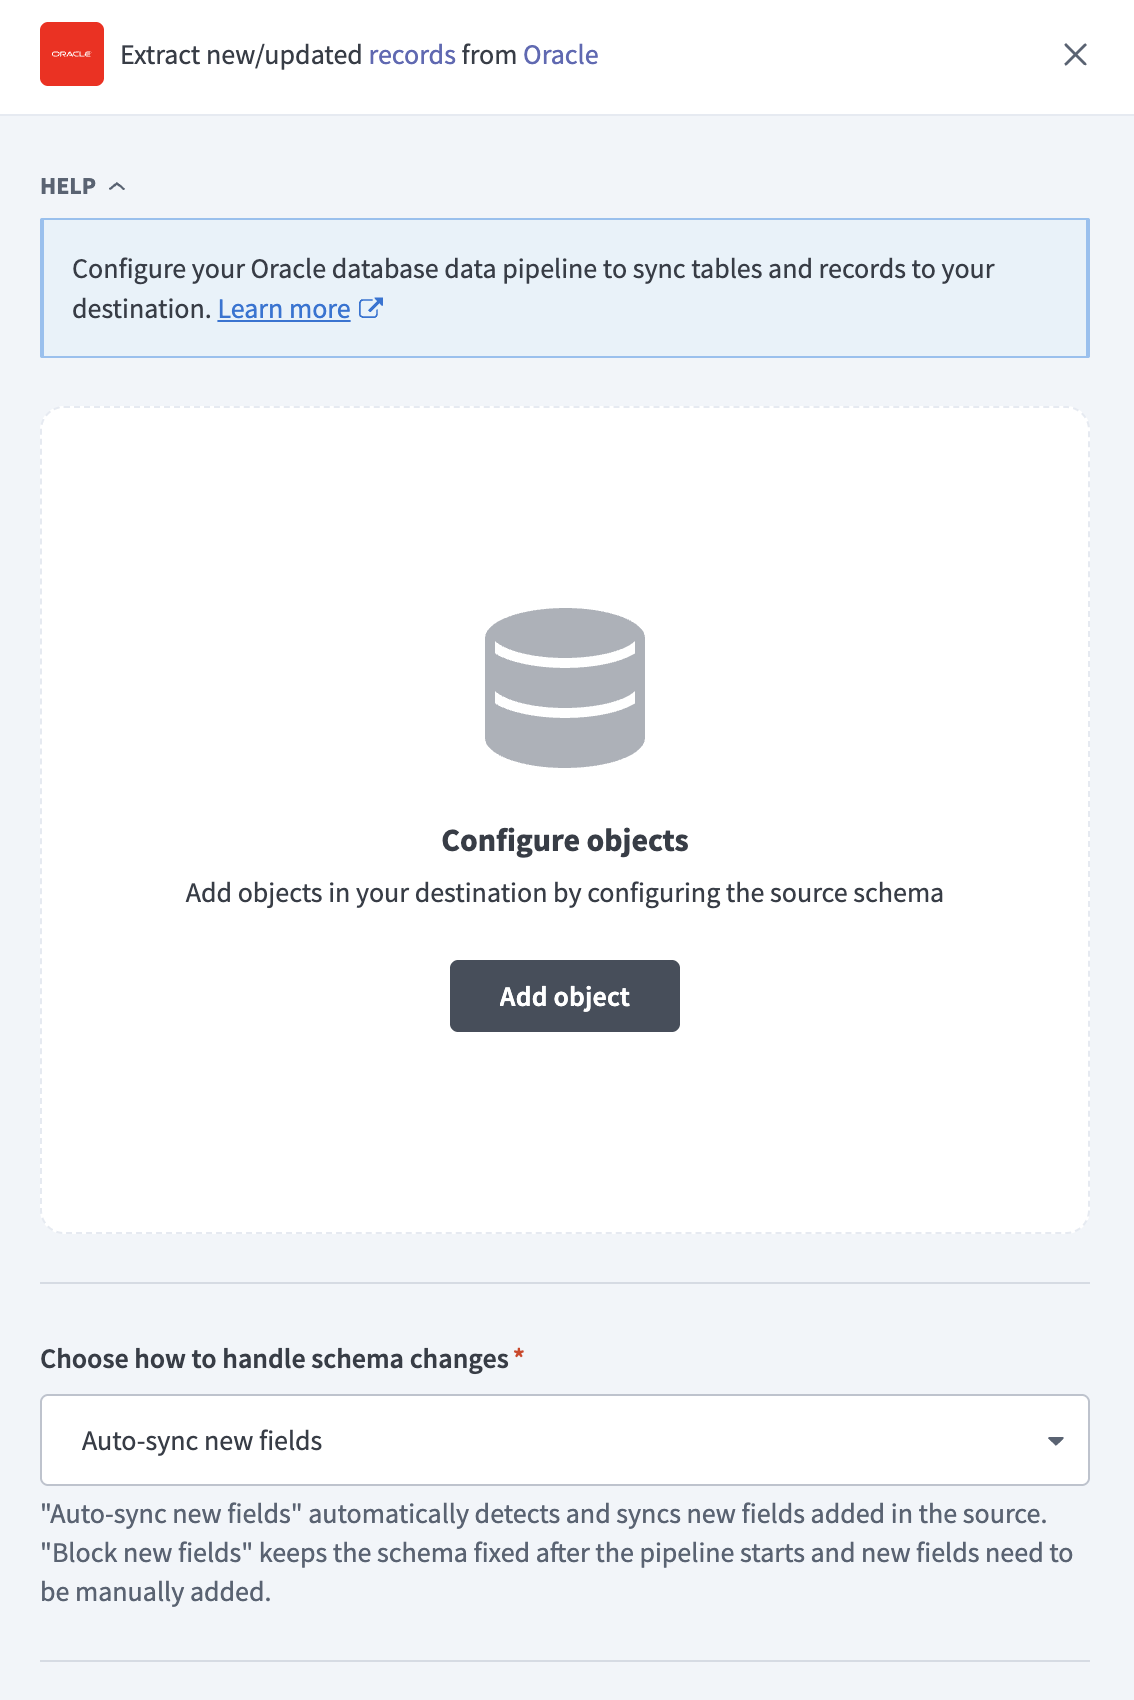 Add object
Search or browse the list of available Oracle tables and select the tables you plan to sync.
Click Add.
Review and customize the schema for each selected table. The pipeline automatically fetches the schema for each table you select to ensure the destination matches the source.
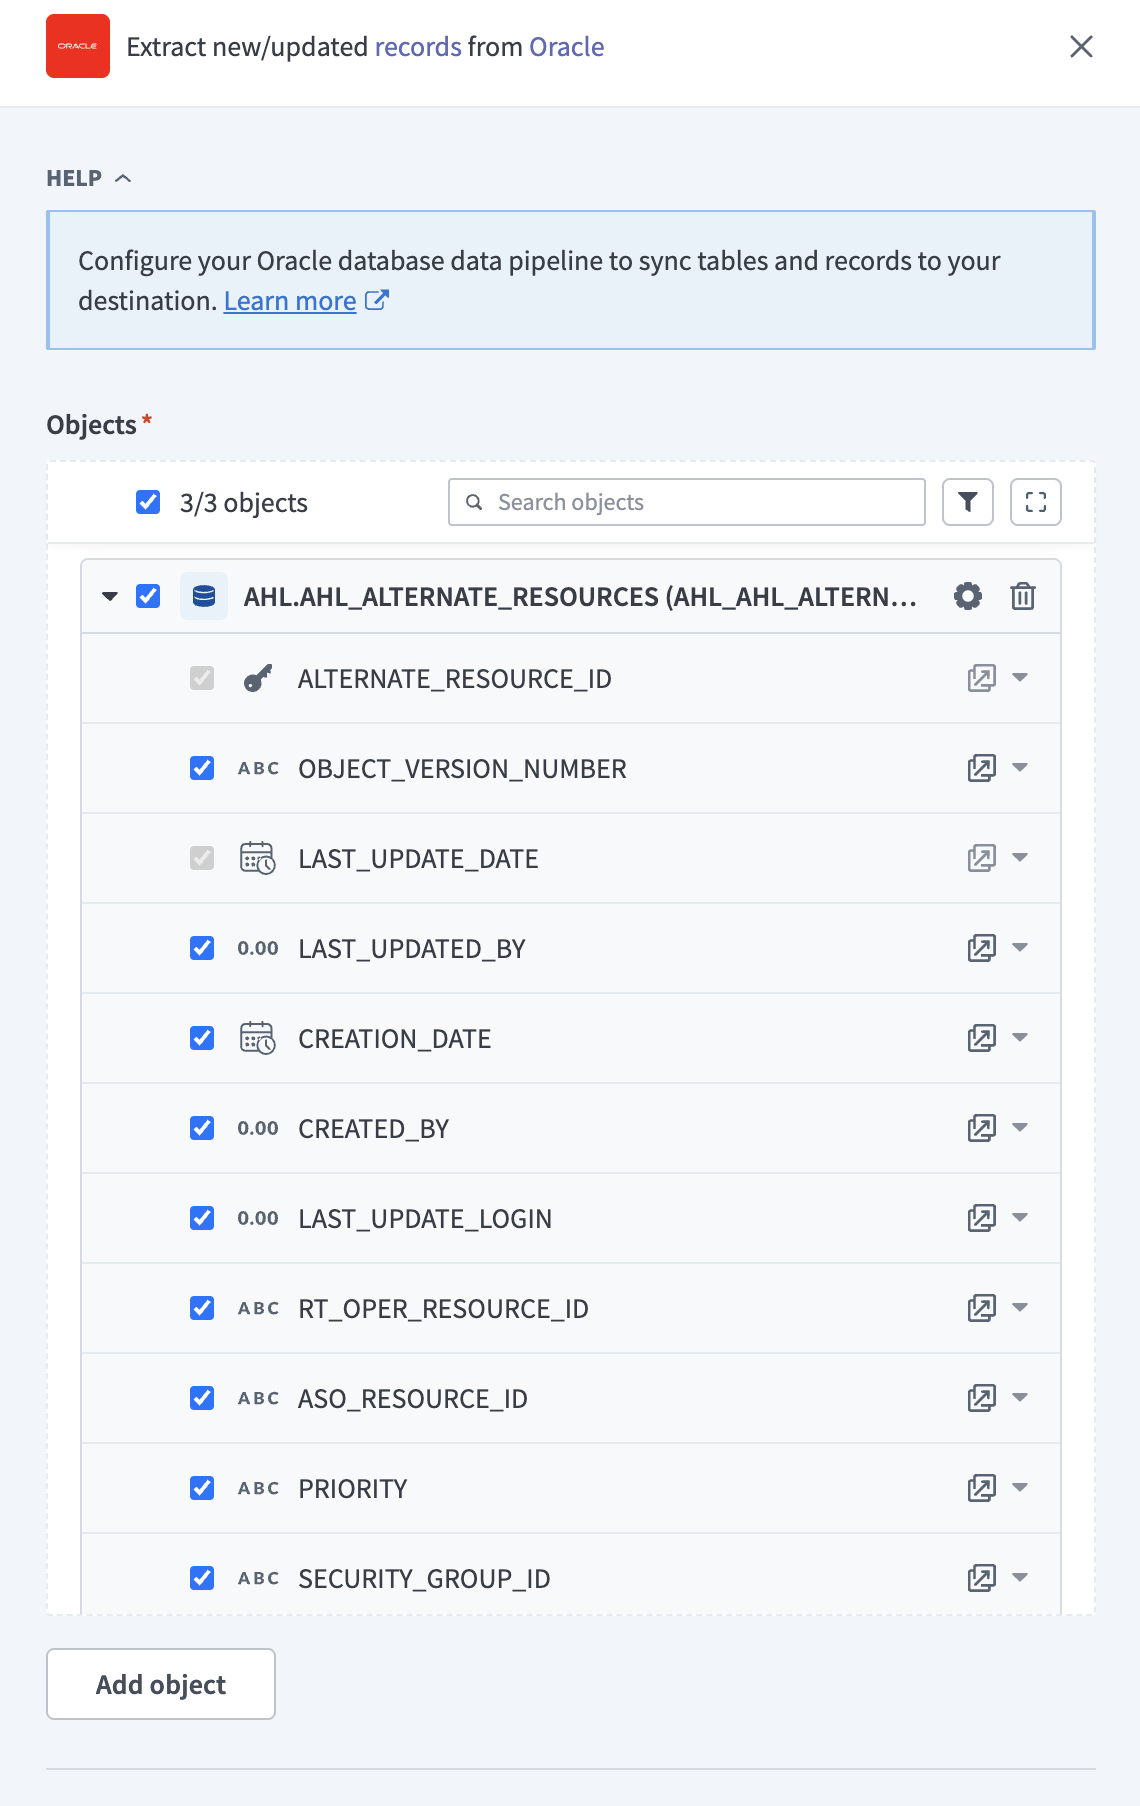 Expand object
You can expand a table to view its fields. Keep all fields selected to extract all available data, or deselect specific fields to exclude them from extraction and schema replication.
Configure sync settings for each table:
Click the Settings (gear) icon next to the table.
![]() Configure sync settings
Configure sync settings
Select a Sync mode:
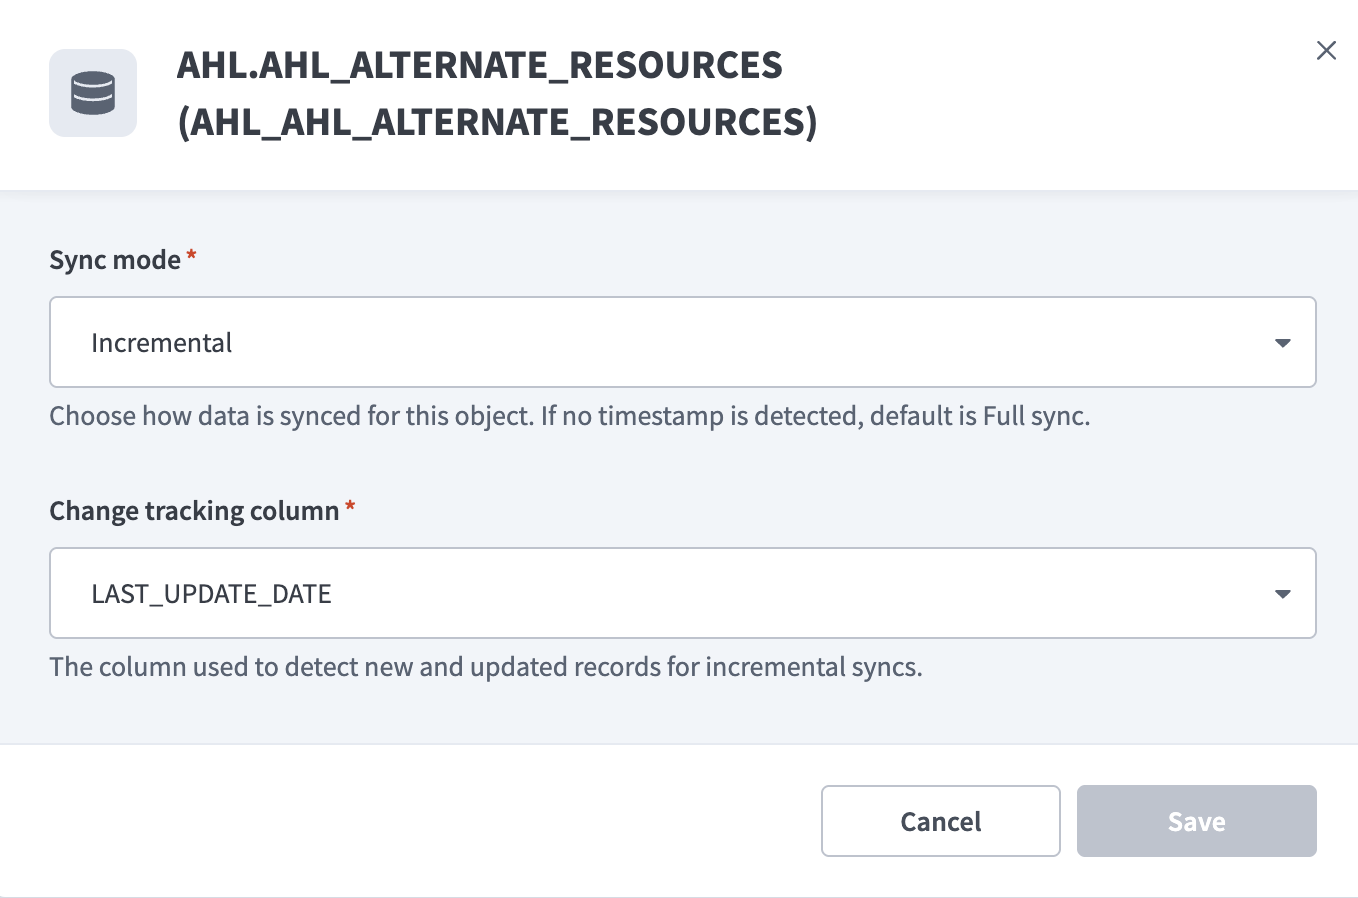 Configure sync settings
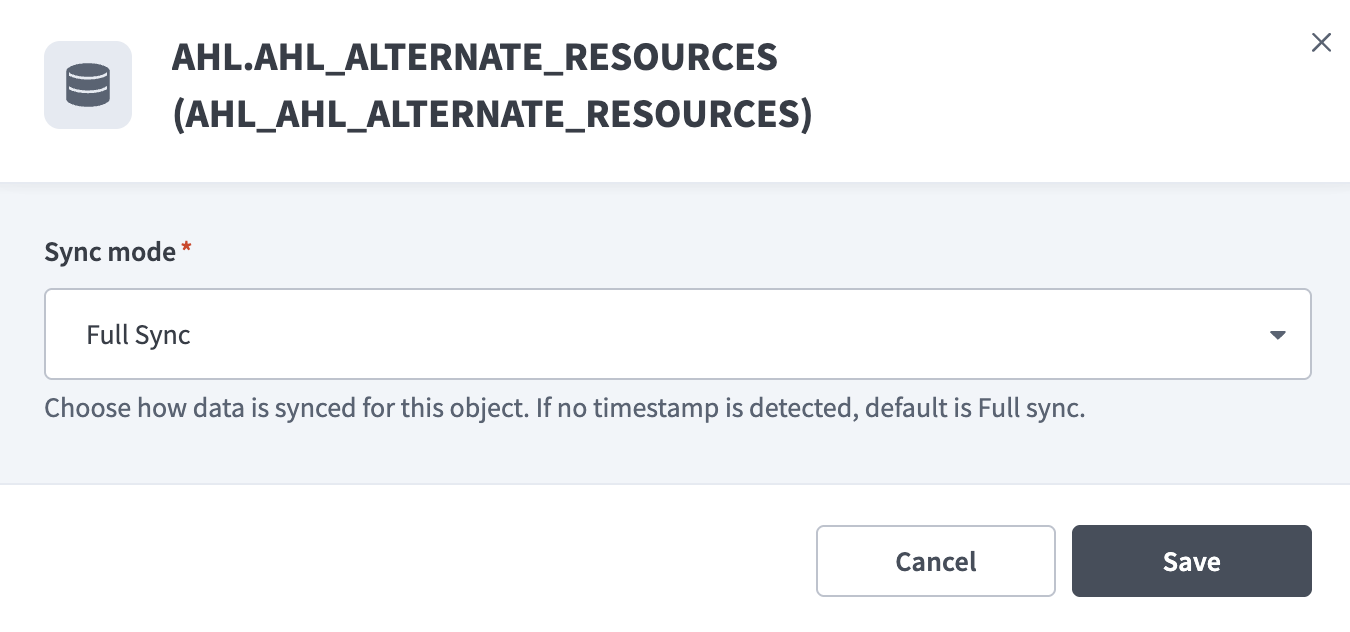 Configure sync settings
Review the impact of sync configuration changes.
FULL RE-SYNC BEHAVIOR
Changing the Sync mode or Change tracking column triggers a full re-sync of the affected table on the next pipeline run.
During a full re-sync, the pipeline reloads all records for that table. This process may increase runtime and reprocess existing data in the destination.
Click Add object again to add additional tables using the same flow.
Choose how to handle schema changes:
- Select Auto-sync new fields to detect and apply schema changes automatically.
- Select Block new fields to manage schema changes manually. This option may cause the destination to fall out of sync if the source schema updates.
Unsynchronized schema changes, also known as schema drift, can cause issues if not managed. Refer to the Schema drift section for more information.
Configure how often the pipeline syncs data from the source to the destination in the Frequency field. Choose either a standard time-based schedule or define a custom cron expression.
 Configure sync frequency
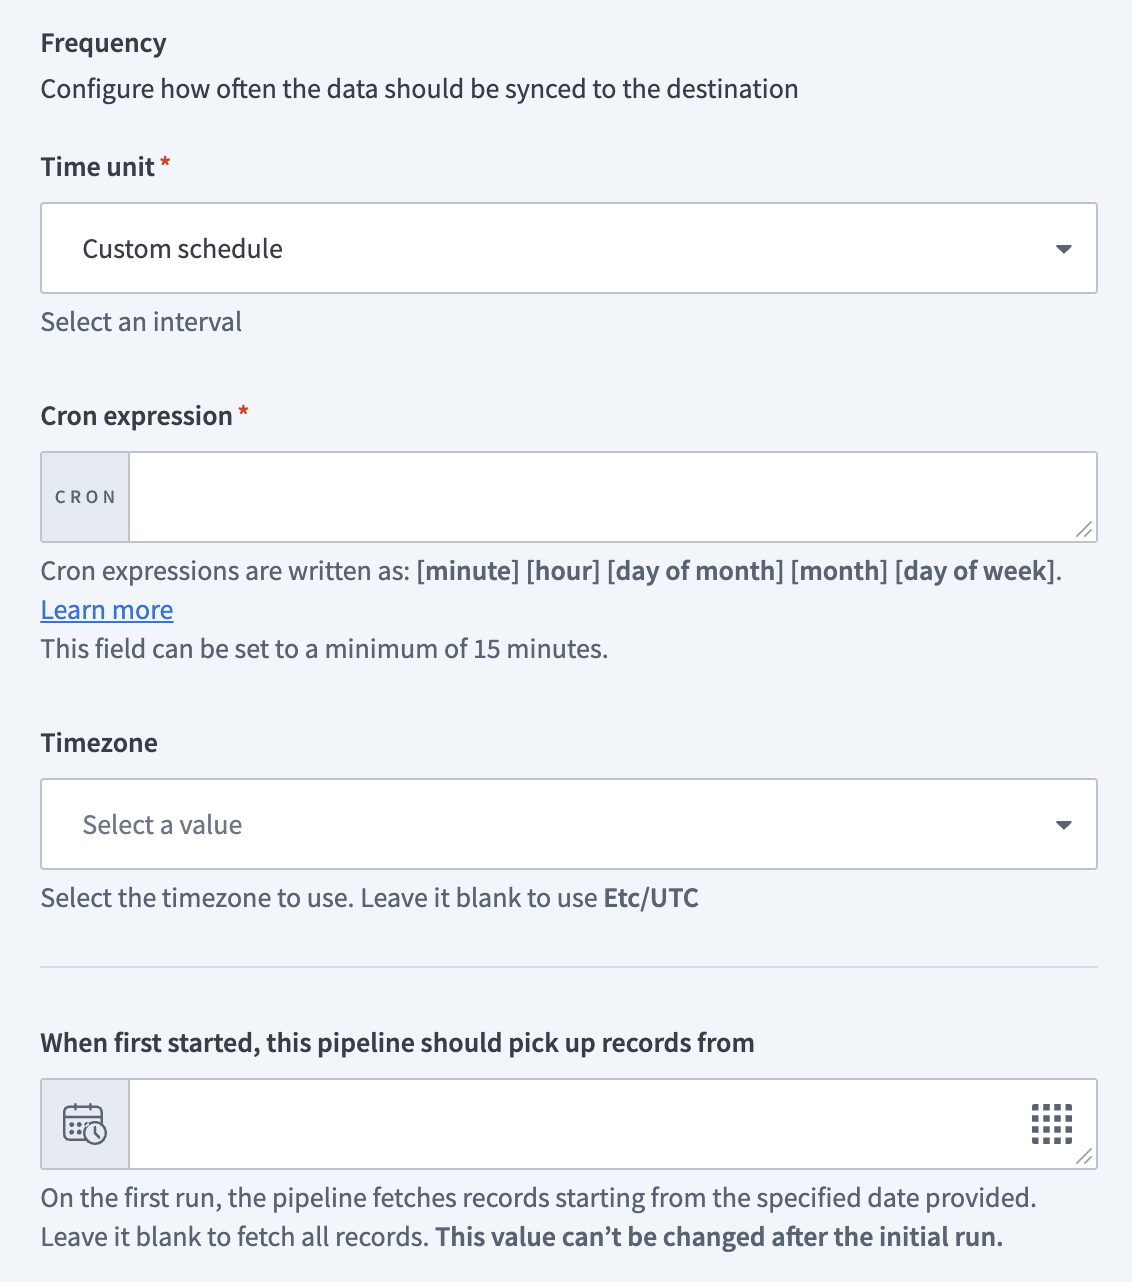 Configure sync frequency
# Supported Oracle tables
The Oracle connector supports most tables available in the connected Oracle database instance. Workato retrieves table metadata and schema information from the Oracle database to populate available objects during pipeline configuration.
The tables available for selection depend on:
- The schema configured in the Oracle database
- The permissions granted to the database user used for the connection
Last updated: 4/29/2026, 2:37:19 PM