Set up your data sources
The Data Sources setting allows you to specify one or more sources for performing SQL queries. You can add multiple data sources during the recipe setup. To modify existing data sources or add new ones after the recipe is active, stop the recipe first, then make your changes.
How to set up your data sources
Complete the following steps to set up your data sources:
1
Select Add data source to include one or more data sources.
2
Configure the following fields for each data source:
Data source name
Provide a name for the data source, such as accounts or employees, to reference in the query.
Data source type
Select the type of data source from which SQL Transformations retrieves data:
Choose Content stream to use file content from upstream actions as your data source. Supports CSV, Excel, JSON, Avro, and Parquet formats. Pass the Contents or File contents reference datapill into the Content input stream field from an upstream action or trigger.
Choose FileStorage file to use a file within Workato FileStorage as your data source. You can use the file's path directly or use a datapill from upstream FileStorage actions, such as Search files or Get file contents.
Choose Data table to use a data table within Workato's data tables as your data source. This option allows you to retrieve data from tables configured within Workato without additional setup requirements.
MULTI-VALUE COLUMNS IN SQL TRANSFORMATIONS
Multi-value columns do not appear in SQL Transformation outputs. Multi-value columns are complex data types that cannot be serialized into standard flat file formats. Formats like CSV and Excel do not natively support the nested data structures that multi-value columns use.
3
Select a specific data table from the available list if you chose Data table as the data source type. No additional setup is required after you select the table.
RESERVED CHARACTER USAGE
Avoid using the @ character at the beginning of table and column names in data tables. It is reserved in SQL and can cause errors during query execution.
4
Choose the File format for your data if you select Content stream or FileStorage file as the data source type. Options include CSV, Excel, Parquet, Avro, and JSON. Based on your selection, additional fields display:
Worksheet (Excel files only)
Enter the name of the Excel worksheet that contains the data you plan to retrieve.
Range (Excel files only)
Specify the cell range within the Excel worksheet from which to retrieve data (for example, B5:C20). Ignore the header row when providing the range. If the data range is dynamic, include an arbitrary range and configure the query to ignore empty or null rows.
jq expression (JSON files only)
Provide a jq expression to convert your JSON data into CSV format. For example, .items[] | [ keys[] as $k | .[$k] ] | @csv.
AVRO AND PARQUET SUPPORT
Refer to Transform Avro and Parquet files for guidance on configuring Avro and Parquet files, including performance optimization and schema handling.
5
Set the Column schema type after selecting the file format. This setting determines how to define the schema of your incoming data:
Use the Defined schema when the structure of your incoming data is established at design-time. This option allows you to explicitly define the columns and their expected data types.
Complete the following fields to configure the Defined schema:
Data schema
Provide the column names from your data source file. You can manually input the names or provide a sample of your data source to automatically generate the schema. For Excel files, you must manually enter the column names to tailor the schema to your specific requirements.
Column relaxation
Select Yes if the source data may contain more columns than defined in the schema, allowing variations without causing errors. Select No to enforce an exact match between the schema and the data. If extra columns are present when No is selected, an error is returned.
Contains header (CSV and Excel files only)
Choose whether the data contains a header row with column names. Select Yes if the data includes a header row. Select No to match columns by order.
Header matching (CSV and Excel files only)
Choose whether to match the provided schema by name or by order with the incoming data header. Select Named to match columns by name if headers are present. Select Ordered if your schema contains column names that may vary from the data header, mapping the schema columns to the data from left to right. Appears when Contains header is set to Yes.
Column delimiter (CSV files only)
Select the character that separates columns in your CSV data, such as a , (comma) or ; (semicolon). The default is a comma.
HOW ARE THE COLUMNS MATCHED IN THE DEFINED SCHEMA?
Columns in your schema match top to bottom with the actual data from left to right. This ensures correct column identification, even if the actual data does not include column names. If column relaxation is set to No, Workato returns an error if the number of columns in the schema and the actual data do not match.
If column relaxation is set to Yes, Workato assigns arbitrary column names (for example, column_1, column_2) to any additional columns not defined in the schema. These arbitrary names also appear in the output if Add header in output is set to Yes.
Use the Dynamic schema option when the structure of your data changes at run-time. Pass the schema using datapills to specify column names and types. Column relaxation is supported, so the number of columns does not need to match exactly. Workato matches data by name if headers are present or by order if they are not.
Complete the following fields to configure the Dynamic schema:
Data schema
Input the schema using datapills to provide the necessary column names and types at run-time. For Excel files, specify the sheet name where the data is located. Use this approach when the structure of the incoming data is not fixed and varies between data sources.
Column relaxation
Select Yes if the source data may contain more columns than defined in the schema, allowing variations without causing errors. Select No to enforce an exact match between the schema and the data. If extra columns are present when No is selected, an error is returned.
Contains header (CSV and Excel files only)
Choose whether the data contains a header row with column names. Select Yes if the data includes a header row. Select No to match columns by order. The default setting is Yes.
Header matching (CSV and Excel files only)
Choose whether to match the provided schema by name or by order with the incoming data header. Select Named to match columns by name if headers are present. Select Ordered if your schema contains column names that may vary from the data header, mapping the schema columns to the data from left to right.
Column delimiter (CSV files only)
Select the character that separates columns in your CSV data, such as a , (comma) or ; (semicolon). The default is a comma.
DYNAMIC SCHEMA USE CASES
Refer to the following examples for specific use cases of the dynamic schema in action:
The Dynamic schema with Salesforce trigger output example demonstrates how to dynamically handle varying data structures from a Salesforce trigger. The schema adjusts automatically to the fields provided by Salesforce without manual intervention.
The Dynamic schema with schema from previous query example demonstrates how to pass a schema from one query to another using the Source schemas and Output schemas datapills. This allows for dynamic updates based on prior query outputs.
Use the Infer schema option when you do not plan to provide a schema. The schema is inferred directly from the data based on the header information. This option is useful for dynamic queries where schema changes are automatically handled without user input.
Complete the following fields to configure the Infer schema:
- Column delimiter (CSV files only)
- Select the character that separates columns in your CSV data, such as a
, (comma) or ; (semicolon). The default is a comma.
HOW DOES WORKATO HANDLE INFER SCHEMA?
Workato automatically matches columns in your data based on the headers provided. Schema adjustments and column order changes are inferred automatically without manual input.
6
Provide additional data sources by selecting Add data source. This allows you to compile the necessary data for the transformation.
Example data source: CSV file content from AWS S3 connector
In this example the data source is named employee and the data is fetched from file content coming from an S3 download file action. The schema contains employee-related information, and the CSV data uses a , (comma) as the delimiter.
Additionally, the user has chosen to ignore the CSV header row.
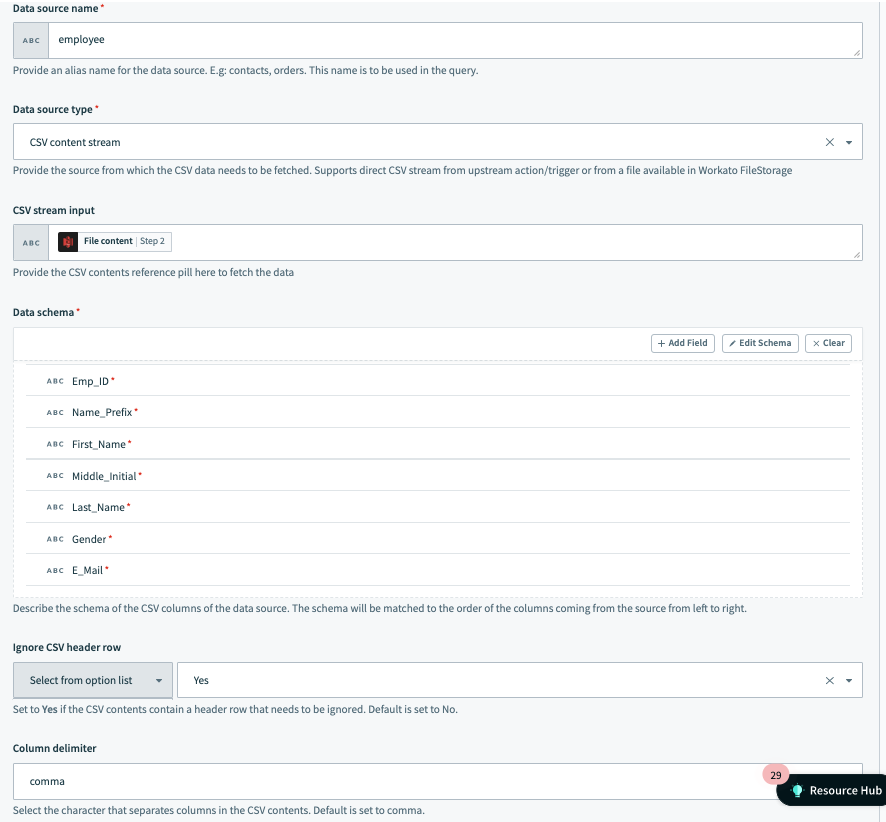 Data source example setup 1
Example data source: CSV file stored in Workato FileStorage
In this example the data source is named zipcode and is fetched from a file stored in Workato FileStorage in the path SQL/zipcode_data.csv.
Similar to the preceding example, the column delimiter is a , (comma), and the user has chosen to ignore the CSV header row of the data from the file while running the query.
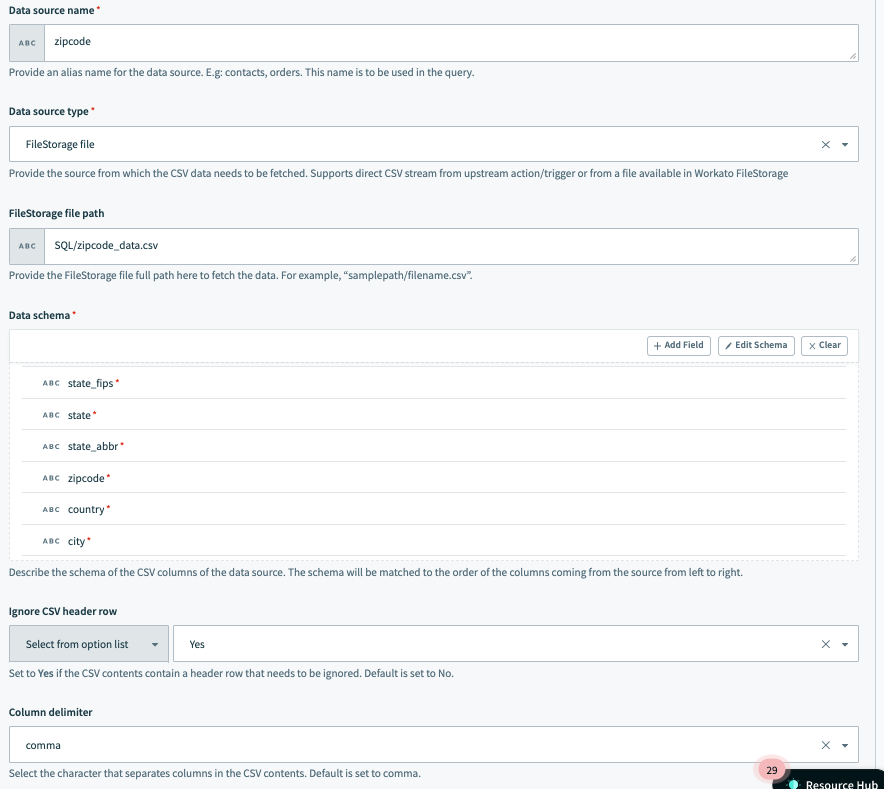 Data source example setup 2
Example data source: Excel file content from Google Drive connector
In this example, the data source is named sales_data. It retrieves data from an Excel file sourced from a Google Drive download file action. The schema is configured with sales-related columns, and the Excel data is obtained from the worksheet named Q1_Sales and the range A3:E100.
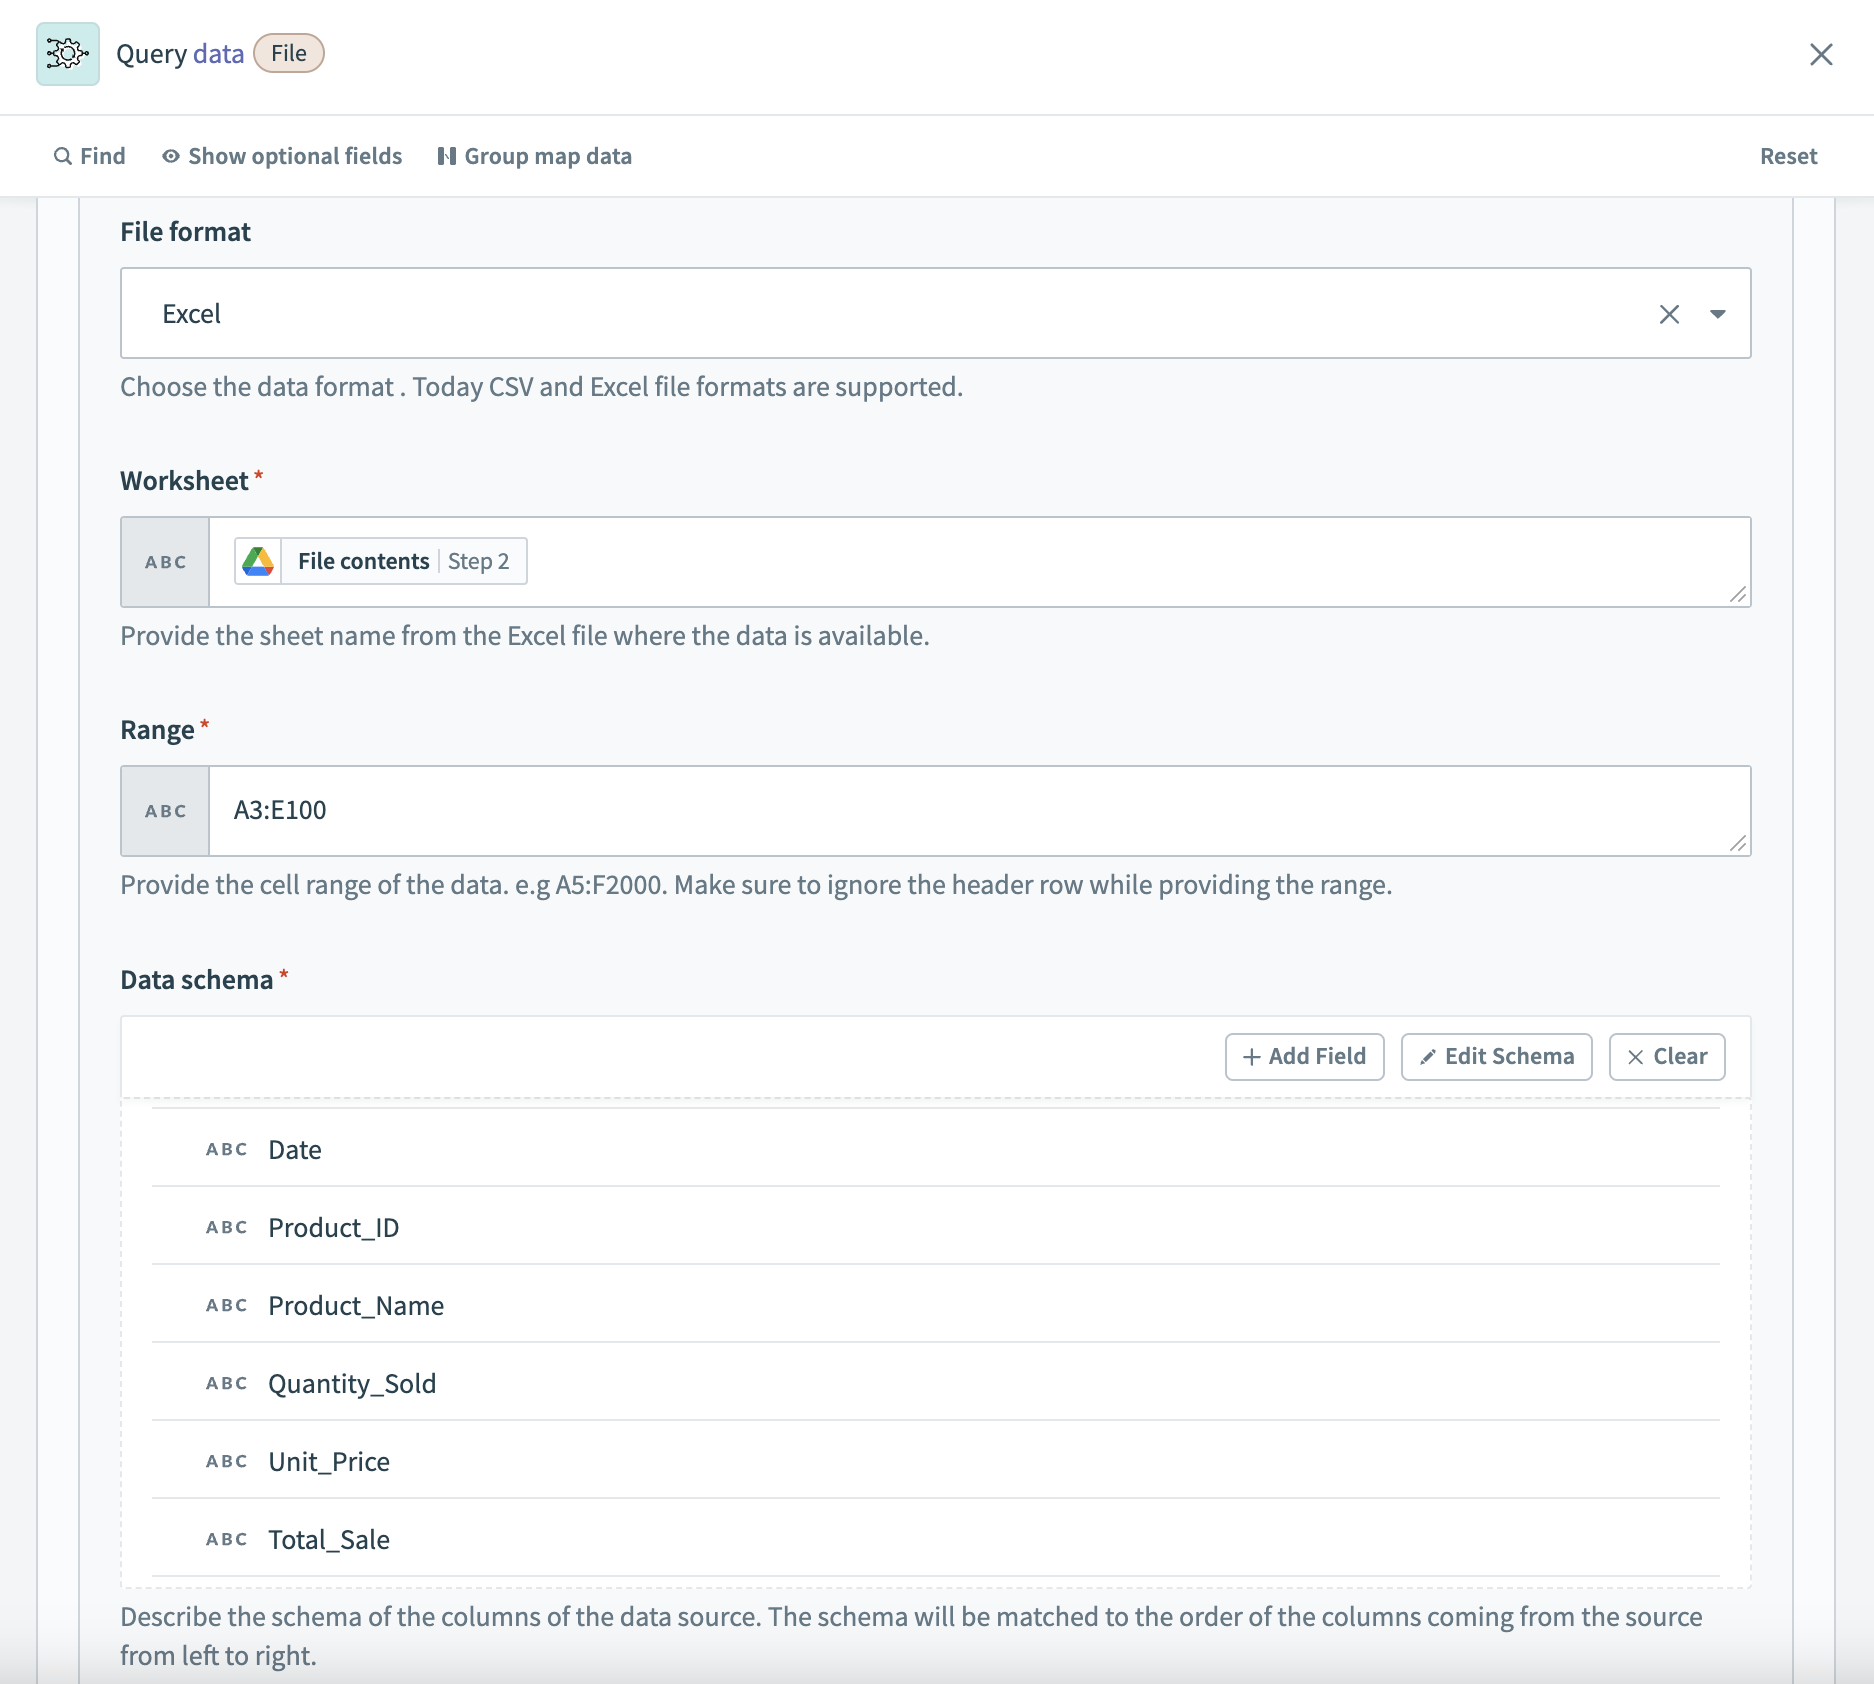 Data source example setup 3
Example data source: Dynamic schema with Salesforce trigger output
This example uses a Salesforce trigger, where the schema updates dynamically through the Object schema datapill in the Salesforce output. Since Salesforce data, like Field name , Field label , and Mapped type , can vary depending on the records returned by the trigger, this recipe sets the Column schema type to Dynamic.
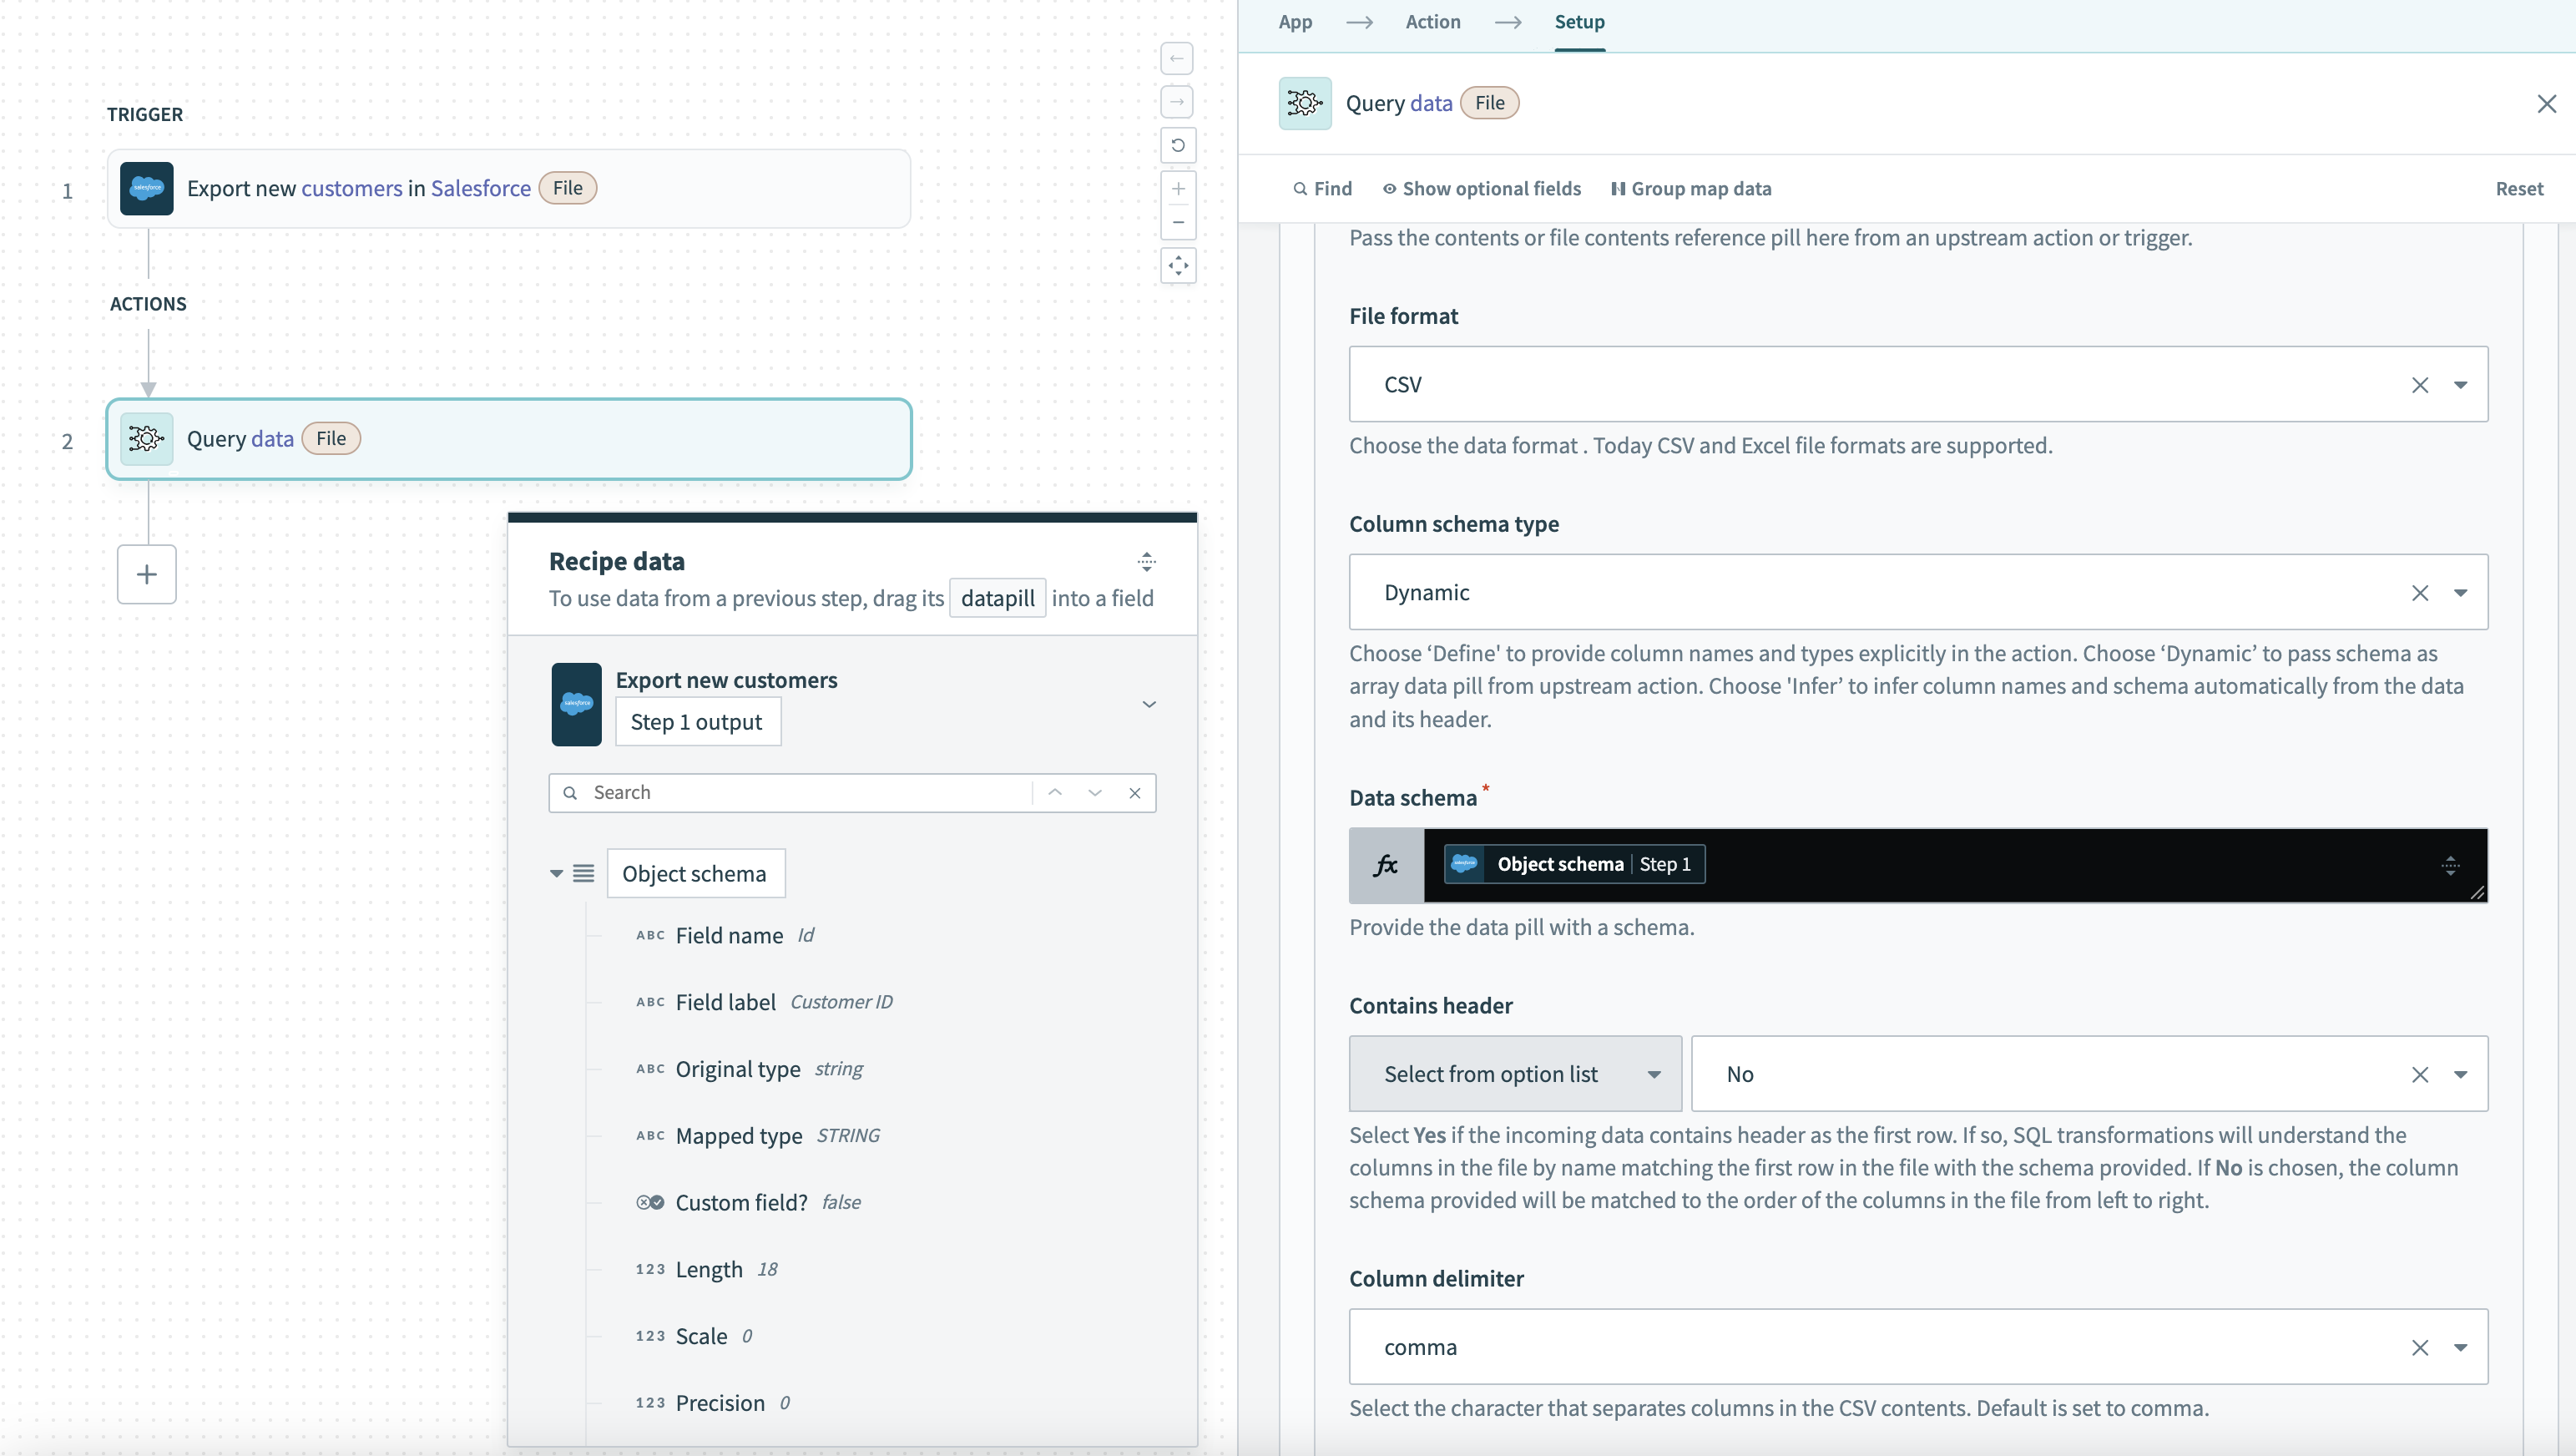 Data source example setup for Salesforce dynamic schema
The schema automatically adjusts to the fields from the Salesforce output, handling any changes or updates to the object fields without manual intervention.
Example data source: Dynamic schema with schema from previous query
The following example passes a dynamic schema from one query step to the next. The Output schema datapill from the first query is mapped as the data source in the dynamic schema section of the second query:
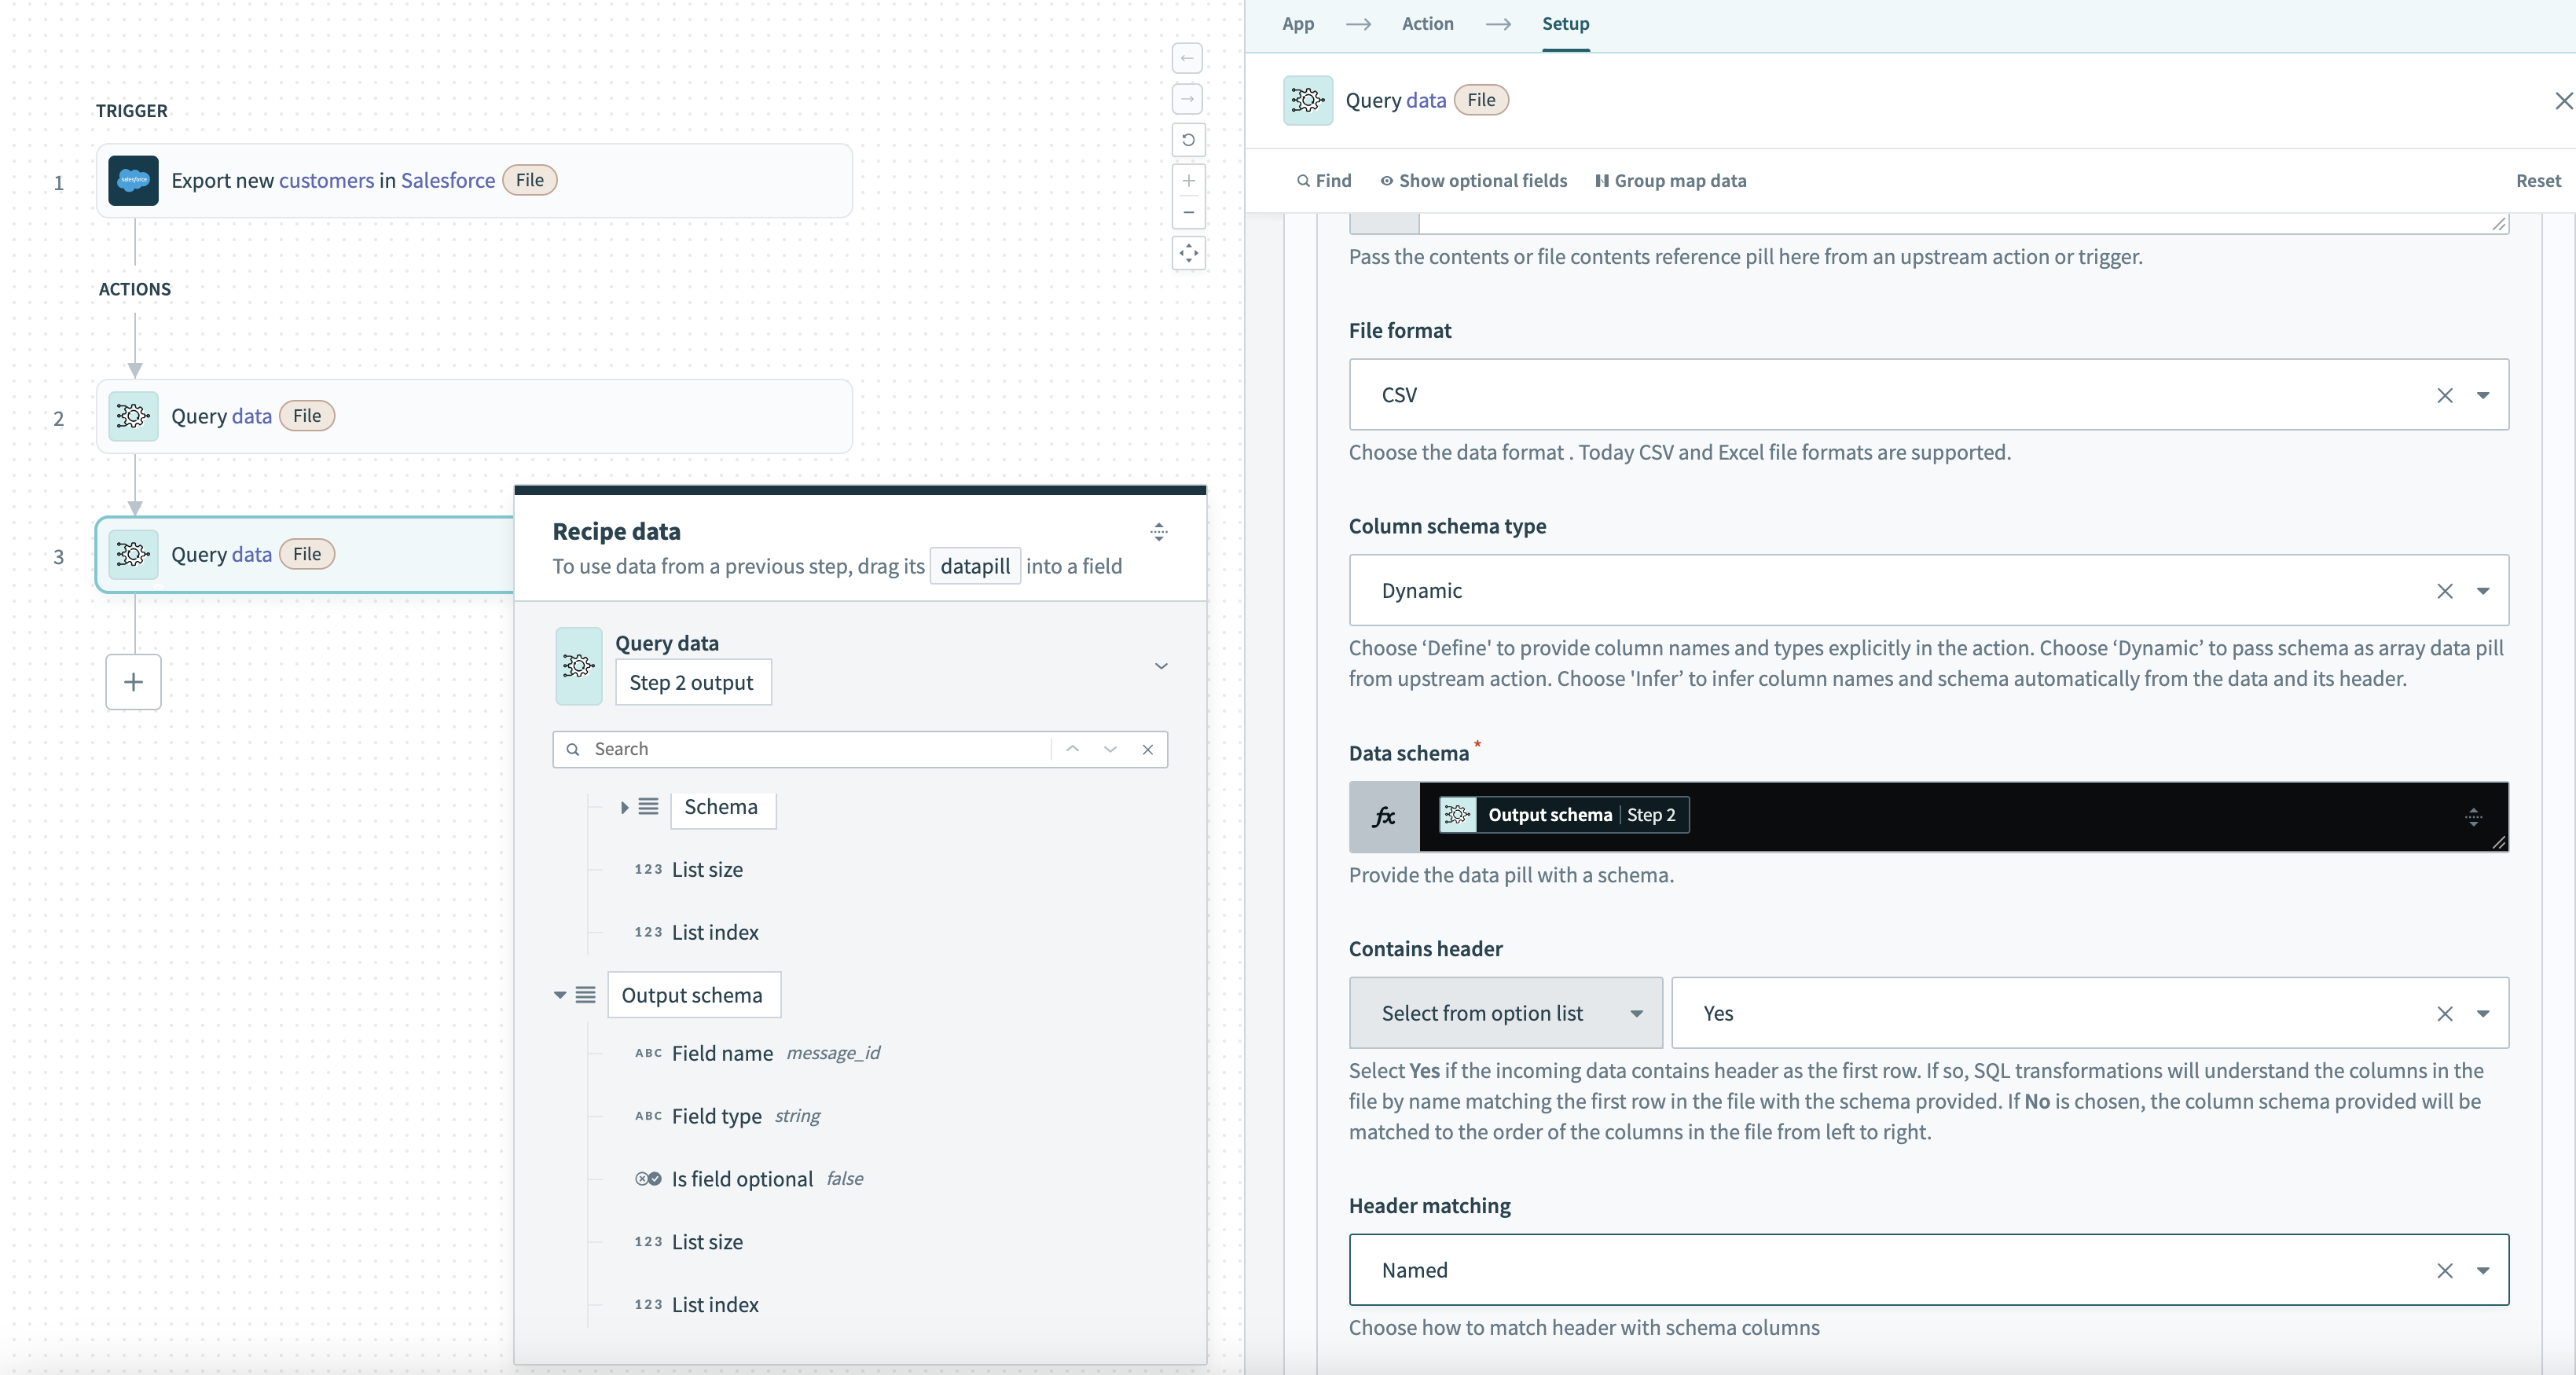 Data source example setup passing schema from previous query data
The dynamic schema option is selected because the data structure, such as Field name and Field type , can vary with the records processed earlier. The schema automatically adjusts to match the structure of the previous query’s output without requiring manual configuration.
Read next
- Transform Avro and Parquet files
- Set up your query
- Configure your output
SAMPLE USE CASES
See our guides for step-by-step instructions on how to leverage SQL Transformations for the following use cases:
 Data source example setup 1
 Data source example setup 2
 Data source example setup 3
 Data source example setup for Salesforce dynamic schema
 Data source example setup passing schema from previous query data