Custom field validation
Workflow apps offers custom client-side field validation for specific page components. Custom client-side field validation in Workflow apps ensures data accuracy, prevents errors, and enhances workflow efficiency. It guides the end-users of your apps to enter data correctly, helps in regulatory compliance, and provides flexibility for customization. This ultimately enables you to create more reliable and streamlined business processes.
Workato recommends that you configure your recipes to perform additional validation in business-critical fields. Because data table entries can be edited directly in columns, they are not eligible for client-side validations.
How it works
You can configure custom client-side field validation for page components manually in the properties panel of the page editor. Note that this type of validation is separate from the built-in validation of user input it offers for many other page components.
Workflow apps offers the following types of custom client-side field validation:
Compatible components
The following table describes which page components are compatible with each custom client-side validation type.
| Custom validation type | Compatible components |
|---|---|
| Limit input length | Short answer |
| Limit input value | Number |
| Pattern matching with regex | Short answer |
Limit input length
Determine the minimum and maximum character length for page components.
How to limit input length
Complete the following steps to limit input length for short answer components:
In Workato, navigate to your Workflow app.
Select the page where you plan to add custom field validation. Select the page to open the page editor.
Drag and drop the Short answer component from the Content and background panel onto your page.
Customize this component using the Properties panel.
View complete list of short answer component properties
Editable
Determine whether the text is editable, read-only, or editable only under the conditions you specify. This property is useful for gathering user input or creating read-only fields. For example, if you are creating a submission form you would make most, if not all, of the page components editable and then make the corresponding approval form read-only.
Yes
Select Yes for components that you plan to use to collect user input.
No
Select No for components that you plan to be read-only.
Conditional
Configure an IF condition to make this component editable only under the conditions you specify. You can chain multiple IF conditions using
ANDorOR. For example, you can configure an input field to be editable by a specific user only during a specific workflow stage. Configuring an IF condition in Workflow apps is similar to adding an IF condition to a recipe workflow. Use the Page data modal to map data related to app users, requests, and page components into your IF condition.
Save user input to data column/ display from data column
When this component is editable, this property specifies which data column Workato uses to populate the input component and capture user input. When this component is read-only, this property specifies from which column Workato displays data.
Visible
This property determines the visibility of input components. The following options are available.
Always show
When set to Always show, input components are always visible.
Conditional
Configure an IF condition to make this component visible only under the conditions you specify. You can chain multiple IF conditions using
ANDorOR. For example, you can configure input components to be visible to a specific user only during a specific workflow stage. Configuring an IF condition in Workflow apps is similar to adding an IF condition to a recipe workflow. Use the Page data modal to map data related to app users, requests, and page components into your IF condition.
Input type
This field allows you to change the type of user input you plan to collect. For example, if you add an Email component to your page, and later decide to collect phone numbers instead, this field enables you to do so without adding an entirely new component to your page.
Label
Determine a label for this input field.
Hint
Provide a hint to help users understand the type of input you plan to collect.
Placeholder
Provide a placeholder value for this input field.
Required
Determine whether users must provide input for this field. The following options are available:
Yes
When Yes, users must provide input for this field.
No
When No, providing input for this field is optional.
Conditional
Configure an IF condition to make this component required only under the conditions you specify. You can chain multiple IF conditions using
ANDorOR. For example, you can configure an input field to require user input by a specific user only during a specific workflow stage. Configuring an IF condition in Workflow apps is similar to adding an IF condition to a recipe workflow. Use the Page data modal to map data related to app users, requests, and page components into your IF condition.
Limit input length
Use this toggle to limit the amount of user input this component can accept. You can customize the minimum and maximum characters allowed.
Minimum length
Specify the minimum amount of characters this field can accept.
Maximum length
Specify the maximum amount of characters this field can accept.
Match regular expression
Use this toggle to create a rule that user input must match the regex (regular expression) you specify. This configuration option is only available for Short answer components.
Regular expression
Provide the regex that user input must match. Refer to our Custom field validation guide for more information.
Error message if expression not met
Enter a custom error message. Workflow apps displays this message to end-users when user input does not match the regex you specify.
In the Rules section of the Properties panel, toggle Limit input length.
Customize the minimum and maximum characters allowed by configuring the following fields:
Minimum length
Specify the minimum amount of characters this field can accept.
Maximum length
Specify the maximum amount of characters this field can accept.
For example, we've configured this page to accept a minimum of five characters and a maximum of sixteen characters.
 Limit length setup
Click Save.
Click Preview to preview and test your configurations. You can preview your page using existing columns from your data table or using an empty record to enter custom input.
 Error message: Minimum 5 characters (2 characters short)
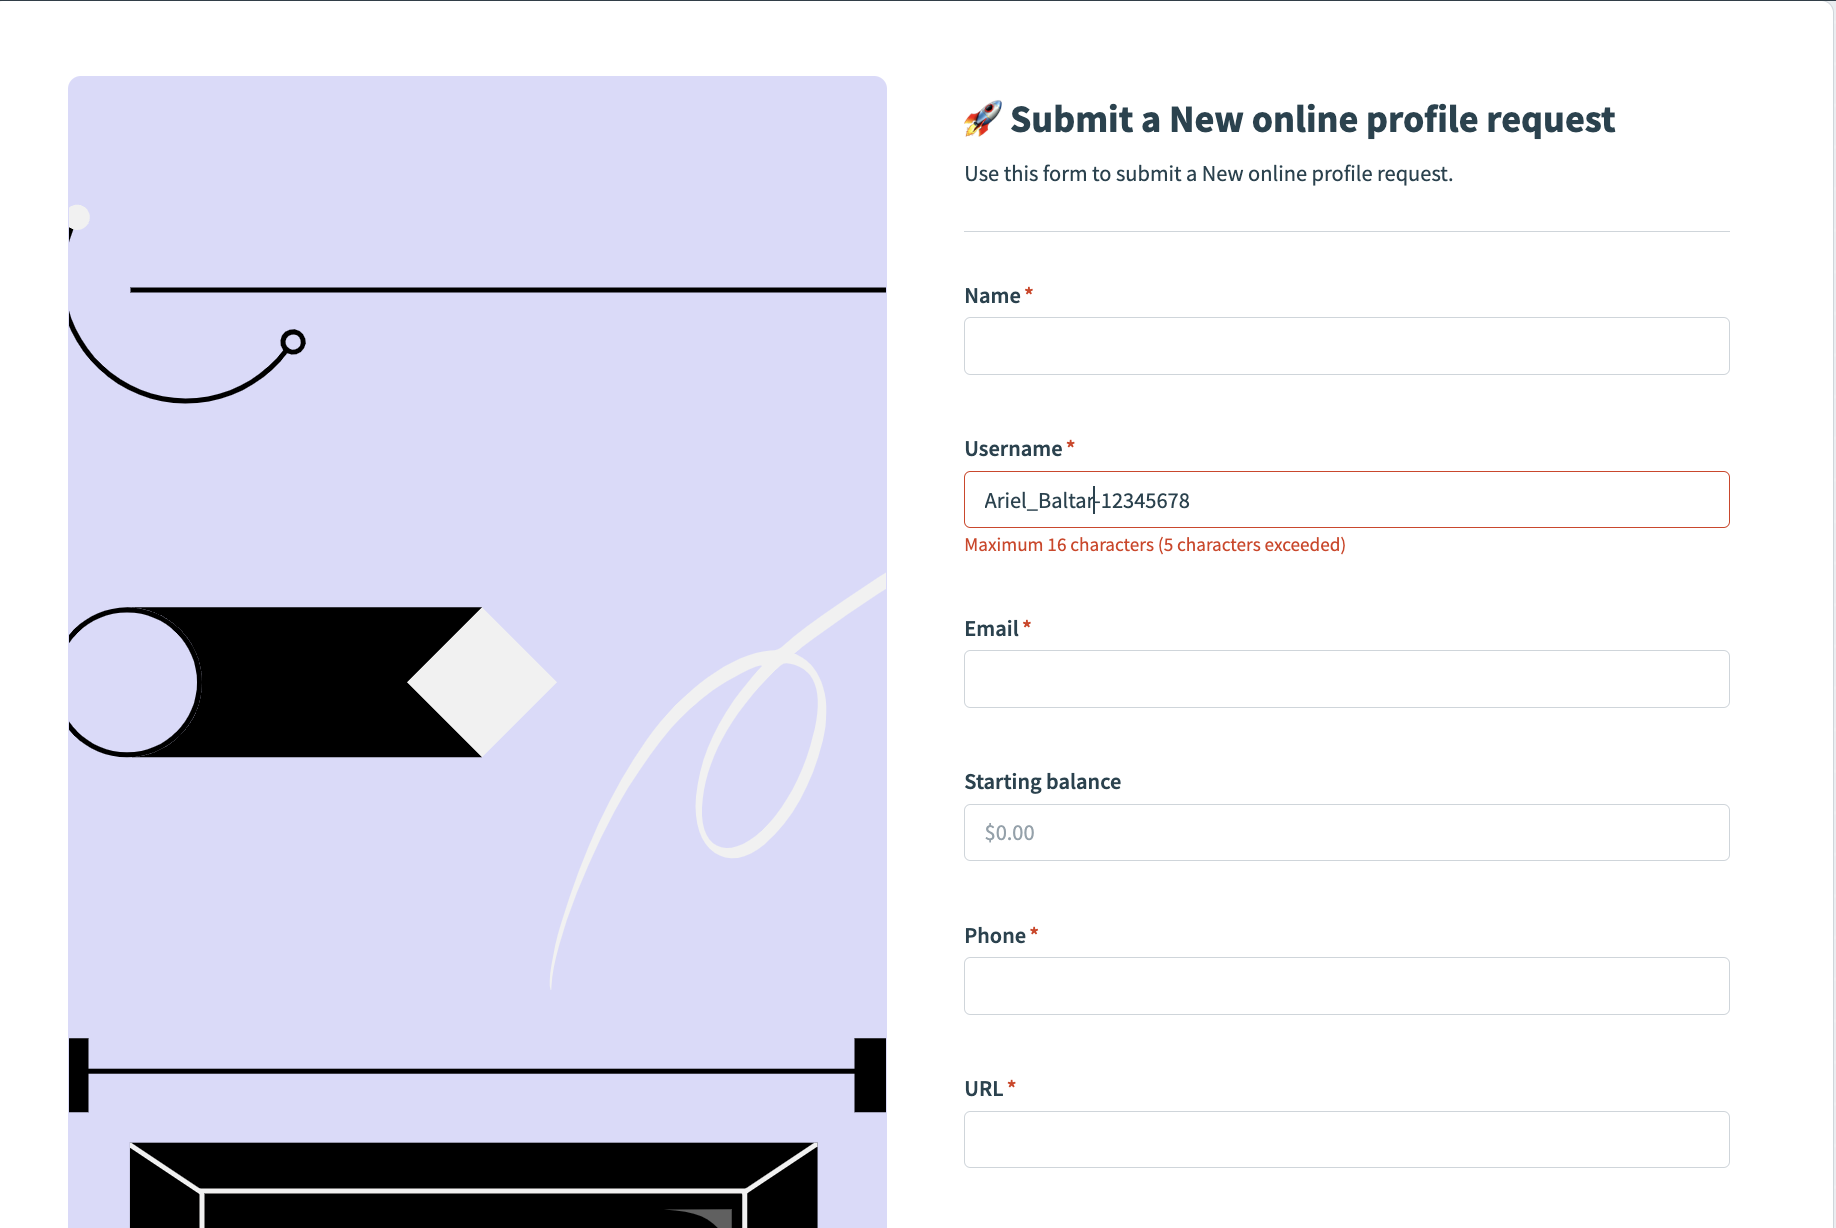 Error message: Maximum is 15 characters (5 characters exceeded)
Limit input value
Use this feature to limit the values that Number components can accept.
How to limit input value
Complete the following steps to limit input length for Number components:
In Workato, navigate to your Workflow app.
Select the page where you plan to add custom field validation. Select the page to open the page editor.
Drag and drop a Number component from the Content and background panel onto your page.
Customize this component using the Properties panel.
View complete list of number properties
Editable
Determine whether the component is editable, read-only, or editable only under the conditions you specify. This property is useful for gathering user input or creating read-only fields. For example, if you are creating a submission form you would make most, if not all, of the page components editable and then make the corresponding approval form read-only.
Yes
Select Yes for components that you plan to use to collect user input.
No
Select No for components that you plan to be read-only.
Conditional
Configure an IF condition to make this component editable only under the conditions you specify. You can chain multiple IF conditions using
ANDorOR. For example, you can configure an input field to be editable by a specific user only during a specific workflow stage. Configuring an IF condition in Workflow apps is similar to adding an IF condition to a recipe workflow. Use the Page data modal to map data related to app users, requests, and page components into your IF condition.
Save user input to data column/ display from data column
When this component is editable, this property specifies which data column Workato uses to populate the input component and capture user input. When this component is read-only, this property specifies from which column Workato displays data.
Visible
This property determines the visibility of components. The following options are available.
Always show
When set to Always show, components are always visible.
Conditional
Configure an IF condition to make this component visible only under the conditions you specify. You can chain multiple IF conditions using
ANDorOR. For example, you can configure input components to be visible to a specific user only during a specific workflow stage. Configuring an IF condition in Workflow apps is similar to adding an IF condition to a recipe workflow. Use the Page data modal to map data related to app users, requests, and page components into your IF condition.
Input type
This field allows you to change the type of user input you plan to collect. For example, if you add an Email component to your page, and later decide to collect phone numbers instead, this field enables you to do so without adding an entirely new component to your page.
Label
Determine a label for this input field.
Hint
Provide a hint to help users understand the type of input you plan to collect.
Placeholder
Provide a placeholder value for this input field.
Required
Determine whether users must provide input for this field. The following options are available:
Yes
When Yes, users must provide input for this field.
No
When No, providing input for this field is optional.
Conditional
Configure an IF condition to make this component required only under the conditions you specify. You can chain multiple IF conditions using
ANDorOR. For example, you can configure an input field to require user input by a specific user only during a specific workflow stage. Configuring an IF condition in Workflow apps is similar to adding an IF condition to a recipe workflow. Use the Page data modal to map data related to app users, requests, and page components into your IF condition.
Limit input value
Use this toggle to limit the values this component can accept. You can customize the minimum and maximum values allowed.
Minimum value
Specify the minimum value this field can accept.
Maximum length
Specify the maximum value this field can accept.
In the Rules section of the Properties panel, toggle Limit input value.
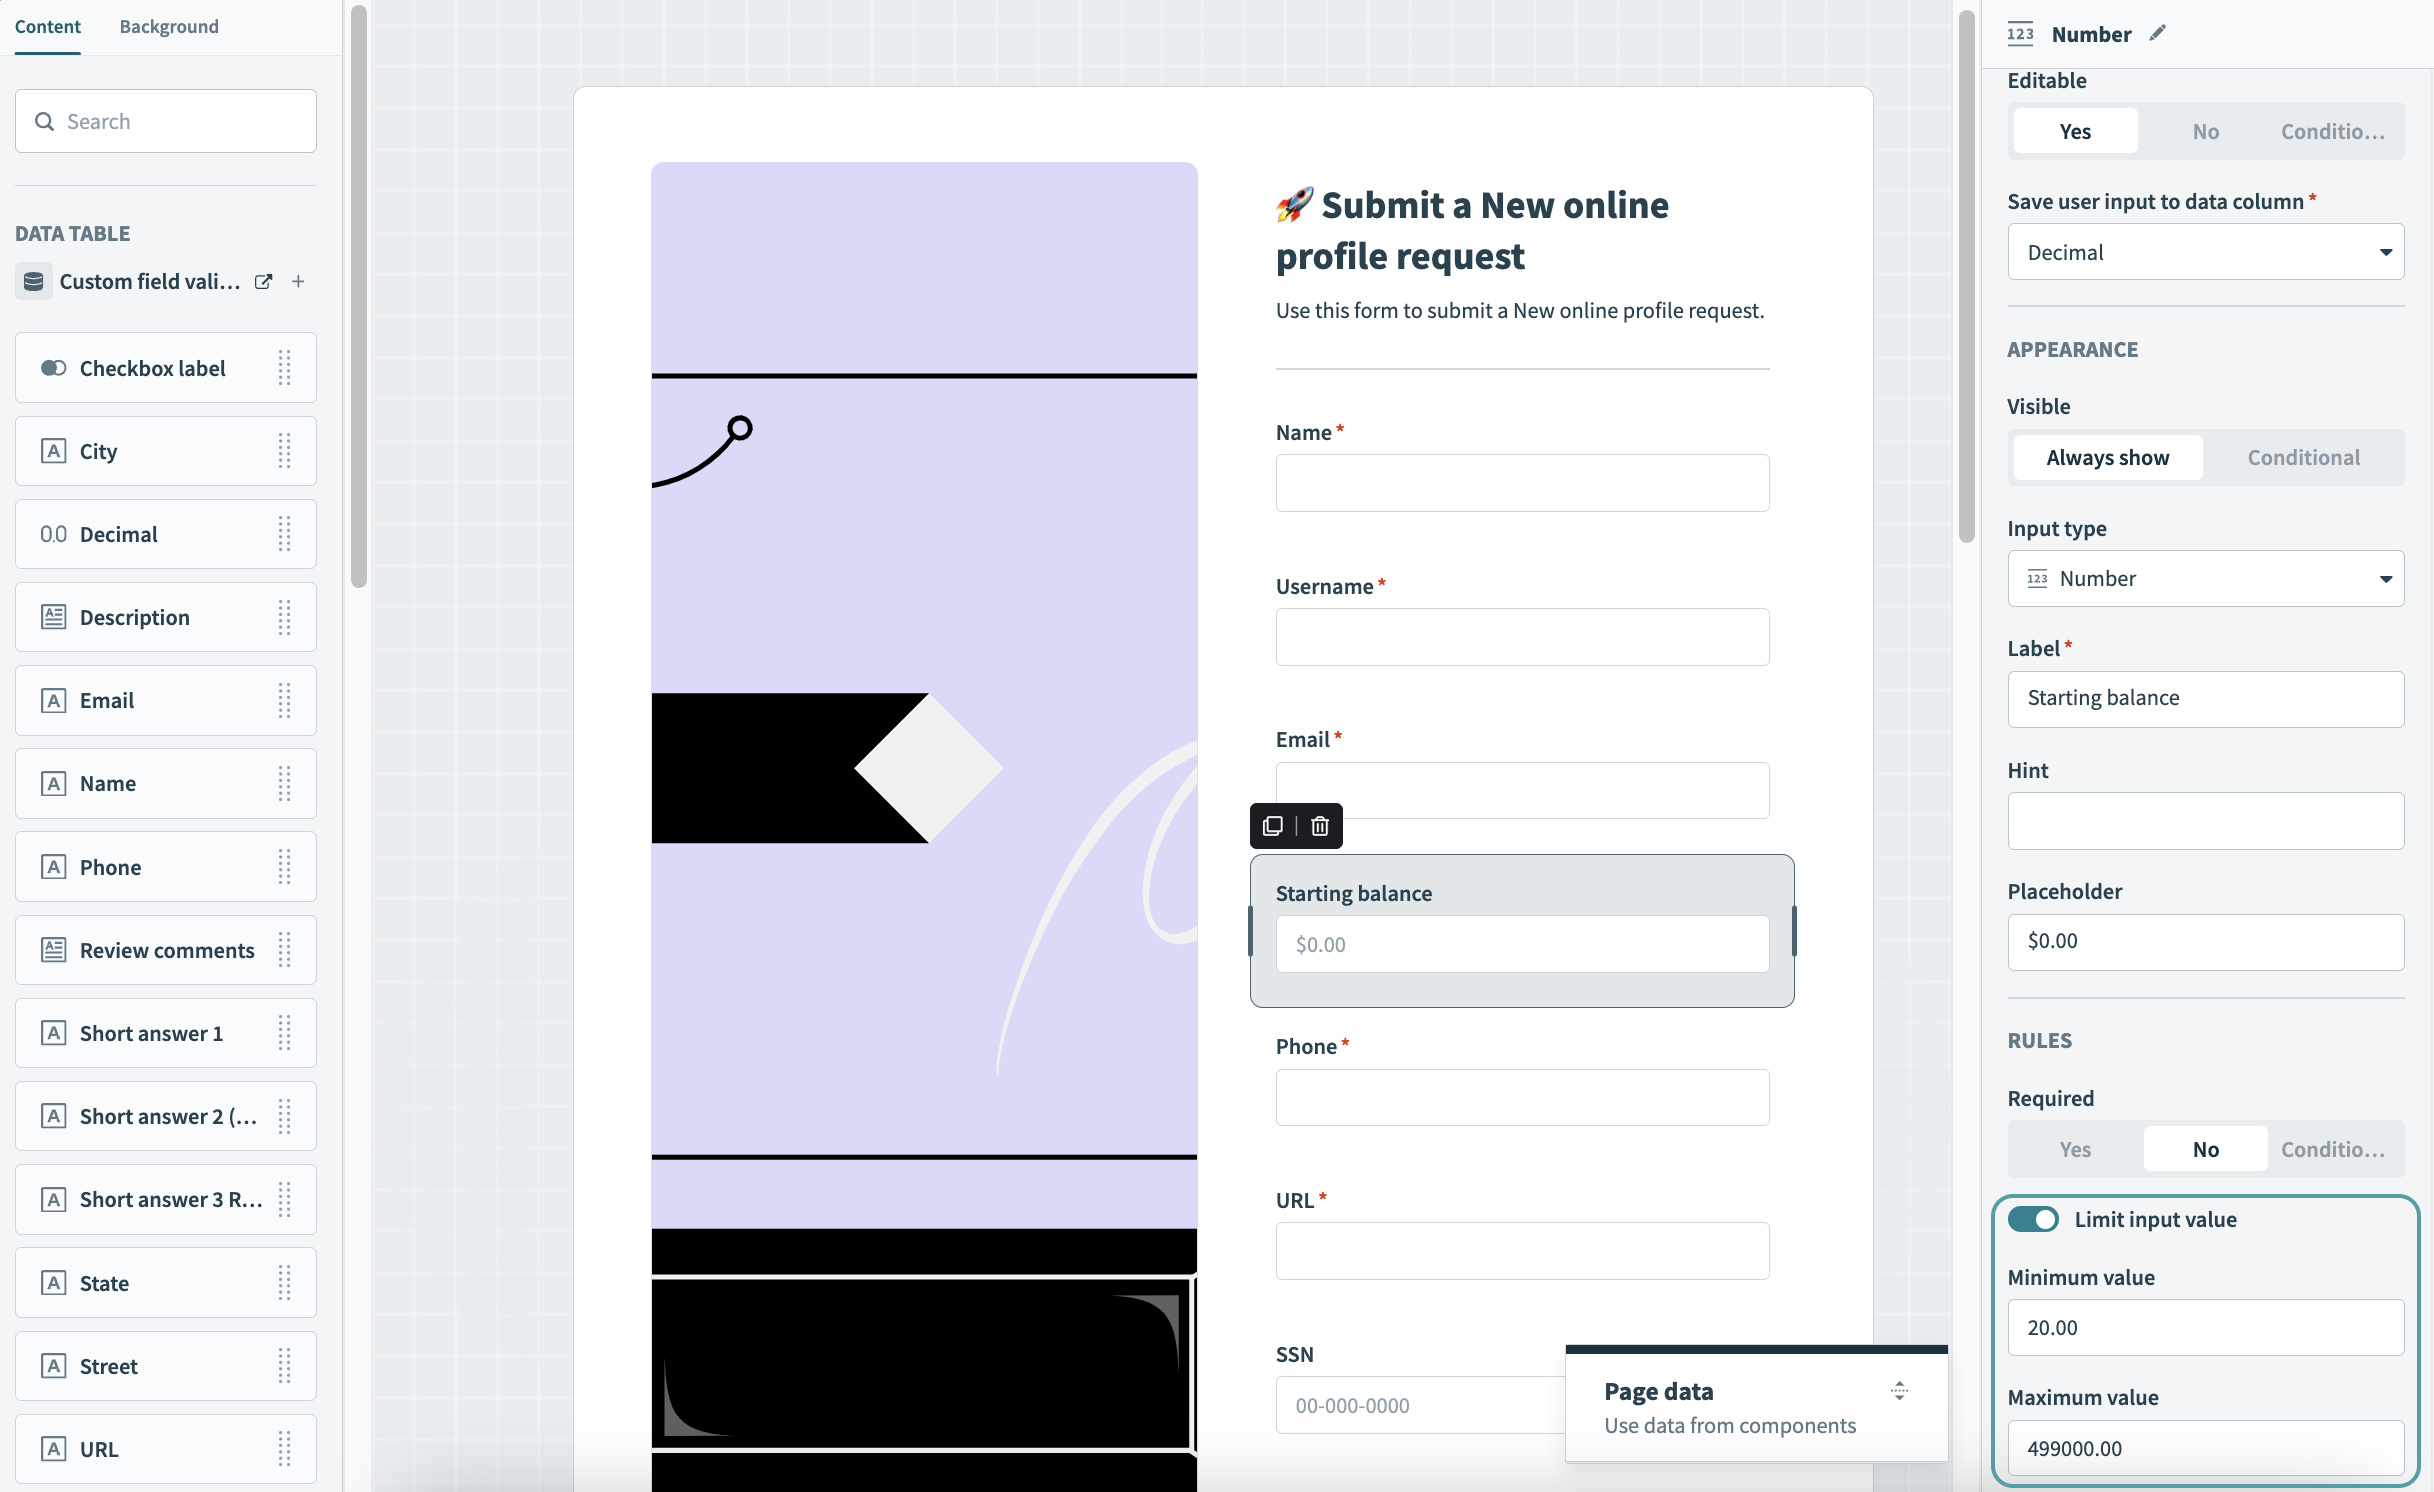 Value limit setup
Customize the minimum and maximum values allowed by configuring the following fields:
Minimum value
Specify the minimum amount of characters this field can accept.
Maximum value
Specify the maximum amount of characters this field can accept.
For example, we've configured this page to accept a minimum value of 20 and a maximum value of 499,000.
Click Save.
Click Preview to preview and test your configurations. You can preview your page using existing columns from your data table or using an empty record to enter custom input.
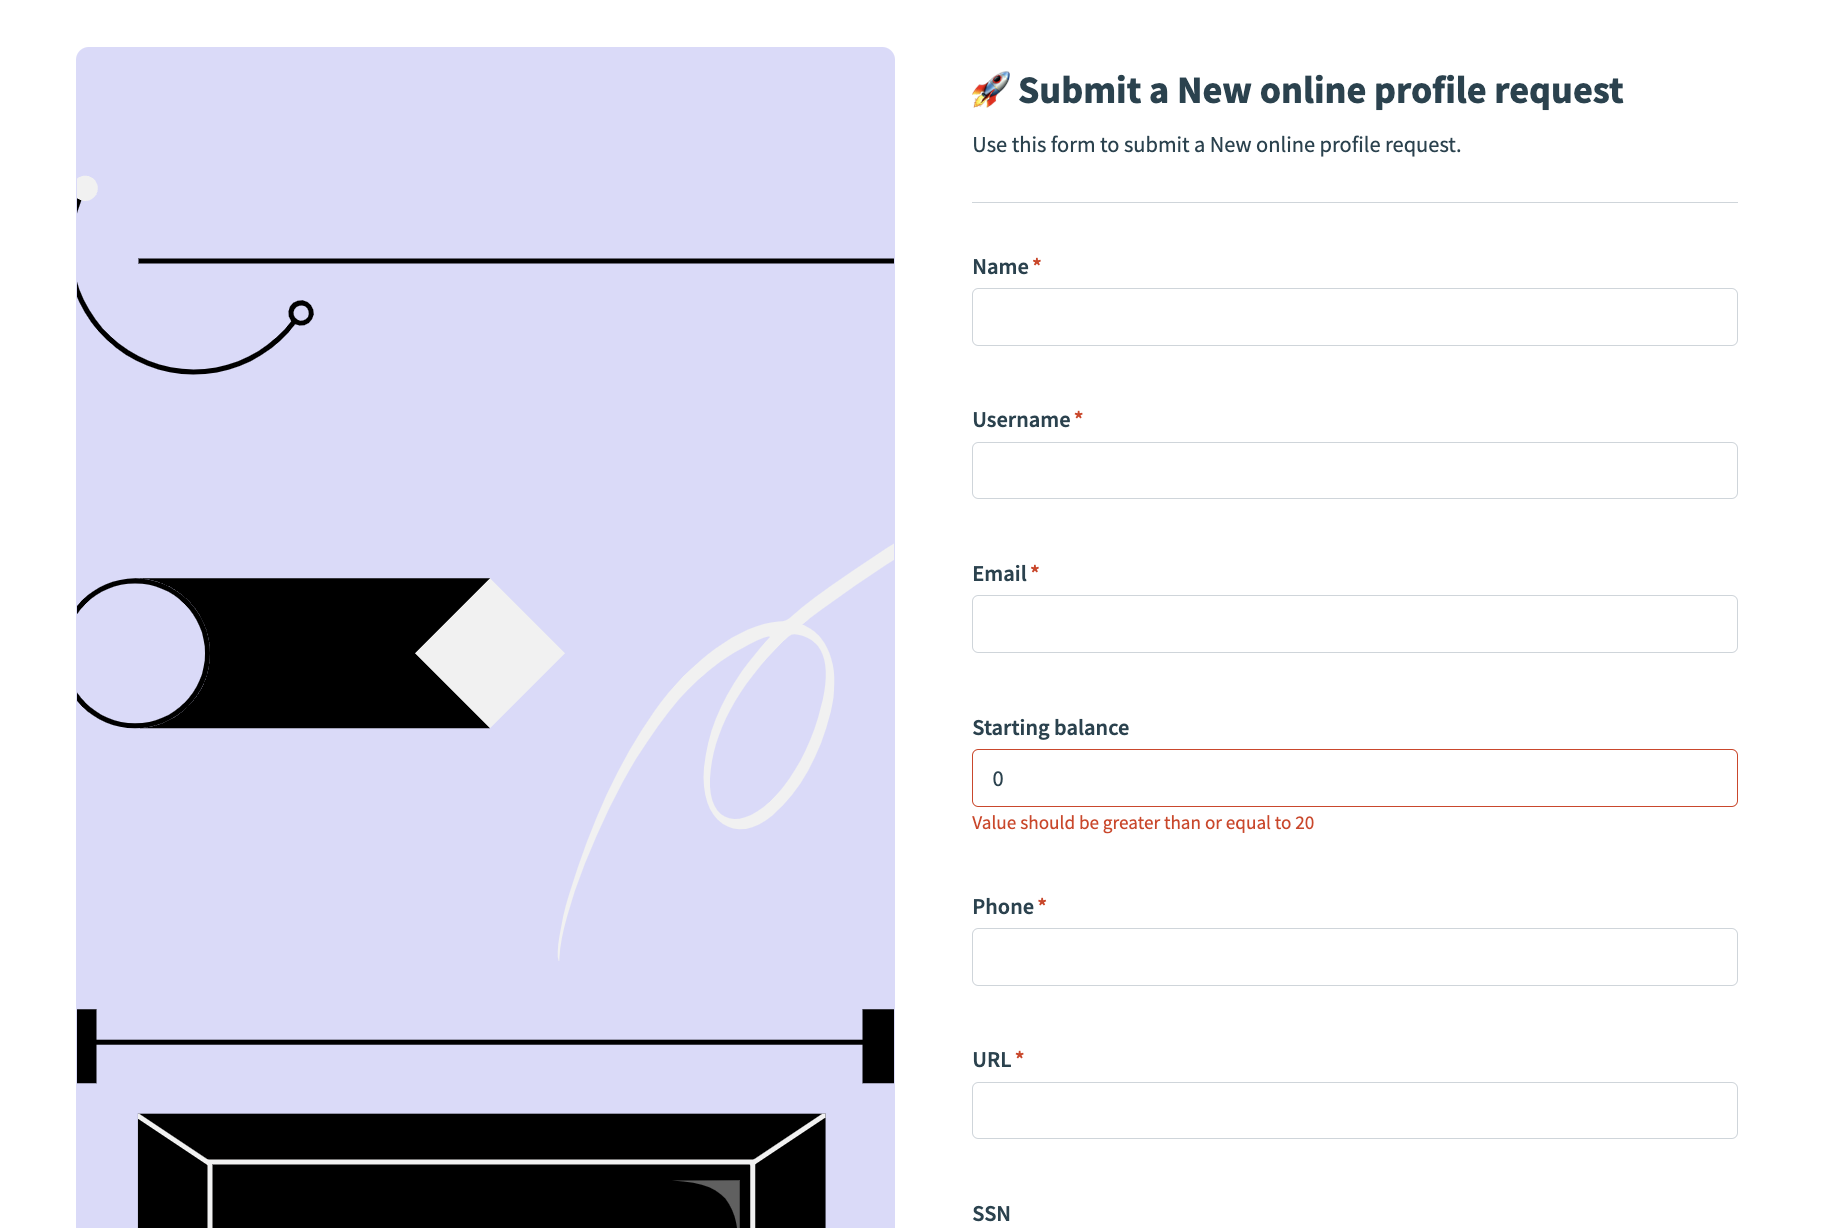 Error message: Value should be greater than or equal to 20
 Error message: Value should be less than or equal to 499000
Pattern matching with regex
Workflow apps uses regex (regular expression) to provide custom field validation for short answer text components.
How to set up pattern matching with regex
Complete the following steps to set up pattern matching with regex for Short answer components:
In Workato, navigate to your Workflow app.
Select the page where you plan to add custom field validation. Select the page to open the page editor.
Drag and drop a Short answer component from the Content and background panel onto your page.
Customize this component using the Properties panel.
View complete list of short answer properties
Editable
Determine whether the text is editable, read-only, or editable only under the conditions you specify. This property is useful for gathering user input or creating read-only fields. For example, if you are creating a submission form you would make most, if not all, of the page components editable and then make the corresponding approval form read-only.
Yes
Select Yes for components that you plan to use to collect user input.
No
Select No for components that you plan to be read-only.
Conditional
Configure an IF condition to make this component editable only under the conditions you specify. You can chain multiple IF conditions using
ANDorOR. For example, you can configure an input field to be editable by a specific user only during a specific workflow stage. Configuring an IF condition in Workflow apps is similar to adding an IF condition to a recipe workflow. Use the Page data modal to map data related to app users, requests, and page components into your IF condition.
Save user input to data column/ display from data column
When this component is editable, this property specifies which data column Workato uses to populate the input component and capture user input. When this component is read-only, this property specifies from which column Workato displays data.
Visible
This property determines the visibility of input components. The following options are available.
Always show
When set to Always show, input components are always visible.
Conditional
Configure an IF condition to make this component visible only under the conditions you specify. You can chain multiple IF conditions using
ANDorOR. For example, you can configure input components to be visible to a specific user only during a specific workflow stage. Configuring an IF condition in Workflow apps is similar to adding an IF condition to a recipe workflow. Use the Page data modal to map data related to app users, requests, and page components into your IF condition.
Input type
This field allows you to change the type of user input you plan to collect. For example, if you add an Email component to your page, and later decide to collect phone numbers instead, this field enables you to do so without adding an entirely new component to your page.
Label
Determine a label for this input field.
Hint
Provide a hint to help users understand the type of input you plan to collect.
Placeholder
Provide a placeholder value for this input field.
Required
Determine whether users must provide input for this field. The following options are available:
Yes
When Yes, users must provide input for this field.
No
When No, providing input for this field is optional.
Conditional
Configure an IF condition to make this component required only under the conditions you specify. You can chain multiple IF conditions using
ANDorOR. For example, you can configure an input field to require user input by a specific user only during a specific workflow stage. Configuring an IF condition in Workflow apps is similar to adding an IF condition to a recipe workflow. Use the Page data modal to map data related to app users, requests, and page components into your IF condition.
Limit input length
Use this toggle to limit the amount of user input this component can accept. You can customize the minimum and maximum characters allowed.
Minimum length
Specify the minimum amount of characters this field can accept.
Maximum length
Specify the maximum amount of characters this field can accept.
Match regular expression
Use this toggle to create a rule that user input must match the regex (regular expression) you specify. This configuration option is only available for Short answer components.
Regular expression
Provide the regex that user input must match. Refer to our Custom field validation guide for more information.
Error message if expression not met
Enter a custom error message. Workflow apps displays this message to end-users when user input does not match the regex you specify.
In the Rules section of the Properties panel, toggle Match regular expression.
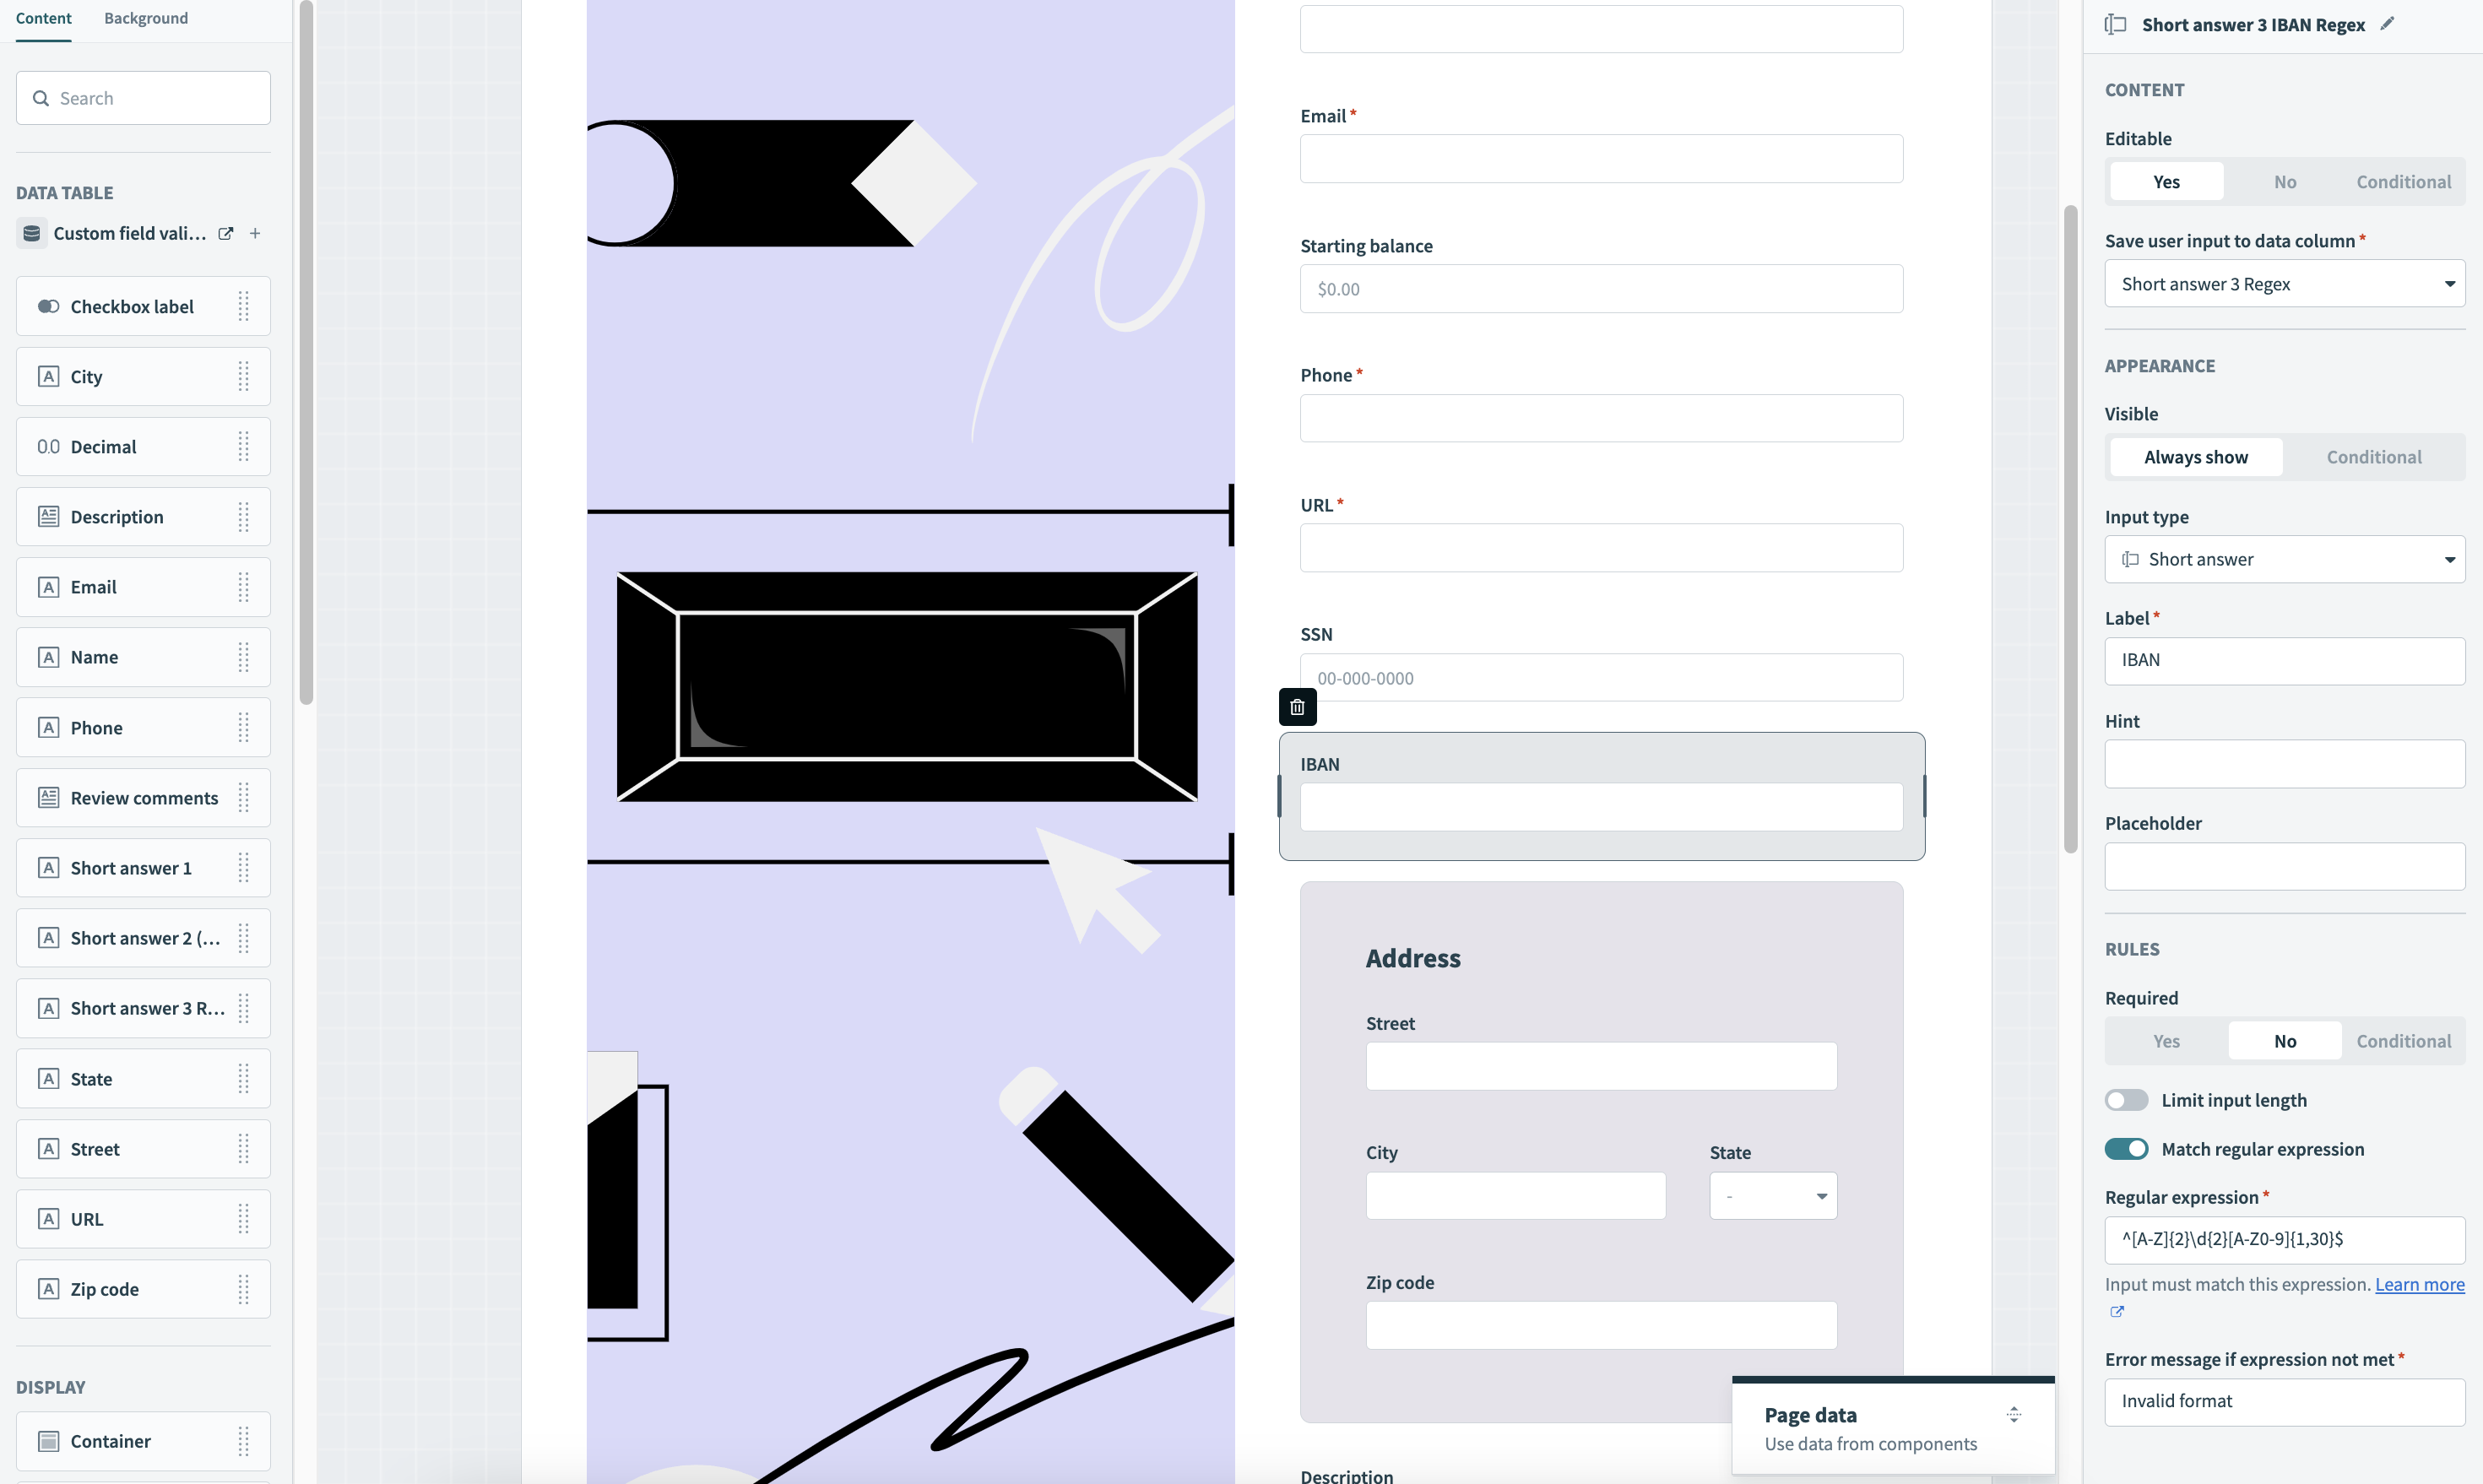 Custom field validation with regex
Determine the type of input you plan to accept by configuring the following field:
- Regular expression
- Provide the regex that user input must match.
In our example, we plan to collect an IBAN (International Banking Account Number) from users and have provided the regex that matches this format:
^[A-Z]{2}\d{2}[A-Z0-9]{1,30}$Enter a custom error message in the Error message if expression not met field. Workflow apps displays this message to end-users when user input does not match the regex you specify.
Click Save.
Click Preview to preview and test your configurations. You can preview your page using existing columns from your data table or using an empty record to enter custom input.
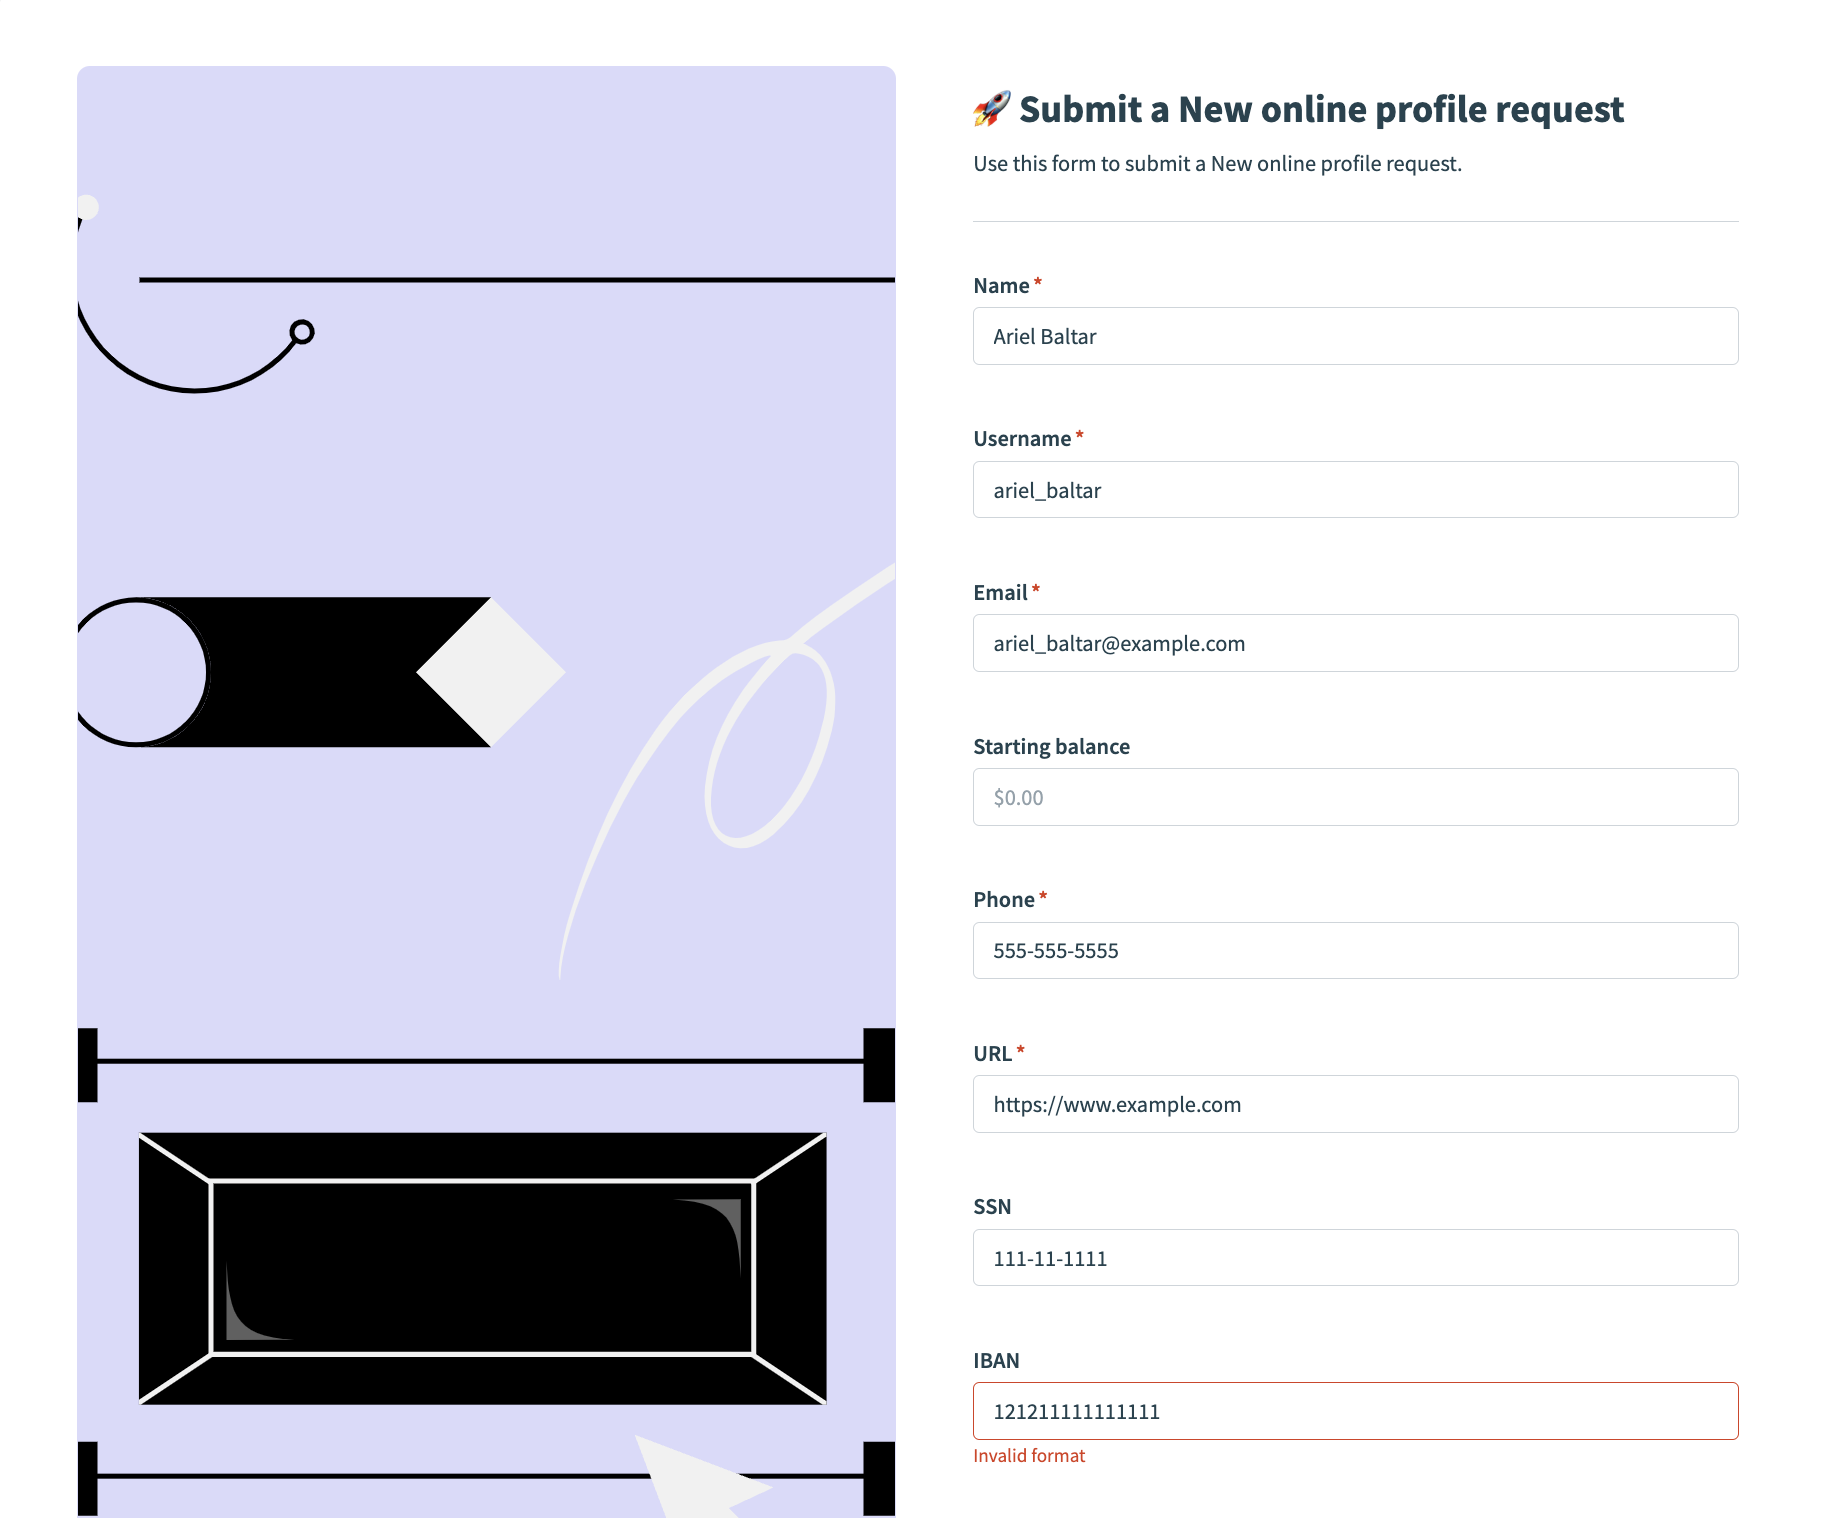 Error message: Invalid format
Practical regex examples
The following examples demonstrate how to use regex to match specific strings of text, including SSNs (Social Security Numbers), IBAN (International Banking Account Numbers), and ZIP Codes.
IBAN (International Banking Account Number)
IBAN (International Banking Account Number) formats vary by country. The following regex pattern that covers many standard IBAN formats:
^[A-Z]{2}[0-9]{2}[A-Z0-9]{1,30}$SSN (Social Security Number)
The following pattern matches US SSNs (Social Security Numbers).
^\d{3}-\d{2}-\d{4}$ZIP Codes/postal codes
US ZIP Codes
US ZIP Codes can be either five digits or nine digits (ZIP+4 format). The following regex covers both:
^\d{5}(-\d{4})?$EU postal codes
Postal codes can vary widely across EU countries. The following regex is configured to cover a broad range, but may not cover all postal codes in the EU:
^\d{4,5}([-\s]?\d{3})?$Japan postal codes
Japanese postal codes are formatted as three digits, a hyphen, and four digits:
^\d{3}-\d{4}$Singapore postal codes
Singapore postal codes are six digits:
^\d{6}$Australian postal codes
Australian postal codes are four digits:
^\d{4}$FURTHER READING
Refer to our using regex in Workato guide for more information about using regex in Workato.
Last updated: