Workato Logging Service
Logging is an essential tool for testing, troubleshooting, and debugging. The Workato Logging Service provides centralized storage for collecting and searching through log entries. You can add log entries to recipes by using the Logger by Workato connector.
On the Logs page, you can filter logs by recipe ID, by a search term in the log data, and more. For example, you can use the ERROR log level to find logs with errors. Refer to Filter log entries for more information.
You can also send OPA logs to the Workato Logging Service. Refer to the on-prem documentation for more information.
 Example log entry data
LOG STREAMING
Refer to Audit log streaming to replicate and store log data in one of the following destinations:
- Amazon S3 Bucket
- Azure Monitor
- Azure Blob
- A cloud-based logging service, such as Sumo Logic, Datadog, Splunk, or Google Cloud Storage Buckets
FEATURE AVAILABILITY
The Workato Logging Service feature is included in specific pricing plans. It includes access to the Logs page and the Logger by Workato connector. Refer to your pricing plan and contract to learn more.
Your environment role must include the Logs privilege to access this feature.
VIDEO GUIDE: WAYS TO USE WORKATO LOGGING SERVICE
Workato Logging Service use cases
VIDEO GUIDE: TROUBLESHOOT STEPS IN A LOOP FASTER
Steps that are repeated in a loop are not fully visible from the job reports, as only the last execution of that step is displayed. Logging provides visibility into each iteration of repeated steps. This makes it easier to troubleshoot and debug steps which are nested within a loop.
Some business objects, such as customer workspaces, are integrated into multiple workflows. Logging allows you to track every time a recipe interacts with a certain customer (for example, customer workspace ACME Corp).
How to access the Logs page
You must have one of the following to view the Logs page:
- The Environment admin role or the legacy Admin collaborator role.
- The Logs privilege.
Complete the following steps to view the logs page:
Log in to your Workato account.
Click Tools > Logs.
 Workato Logging Service
OPEN THE LOGS PAGE IN YOUR REGION
Each data center is independent, so use the following links to open Workato Logging service for your region:
Open Workato Logging service using the data center for your region.
Workato Enterprise customers
- US Data Center
- EU Data Center
- JP Data Center
- SG Data Center
- AU Data Center
- IL Data Center
- CN Data Center
- KR Data Center
Self-service (Workato Free, Workato Pro, or Developer Sandbox) users
View log entries
VIDEO GUIDE: HOW TO SEARCH IN LOGS
Complete the following steps to view a log entry on the Logs page:
Log in to your Workato account.
Click Tools > Logs.
Select the log you plan to review.
Optional. Select the Hide columns button above the list of logs and uncheck the box next to the column name to hide a column. You can show a column by checking the box next to the column name.
 Showing all columns in the Logs page
Each log entry contains fields with metadata about when and how the log was created. This information is displayed in columns on the Logs page.
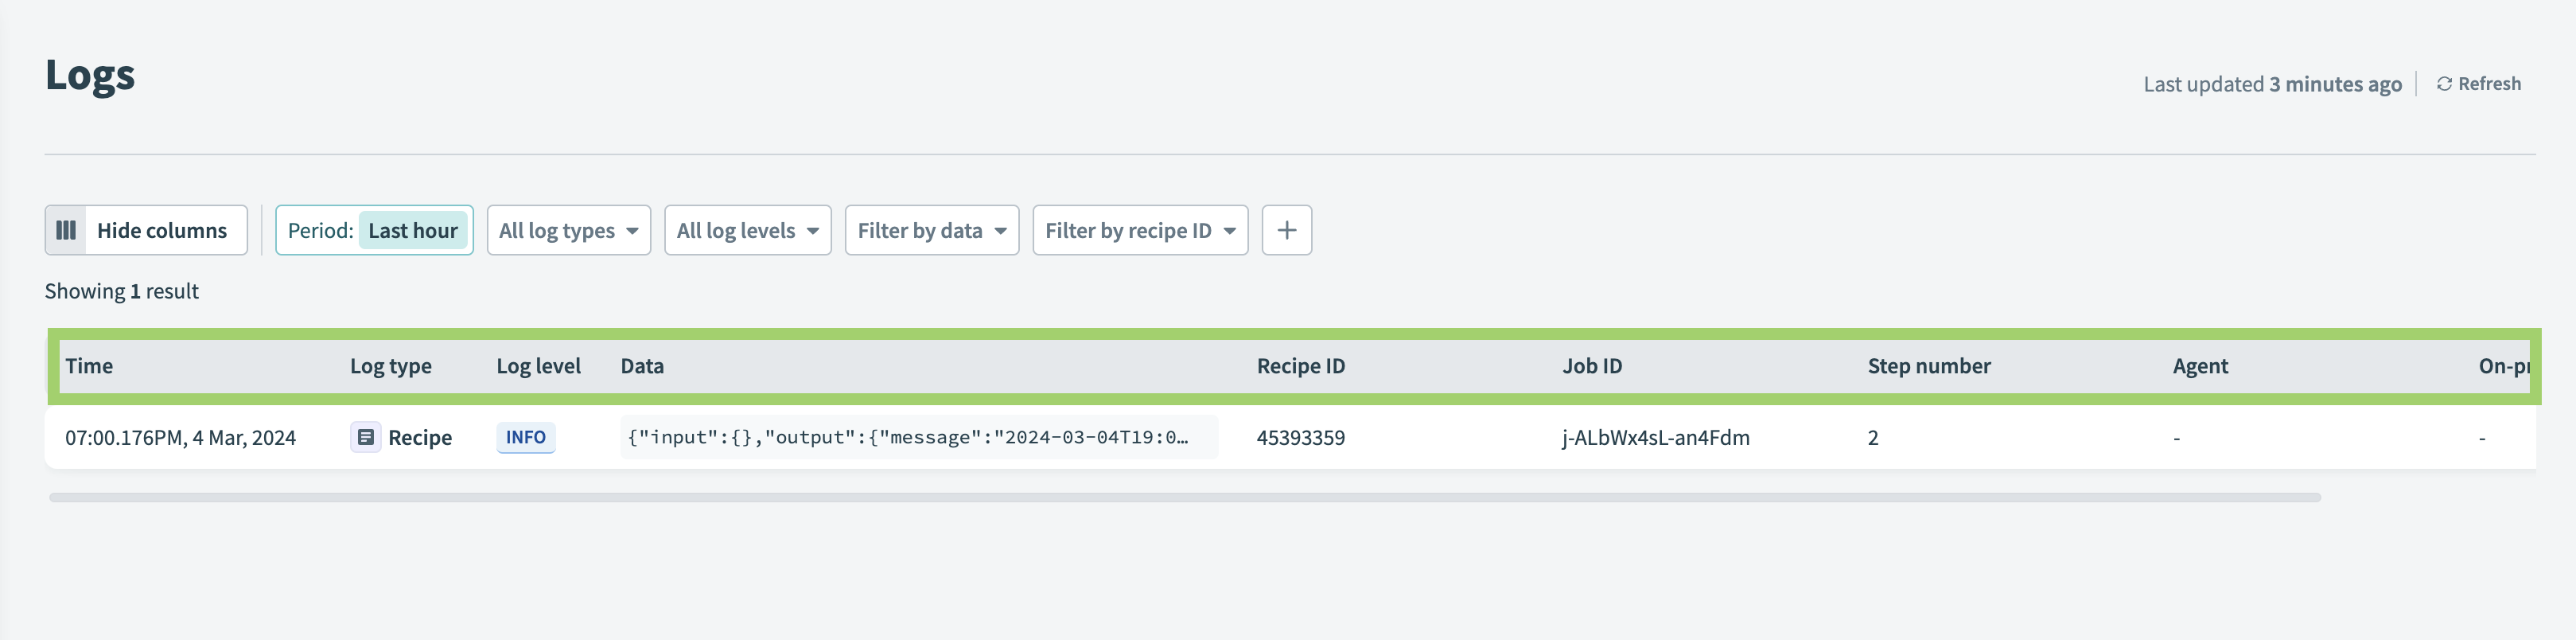 All columns displayed on the Logs page
Log columns
| Log column | Description |
|---|---|
| Time | The time this log entry was created, according to the workspace's timezone. |
| Log type | The source of the log entry, such as the Job, Polling error or OPA. |
| Log level | Possible log levels are DEBUG (OPA logs only), INFO, WARN, ERROR.OPA TRACE logs are not currently supported in Logging Service. |
| Data | The log message from Logger by Workato. |
| Recipe ID | The recipe ID. |
| Job ID | The job ID. |
| Step number | The step number of the action in the recipe that created this log. |
| Agent | The on-prem agent that the log originated from. Only OPA versions 23.0 and newer can send logs to the Logging Service, and the OPA logging feature must be enabled. |
| On-prem group | The on-prem group associated with the agent that originated the log. Only OPA versions 23.0 and newer can send logs to the Logging Service, and the OPA logging feature must be enabled. |
Filter log entries
You can filter the log entries by each column listed in the Log columns section.
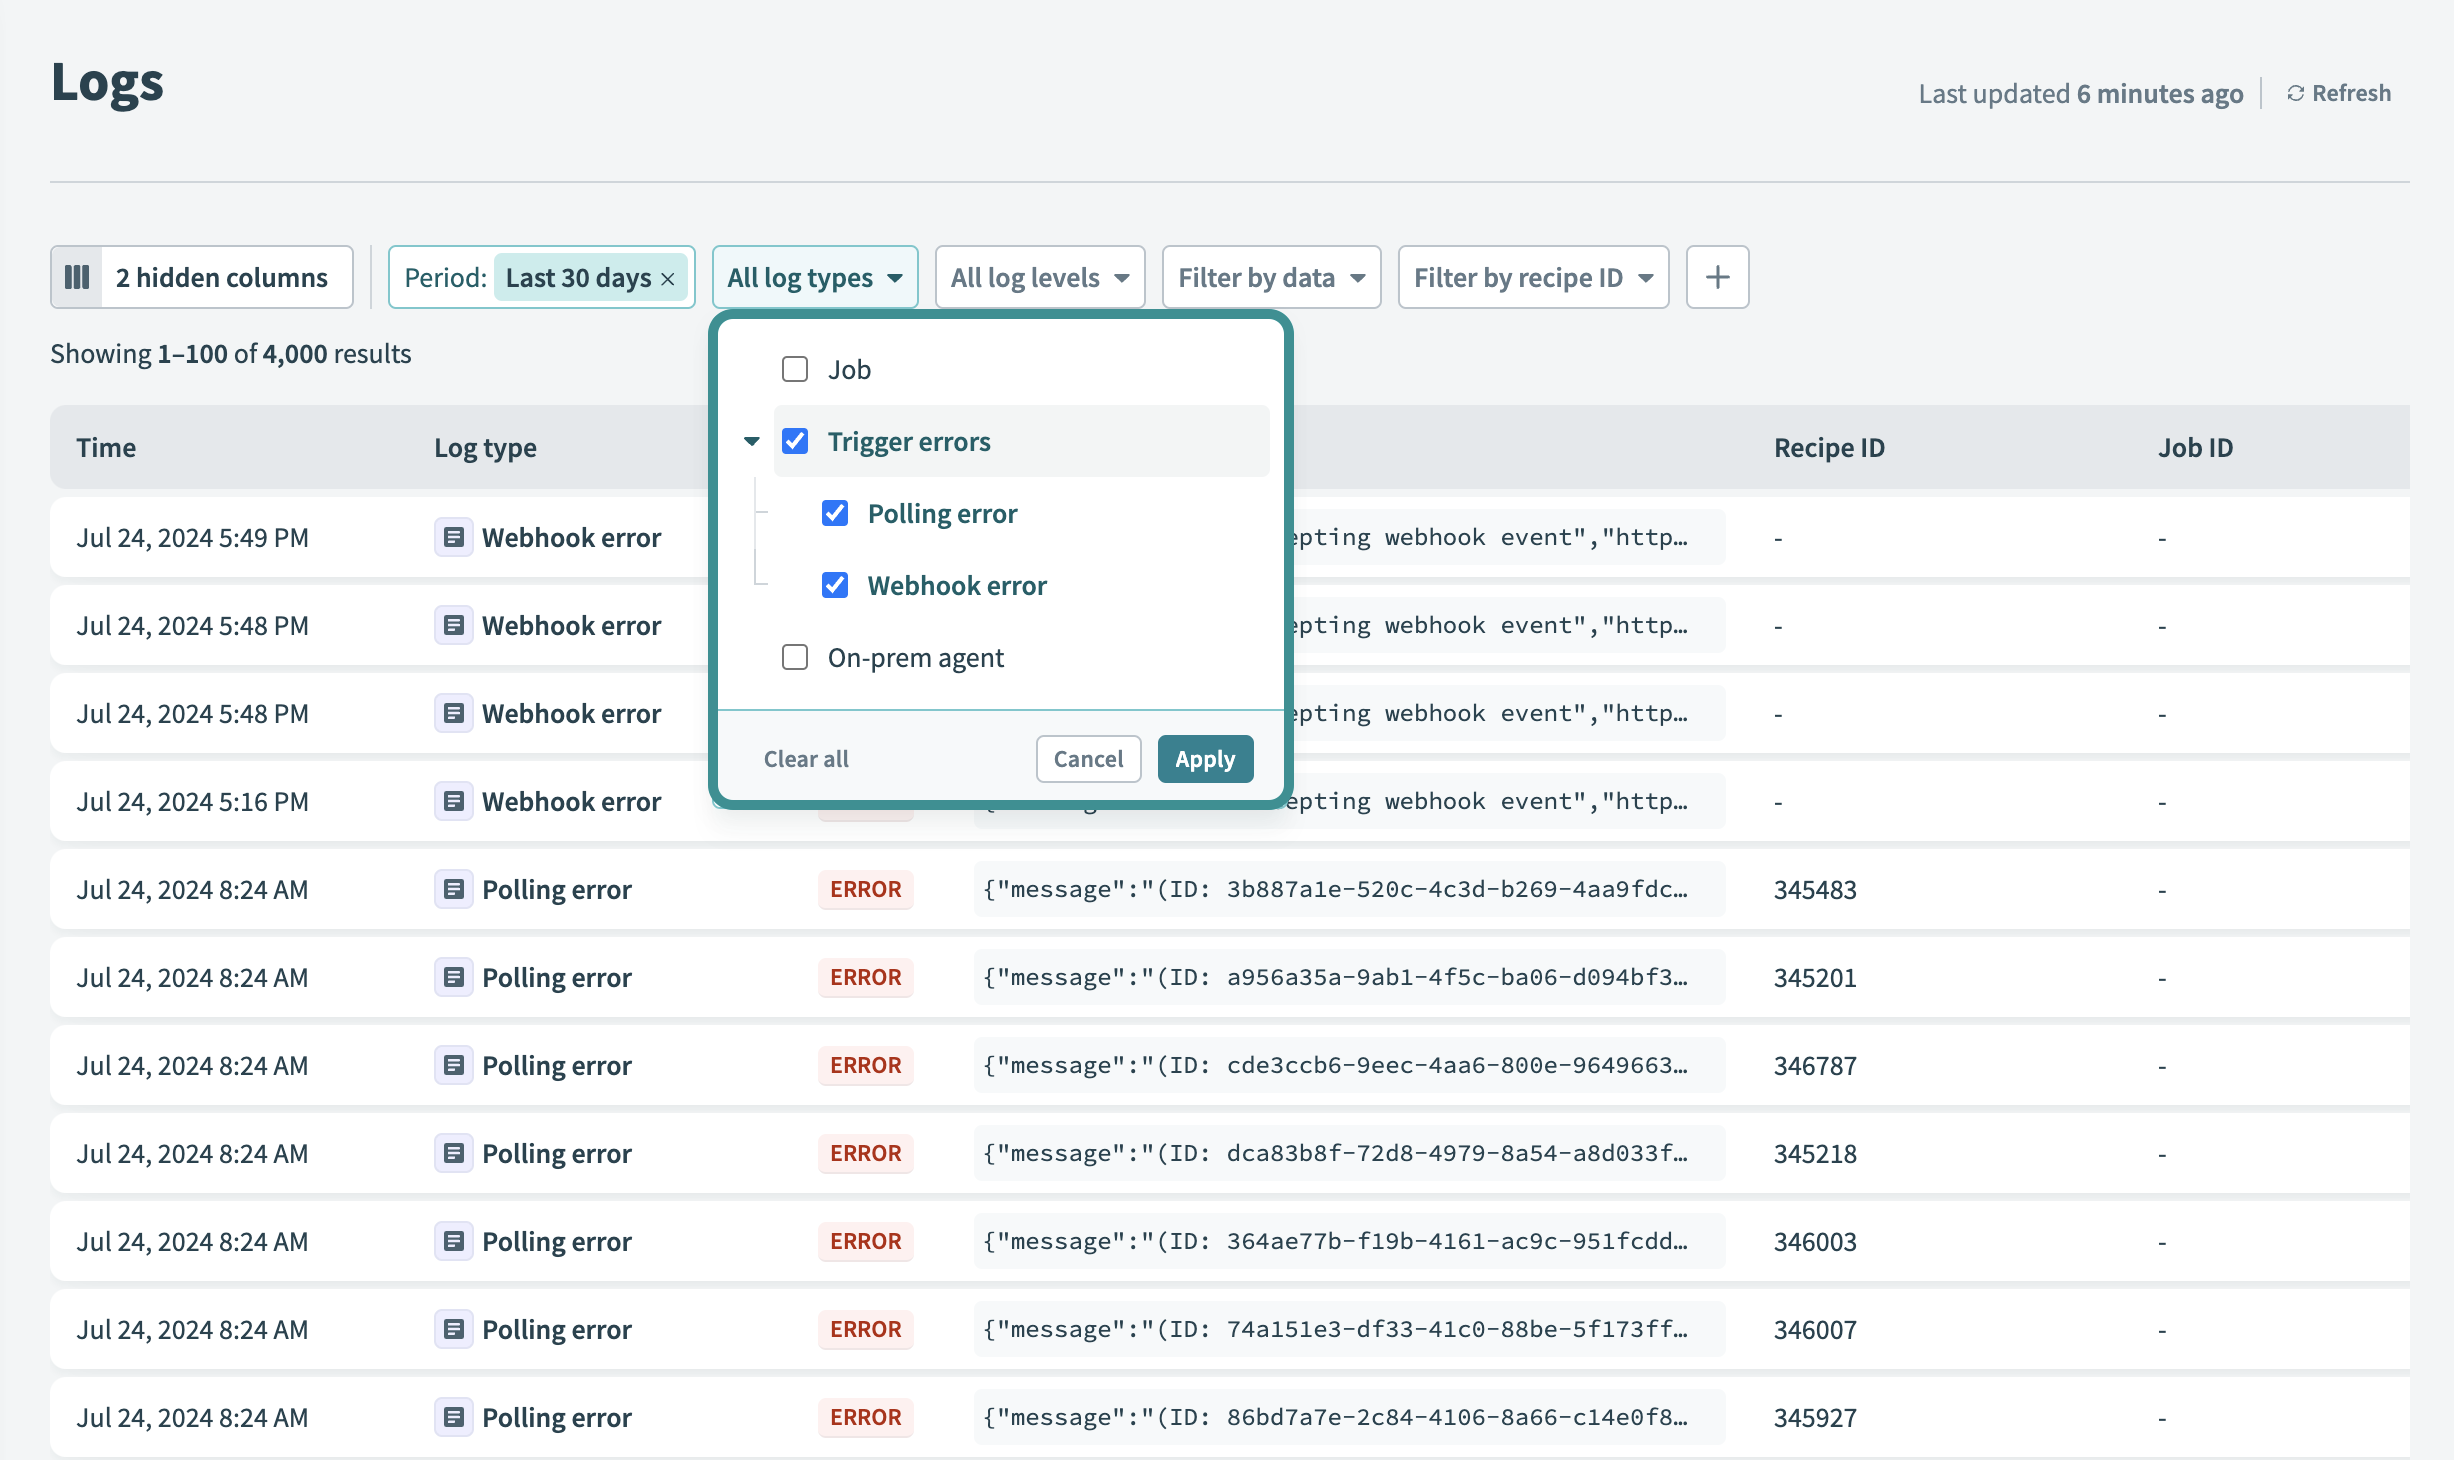
Several filters are shown by default. Select additional filters by clicking the + (plus) icon and choosing the filter(s) you plan to display:
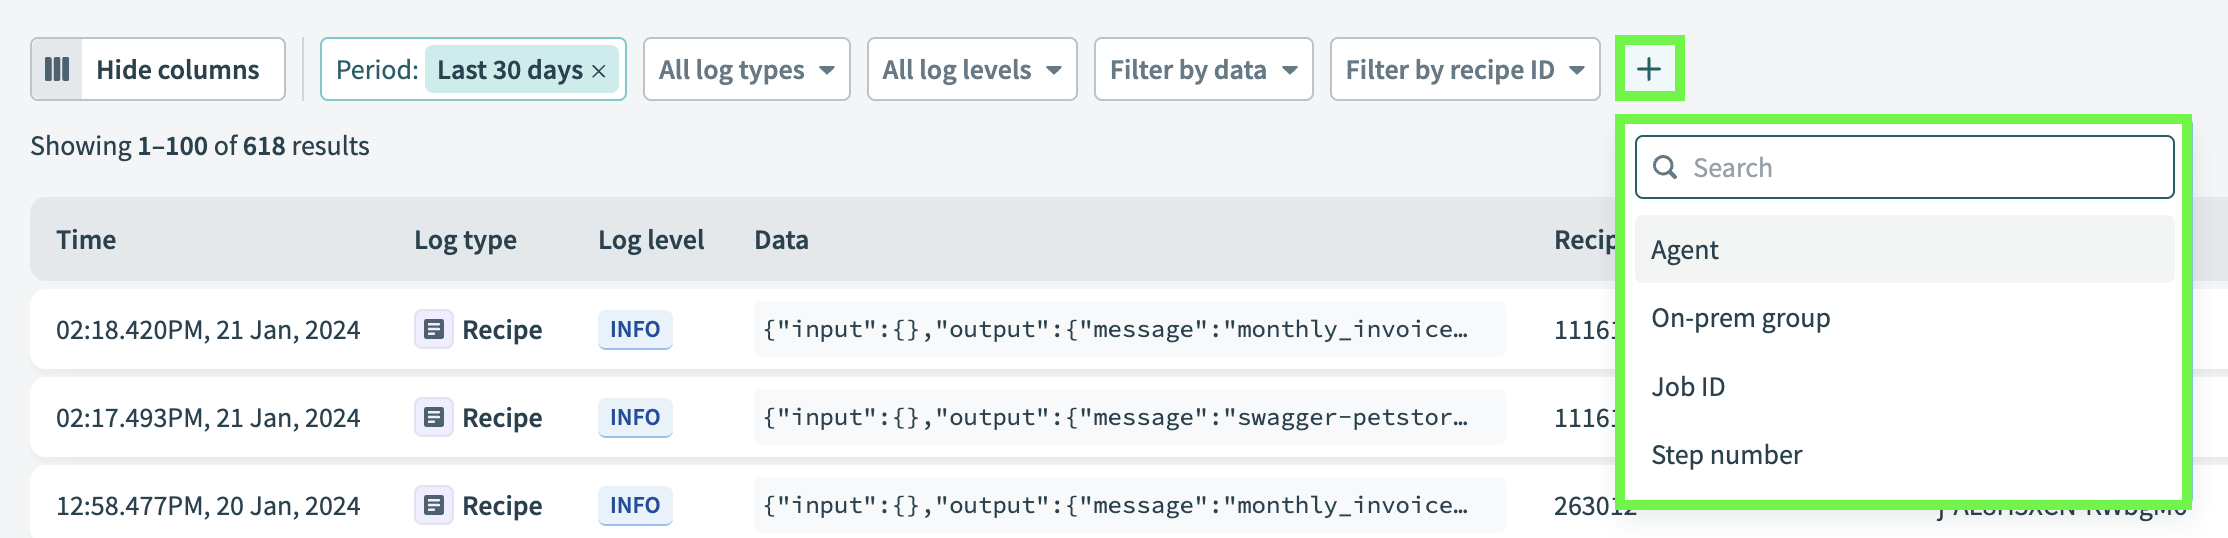 Select filters to display on the Logs page
Example: Filter entries by data
To filter entries by searching for a term in the Data field:
Select the Filter by data button on the Logs page.
 The Filter by data button
Enter a search term in the contains field that appears.
 Searching logs by a term in the Data field
Click the checkmark in the contains field or type Enter.
The Logs page displays only logs that have a Data field containing the term you entered.
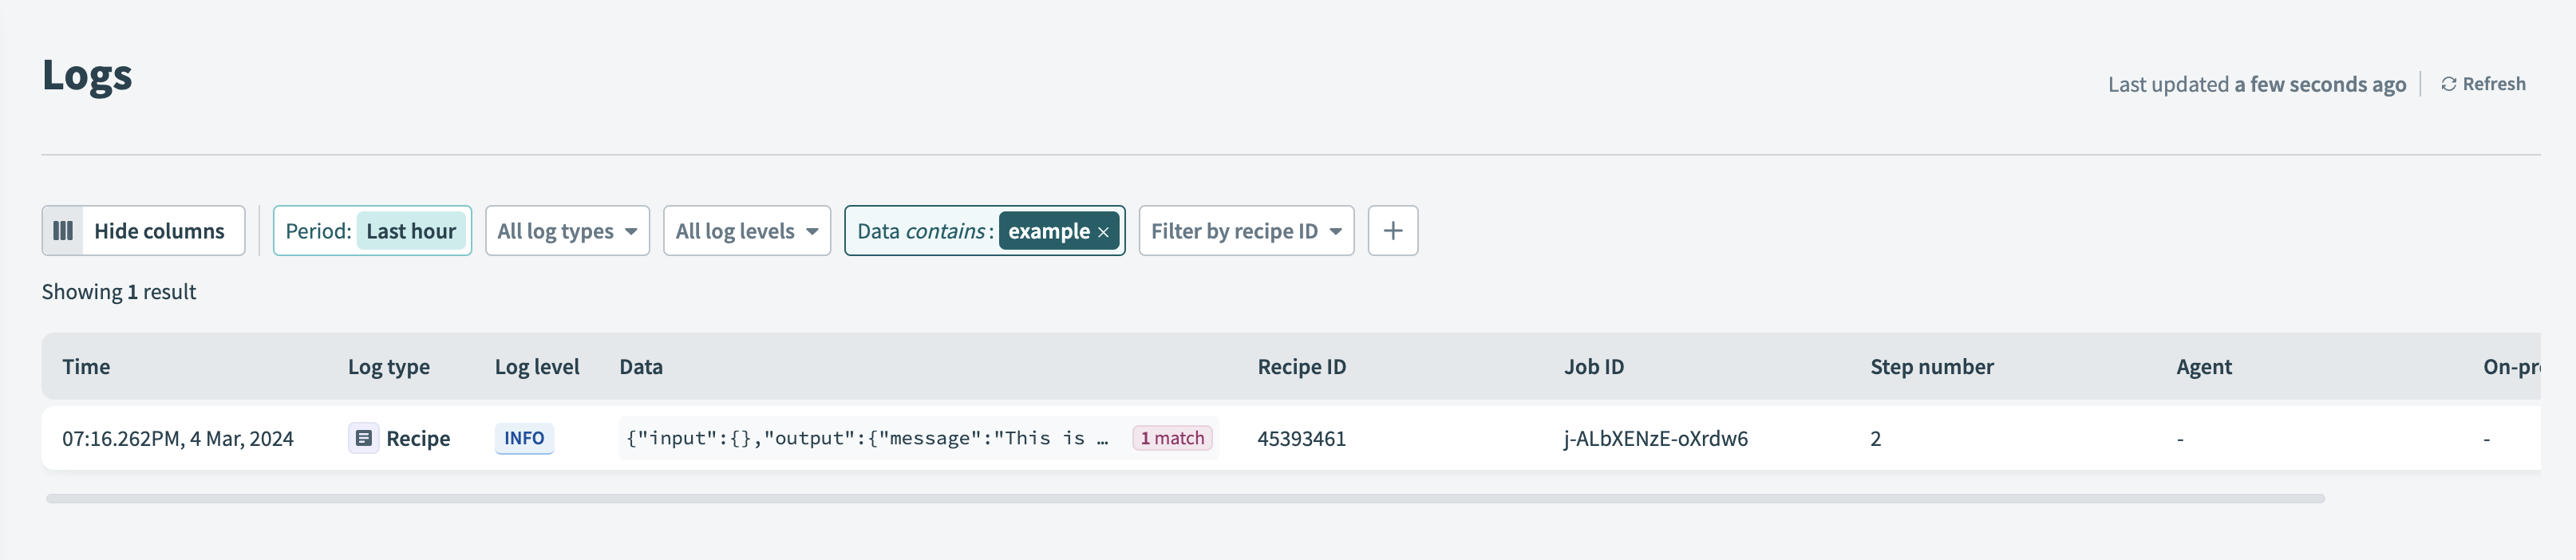 Logs filtered by a term in the Data field
Refresh log entries
Workato's Logging Service includes a Refresh button that allows you to manually refresh log entries instead of waiting for automatic log updates. This feature reduces wait times and provides you with quicker access to the latest log information.
 Refresh button
Trigger error logging
You can view error logging to help you understand why a trigger error occurs. Error logging enables you to troubleshoot recipe triggers effectively. Trigger errors can occur for various reasons, including issues with polling, webhooks, or trigger filters. Identifying and resolving these errors is crucial for maintaining the functionality of your recipes.
 Filter errors
TRIGGER ERRORS VISIBILITY
A job isn't generated for a recipe when a trigger error occurs. This means that there is no job ID, and no entry is created in the job history table. These errors are only visible on the logging service page. Data-related errors don't generate a prompt or notification because no job was generated.
Trigger filter errors
Trigger filter errors occur when the conditions set in the trigger filters are invalid or when the data does not match the expected format.
Trigger filter errors are logged automatically. Automatic logging helps diagnose and troubleshoot issues related to trigger filters effectively.
Polling errors
Polling errors occur in three main conditions:
- When a poll request fails
- When the poll response cannot be parsed successfully
- When the fetched data size exceeds the trigger event size quota of 50 MB
The following example displays log data for a polling error due to a timeout issue:
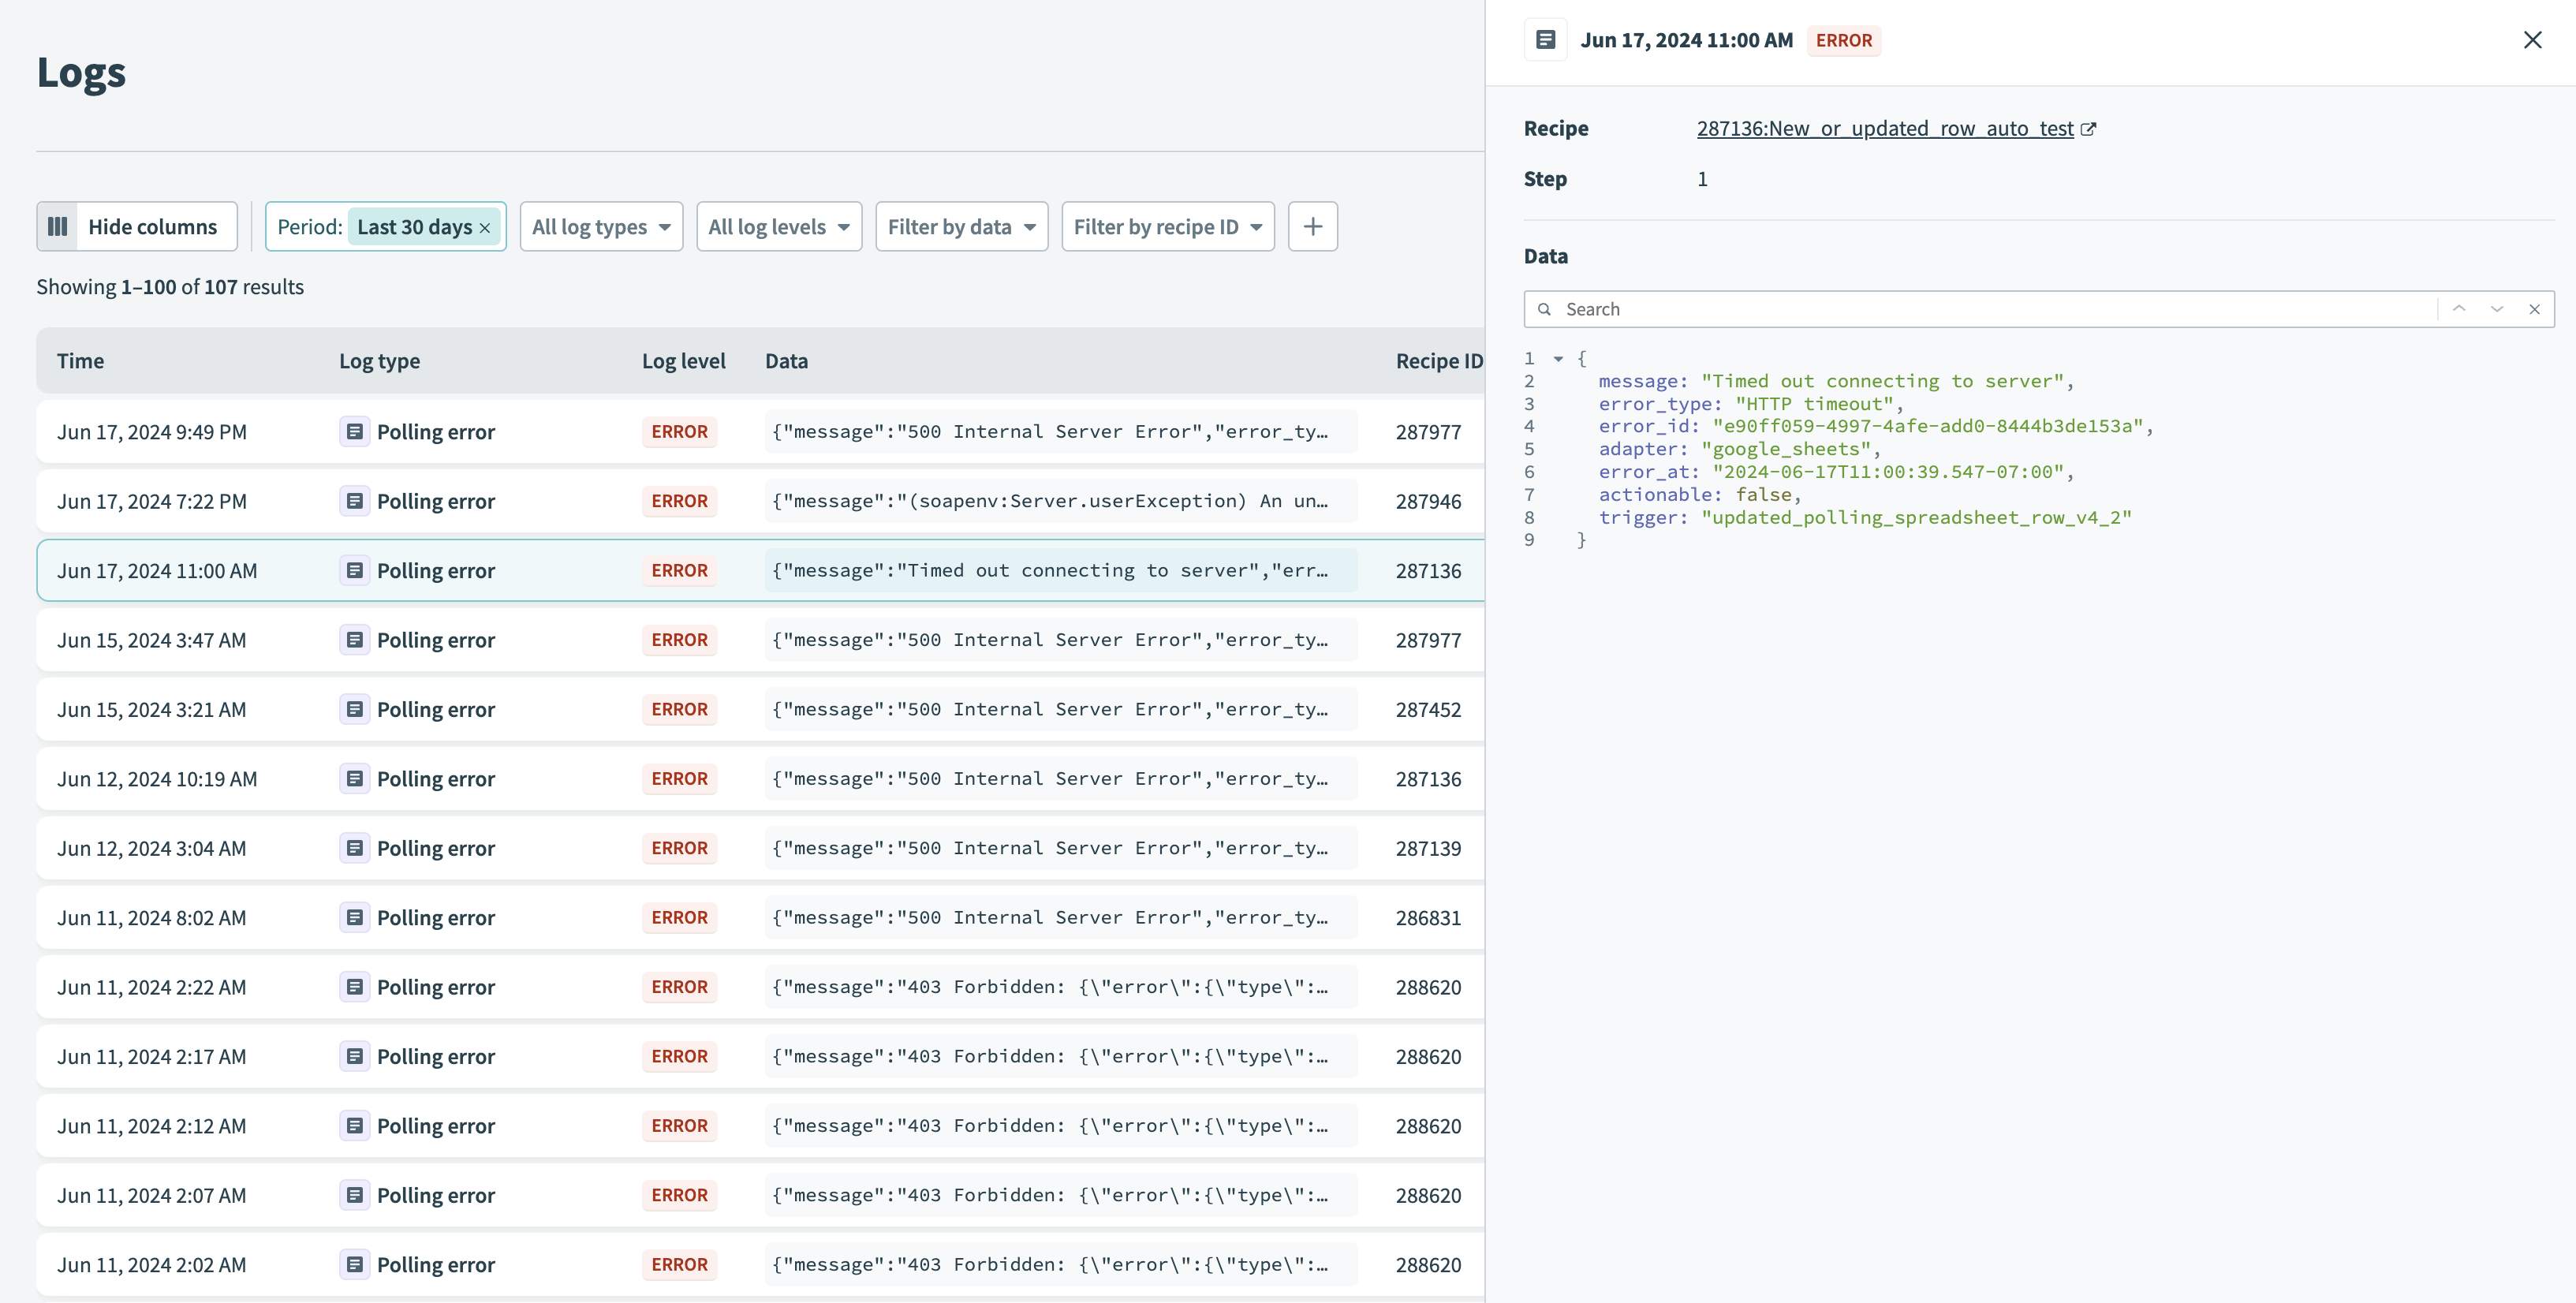 Polling errors
Webhook errors
Webhook errors occur when there is an issue with accepting or processing a webhook event. These errors can occur for various reasons, such as an invalid request, incorrect URL, or server issues. Addressing webhook errors is essential to ensure the reliability of your webhook-based triggers.
There are two types of webhook errors:
Webhook Gateway errors
These errors occur at the gateway level, typically due to rate limiting, verification failures, or invalid requests. These errors prevent the webhook event from reaching the processing stage.
Webhook Processing errors
These errors occur during the processing of the webhook event after it has been accepted by the gateway. These can be due to data parsing issues, processing logic failures, or downstream service errors.
Both types of webhook errors are logged automatically and handled similarly.
The following example displays log data for a webhook error:
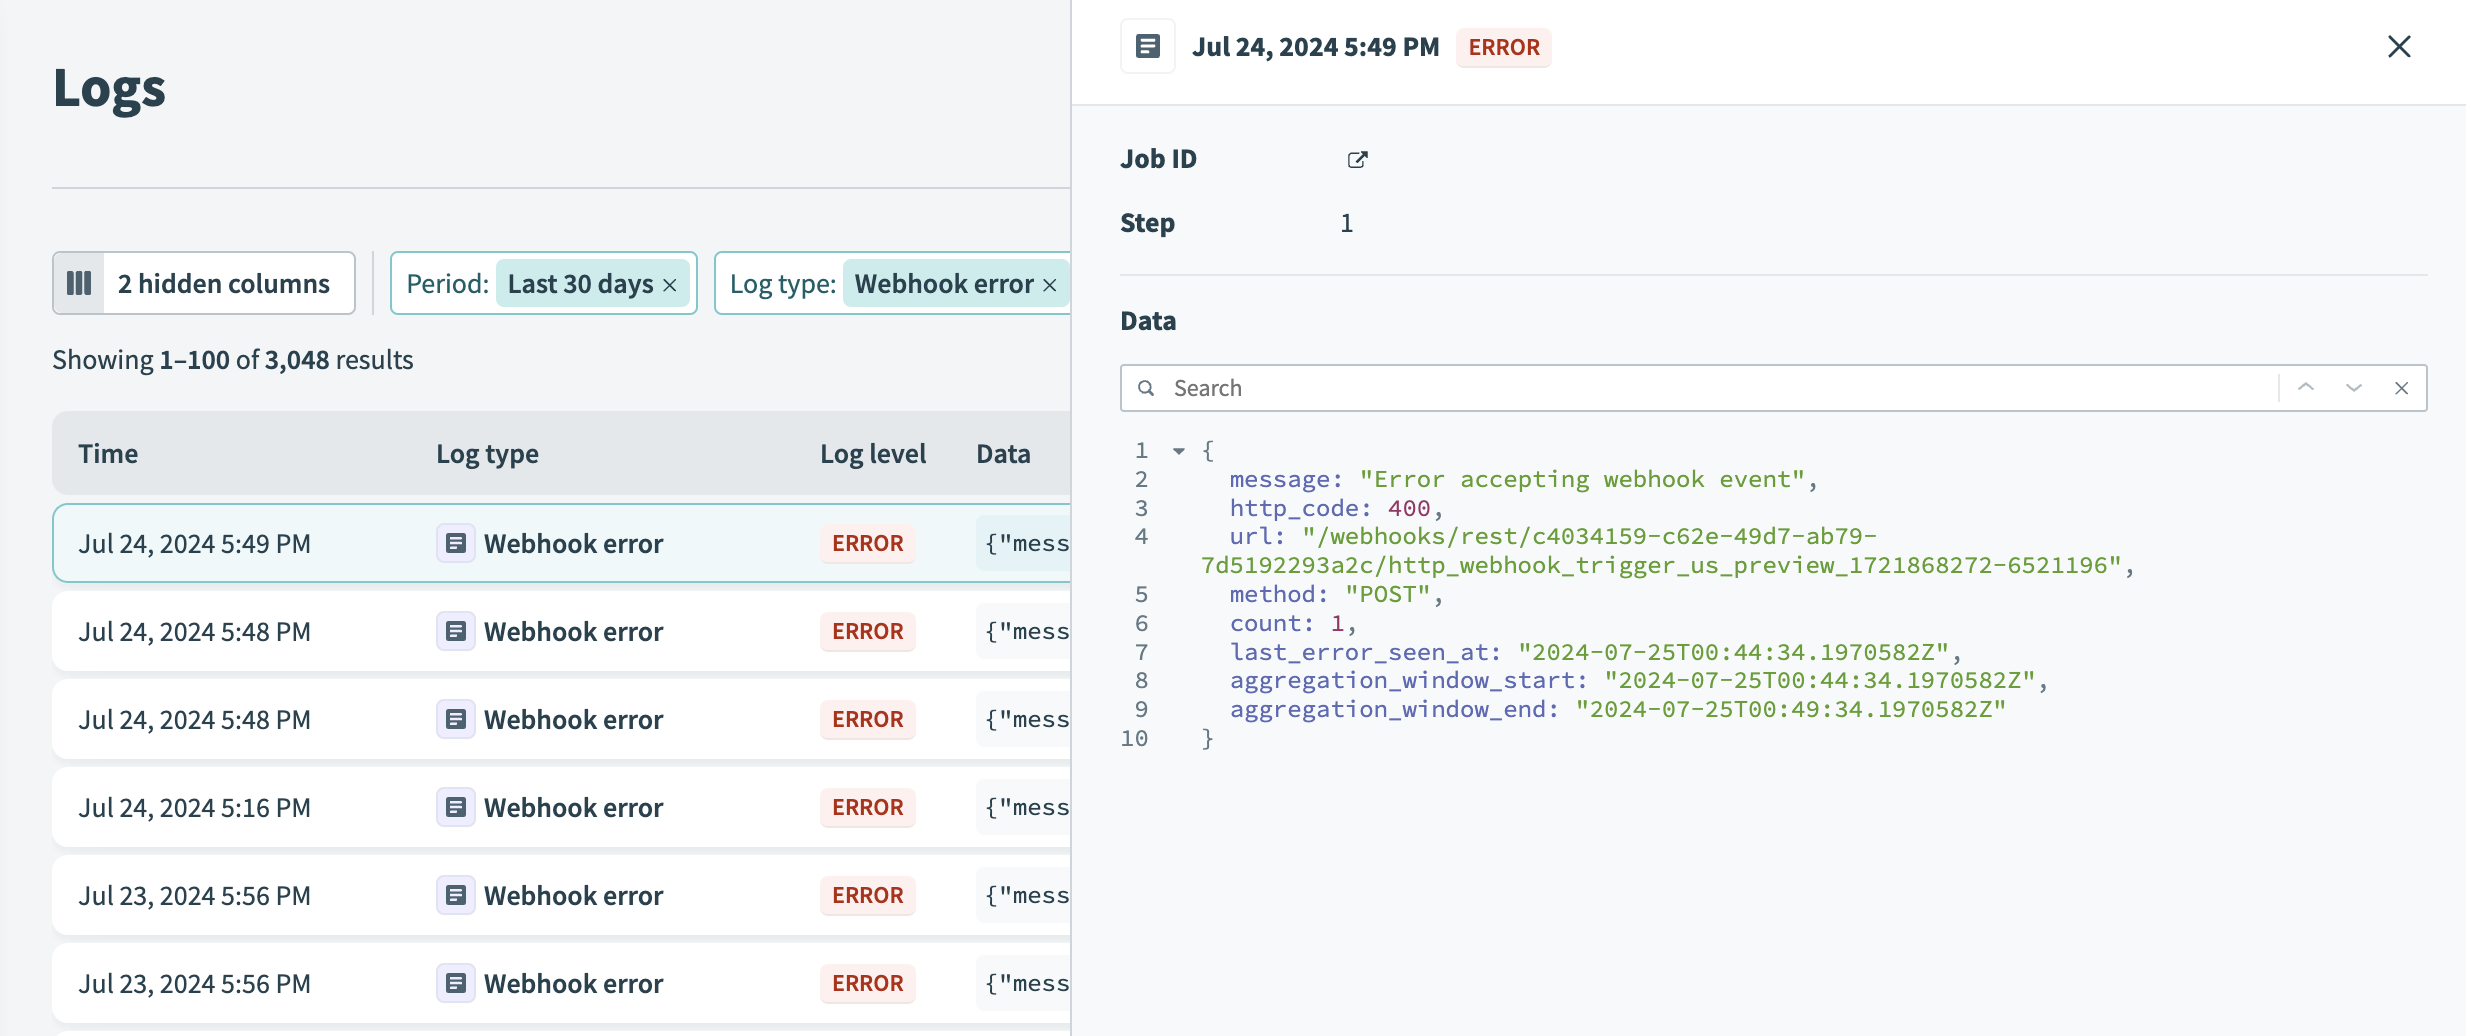 Webhook errors
Refer to the Webhooks connector Debug common errors page for more troubleshooting information.
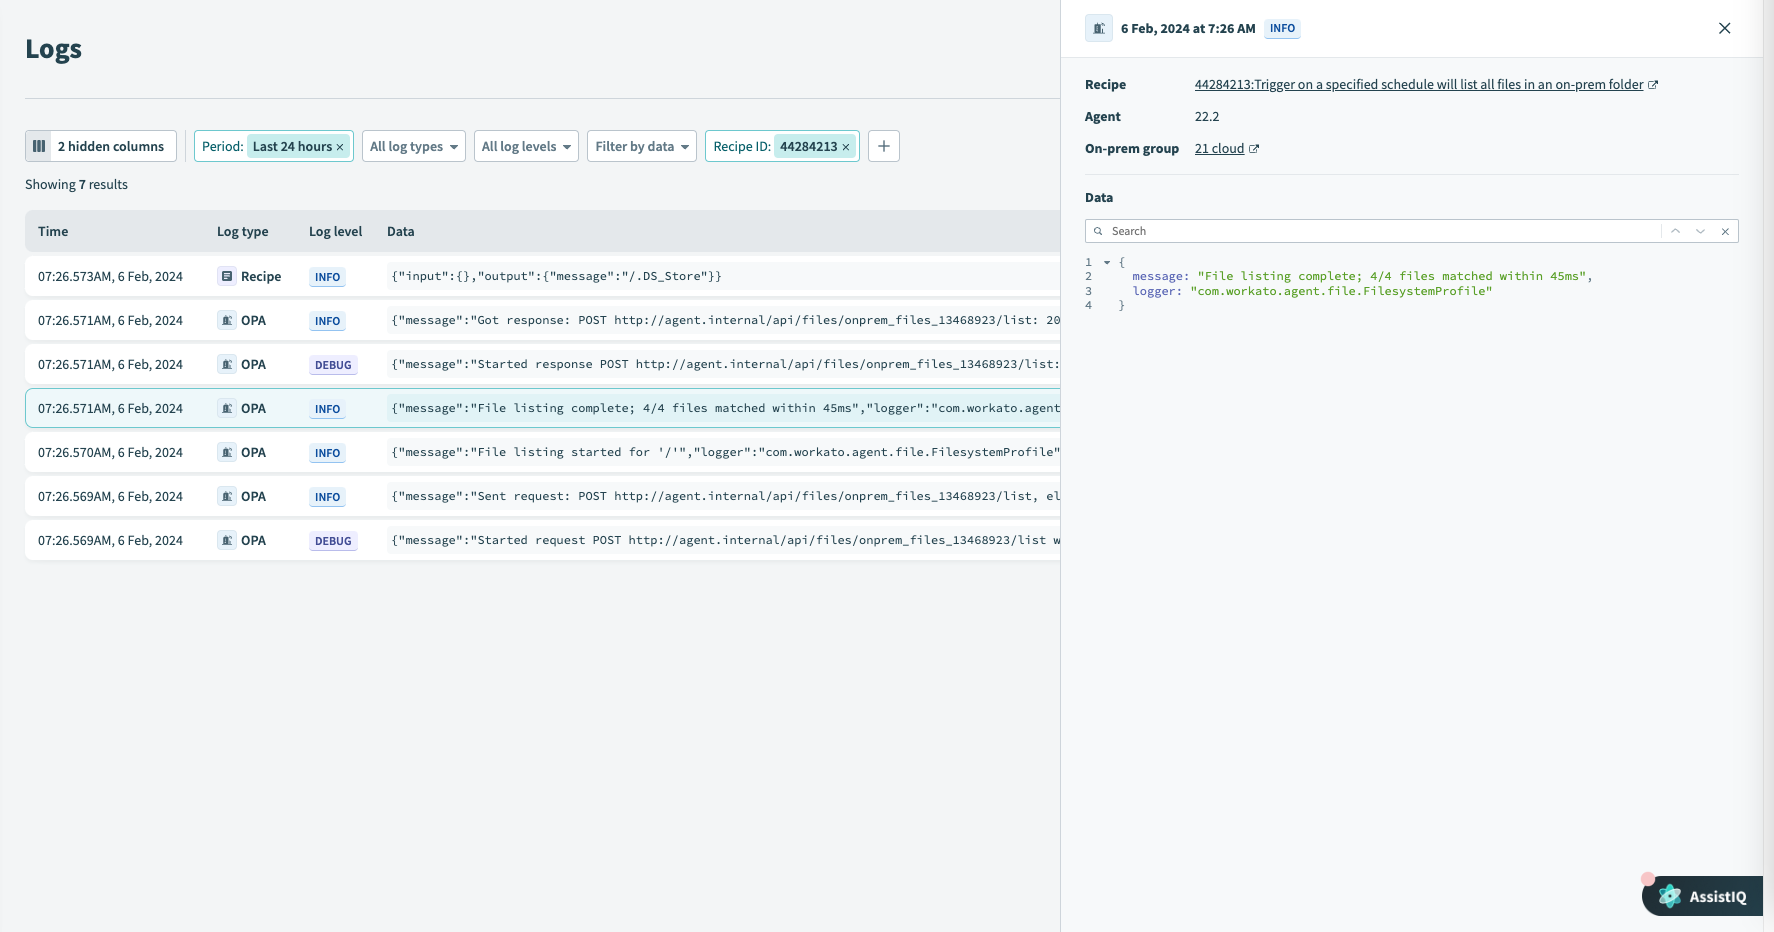
Log entry details
Click the log entry to expand the log data. This displays the full log message.
Enter a search term in the Data field of the log entry to refine your search.
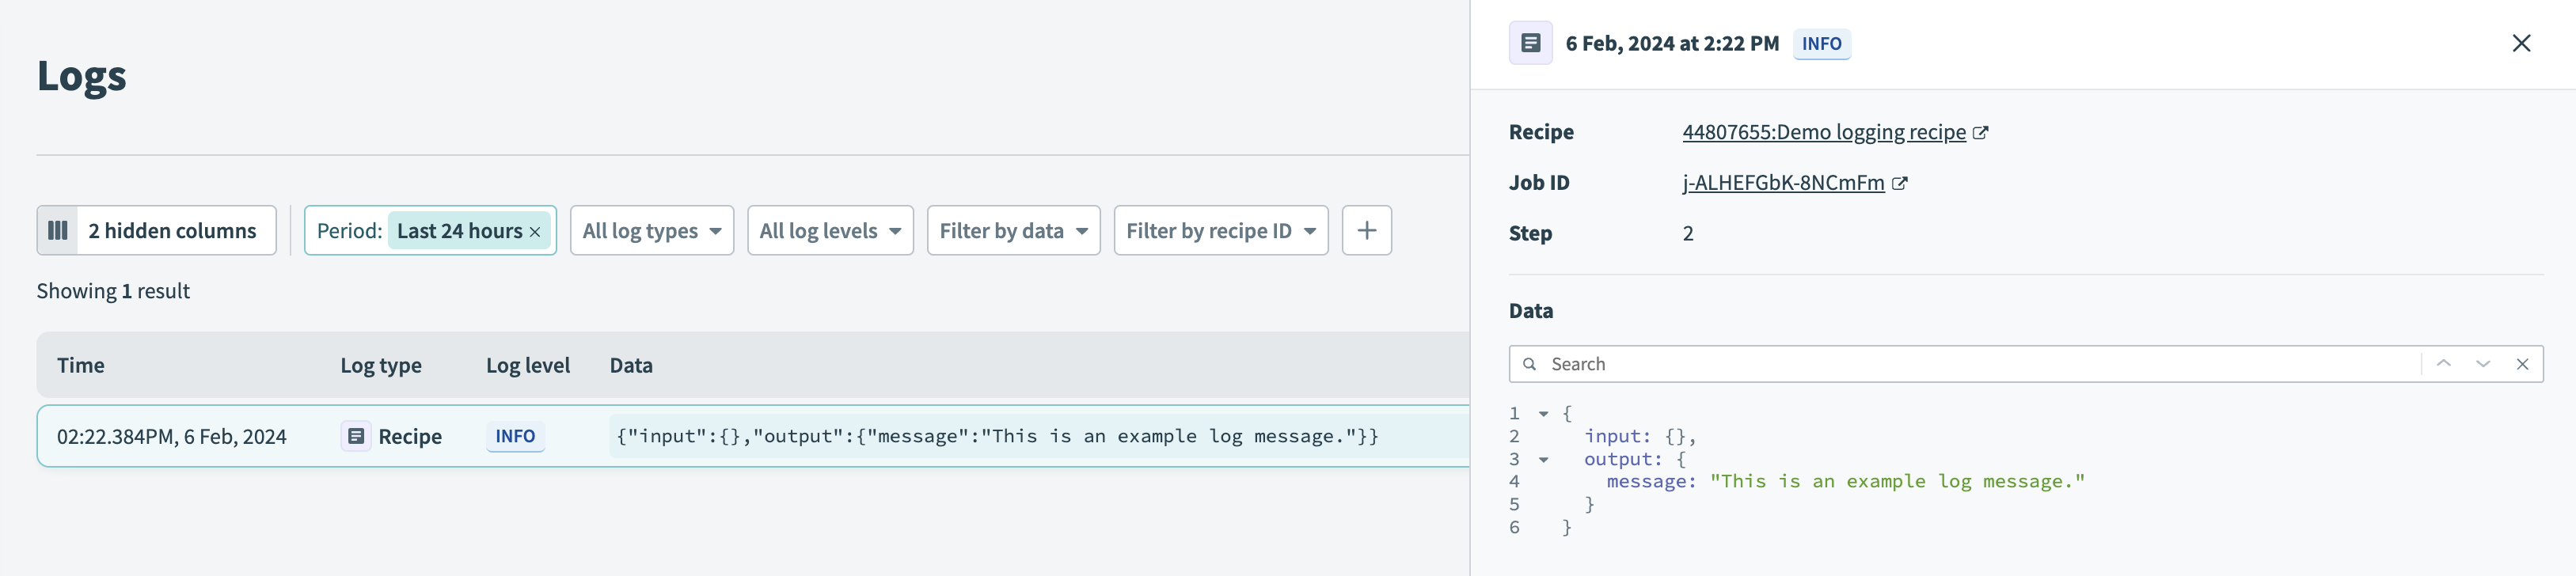
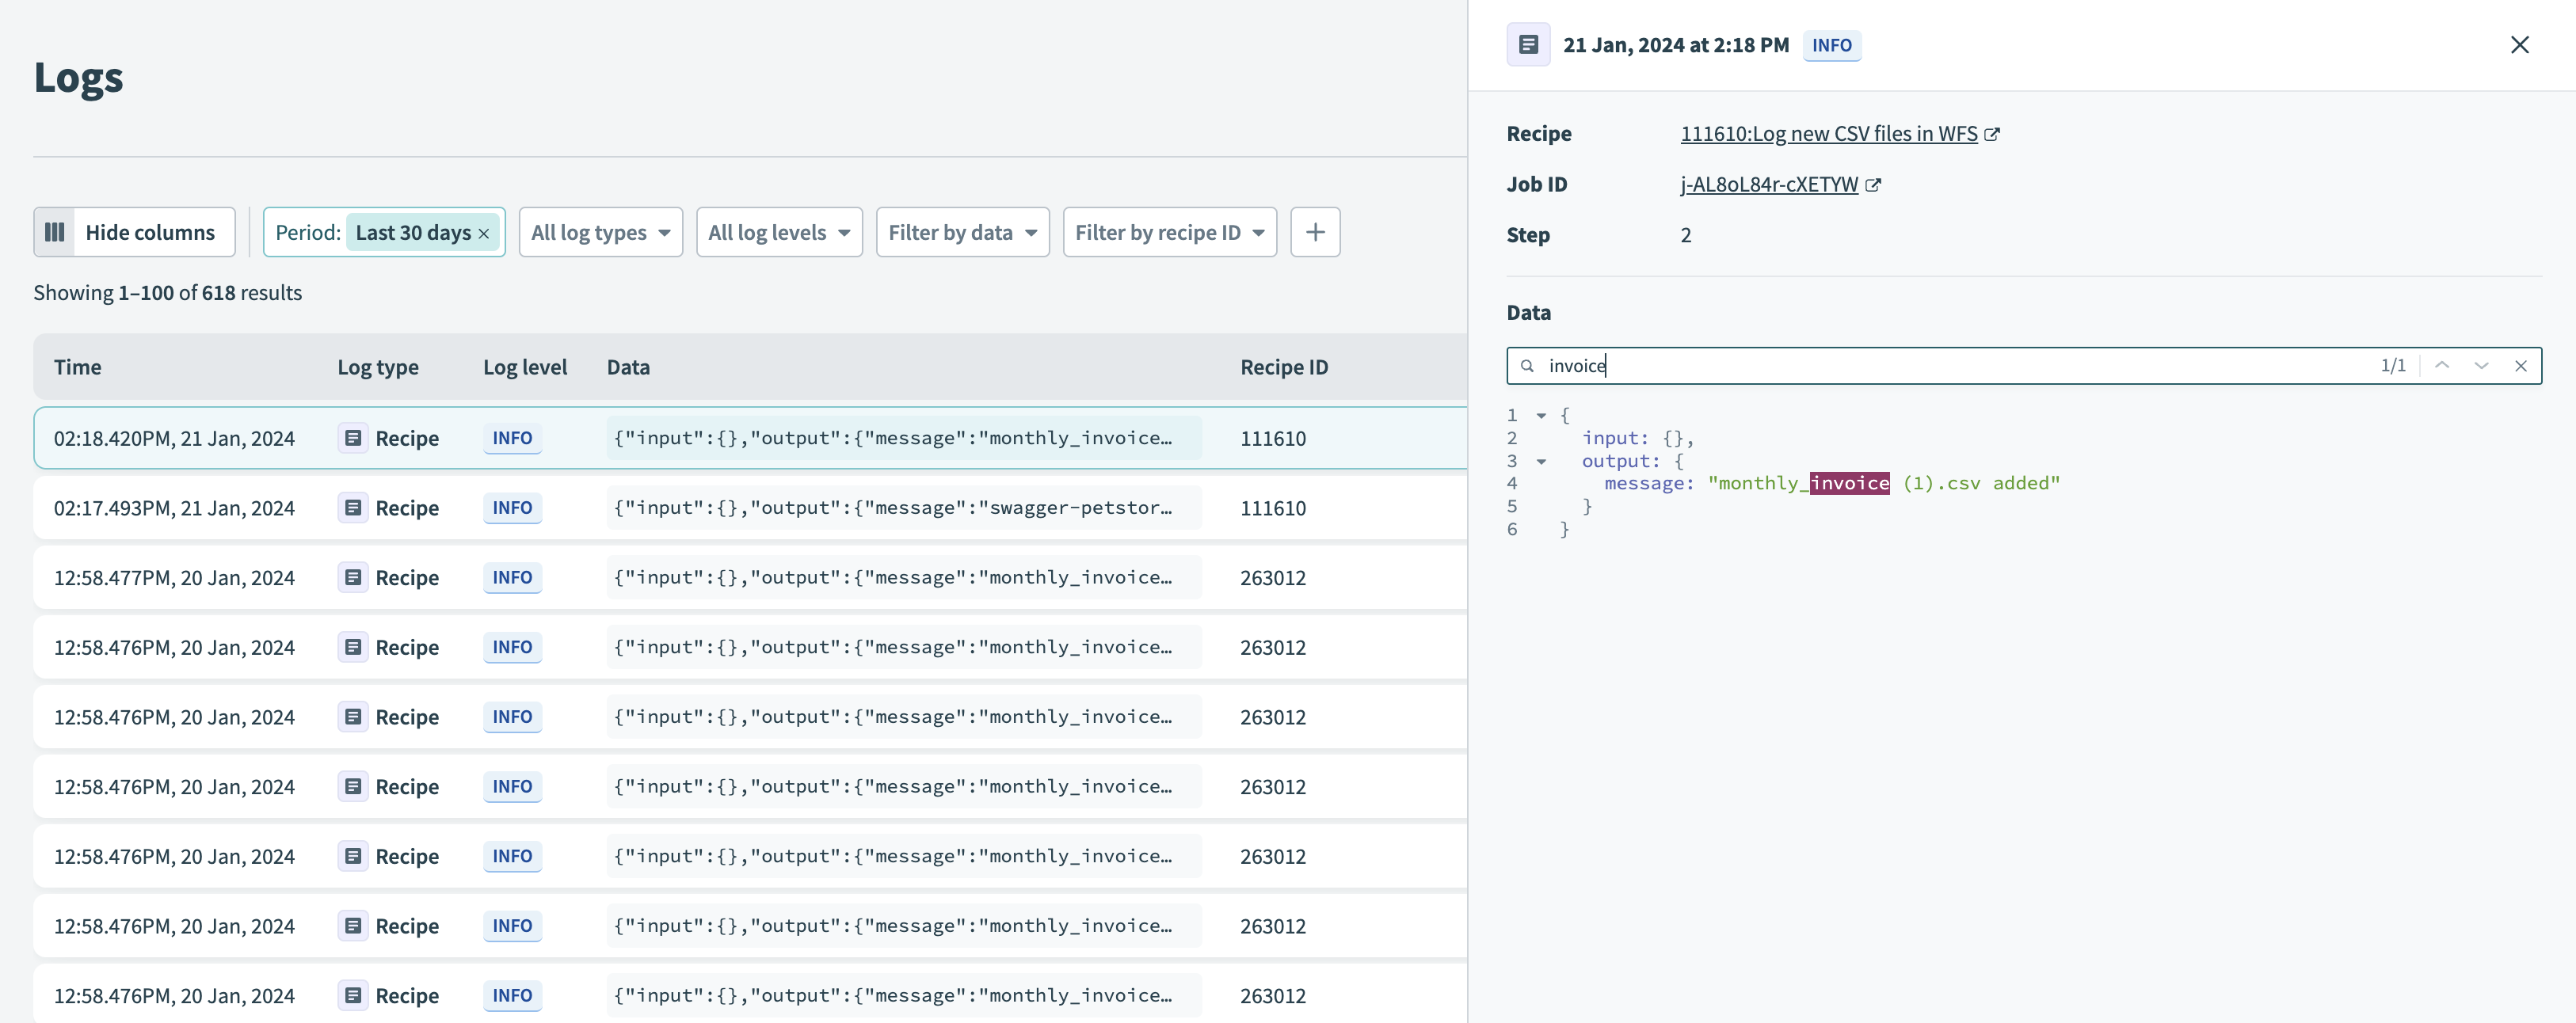 Log entry data
INPUT AND OUTPUT MESSAGE FIELD BEHAVIOR
The input and output message fields contain the same data for log entries. The message field under output contains the data for both the input and output fields, leaving the input field empty.
Add log entry with Logger by Workato
Log in to your Workato account.
Go to Projects.
Click Create > Recipe or press C+R to create a new recipe, or click an existing recipe and select Edit recipe.
Click the + (plus) button under Actions to add a new step.
Select Action in an app.
Search for and select Logger by Workato.
Customize the content of your log message by filling out the Message field. You can insert datapills into this field.
Toggle Send to Workato log service and select the log level. The Logger by Workato connector supports the log levels INFO, WARN, and ERROR.
This creates a log entry for every job, including test jobs.
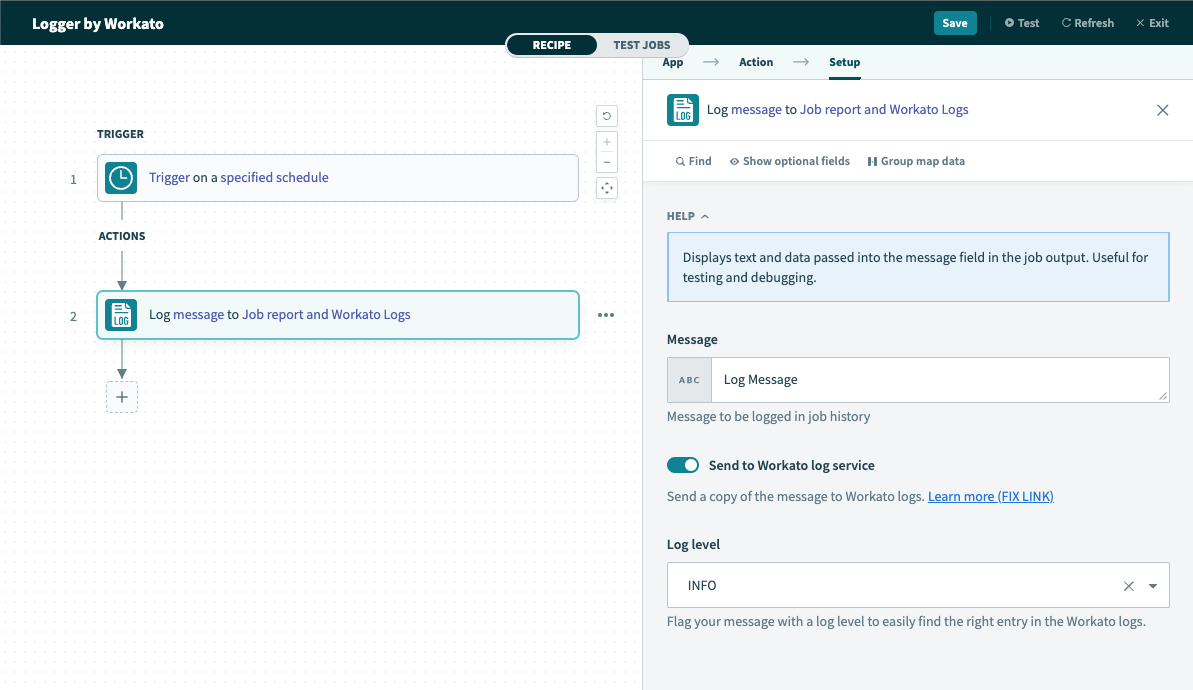 Logger by Workato
MONITOR RECIPE JOBS IN REAL-TIME WITH LOGS
The Logs page is updated as each log step is completed. This means that you do not need to wait for the entire recipe job to finish processing before viewing the logs. This enables you to track the real-time progress of long running recipes.
Add log entries from OPA
You can send logs to the Logging Service if you use OPA versions 23.0 or newer and have the Send to Workato logs setting enabled. To enable this setting:
Log in to your Workato account.
Click Tools > On-prem groups > Settings > Log management.
Enable the Send to Workato logs setting. Note that this setting is disabled by default. Refer to the on-prem documentation for more information.
 OPA logs in the Workato Logging Service
Log encryption
Logs are encrypted at rest and in transit with a unique encryption key for each workspace and environment (if applicable).
Check out how it works with Workato's Encryption Key Management.
Log limits
Each log entry has a maximum retention period of 30 days or 1 million entries. This limit is independent of the customized retention periods for other components in your workspace. You can stream logs to an external destination to maintain logs beyond this retention period.
In each workspace or environment, every log type source has a retention limit of 1,000,000 log entries. This retention limit prevents the logging service from being overloaded and ensures that older logs do not displace newer ones. When this threshold is reached, the system deletes the oldest entries for that specific log type source to make space for incoming logs.
Size limits
The data column for each log entry has a maximum limit of 10KB. Once the limit is exceeded, the contents are truncated.
Character encoding
UTF-8 character encoding is used in log entries and international characters are supported (e.g. "こんにちは世界!").
Last updated: