Configuring Microsoft Azure Key Vault for on-prem agent
Microsoft Azure Key Vault is a service that enables you to securely store and access secrets in the cloud. Workato supports Azure Key Vault for managing secrets for on-prem systems.
Azure Key Vault support for OPA connection types
Azure Key Vault supports both cloud profiles and connection profiles, though the process of connecting to and using Azure Key Vault is different for each, as summarized in the following table:
| On-prem system connection type | Azure Key Vault setup | Azure Key Vault secret syntax |
|---|---|---|
| Cloud profile (recommended) | Azure Key Vault connector in Workato | {{workato:sm:<secret_name>}} |
| Connection profile | secrets section in config.yml | { secret: '<secret_name>' } |
Configure and use Azure Key Vault according to the connection type of the on-prem system whose secrets are stored in Key Vault:
- Using Azure Key Vault with on-prem systems configured as cloud profiles
- Using Azure Key Vault with on-prem systems configured as connection profiles
CONNECTION TYPES
- Cloud profiles are set up directly in Workato, so you don't need to access the machine where the on-prem agent is installed.
- Connection profiles are set up manually in a
config.ymlfile on the machine where the on-prem agent is installed.
Using Azure Key Vault with cloud profiles
To set up and use Azure Key Vault to store credentials for an on-prem system configured as a cloud profile, complete the following steps:
- Register an application with Microsoft Entra ID. This enables Workato to retrieve secrets from Key Vault.
- Set up Azure Key Vault for either workspace-level secrets management or project-specific secrets management.
- Use Azure Key Vault secrets in connections. In the Connection type field of the connection setup, select the name of the on-prem group that you set up as a cloud profile (meaning directly in Workato).
Using Azure Key Vault with connection profiles
LEGACY CONNECTION CONFIGURATION
Setting up Azure Key Vault with a config.yml file is a legacy connection configuration that will eventually be deprecated. We encourage you to migrate your connection profiles to cloud profiles, so you can set up Azure Key Vault using the connector directly in Workato.
In this guide, we'll show you how to use Microsoft Azure Key Vault with Workato's on-prem agent (OPA) to store credentials for a database that is configured as a connection profile.
Note: We're focusing on using secrets to encrypt passwords in this tutorial, but secrets can be used to encrypt any connection value. This includes usernames, database names, and so on.
Prerequisites
To configure Azure Key Vault to work with OPA, you'll need:
- The On-prem groups privilege in Workato.
- The following in Azure:
- Permissions that allow you to:
- Create secrets
- Register and assign roles to applications
- An existing key vault. Creating a key vault is outside the scope of this tutorial, but you can use this Azure guide to create one.
- An existing service principal with read access to resources. The Workato OPA uses environment variables to provide credentials in requests to Azure. Use this Azure guide to create a service principal with read access to your key vault.
- Permissions that allow you to:
Azure credentials encryption
From on-prem agent version 2.14.0 or later you can set your AZURE_CLIENT_ID, AZURE_TENANT_ID and AZURE_CLIENT_SECRET directly in the config.yml file instead of setting it as an environment variables. Additionally those values can be protected by using built in encryptor.
In the example below only the AZURE_CLIENT_SECRET is encrypted:
secrets:
  provider: azure
  vault: WorkatoSDKeyVault
  tenant: <tenant-id>
  clientId: <client-id>
  clientSecret: {encrypted: 'RCVtuGPjJWNqwkFQvhT...'}
Step 1: Create The Secret In Azure
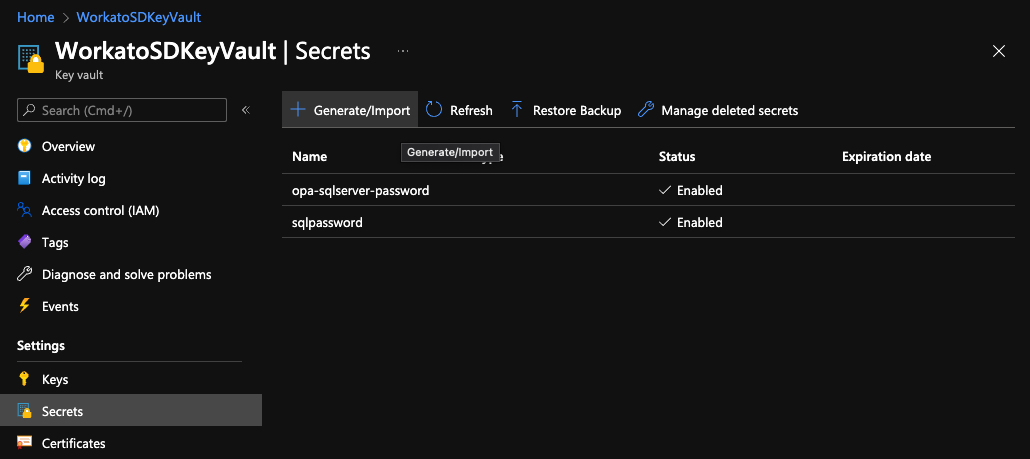
Sign into the Azure portal.
Navigate to Azure Key Vault.
Open the key vault where you want to create the secret. In this example, the vault is WorkatoSDKeyVault.
In the left navigation pane, click Settings > Secrets.
On the Secrets page, click + Generate/Import:
In the Create a secret window that displays, fill in the following:
Upload options: Select
ManualName: Enter a name for the secret. For example:
sales-db-passwordThis name will be used as the
passwordin the OPA config file to retrieve the secret and itsvalue.Value: Enter the value for the secret. This should be an actual password.
Enabled: If it isn't already, set this field to
Yes
The window should look similar to the following:
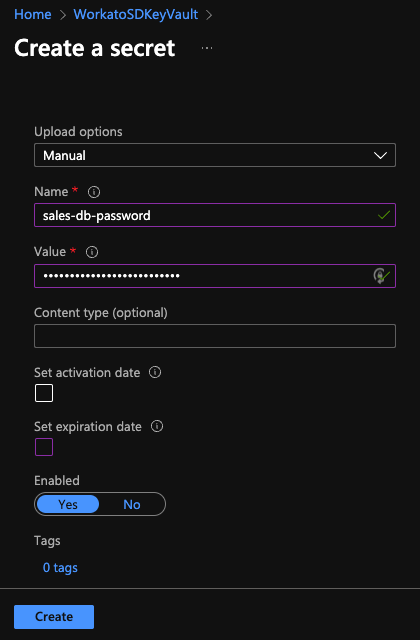
When finished, click Create.
Step 2: Configure The OPA Config File
In this step, you'll add info about the key vault you created to your OPA configuration file.
In your OPA config file, add a secrets section with provider and vault keys:
secrets:
  provider: azure
vault: <VAULT_NAME>For provider, enter azure.
Next, you'll define the vault. Workato supports the ability to specify multiple vaults in an OPA config file:
To define a default vault, enter the name of a vault for
vault. If provided, the vault will be used for all secrets defined in the config file.In the following example, we've enter the name of the vault from Step 1. In our case, this is
WorkatoSDKeyVault:yamlsecrets: provider: azure vault: WorkatoSDKeyVaultTo override the default or define a vault at the secret level, use
{ secret: '<SECRET_NAME>', vault: '<VAULT>'}in the database's connection profile. Refer to the next section for an example.
Save the file.
Step 3: Configure The Database Profile
To wrap things up, you'll specify which secret to use in the database's profile.
In the config file, navigate to the database's profile.
To use the default vault, use { secret: '<SECRET_NAME>' } in the password key to specify the secret. The <SECRET_NAME> must match the name of the secret you created in Step 1:
database:
  sales_database:
    adapter: sqlserver
    host: localhost
    port: 1433
    database: test
    username: sales_user
    password: { secret: 'sales-db-password-password' }
If using a vault other than the default, use { secret: '<SECRET_NAME>', vault: '<VAULT>' } in the password key to provide an override:
database:
  sales_database:
    adapter: sqlserver
    host: localhost
    port: 1433
    database: test
    username: sales_user
password: { secret: 'sales-db-password-password', vault: 'other-vault' }Save the file.
Last updated: