Drop-downs with recipe data source
Workflow apps enable you to use recipes as a data source for single and multi-select drop-down components. This allows you to dynamically populate drop-down components with data from your other applications. This ensures data consistency and reduces manual effort. You can use your existing recipes to fetch data from your apps or create new apps directly from the page editor.
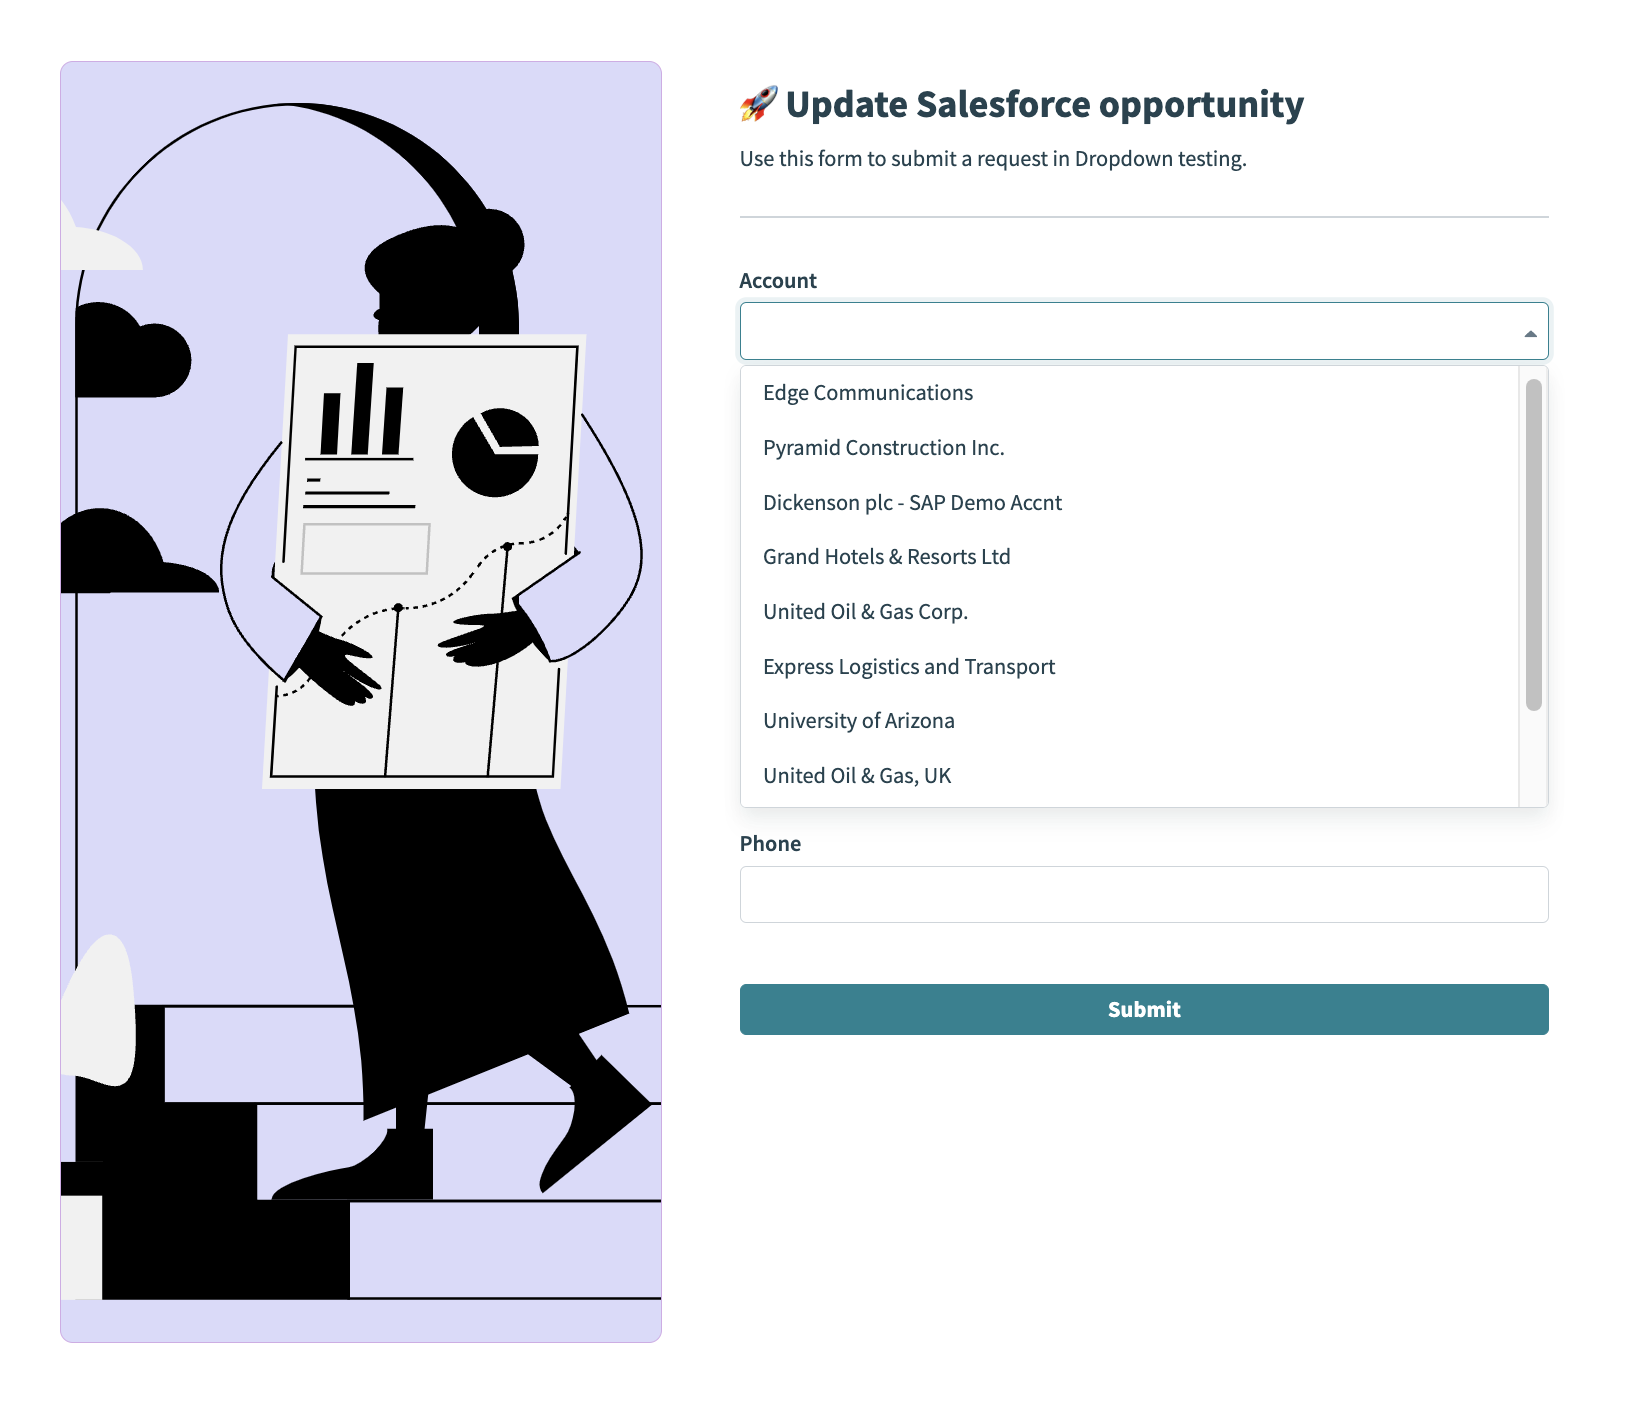 Drop-down component with a recipe as its data source in the Workflow apps portal
How it works
This feature works behind the scenes to surface data from your other applications in your Workflow apps pages. At a high level, this feature uses the following logic:
Use cases
The following use cases provide examples of how you can use this feature to address your business objectives.
Customer support
- Scenario: A customer support workflow requires updating customer account information from a Workflow app page drop-down, which is dynamically populated based on data from a CRM system.
- Solution: A recipe retrieves a list of customer accounts from Salesforce in real-time, ensuring the drop-down reflects the most up-to-date data. The employee can then update the account using a Workflow apps page. Submitting the page triggers an additional recipe that updates the account in the CRM.
Sales order processing
- Scenario: Sales representatives must select products from a drop-down when creating sales orders. The product list is stored in an inventory management system and changes frequently.
- Solution: A recipe fetches the latest product list from the inventory system, ensuring sales representatives always have access to the current product offerings.
HR onboarding
- Scenario: An HR team needs to assign new hires to various departments, which are stored in a database and frequently updated.
- Solution: A recipe fetches the latest list of departments from the database whenever the drop-down is accessed, ensuring the HR team always sees the most current options.
How to set up recipes as a data source
Complete the following steps to set up this functionality in your Workflow app.
Sign in to Workato and create a Workflow app or select one of your existing Workflow apps.
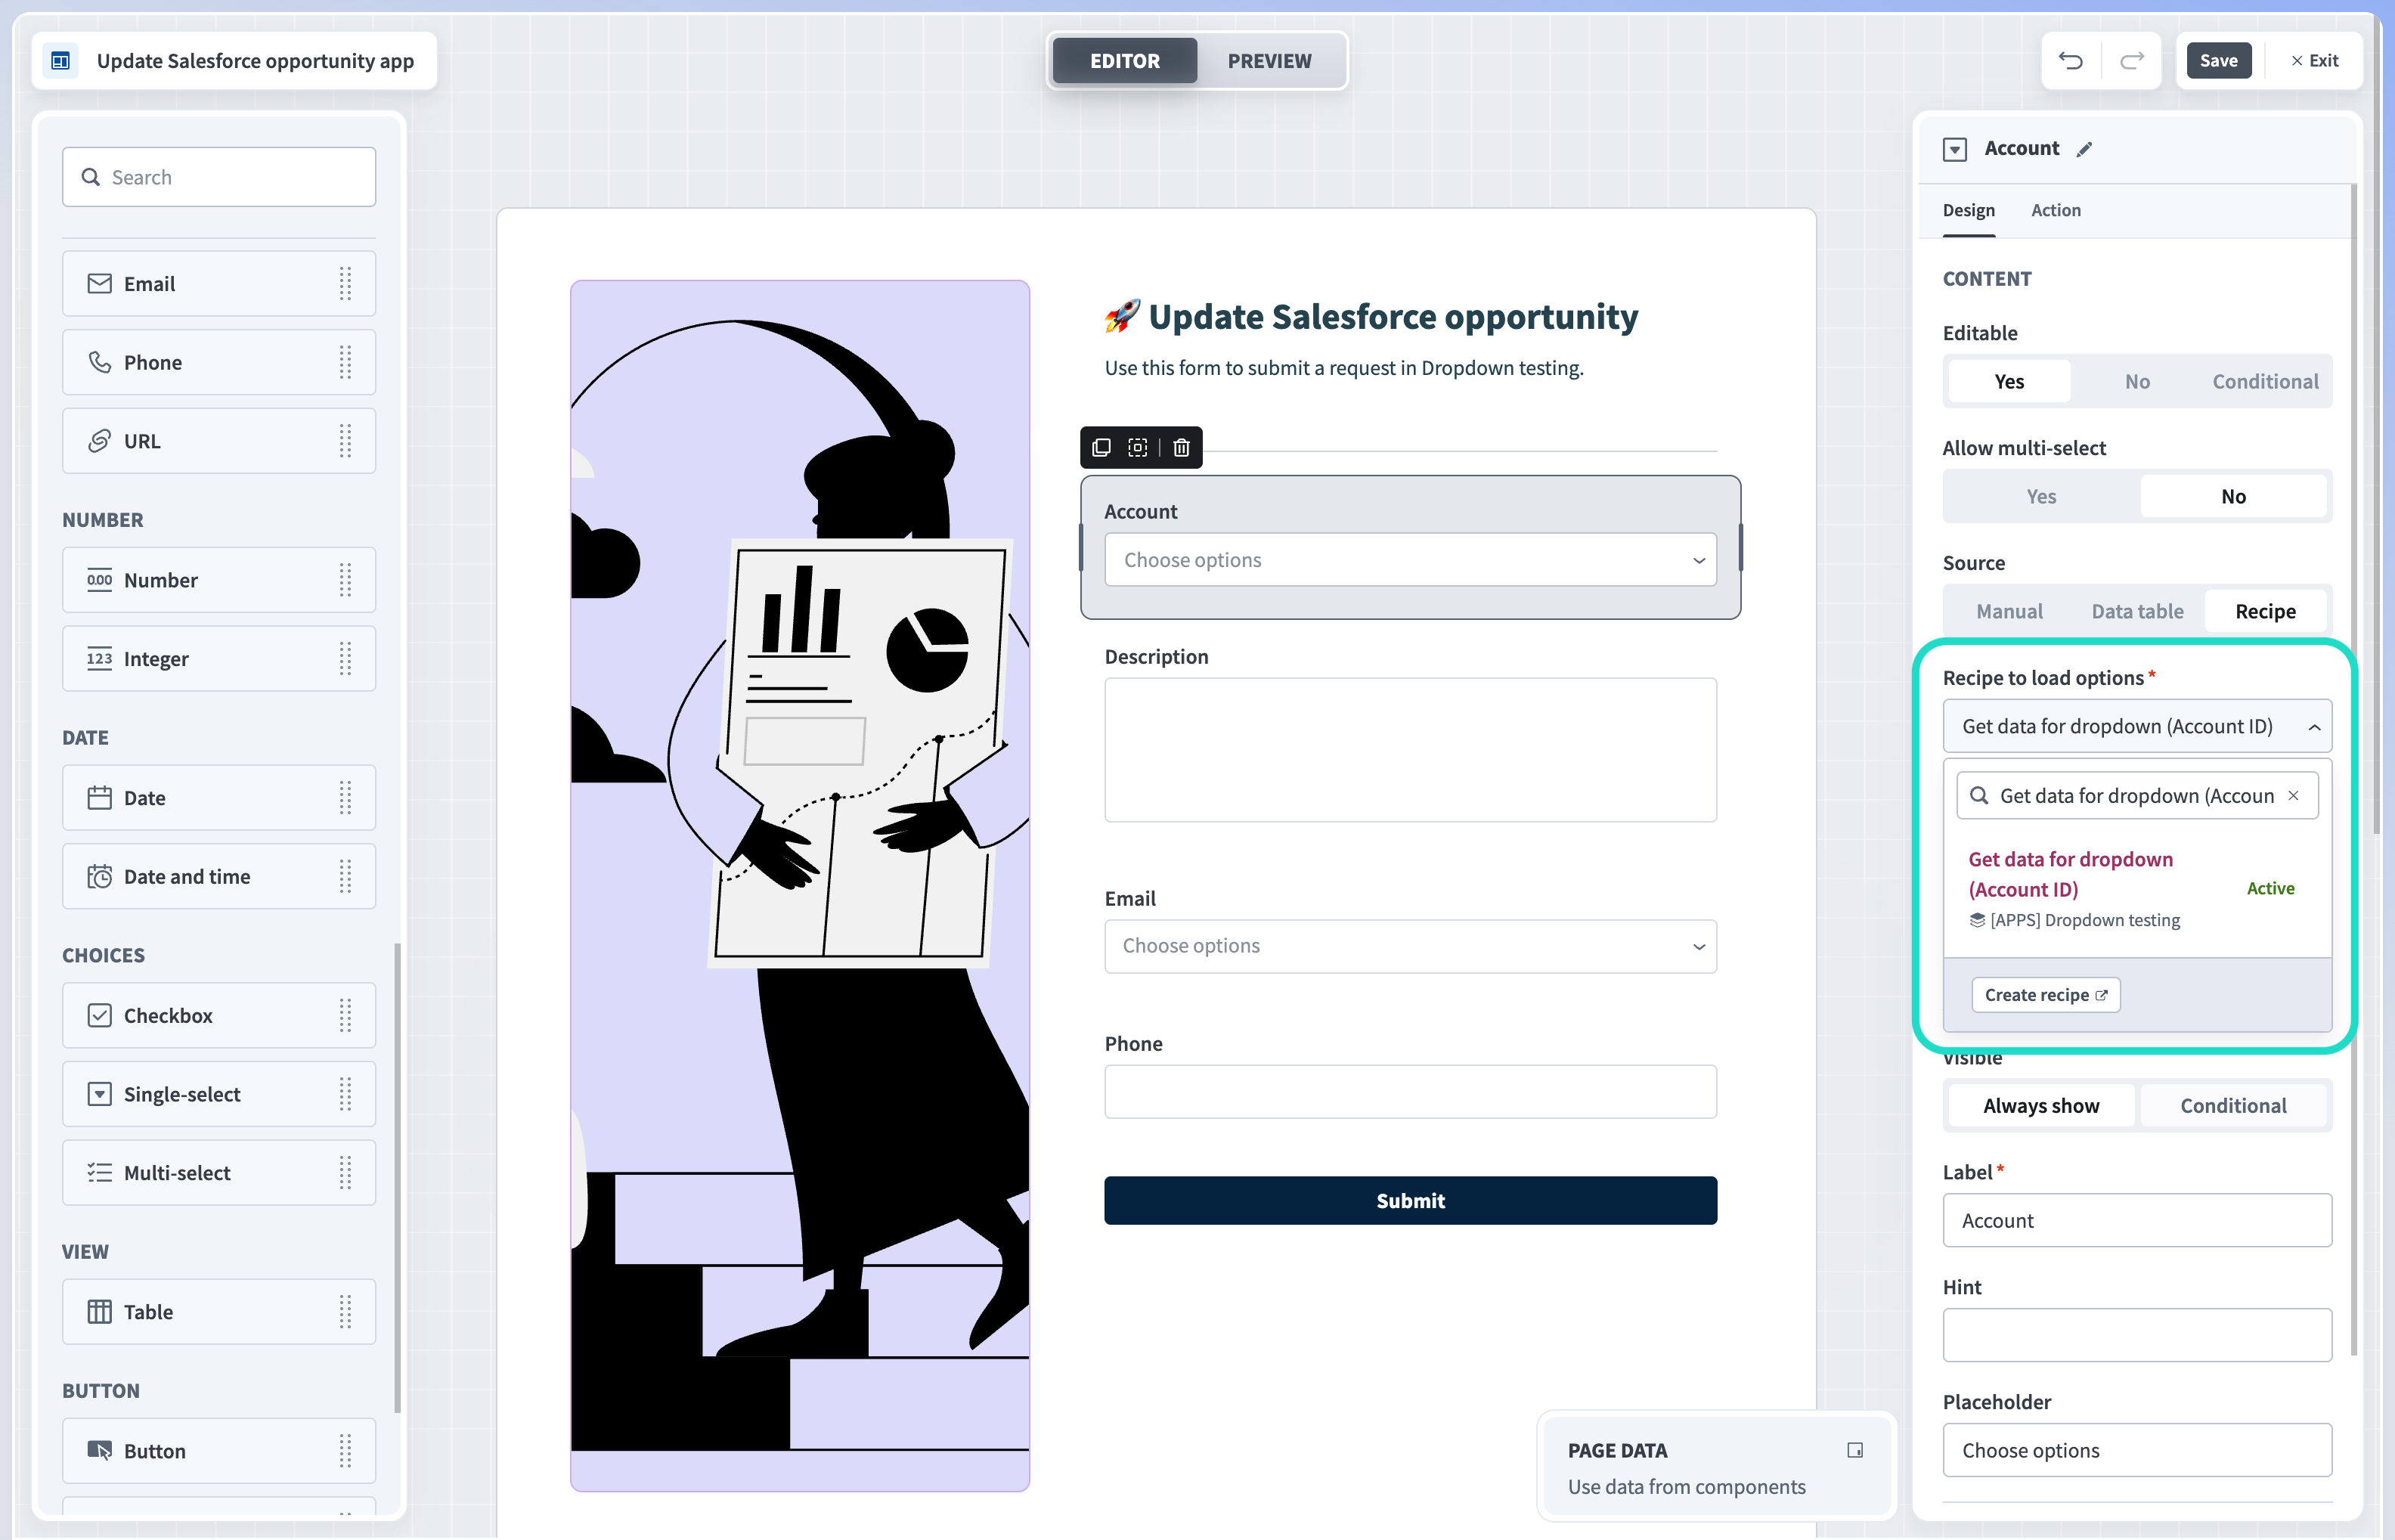
Add a Drop-down component to your page and select Recipe as the data source.
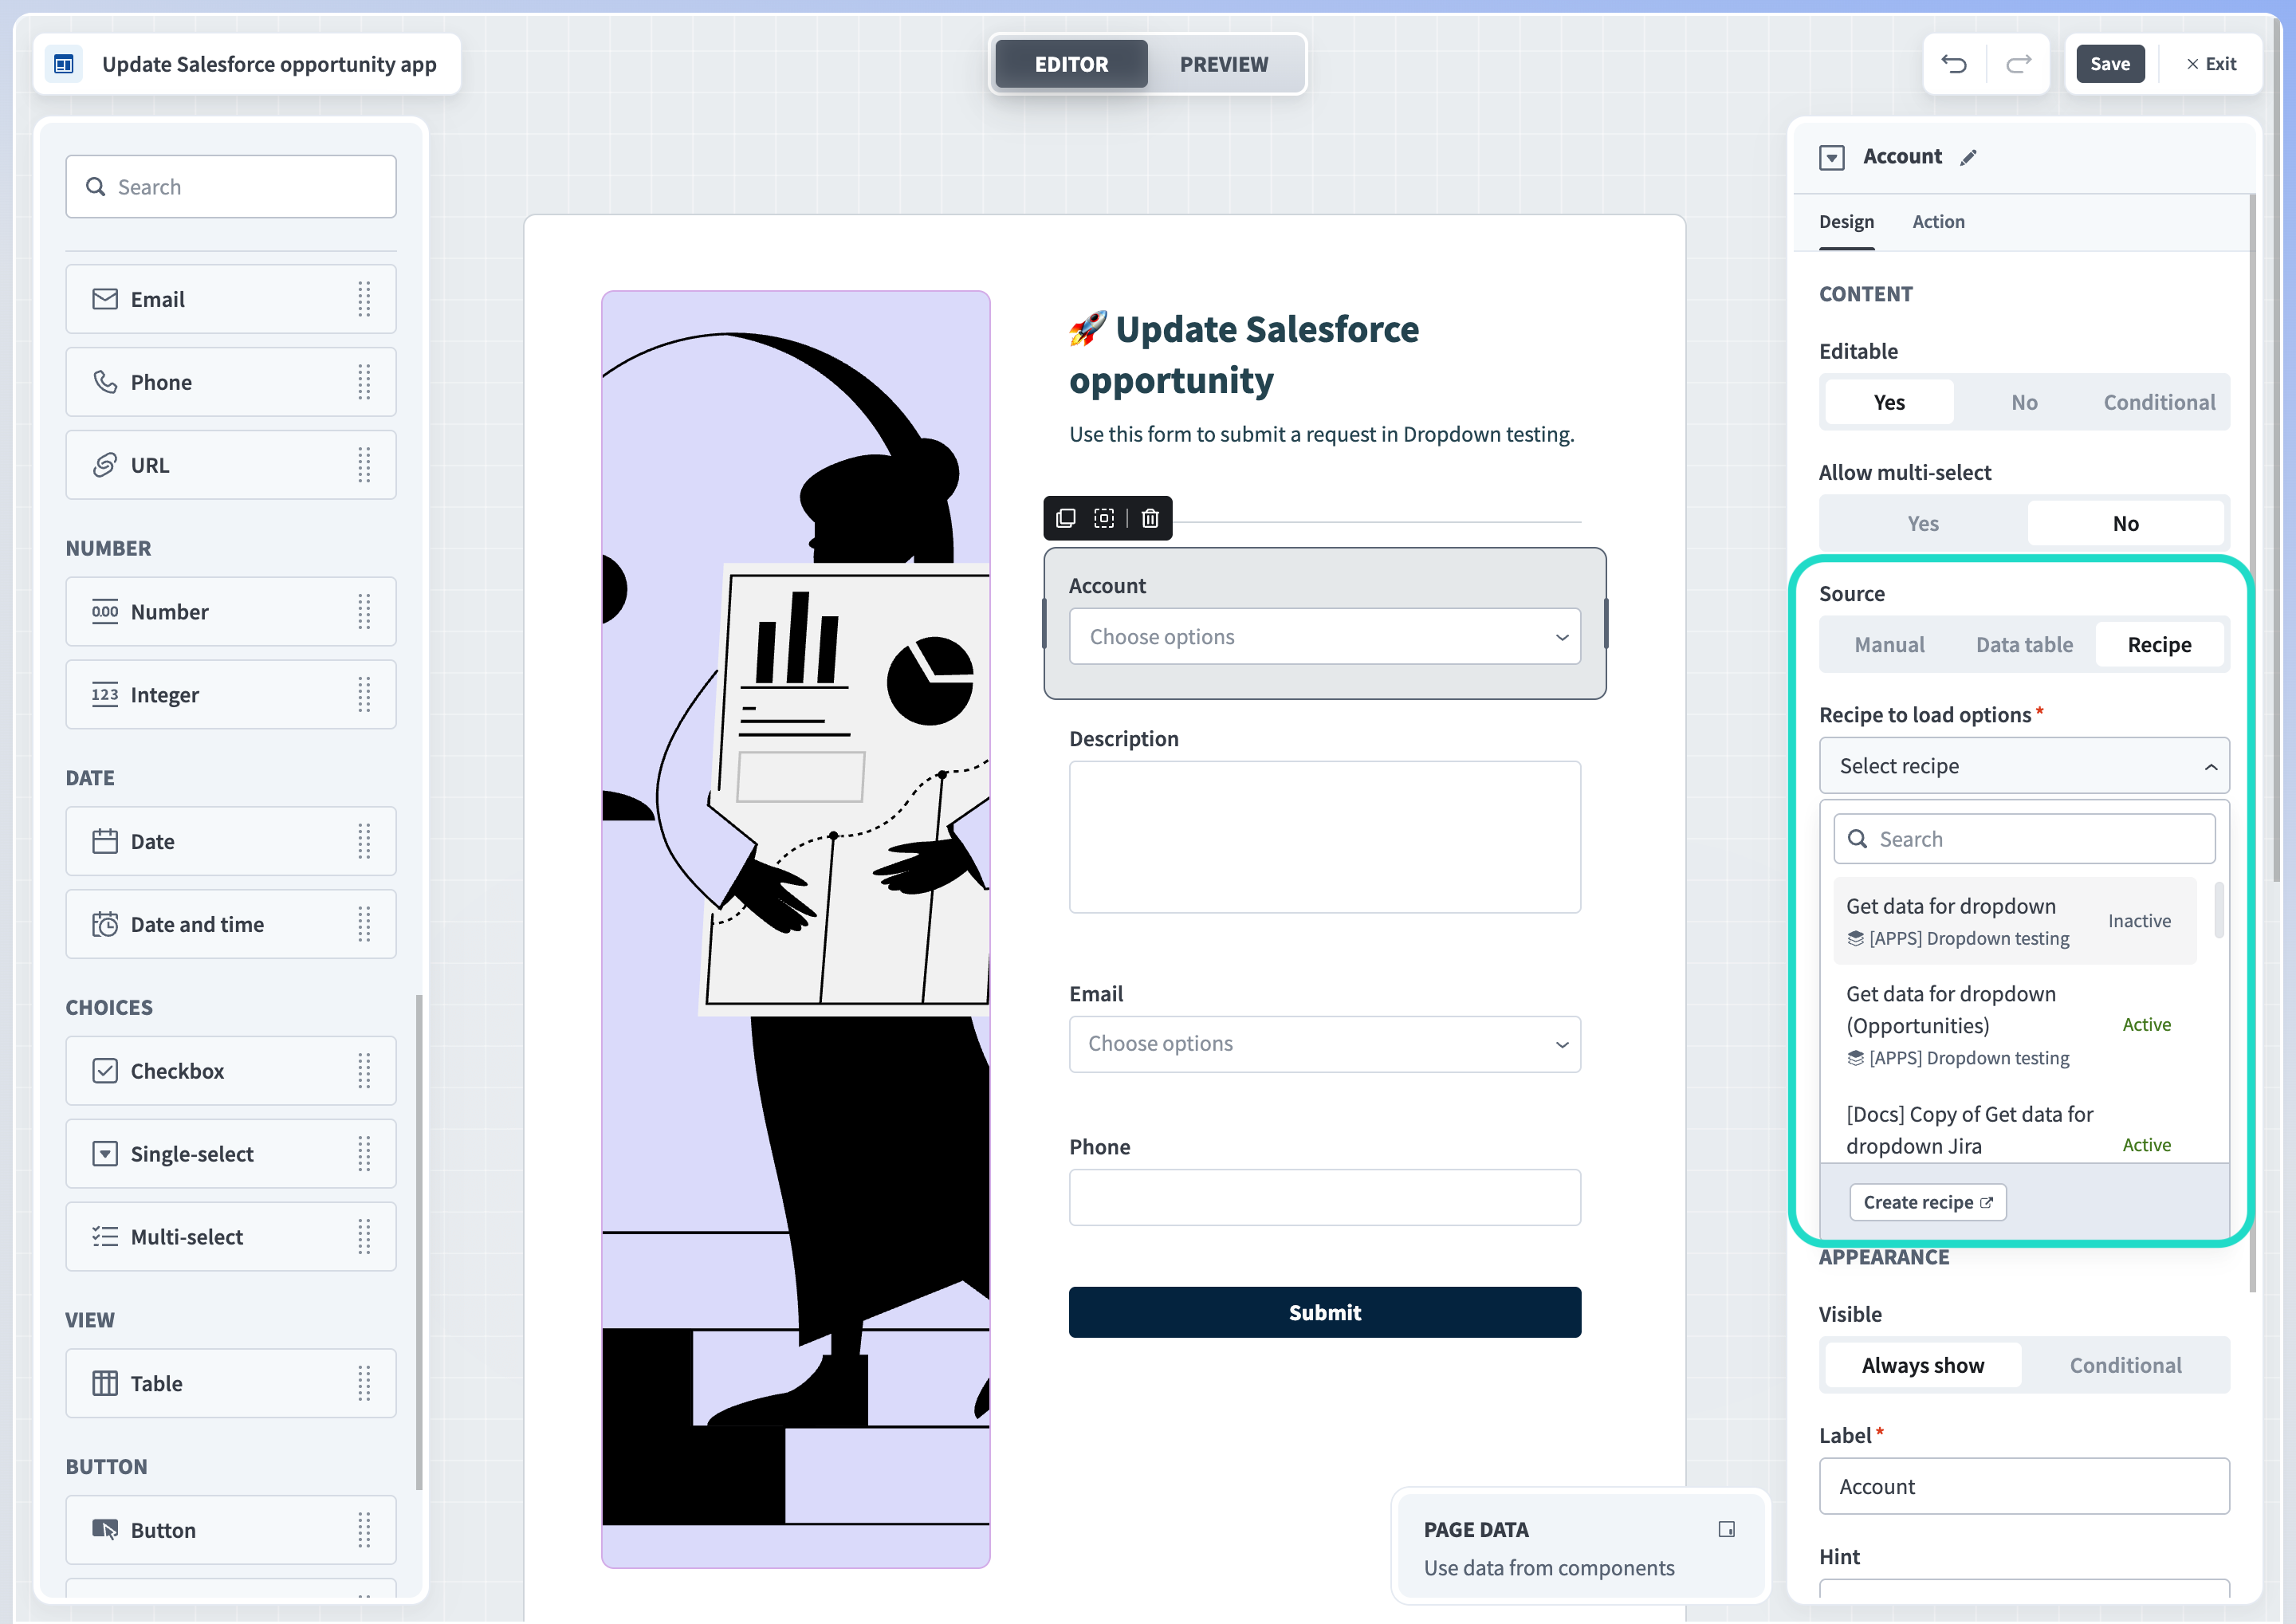 Recipe as a data source
If existing recipes in your Workflow apps project contain the New component event (Drop-down) trigger, Workato displays them here. Otherwise, you can create a new recipe.
Create new recipe
This recipe fetches accounts from Salesforce and returns it to your Workflow app. Refer to the recipes section of this documentation for additional sample Salesforce, Jira, Okta, and HTTP recipes you can use to populate your drop-down components.
Click Create recipe.
Name your recipe. Workato names the recipe Get data from drop-down by default. We recommend giving this recipe a unique name to differentiate it from others in your project. For example, Get data from drop-down (Account ID).
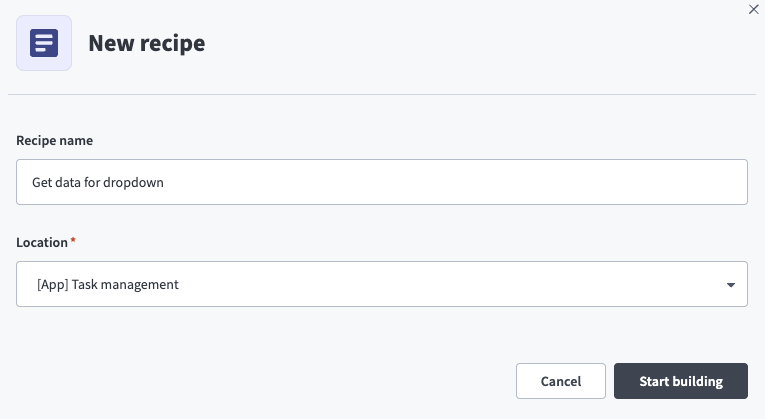 Select recipe as the data source
Click Start building.
Workato automatically creates a recipe skeleton with the New component event (Drop-down) trigger and Return data to component action. Combined, they run the workflow when a user expands the drop-down component. The recipe searches your third-party application for data that matches the configuration and instantly returns the data to your drop-down component.
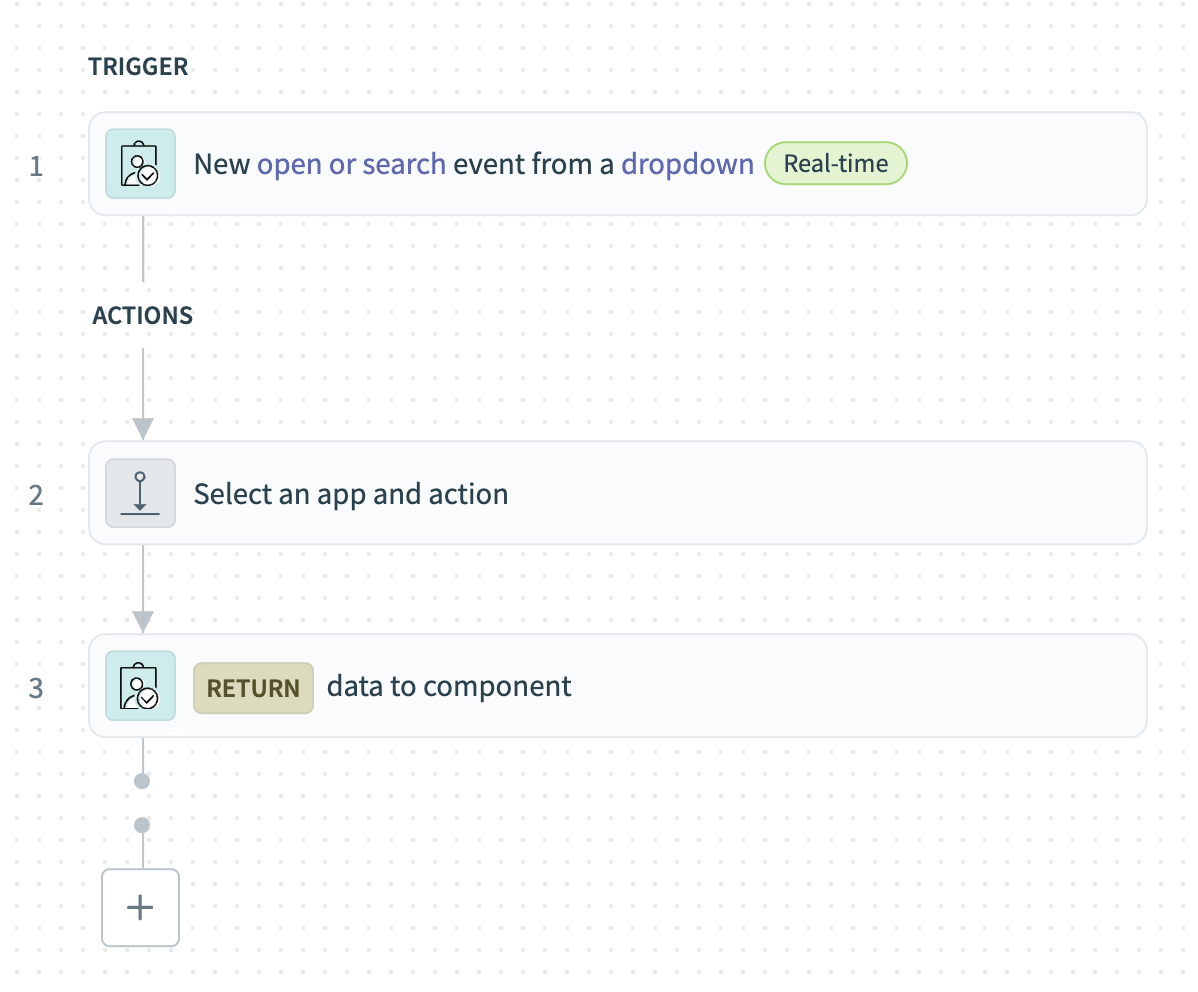 Recipe skeleton
Configure the trigger.
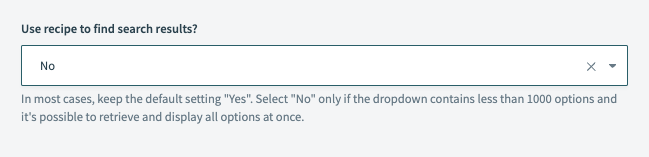
- Use recipe to find search results?
- Select Yes in most situations where the number of records in the target system is high and must be searched using the recipe. When Yes is selected, Workato requires you to map the Search queryStep 1 datapill into the corresponding fetch action. Select No when the number of records in your target system is fewer than
1000. When No is selected, you can perform the search locally in Workato after the records are retrieved.
In our example, we select No because the number of records is a known low amount.
 Set use recipe to find search results to No
Click + Add step to add an app and action to Step 2. This example uses Salesforce and the Search records (Account) action, which enables us to surface customer accounts in our page.
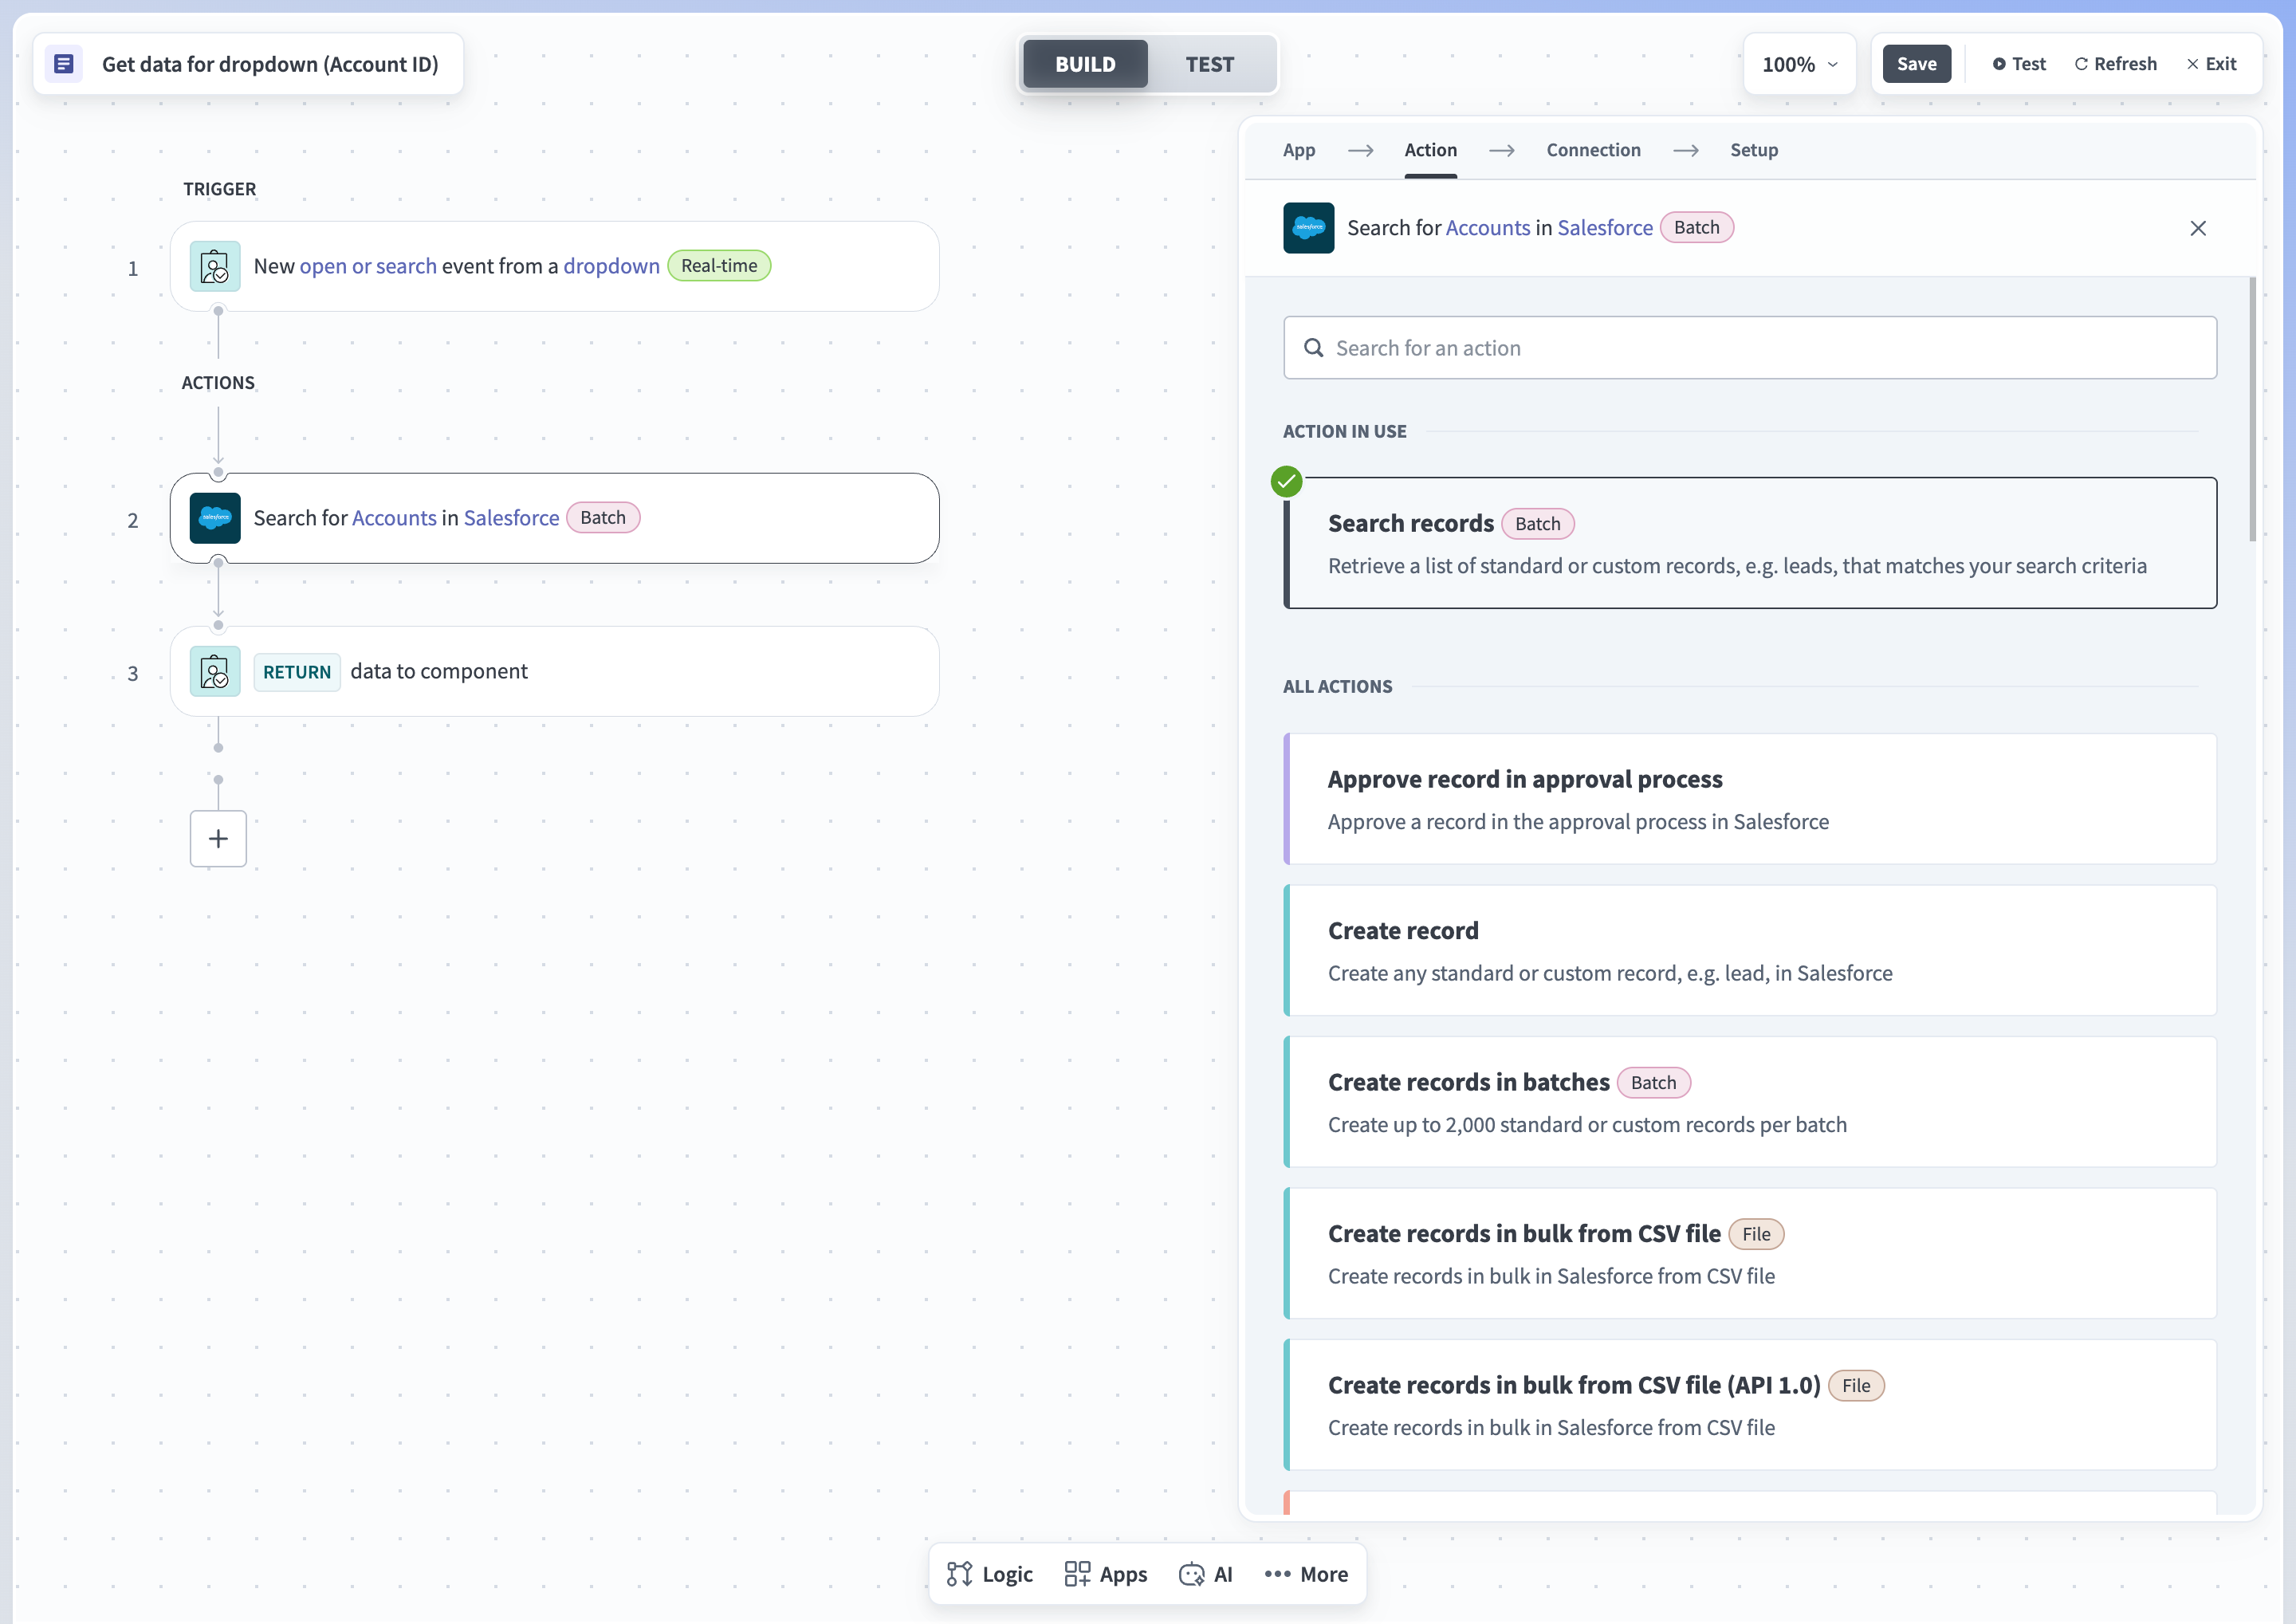 Add an app and action to Step 2
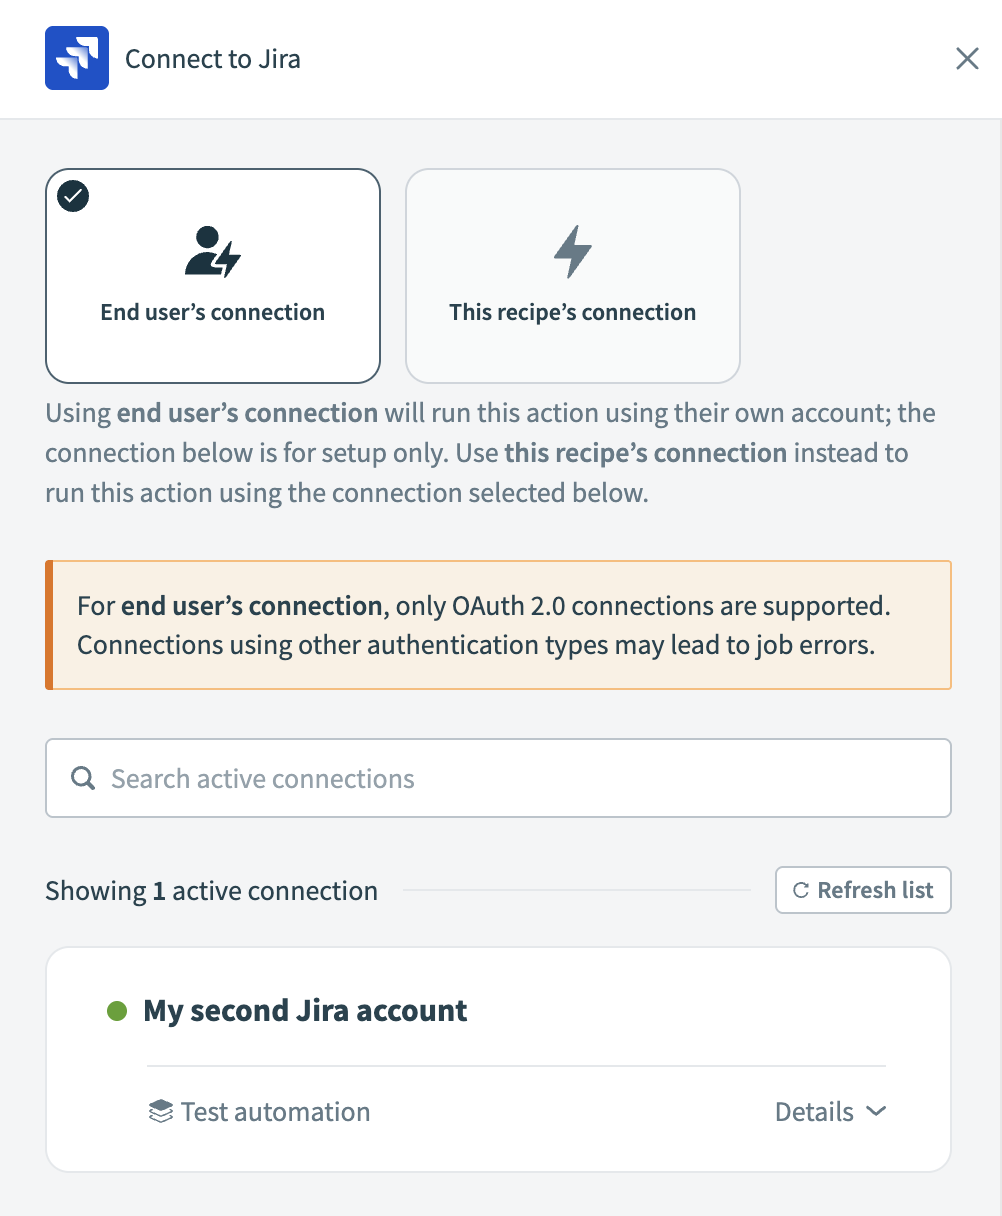
Select the connection type you plan to use for this action.
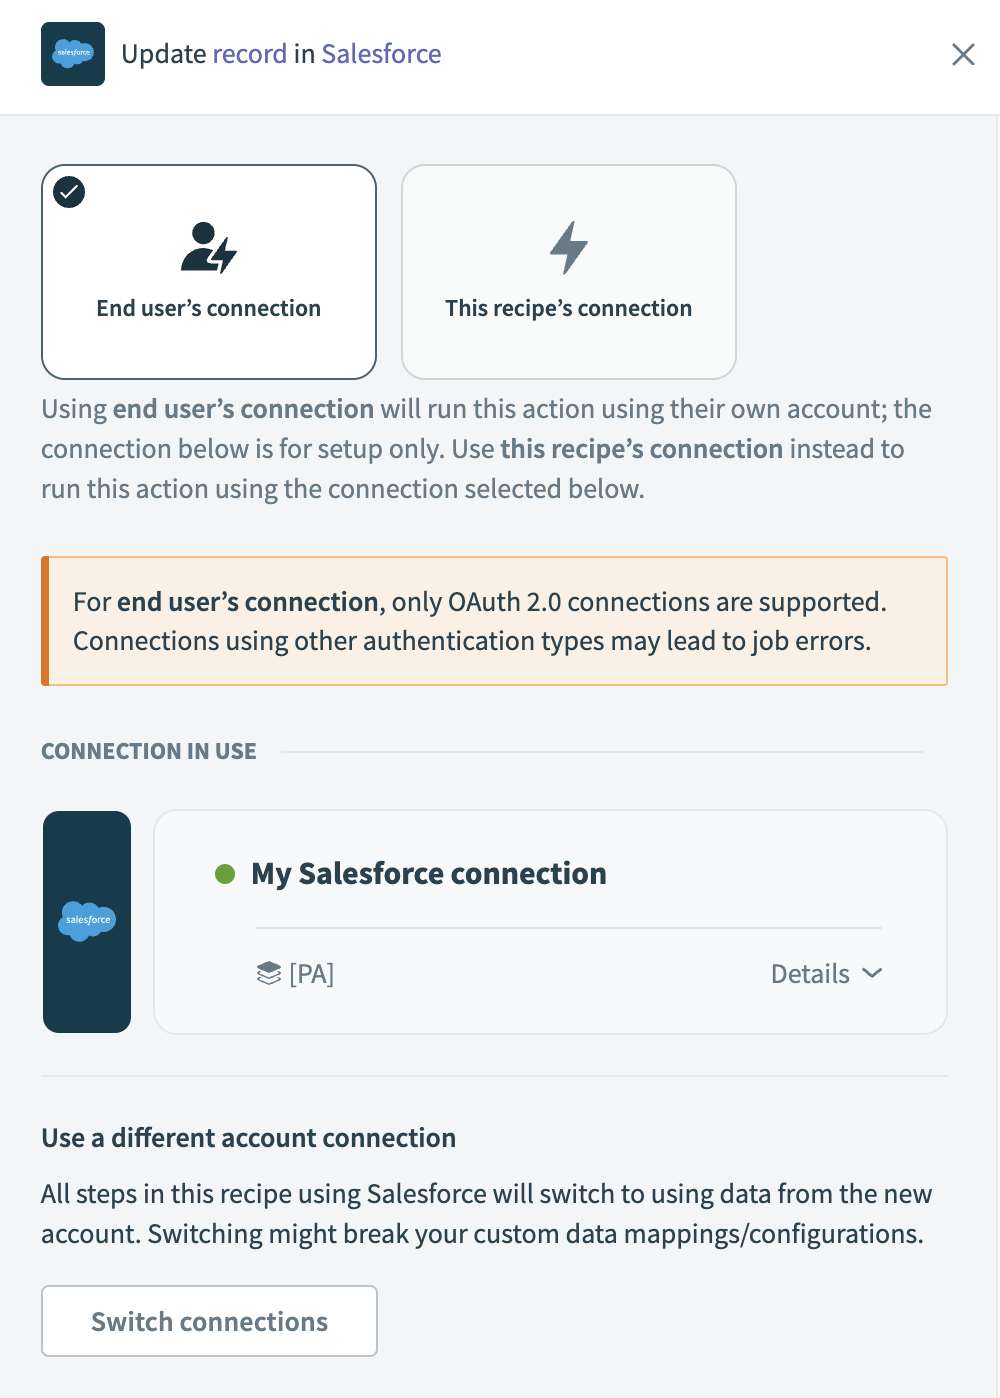 Choose a connection type
- End user's connection: Workflow apps recipes perform actions based on the identity and permissions of the user who connects to the application. End users authenticate with their own credentials to retrieve or modify data in an external app.
- This recipe's connection: This option uses the connection established by the recipe builder and follows the same principles as normal app connections.
Only app connections that use OAuth 2.0 authorization code grant are available for end user's connection. Refer to Verified user access for more information.
Select an existing connection or click + New connection to create a new connection.
Configure the Salesforce action.
Search for
Select the Salesforce object you plan to search for. For example, Account.
Fields to retrieve
Improve recipe performance by selecting only the fields relevant for your use case. Otherwise, all fields in the selected object are returned to the data tree if left blank. For example, enter Account ID and Account name only.
Limit
Enter the maximum number of records you plan to return. Set
1000as the maximum.Active
Select Yes to search for only active accounts.
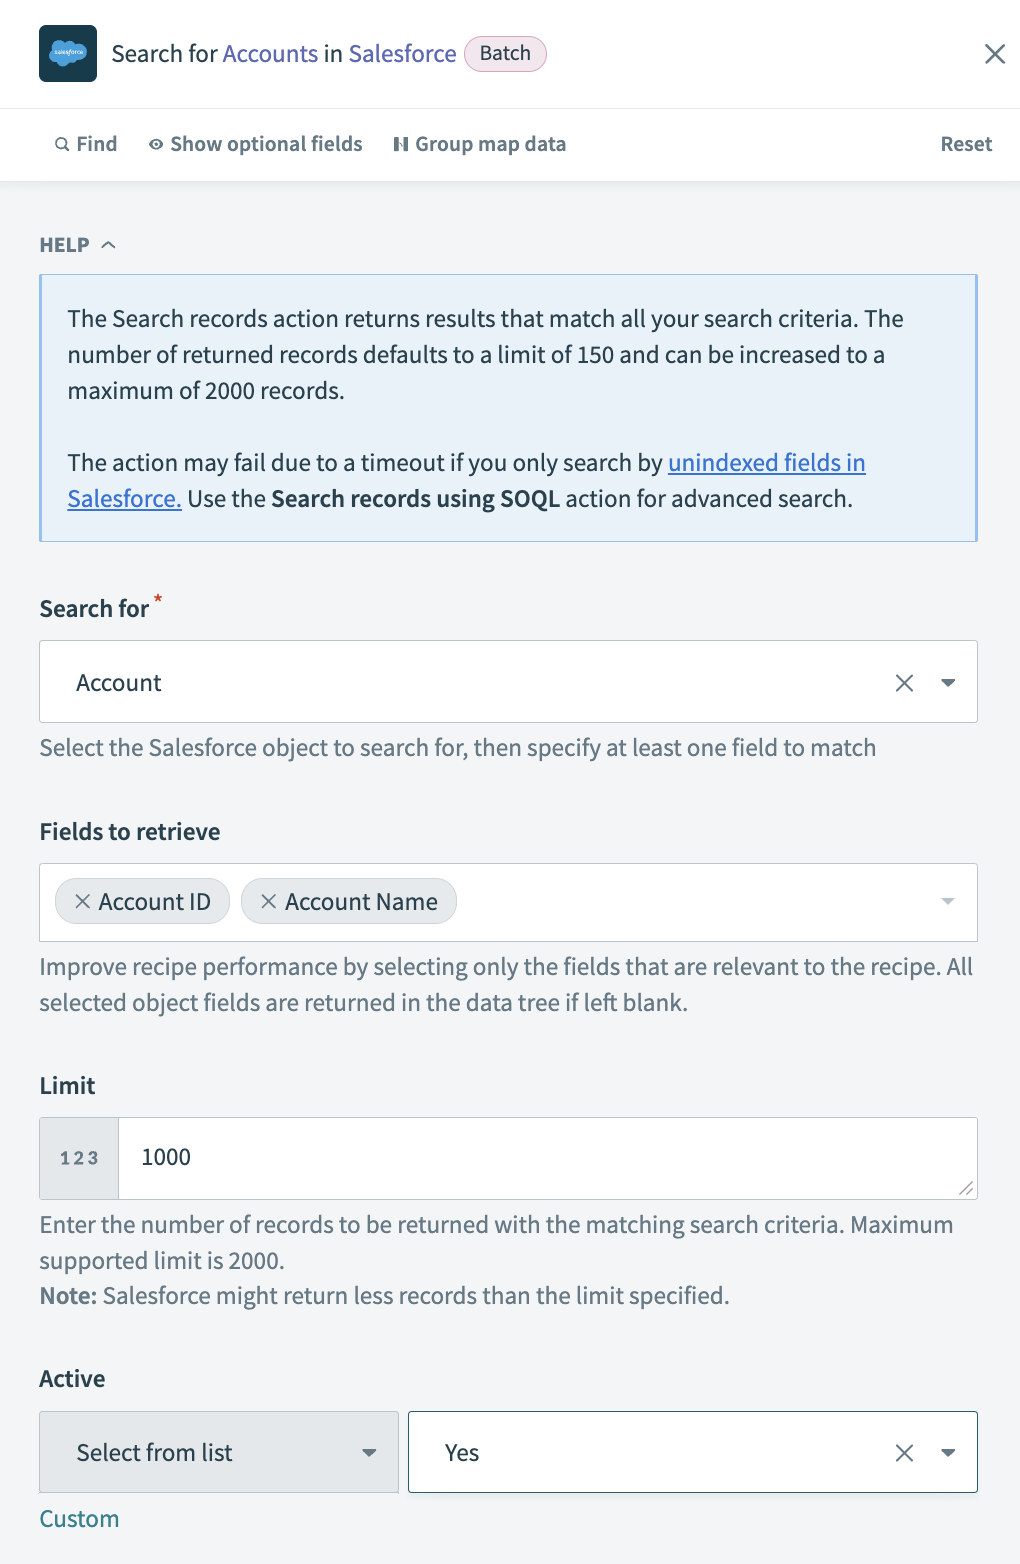 Configure the Salesforce action
Configure the Return data to drop-down action by mapping datapills into the following fields:
Drop-down options list source
Map the AccountsStep 2 datapill.
Value
This is the unique ID that corresponds to the account. Workato stores this value in your Workflow app's data table. Map the Account IDStep 2 datapill.
Label
This is the value Workato displays to your app users on your page. Map the Account IDStep 2 datapill.
 Configure the Return data to drop-down action
Click Save, and Exit. Then, return to your page to finish setting up this component.
Use existing recipe
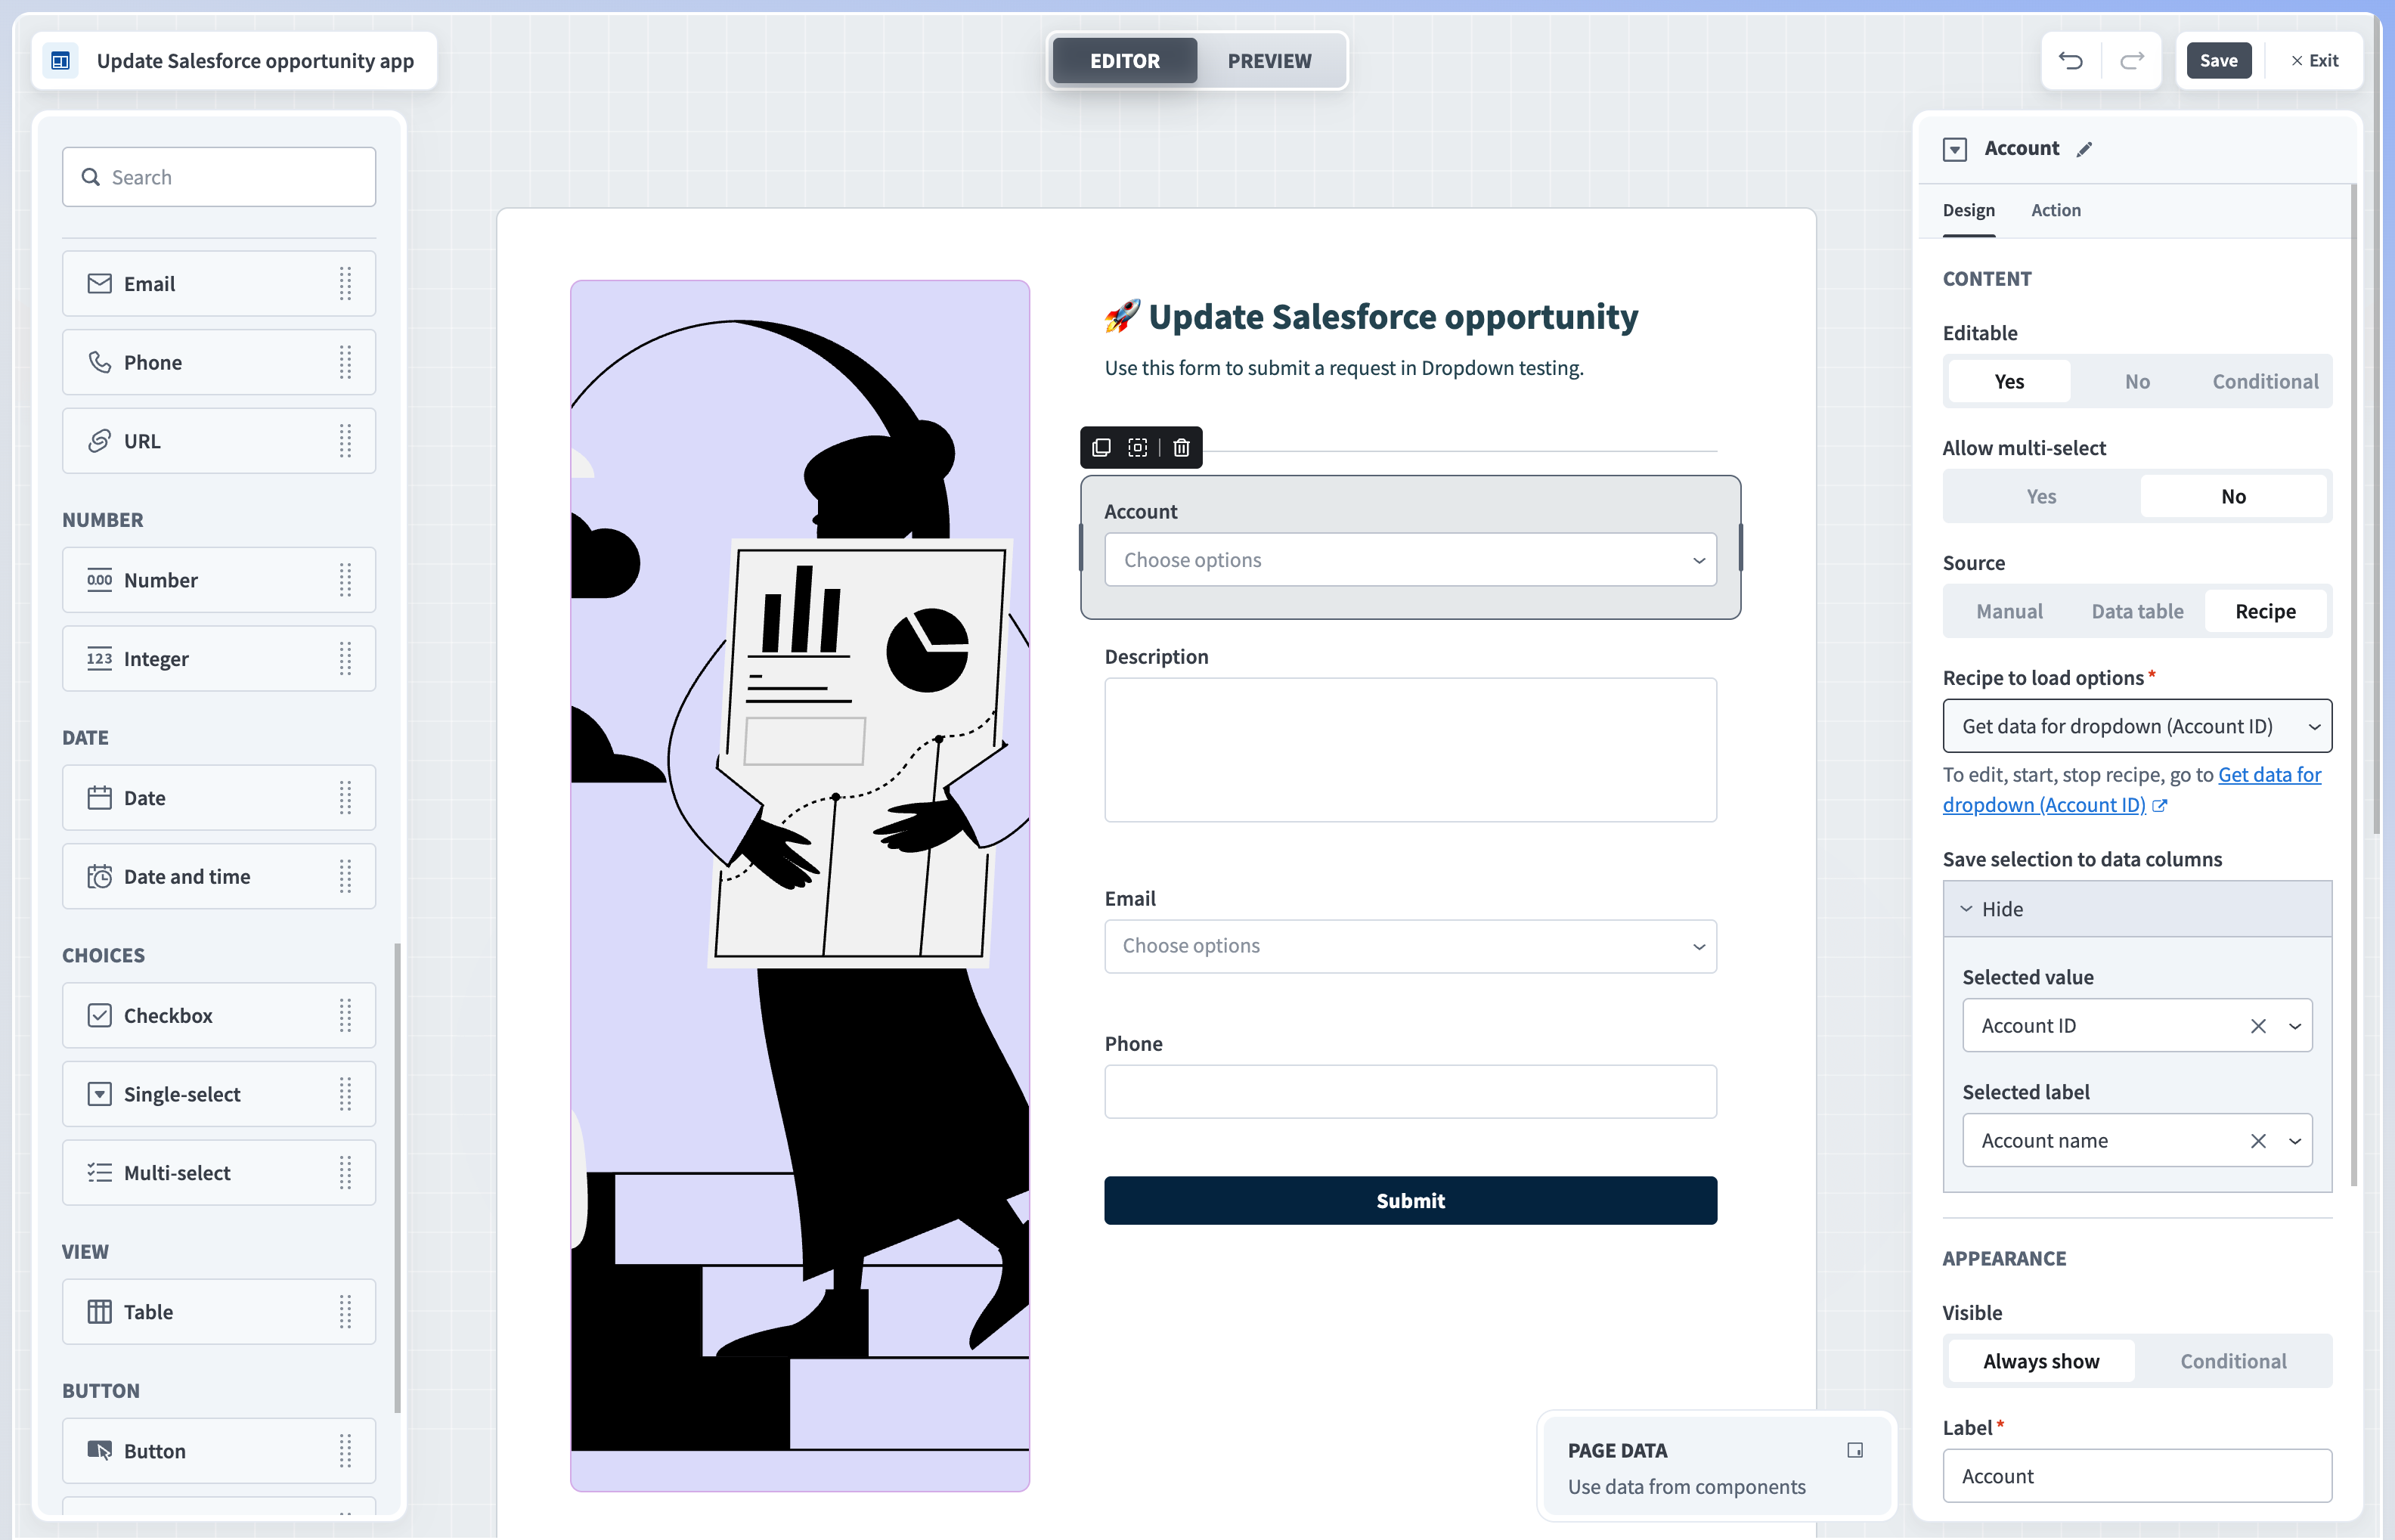
Select a recipe from the drop-down. Workflow apps displays whether the recipe is active or inactive. If the recipe is inactive, Workato shows an error message indicating that the drop-down doesn't contain any options.
 Select a recipe from the drop-down
Save the Selected value and Selected label (Value and Label, respectively) to data columns. Saving the Selected value is required, as Workato uses this value in your recipes. Saving the Selected label is optional.
 Save value and label to data columns
View and test your page in the Workflow apps portal.
View and test your page in the Workflow apps portal
Example recipes
The following recipes demonstrate how to fetch data from your applications for use in drop-down components in your Workflow apps pages. The recipes in this section are examples only. Additional customization can be necessary depending on your applications and use case.
- Salesforce: Get data for multiple drop-downs
- Salesforce: Get data for multi-value drop-downs
- Jira: Get data using JQL
- Okta: Get users for drop-down
- HTTP: Get data from an API
Salesforce: Get data using multiple drop-downs
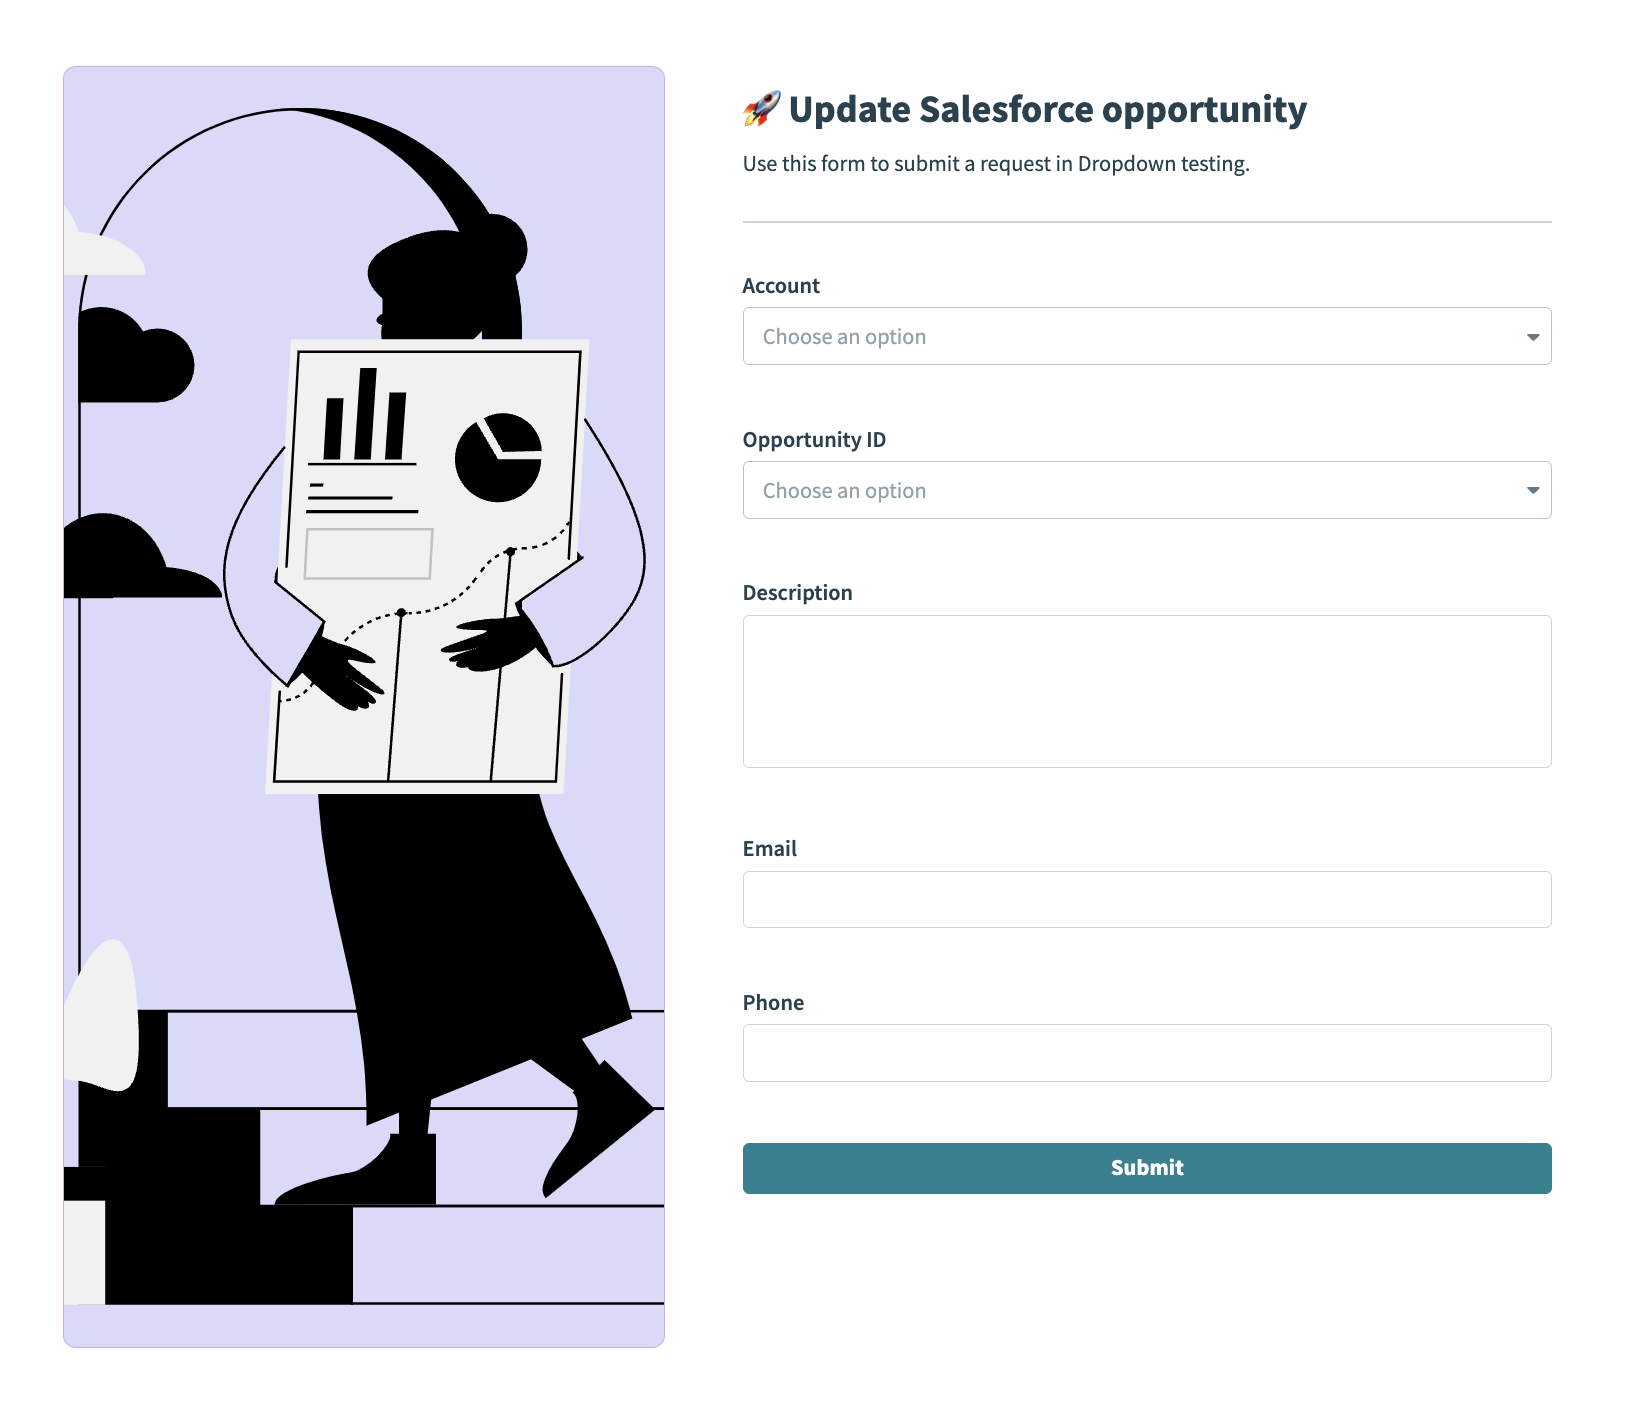
This example demonstrates how to configure pages with interdependent drop-downs. In this scenario, customer support representatives plan to update customer account details during a deal renewal cycle. The page includes separate Account and Opportunities drop-downs, each with its own recipe that fetches data from Salesforce and returns it to our app. The second recipe filters opportunities by Account ID. This enables customer support representatives to select an account and view opportunities specific to that account.
 Get data from Salesforce for drop-down recipe
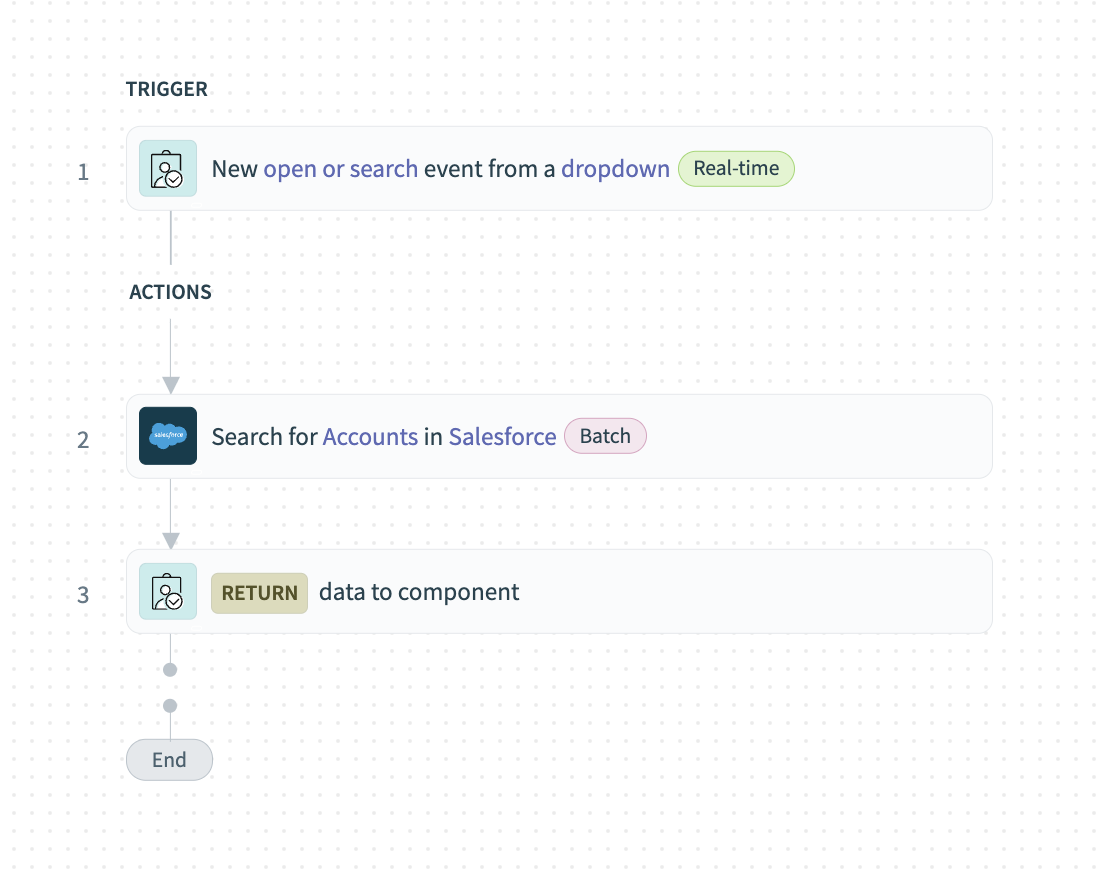 Get data from Salesforce for drop-down recipe
 Get data from Salesforce for drop-down recipe
Set up this recipe
PREREQUISITES
Before proceeding, ensure you have completed all steps in the How to configure recipes as a data source section, as this describes how to set up the first recipe required to configure interdependent drop-down components.
Complete the following steps to set up the recipe.
Add an additional Drop-down to your page. Give this component a unique name, such as Opportunities and select Recipe as the data source.
Click Create recipe and name your recipe appropriately. Workato automatically generates a recipe skeleton with the New open or search event trigger and the Return data to drop-down action.
Recipe skeleton
Configure the New open or search event from a drop-down trigger
Provide one or more input parameters. Input parameters enable you to set up custom variables that control trigger behavior. In this situation, we plan to filter opportunities by Account ID, so we define that as a parameter.
Specify the Name and Data type for each input parameter. For example, account_id and string.
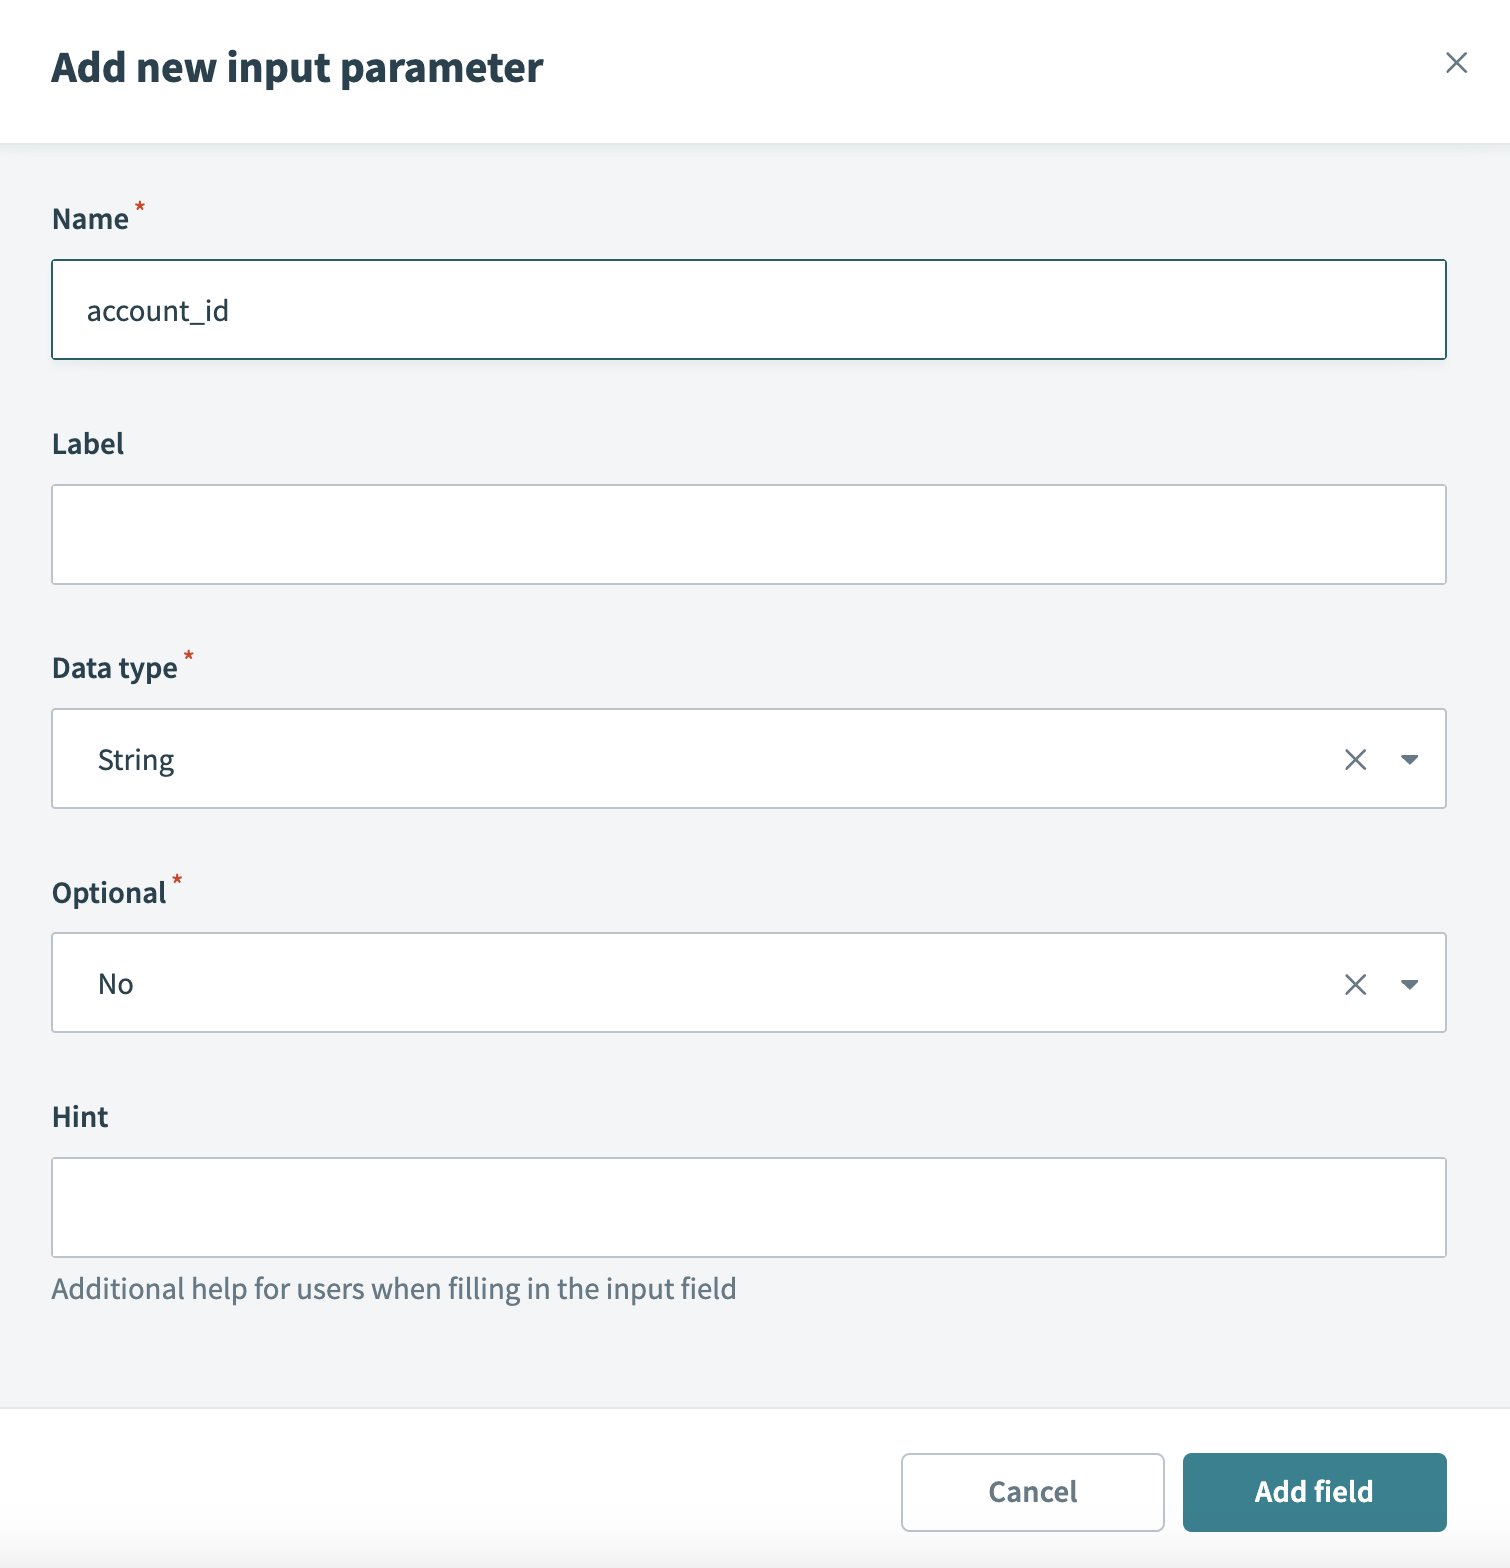 Add input parameters
Set the Use recipe to find search results? field to No.
Set use recipe to find search results to No
Click Select an app and action to add an app and action to Step 2. In our example, we've selected the Salesforce Search for records action.
Select the connection type you plan to use for this action.
Choose a connection type
- End user's connection: Workflow apps recipes perform actions based on the identity and permissions of the user who connects to the application. End users authenticate with their own credentials to retrieve or modify data in an external app.
- This recipe's connection: This option uses the connection established by the recipe builder and follows the same principles as normal app connections.
Only app connections that use OAuth 2.0 authorization code grant are available for end user's connection. Refer to Verified user access for more information.
Select an existing connection or click + New connection to create a new connection.
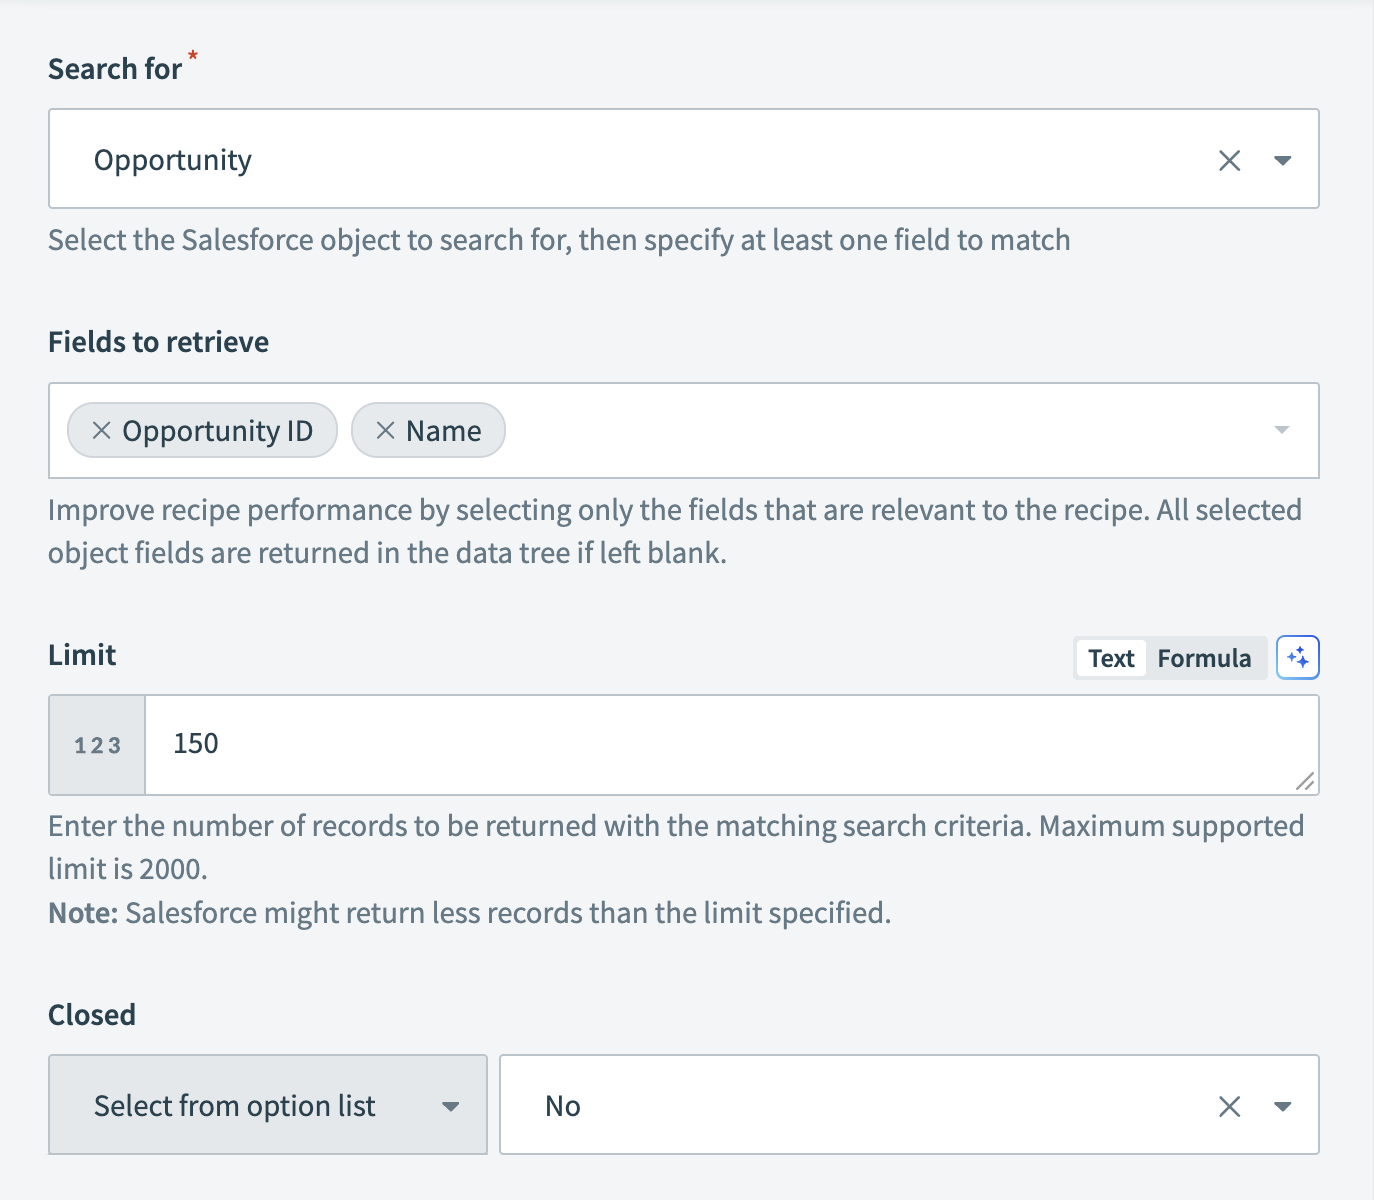
Configure the Search for Opportunities in Salesforce action
Specify the Salesforce object you plan to retrieve in the Search for field. For example, Opportunity.
In Fields to retrieve, select the fields relevant to your use case. Otherwise, all fields in the selected object are returned to the data tree if left blank. For example, select Opportunity ID and Name.
In the Limit field, enter the maximum number of records you plan to return. For example, 150.
Set Closed to No.
 Configure the Search Opportunities action
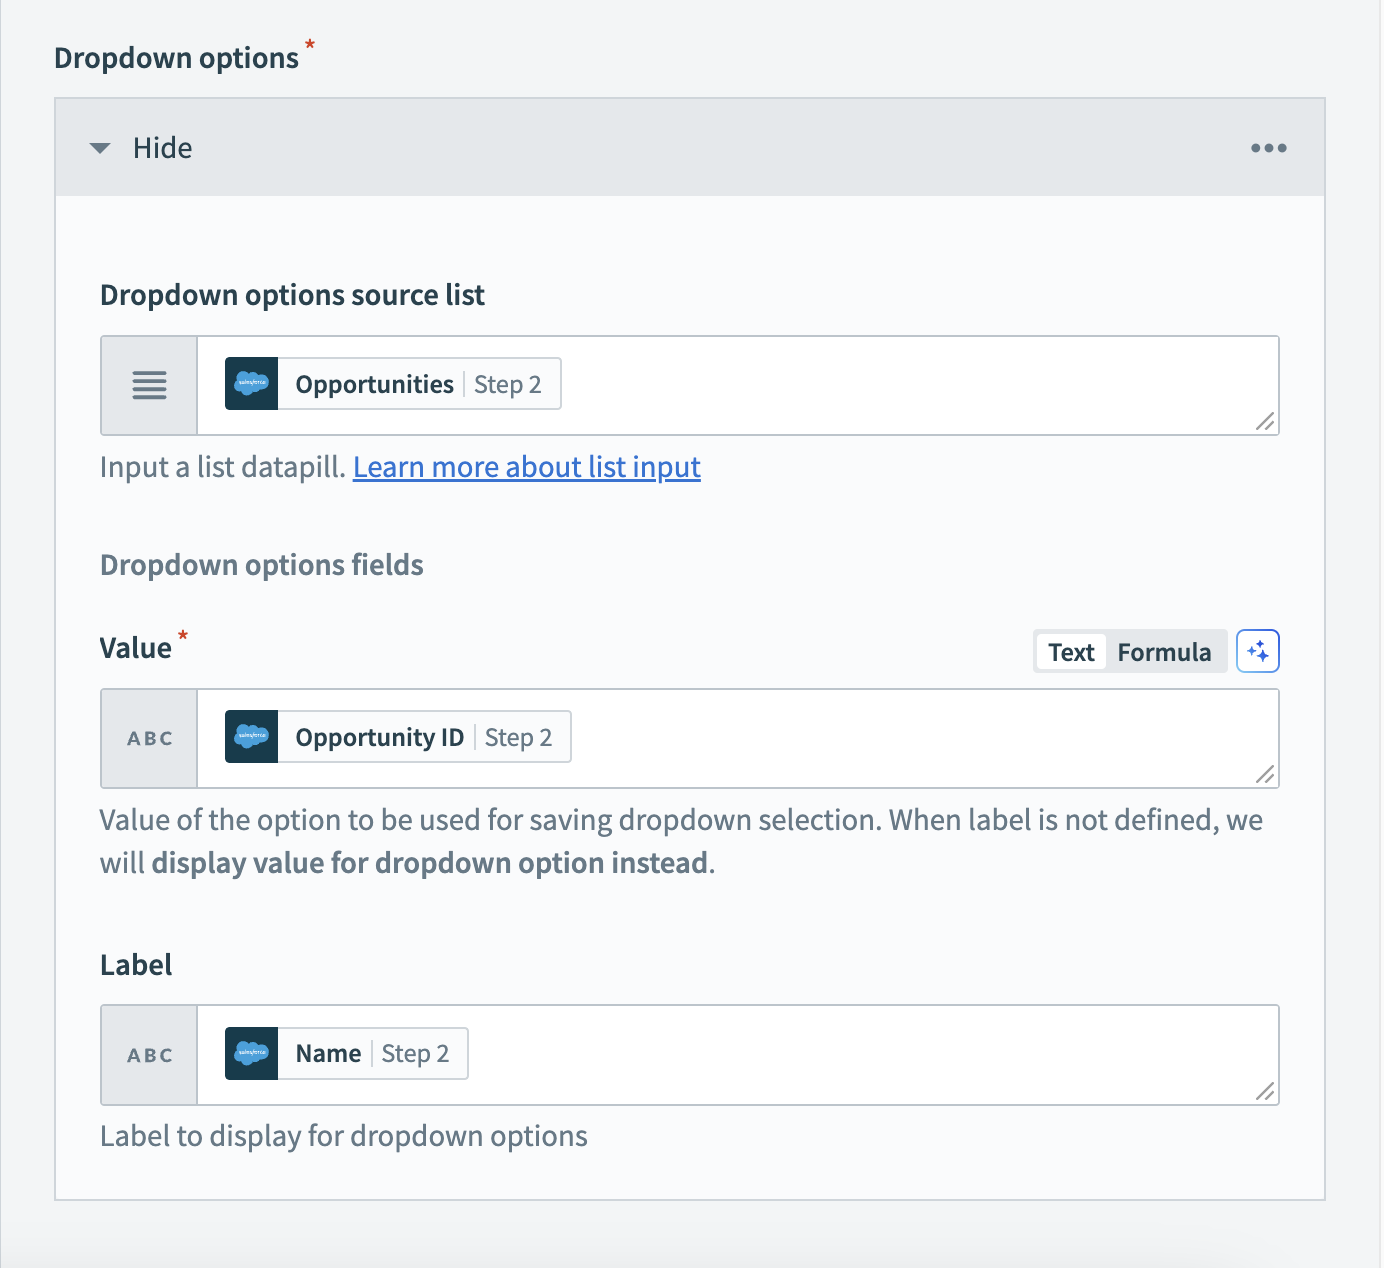
Configure the Return data to drop-down action
Map the OpportunitiesStep 2 datapill to the Drop-down options list source field.
In the Value field, map the Opportunities IDStep 2 datapill. This is the unique ID that corresponds to the account. Workato stores this value in your Workflow app's data table.
In the Label field, map the NameStep 2 datapill. This is the value Workato displays to your app users on your page.
 Configure the return data to drop-down action
Click Save, and Exit. Then, return to your page to finish setting up this component.
In the Recipe input parameters field, map the Selected valueAccount ID datapill. This ensures that the Opportunities drop-down is populated with opportunities corresponding only to the account your user selects.
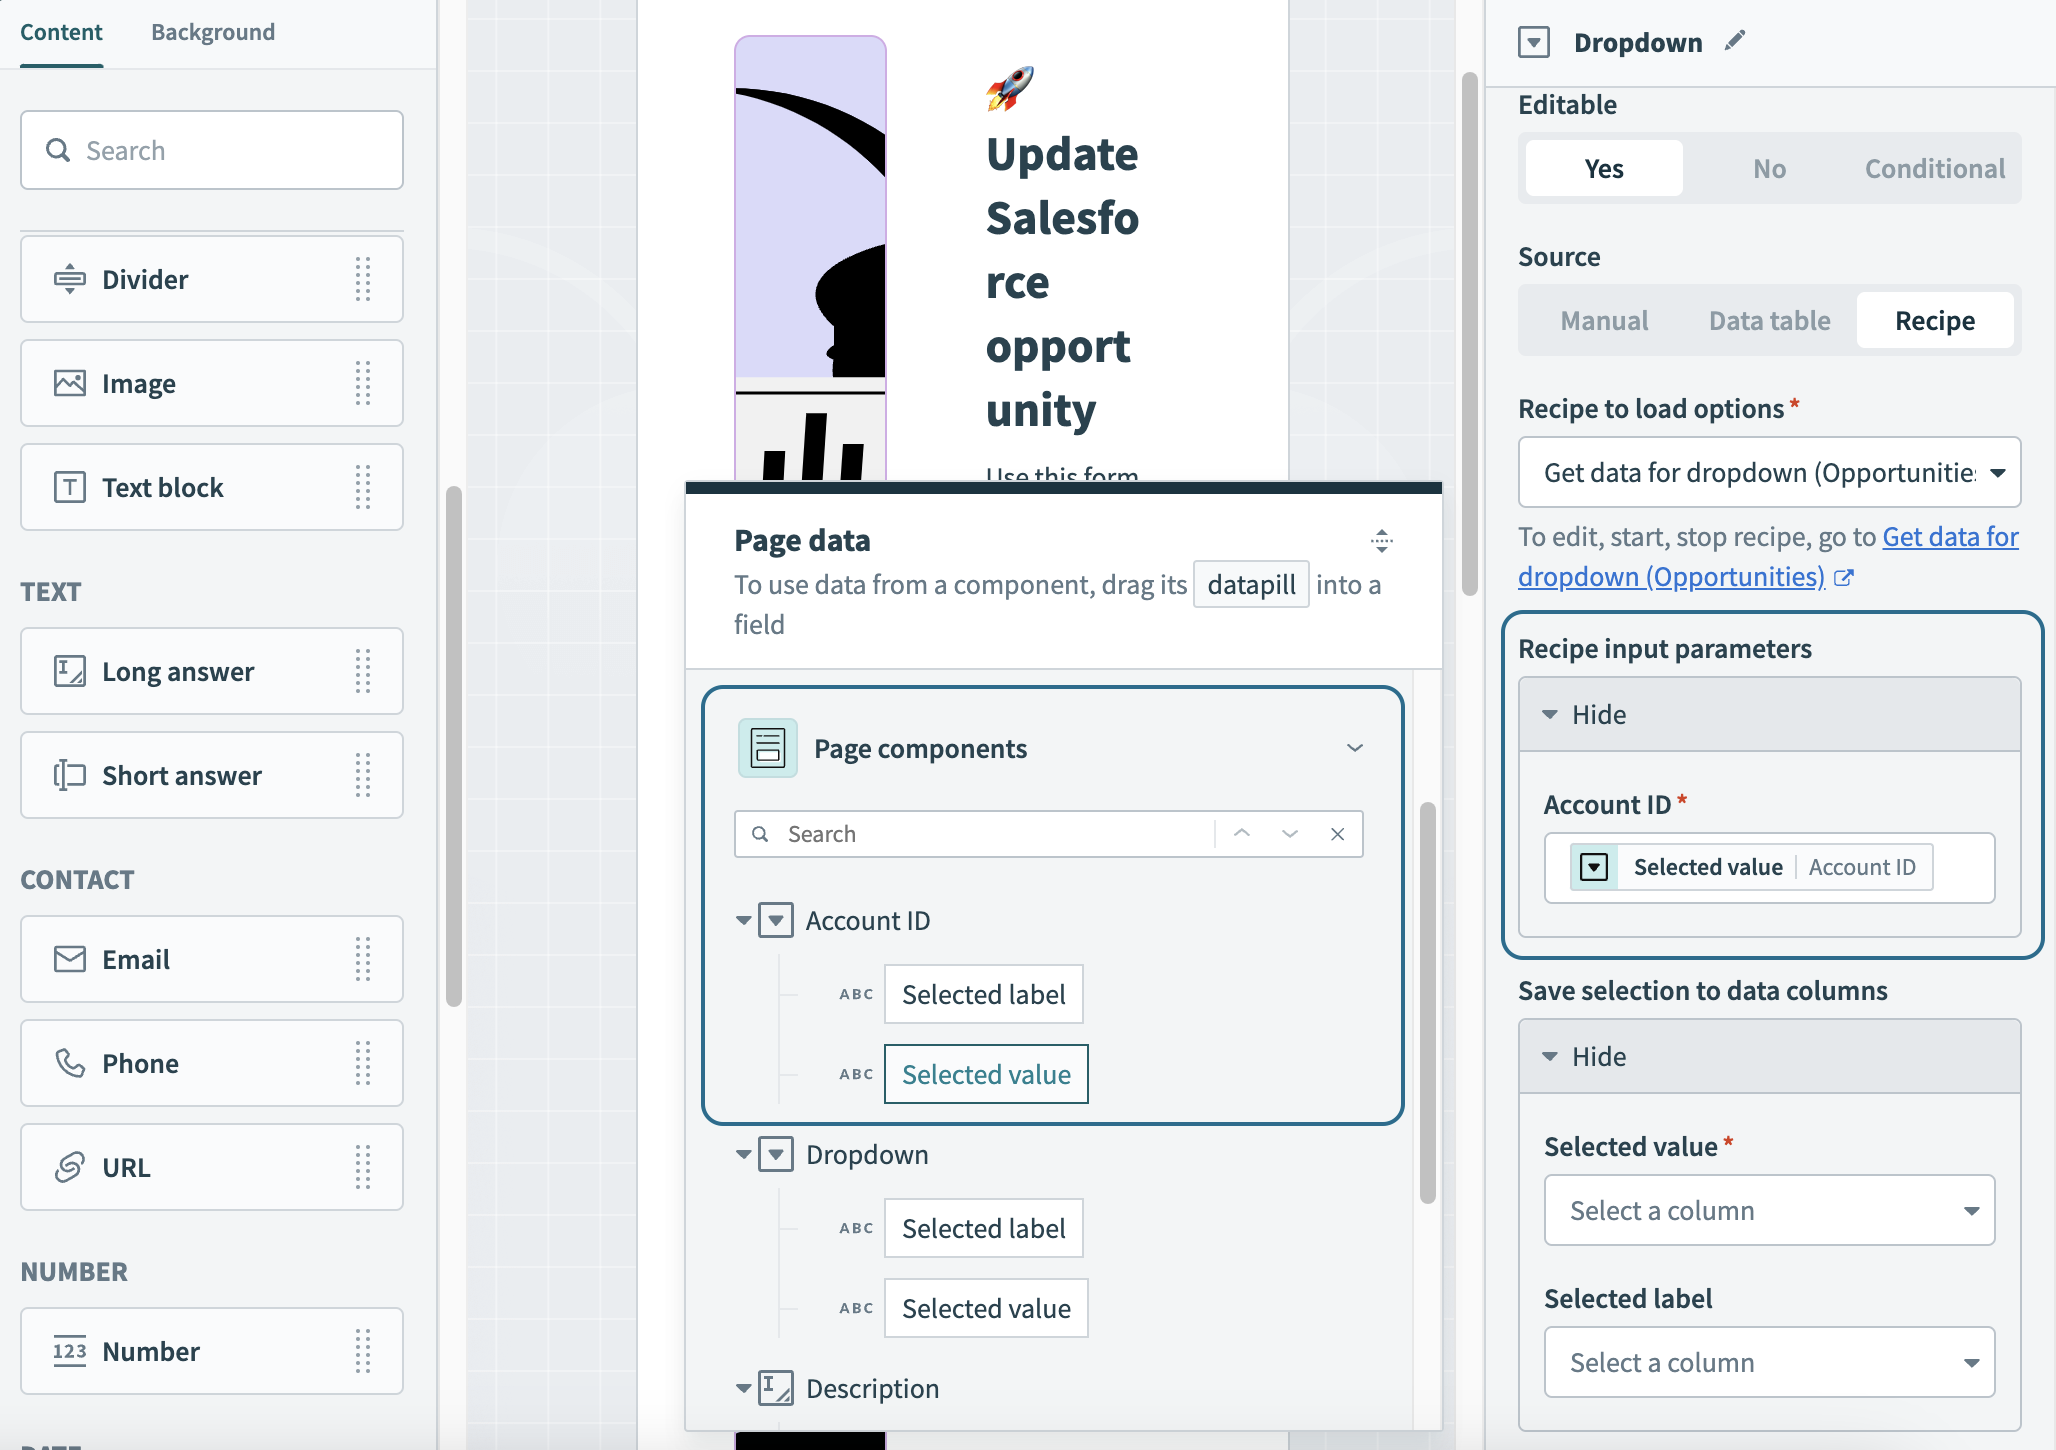 Configure the return data to drop-down action
Save the Selected value and Selected label (Value and Label, respectively) to data columns. Saving the Selected value is required, as Workato uses this value in your recipes. Saving the Selected label is optional.
 Save value and label to data columns
View and test your page in the Workflow apps portal. In this example, only opportunities associated with the United Oil & Gas Corp. account are displayed.
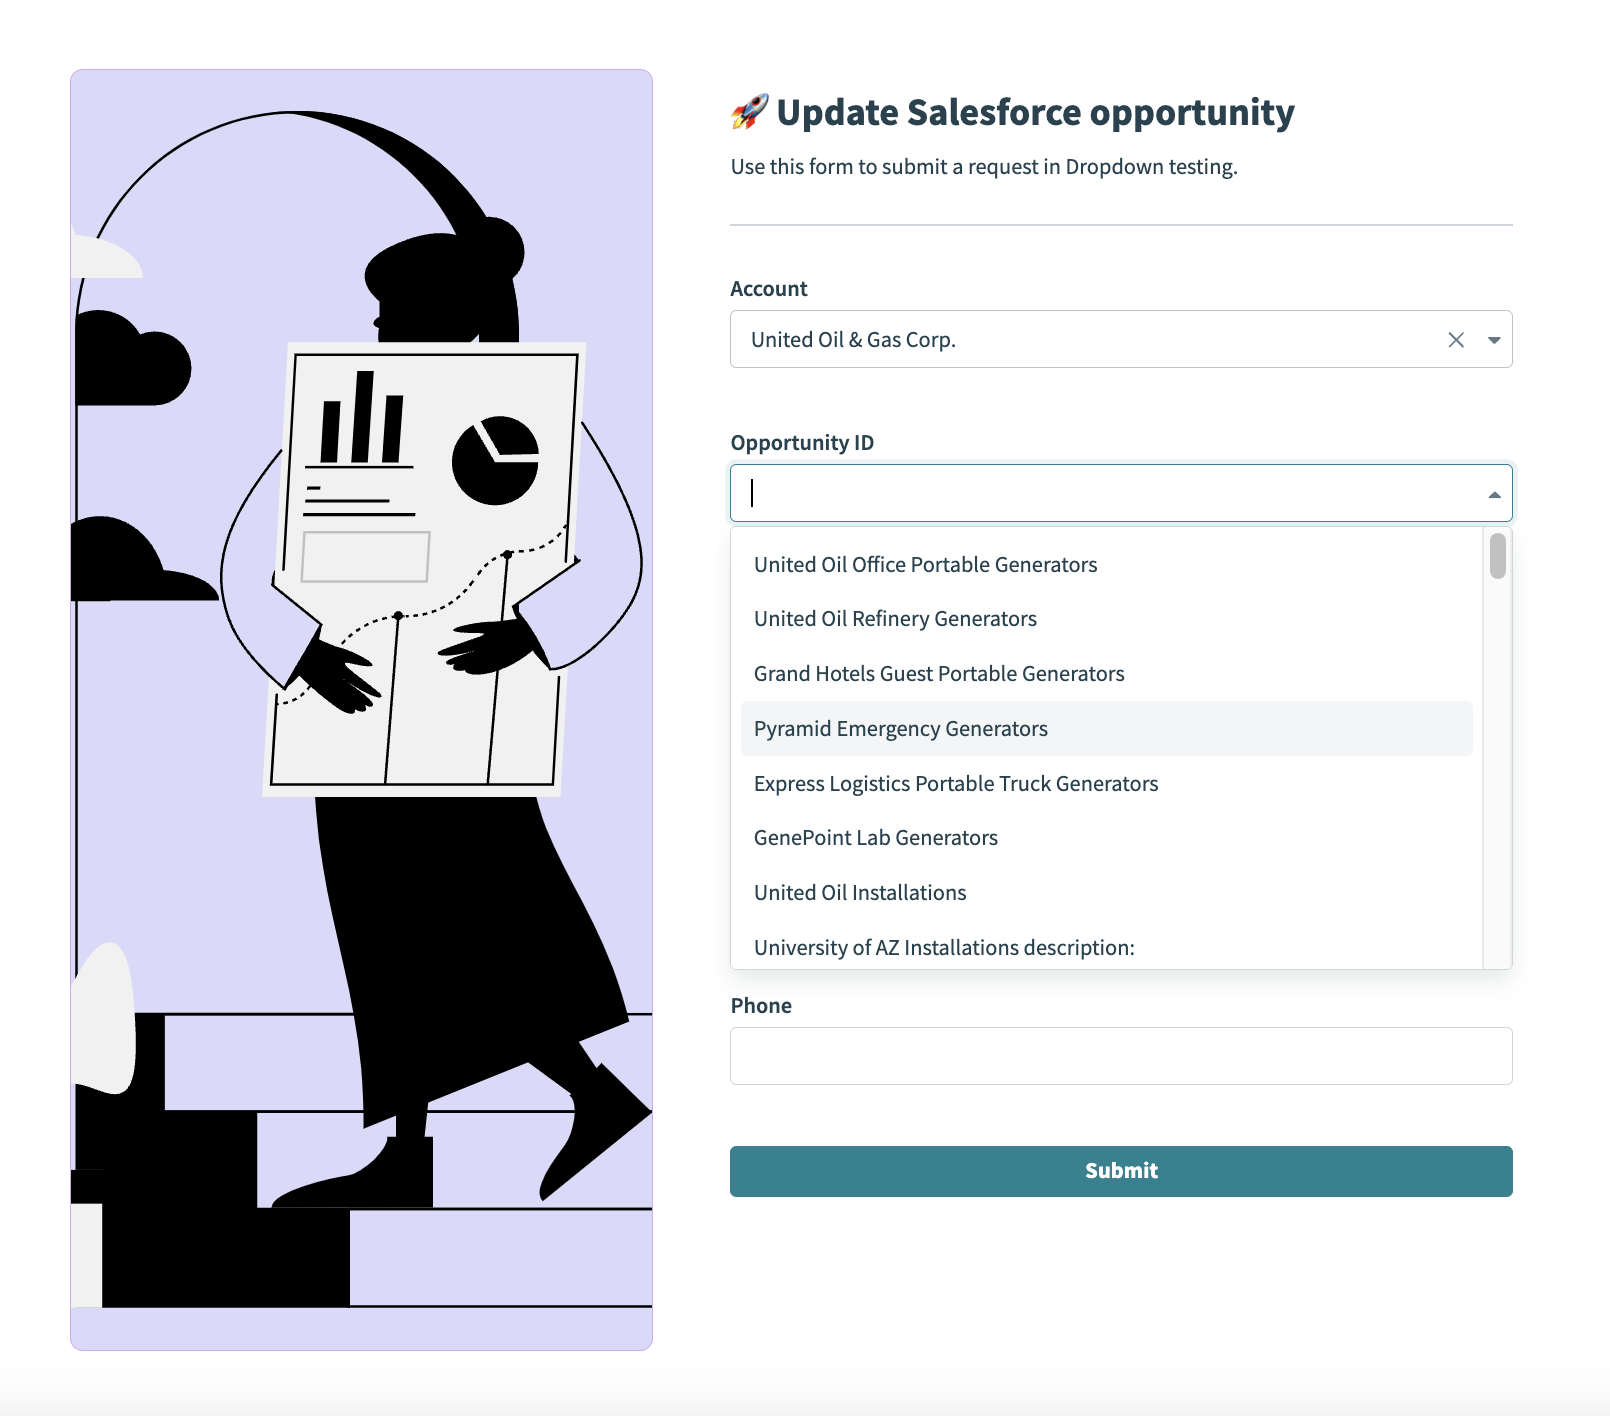 View and test your page in the Workflow apps portal
Salesforce: Get data for multi-value drop-downs
This example demonstrates how to retrieve a list of users from Salesforce and return them to a drop-down component that supports multi-value selection in your Workflow apps pages. This allows your users to select multiple options simultaneously.
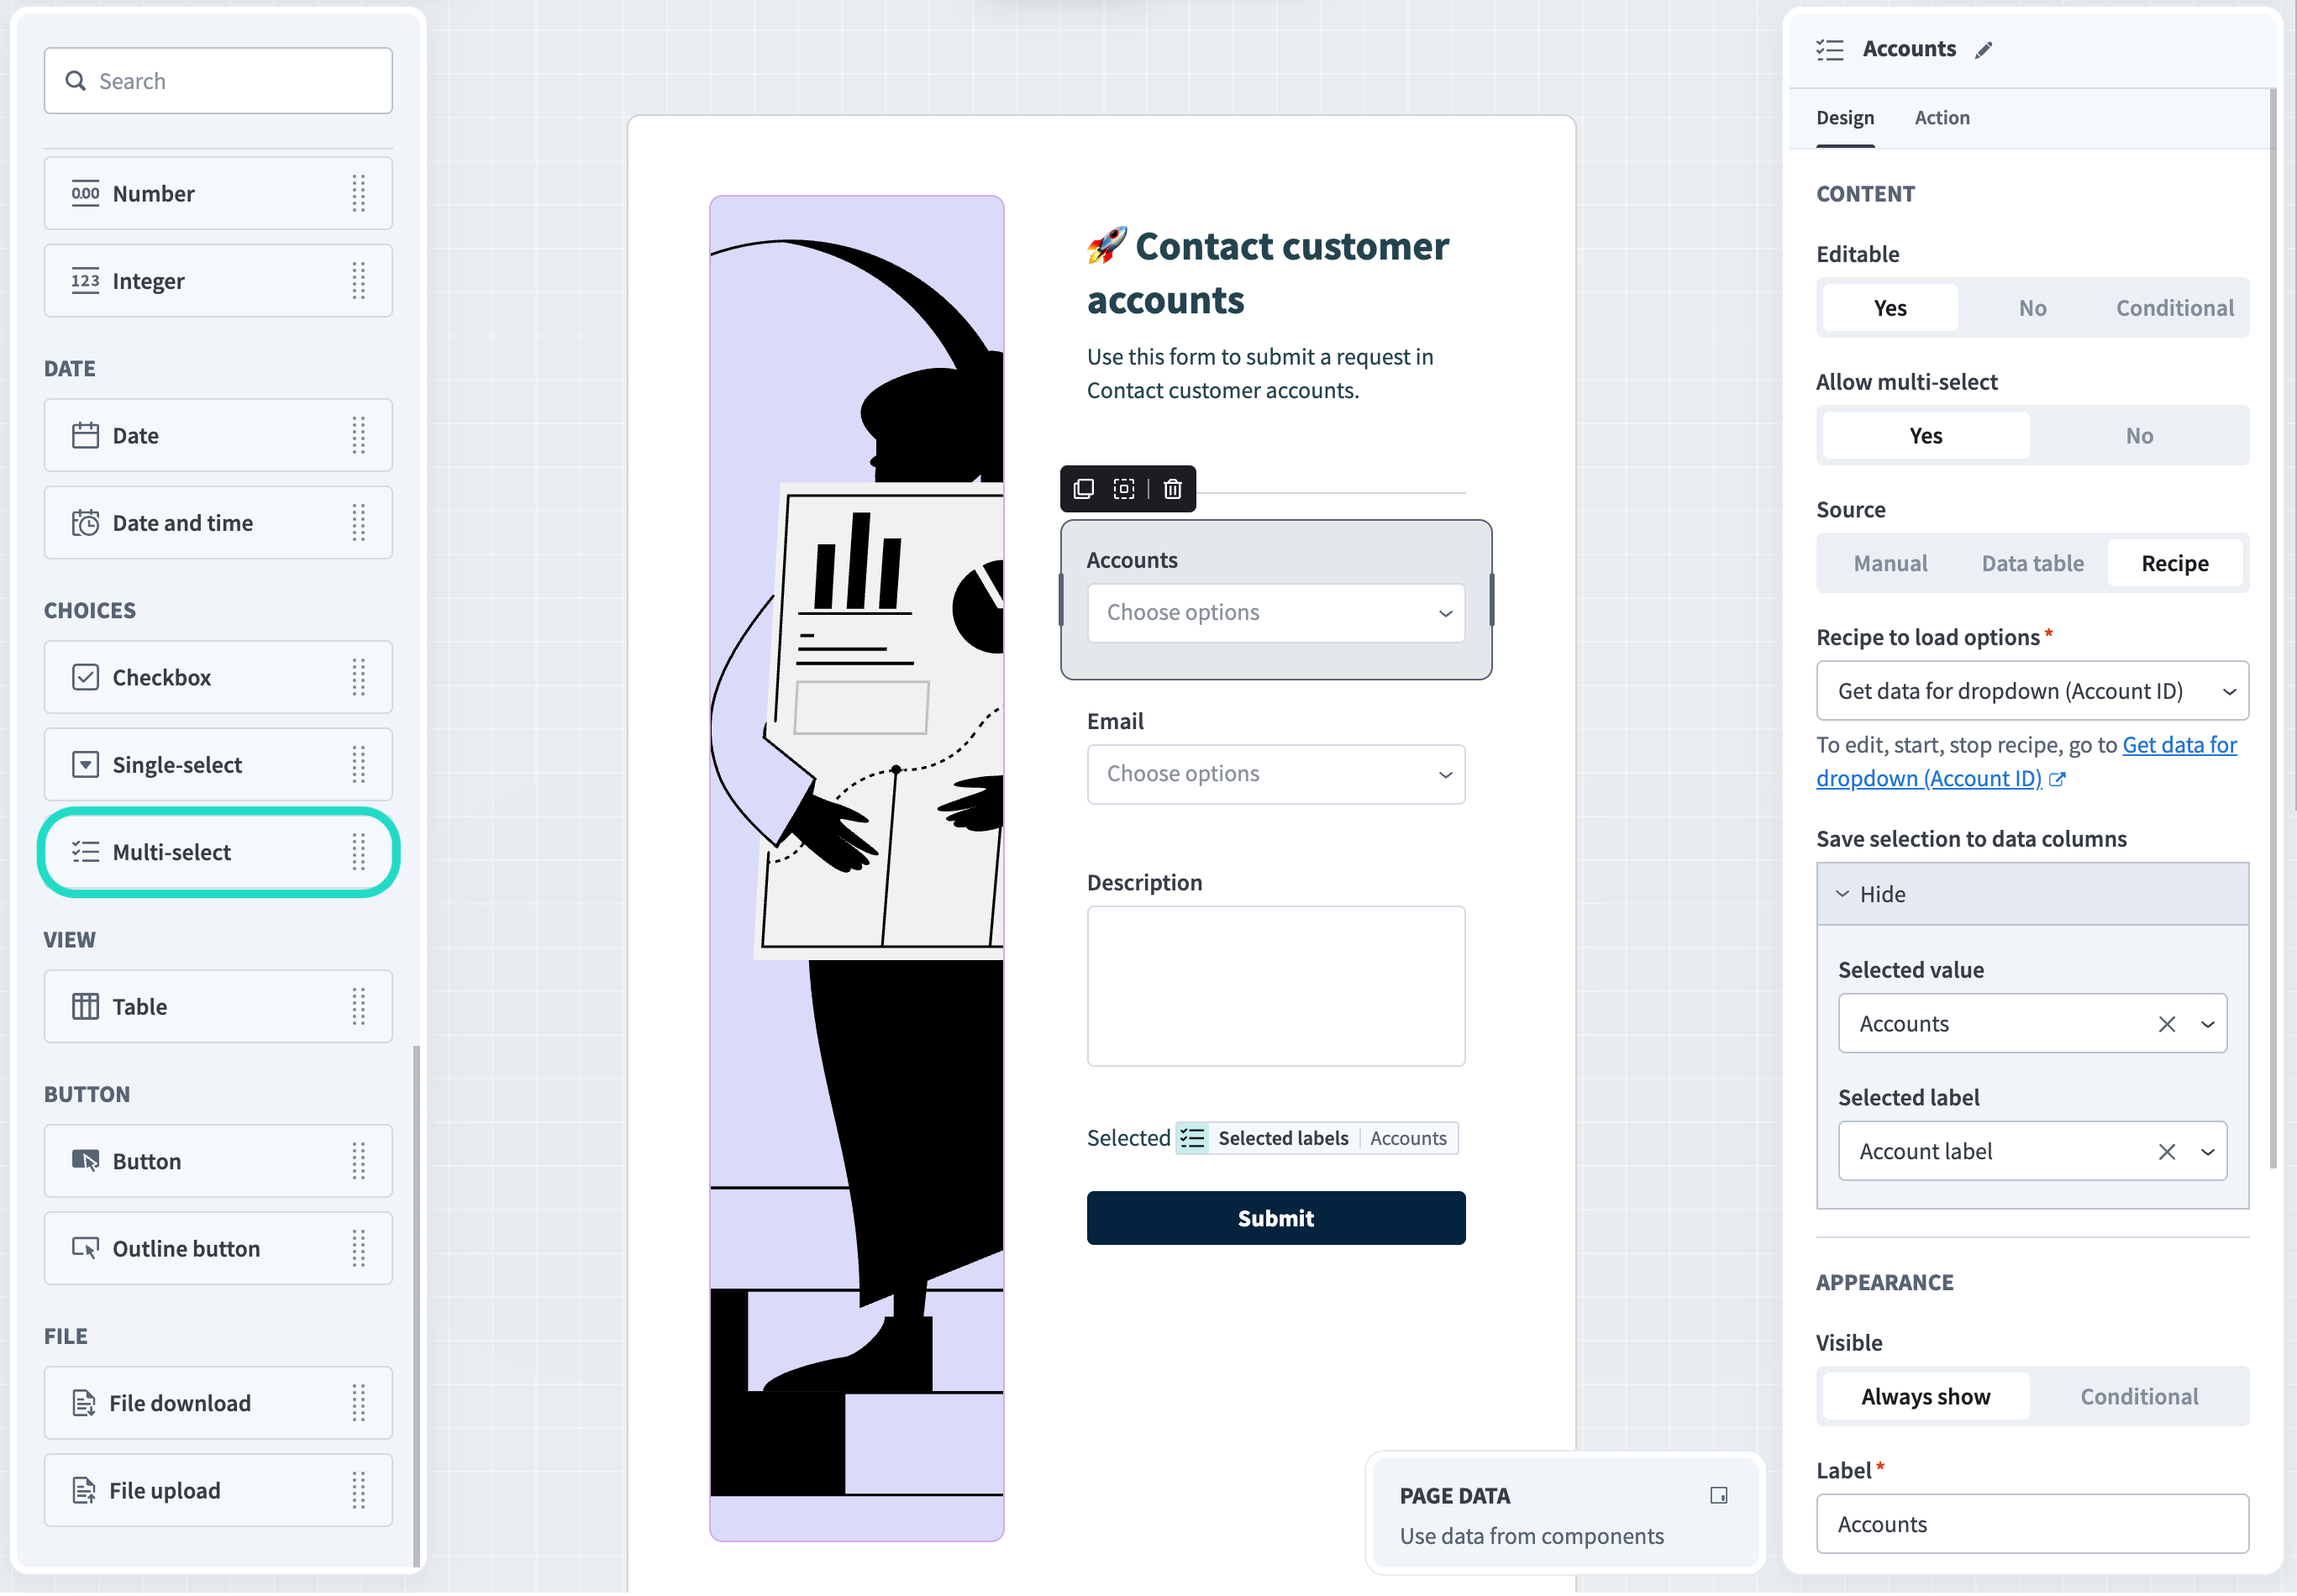
Add a Multi-select drop-down to your page. Give this component a unique name, such as Accounts and select Recipe as the data source.
 Multi-select component
Click Create recipe and name your recipe appropriately. Workato automatically generates a recipe skeleton with the New open or search event trigger and the Return data to drop-down action.
Recipe skeleton
Configure the New open or search event from a drop-down trigger
Set the Use recipe to find search results? field to Yes.
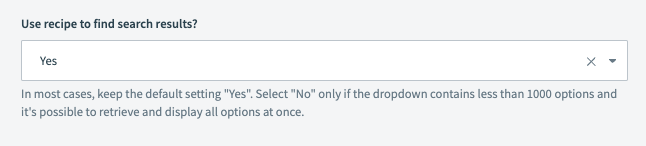 Set use recipe to find search results to Yes
Optional. Use the Minimum search characters to trigger the recipe field to set how many characters a user must type before search is triggered. The default is 3. Alternatively, type 0 to run the recipe immediately when the drop-down component opens without requiring any user input.
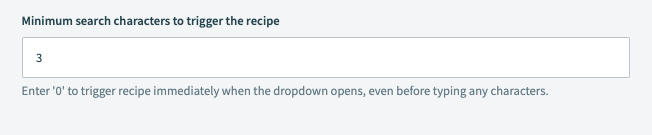 Set minimum characters to trigger search
Click + Add step to add an app and action to Step 2. This example uses Salesforce and the Search records (Account) action, which enables you to surface customer accounts within the page.
Add an app and action to Step 2
Select the connection type you plan to use for this action.
Choose a connection type
- End user's connection: Workflow apps recipes perform actions based on the identity and permissions of the user who connects to the application. End users authenticate with their own credentials to retrieve or modify data in an external app.
- This recipe's connection: This option uses the connection established by the recipe builder and follows the same principles as normal app connections.
Only app connections that use OAuth 2.0 authorization code grant are available for end user's connection. Refer to Verified user access for more information.
Select an existing connection or click + New connection to create a new connection.
Configure the Salesforce Search for accounts action
Specify the Salesforce object you plan to retrieve in the Search for field. For example, Account.
Use the Fields to retrieve drop-down menu to select the fields relevant to your use case. If left blank, all fields in the object you select are returned to the data tree. For example, select Account ID and Account name.
Enter the maximum number of records you plan to return in the Limit field. For example, 150. The maximum is 1000.
Add the Active and select Yes.
Configure the Salesforce action
Configure the Return data to drop-down action
Map the AccountsStep 2 datapill to the Drop-down options list source field.
Map the Account IDStep 2 datapill to the Value field. This is the unique ID that corresponds to the account. Workato stores this value in your Workflow app's data table.
The value must be unique, as Workflow apps omits lines with non-unique values.
Map the Account NameStep 2 datapill to the Label field. This is the value Workato displays to your app users on your page.
The label must be unique to achieve the best user experience. If the label is empty or non-unique, Workflow apps appends the Value to the label in parentheses. For example:
ACME Automations (id88555)ACME Automations (id556666)
Additionally, empty label fields are replaced by the corresponding value.
Configure the return data to drop-down action
Click Save > Exit, and then return to your page to finish the component setup.
Save the Selected value and Selected label (Value and Label, respectively) to data columns. Saving the Selected value is required, as Workato uses this value in your recipes. Saving the Selected label is optional.
Save value and label to data columns
View and test your page in the Workflow apps portal.
 View and test your page in the Workflow apps portal
Jira: Get data using JQL
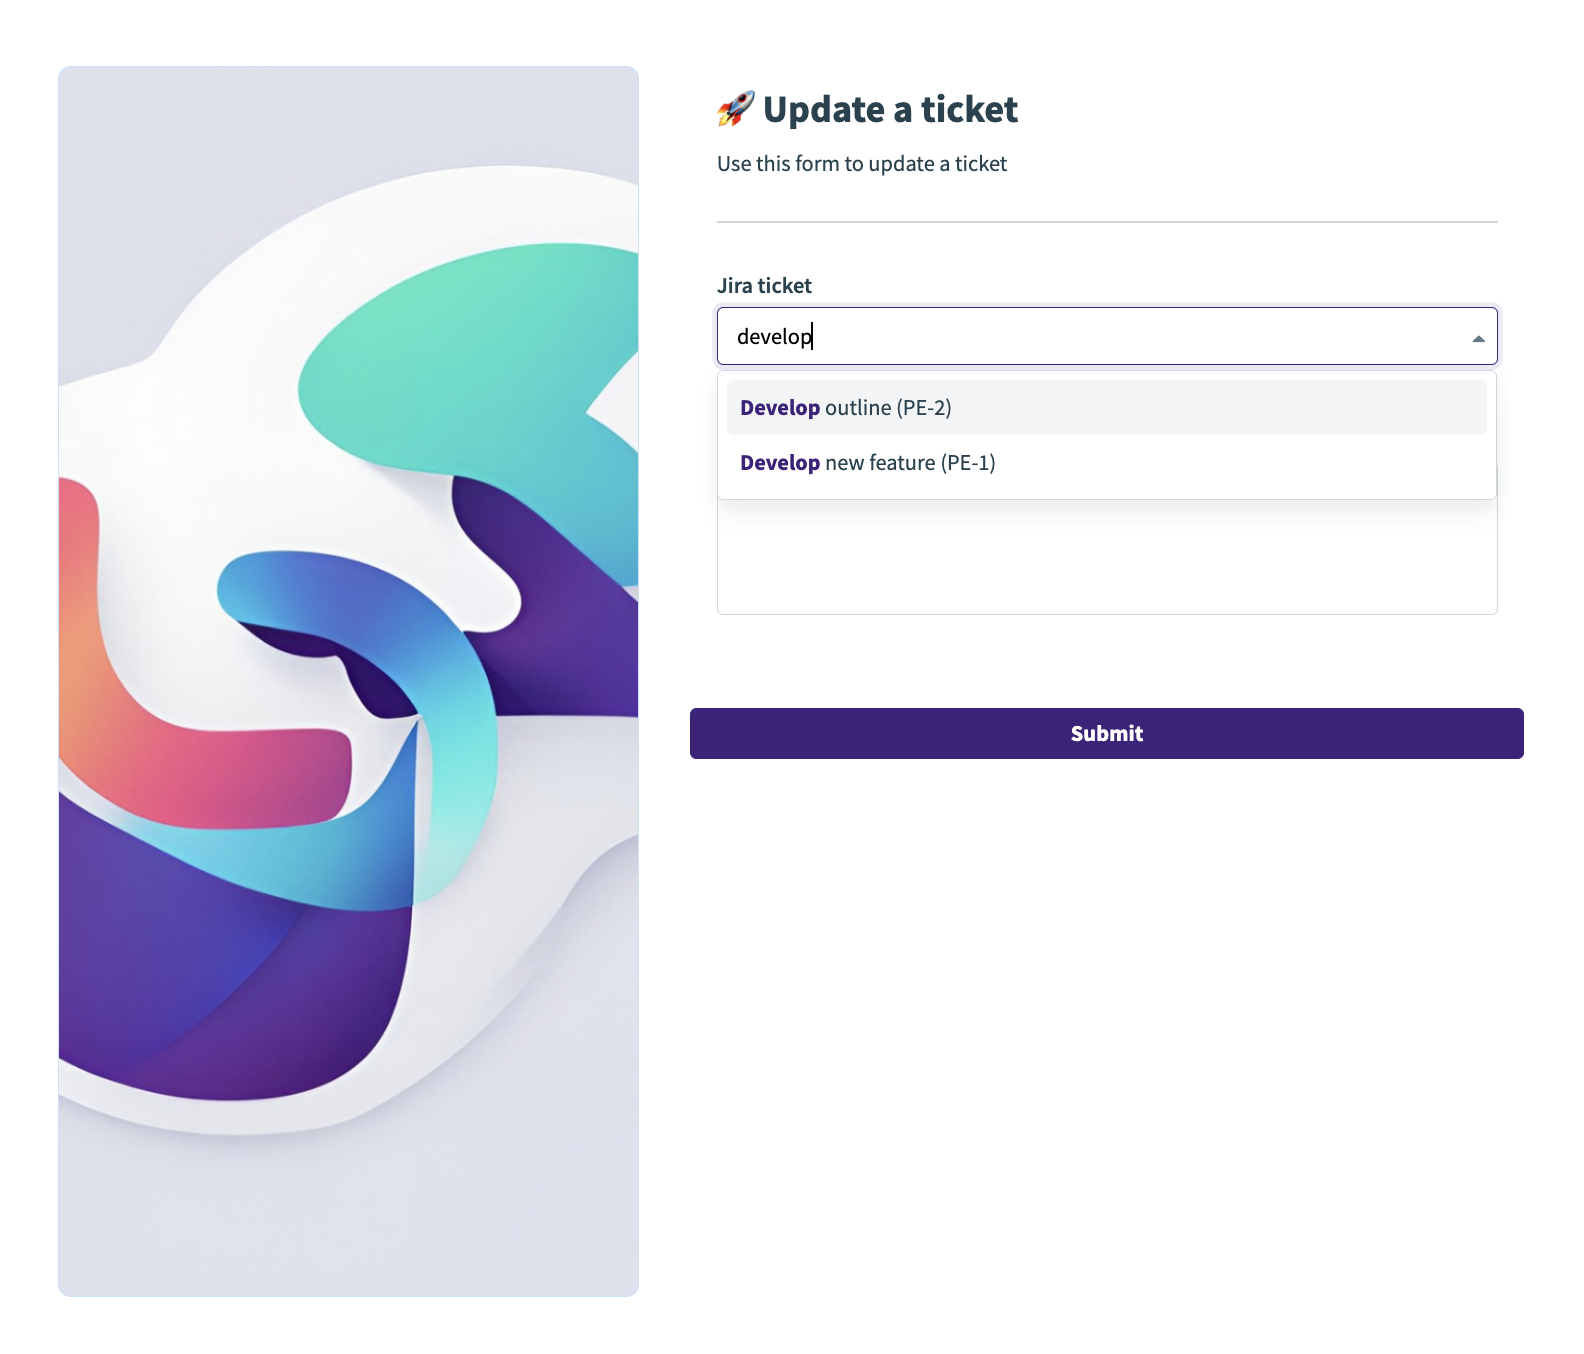
This example demonstrates how to fetch issues from Jira and return them to a drop-down component in your Workflow app pages. The recipe supports type-ahead search, enabling users to search for Jira tickets in real-time. If no search query is provided, the recipe fetches all issues in Jira and returns the name and ID of the first issue.
 Get data from Jira for drop-down
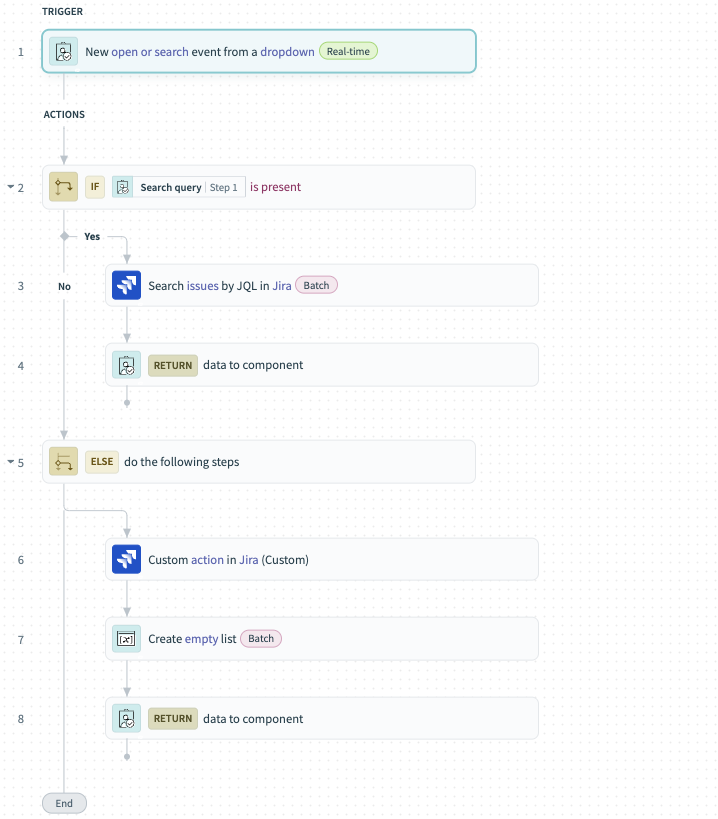 Get data from Jira for drop-down recipe
Set up this recipe
Complete the following steps to set up the recipe.
Add a Drop-down to your page. Give this component a unique name, such as Issues and select Recipe as the data source.
Click Create recipe and name the corresponding recipe appropriately. Workato generates a recipe skeleton with the New open or search event trigger and the Return data to drop-down action automatically.
Recipe skeleton
Configure the New open or search event from a drop-down trigger
Set Use recipe to find search results? to Yes.
This is the appropriate choice in most situations where the number of records in the target system is high and must be searched using the recipe. When Yes is selected, Workato requires you to map the Search queryStep 1 datapill into the corresponding fetch action. Select No when the number of records in your target system is fewer than 1000.
Select yes to use the recipe to find search results
Optional. Use the Minimum search characters to trigger the recipe field to set how many characters a user must type before search is triggered. The default is 3. Alternatively, type 0 to run the recipe immediately when the drop-down component opens without requiring any user input.
Set minimum characters to trigger search
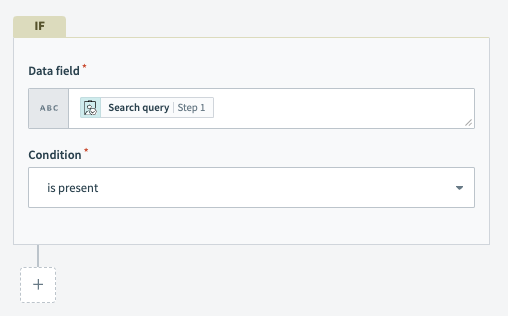
Set up an is Search query present IF condition in Step 2.
This portion of the recipe enables type-ahead search.
Map the Search queryStep 1 datapill into the Data field.
Select is present from the Condition drop-down.
 Configure an IF condition
Click + Add step to add an app and action to the Yes portion of the IF condition. Select Jira and the Search issues by JQL action.
Select the connection type you plan to use for this action.
 Choose a connection type
- End user's connection: Workflow apps recipes perform actions based on the identity and permissions of the user who connects to the application. End users authenticate with their own credentials to retrieve or modify data in an external app.
- This recipe's connection: This option uses the connection established by the recipe builder and follows the same principles as normal app connections.
Only app connections that use OAuth 2.0 authorization code grant are available for end user's connection. Refer to Verified user access for more information.
Select an existing connection or click + New connection to create a new connection.
Configure the Search issues by JQL action
Upon user input, this portion of the recipe searches Jira for issues.
Configure a JQL query string to search for data matching your criteria in Jira. For example:
summary ~ "\"SEARCH_QUERY_DATAPILL\"" order by summary descLearn more about JQL.
Replace the following section of the query:
SEARCH_QUERY_DATAPILL: Map the Search queryStep 1 datapill.
 Enter a JQL query
Click + Add step to add an action to the Yes section of your IF condition. Select the Workflow apps Return data to component action.
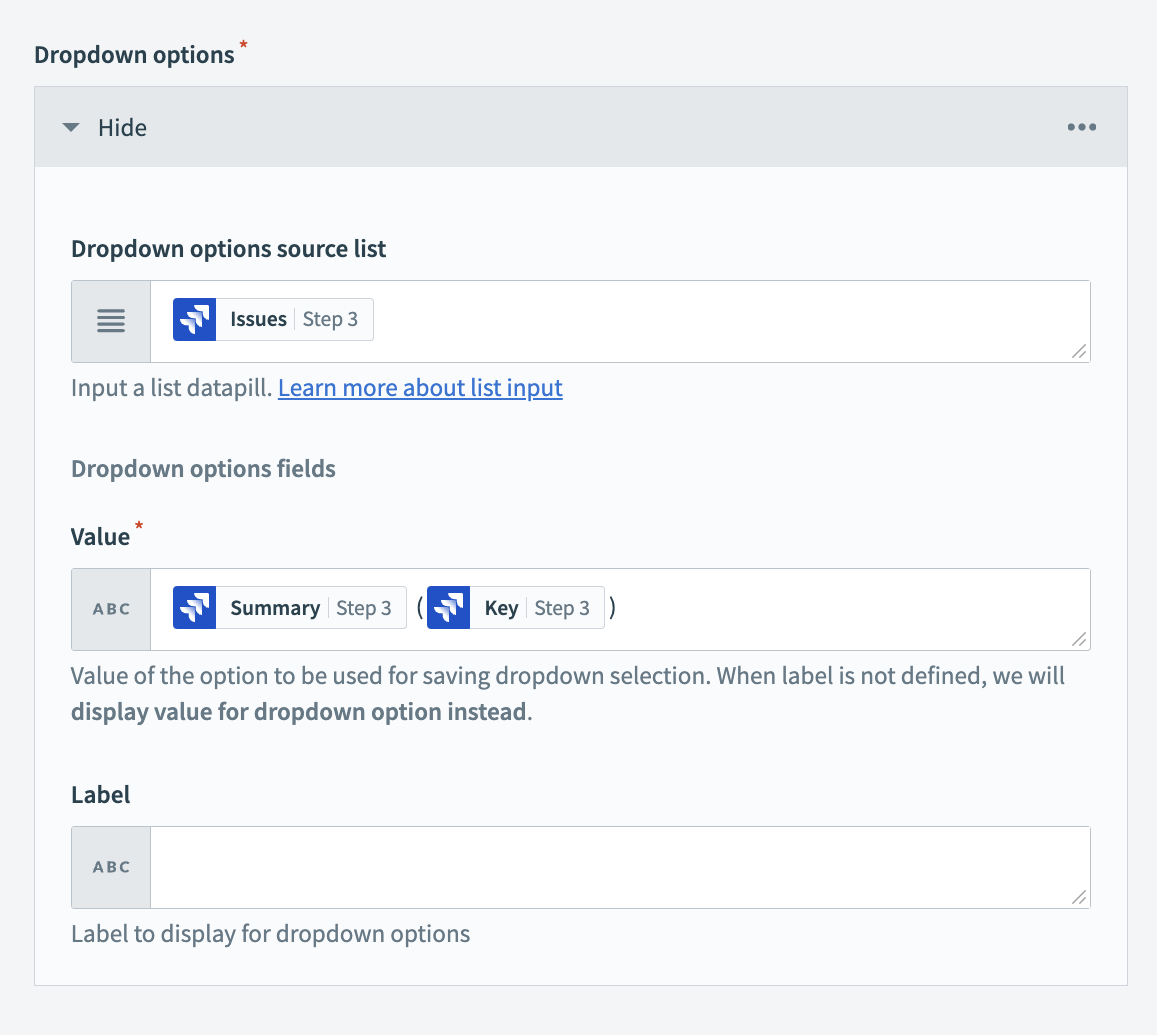
Configure the Return data to drop-down action
Map the IssuesStep 3 datapill into the Drop-down options list source field.
In the Value field, map the SummaryStep 3 and KeyStep 3 datapills. This is the unique ID that corresponds to the account. Workato stores this value in your Workflow app's data table.
 Configure the Return data to drop-down action
Click + Add step to add an ELSE IF condition to the No condition. If there are no results matching the search query, this portion of the recipe returns the first issue.
Click + Add step to add an action from an app. Select Custom action in Jira.
Set up your Custom action in Jira. Refer to our page on creating a custom action to learn more.
Click + Add step to add an action from an app. Select the Variables by Workato Create empty list action.
Set up your Create empty list action
Provide a List name. For example, Issues.
Define your list item schema. You can provide sample JSON or add fields manually. In our example, we have added the Label field because we plan to display the corresponding issue label to our end users.
Click + Add step to add an action from an app. Select the Workflow apps Return data to component action.
Click Save, and Exit. Then, return to your page to finish setting up this component.
Save the Selected value and Selected label (Value and Label, respectively) to data columns. Saving the Selected value is required, as Workato uses this value in your recipes. Saving the Selected label is optional.
Save value and label to data columns
View and test your page in the Workflow apps portal.
Okta: Get users for drop-down
This recipe demonstrates how to retrieve user profiles from Okta and return them to your Workflow apps pages. It supports type-ahead search, enabling users to search for Okta profiles in real-time. When a search query is provided, the recipe splits it into first and last name parts, searches Okta for users whose first name starts with the first part and last name starts with the second part, and returns the first matching user's details. If no matches are found, it returns an empty response to the drop-down.
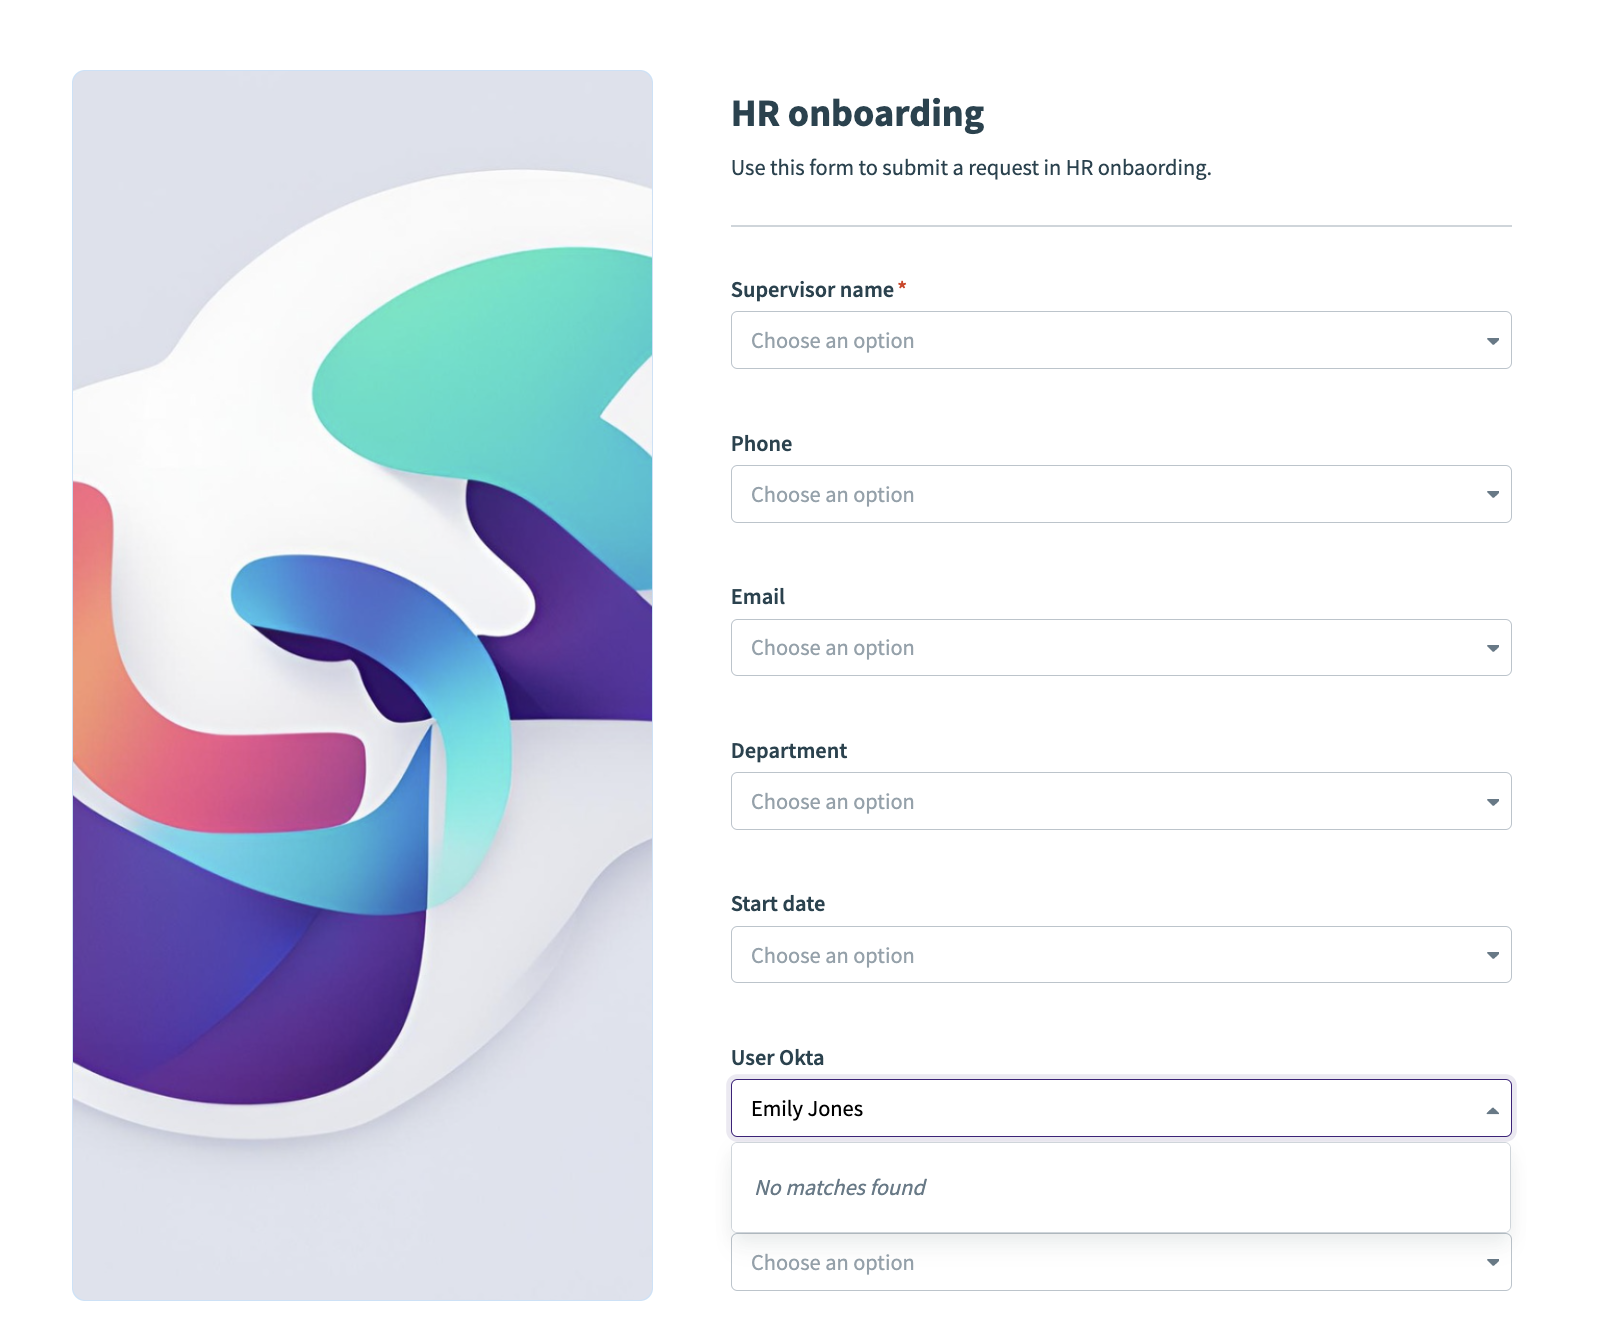 HR onboarding page
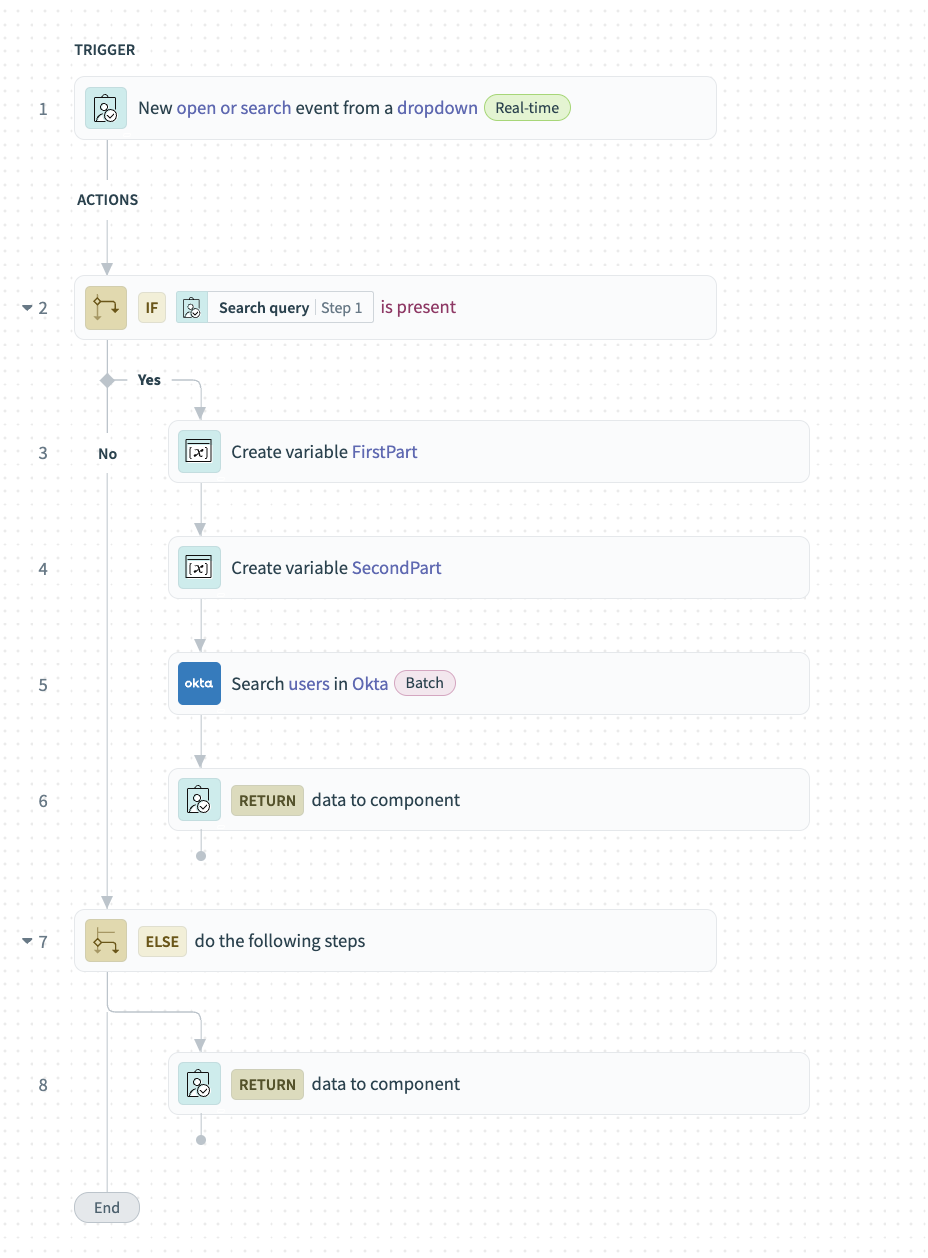 Get users from Okta recipe
Set up this recipe
Complete the following steps to set up the recipe.
Add a Drop-down to your page. Give this component a unique name, such as Users and select Recipe as the data source.
Click Create recipe and name the corresponding recipe appropriately. Workato automatically generates a recipe skeleton with the New open or search event trigger and the Return data to drop-down action.
Recipe skeleton
Configure the New open or search event trigger
Set Use recipe to find search results? to Yes.
This is the appropriate choice in most situations where the number of records in the target system is high and must be searched using the recipe. When Yes is selected, Workato requires you to map the Search queryStep 1 datapill into the corresponding fetch action.
Select yes to use the recipe to find search results
Optional. Use the Minimum search characters to trigger the recipe field to set how many characters a user must type before search is triggered. The default is 3. Alternatively, type 0 to run the recipe immediately when the drop-down component opens without requiring any user input.
Set minimum characters to trigger search
Set up an is Search query present IF condition in Step 2.
This portion of the recipe enables type-ahead search.
Map the Search queryStep 1 datapill into the Data field.
Select is present from the Condition drop-down.
Configure an IF condition
Click + Add step to add an additional action to the Yes section of your IF condition. Select Variables by Workato and the Create variable action.
Set up your first variable
This portion of the recipe splits the search query into two parts and creates a variable for the user's first name.
Click Add a variable. Provide a unique Label and Data type for the variable. For example, FirstPart, and String.
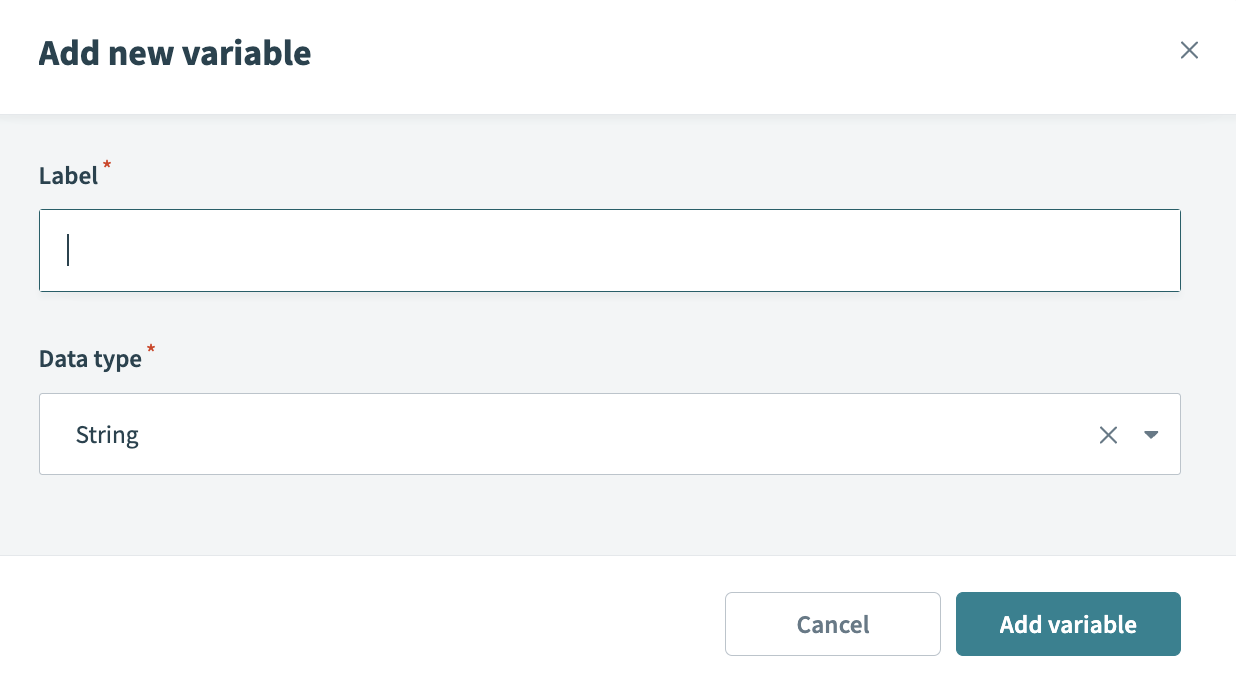 Add a variable
Click Formula to define the variable using formula mode.
Map the Search queryStep 1 datapill into the formula. Use the .split formula to divide the search query into two parts, using a space (" ") as the delimiter. Add [0] to indicate you're selecting the first part of the search query.
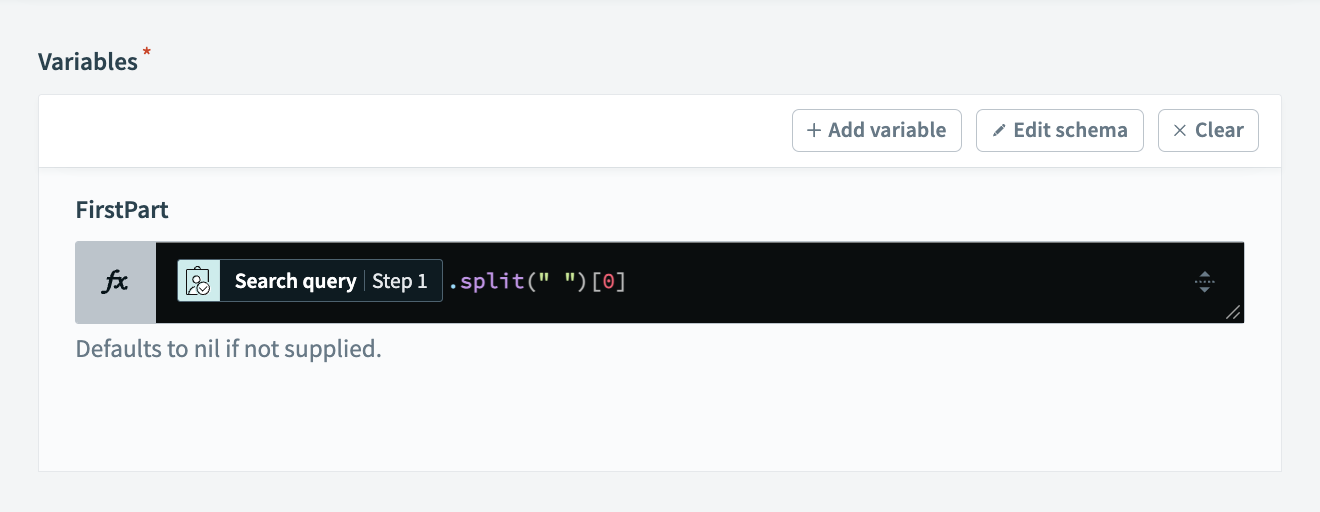 Use
Use .split to create a variable from the first part of the datapill
Click + Add step to add an additional action to the Yes section of your IF condition. Select Variables by Workato and the Create variable action.
Set up another variable
This portion of the recipe splits the search query into two parts and creates a variable for the user's last name.
Click Add a variable. Provide a unique Label and Data type for the variable. For example, SecondPart, and String.
Add a variable
Click Formula to define the variable using formula mode.
Map the Search queryStep 1 datapill into the formula. Use the .split formula to divide the search query into two parts, using a space (" ") as the delimiter. Add [1] to indicate you're selecting the second part of the search query.
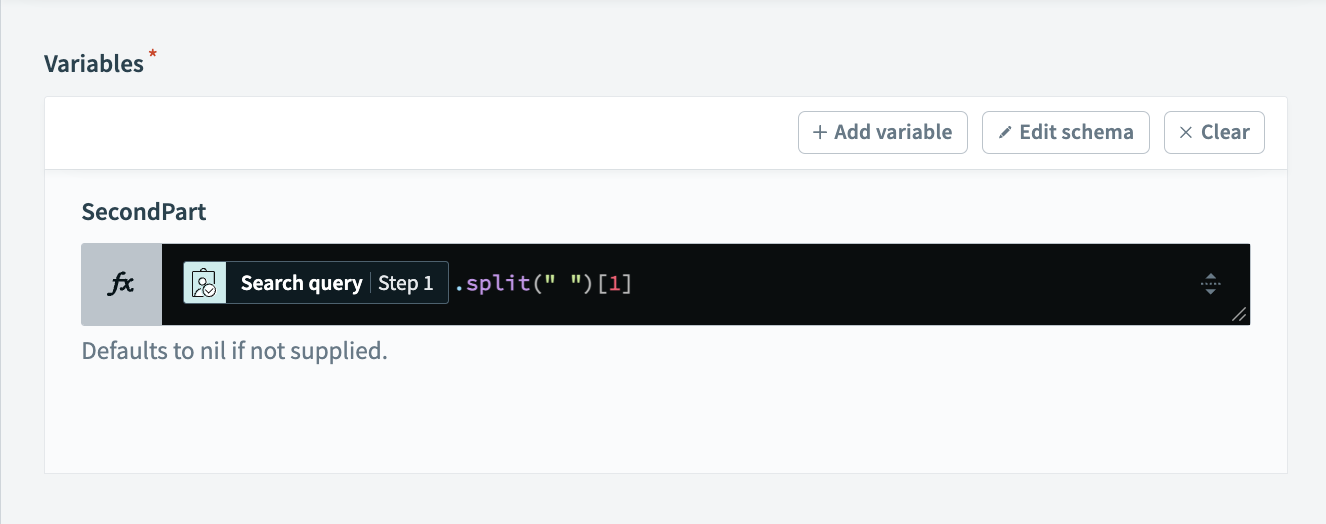 Use
Use .split to create a variable from the second part of the datapill
Click + Add step to add an action to the Yes section of your IF condition. Select Okta and the Search users action.
Select the connection type you plan to use for this action.
- End user's connection: Workflow apps recipes perform actions based on the identity and permissions of the user who connects to the application. End users authenticate with their own credentials to populate components with recipe data.
- This recipe's connection: This option uses the connection established by the recipe builder and follows the same principles as normal app connections.
Only app connections that use OAuth 2.0 authorization code grant are available for end user's connection. Refer to Verified user access for more information.
Select an existing connection or click + New connection to create a new connection.
Set up the Search query
Use the following search query:
profile.firstName sw "FIRSTPART_DATAPILL" and profile.lastName sw "SECONDPART_DATAPILL"Learn more about filtering expressions in Okta.
Replace the following:
FIRSTPART_DATAPILL: Map the FirstPartStep 4 datapill.SECONDPART_DATAPILL: Map the FirstPartStep 4 datapill.
Click + Add step to add an action to the Yes section of your IF condition. Select Workflow apps and the Return data to drop-down action.
Configure the Return data to drop-down action
Map the UsersStep 6 datapill into the Drop-down options list source.
Enter the following into the Value field. This is the unique ID that corresponds to the records Workato stores this value to your Workflow app's data table.
User ID is ID_DATAPILL | User status is STATUS_DATAPILL | Last update STATUS_CHANGED_DATAPILL | FIRSTNAME_DATAPILL LASTNAME_DATAPILL (USERNAME_DATAPILL) | Password = VALUE_DATAPILLReplace the following:
ID_DATAPILL: Map the UsersStep 6 datapill.STATUS_DATAPILL: Map the StatusStep 6 datapill.STATUS_CHANGED_DATAPILL: Map the Status changed timeStep 6 datapill.FIRSTNAME_DATAPILL: Map the First nameStep 6 datapill.LASTNAME_DATAPILL: Map the Last nameStep 6 datapill.USERNAME_DATAPILL: Map theUsernameStep 6 datapill.VALUE_DATAPILL: Map the ValueStep 6 datapill.
Map the First nameStep 6 and Last nameStep 6 datapills into the Label field.
Click + Add step to add an action. Select the Else action. If there are no results matching the search query, this portion of the recipe returns an empty value to your drop-down.
Click + Add step to add an action from an app. Select the Workflow apps Return data to drop-down action.
Click Save, and Exit. Then, return to your page to finish setting up this component.
Save the Selected value and Selected label (Value and Label, respectively) to data columns. Saving the Selected value is required, as Workato uses this value in your recipes. Saving the Selected label is optional.
Save value and label to data columns
View and test your page in the Workflow apps portal.
HTTP: Get data from an API
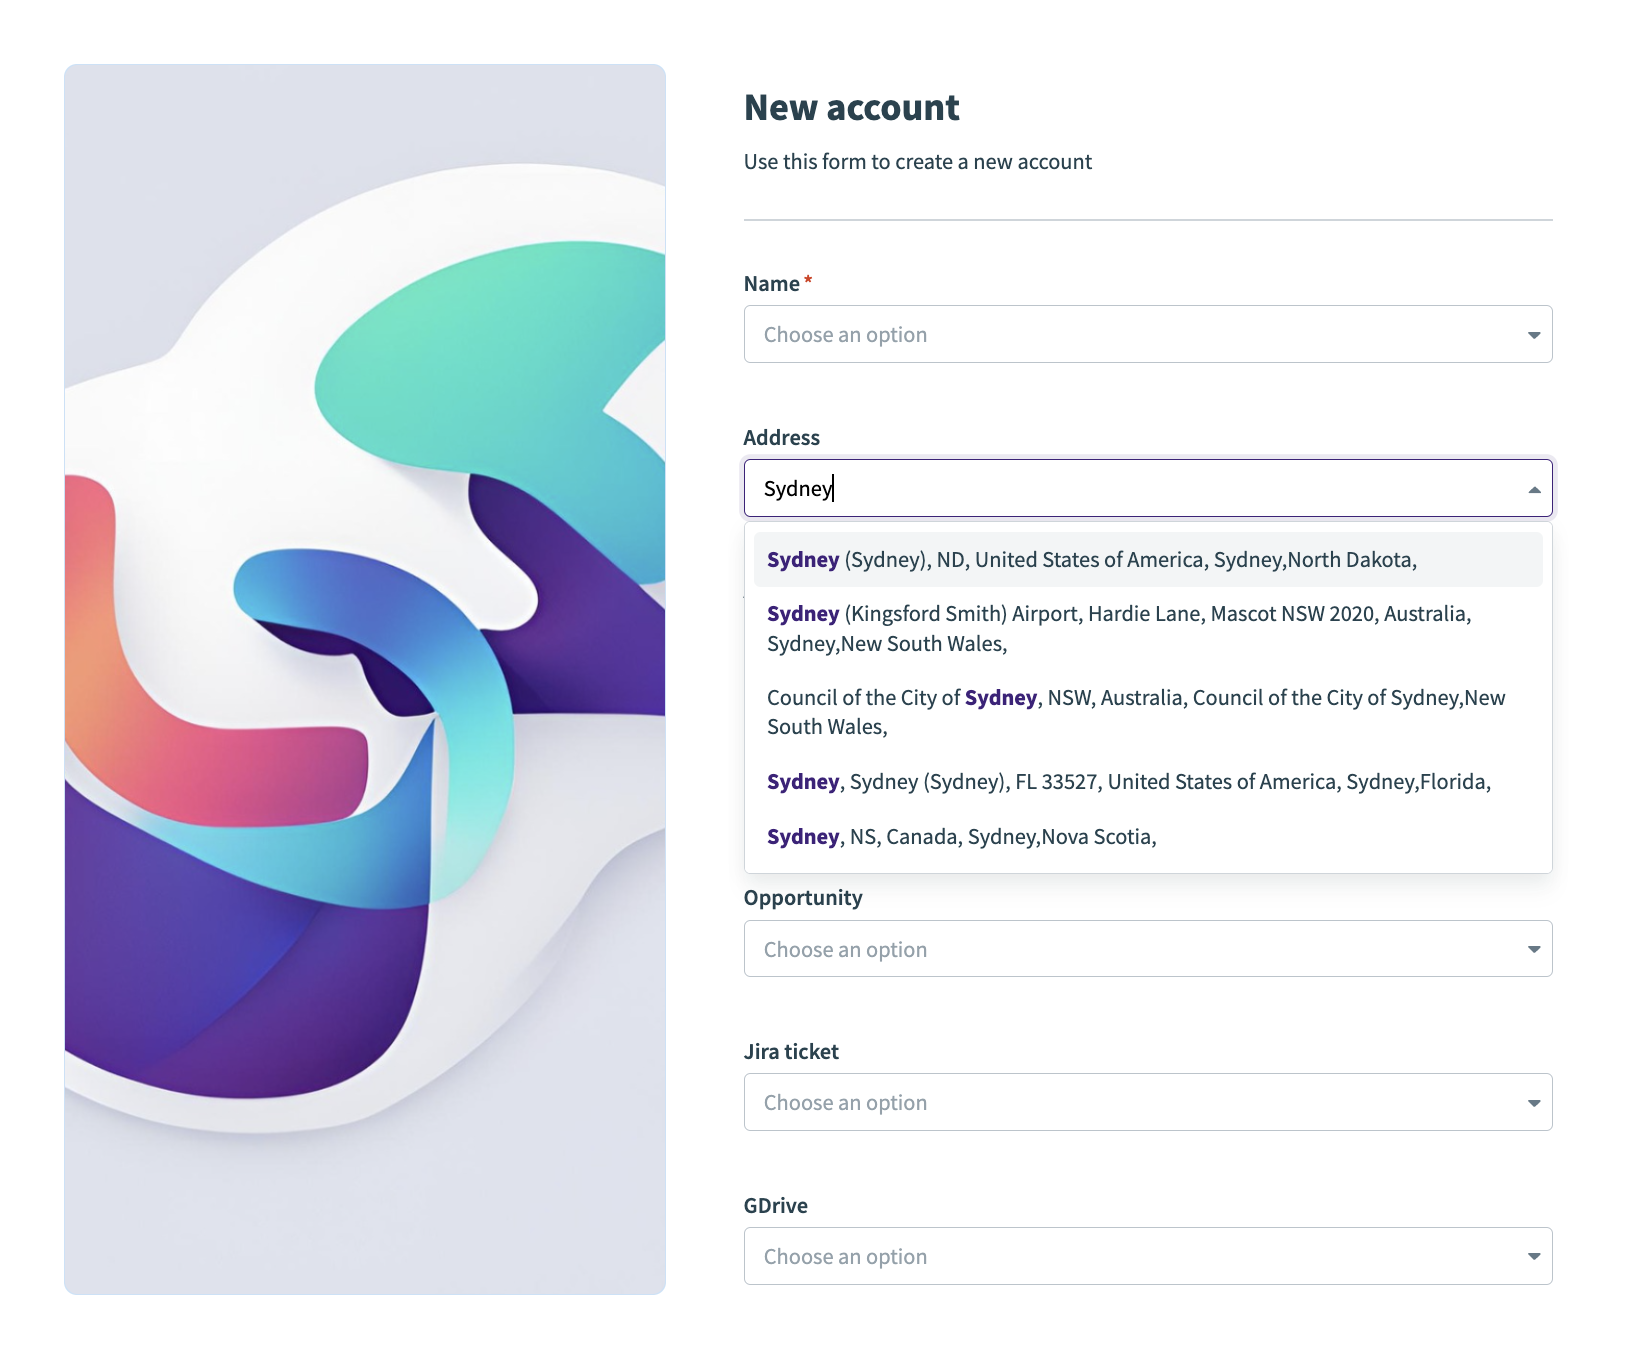
This recipe demonstrates how to fetch locations based on a user's search query and return the result to your Workflow apps page. It uses the HTTP connector to send a custom GET request to the Geoapify Location Platform API. The recipe supports type-ahead search, enabling users to search for locations in real-time. It returns a list of matching locations and formats the first result into a readable address, which is then returned to your page.
 Get data for drop-down using HTTP connector
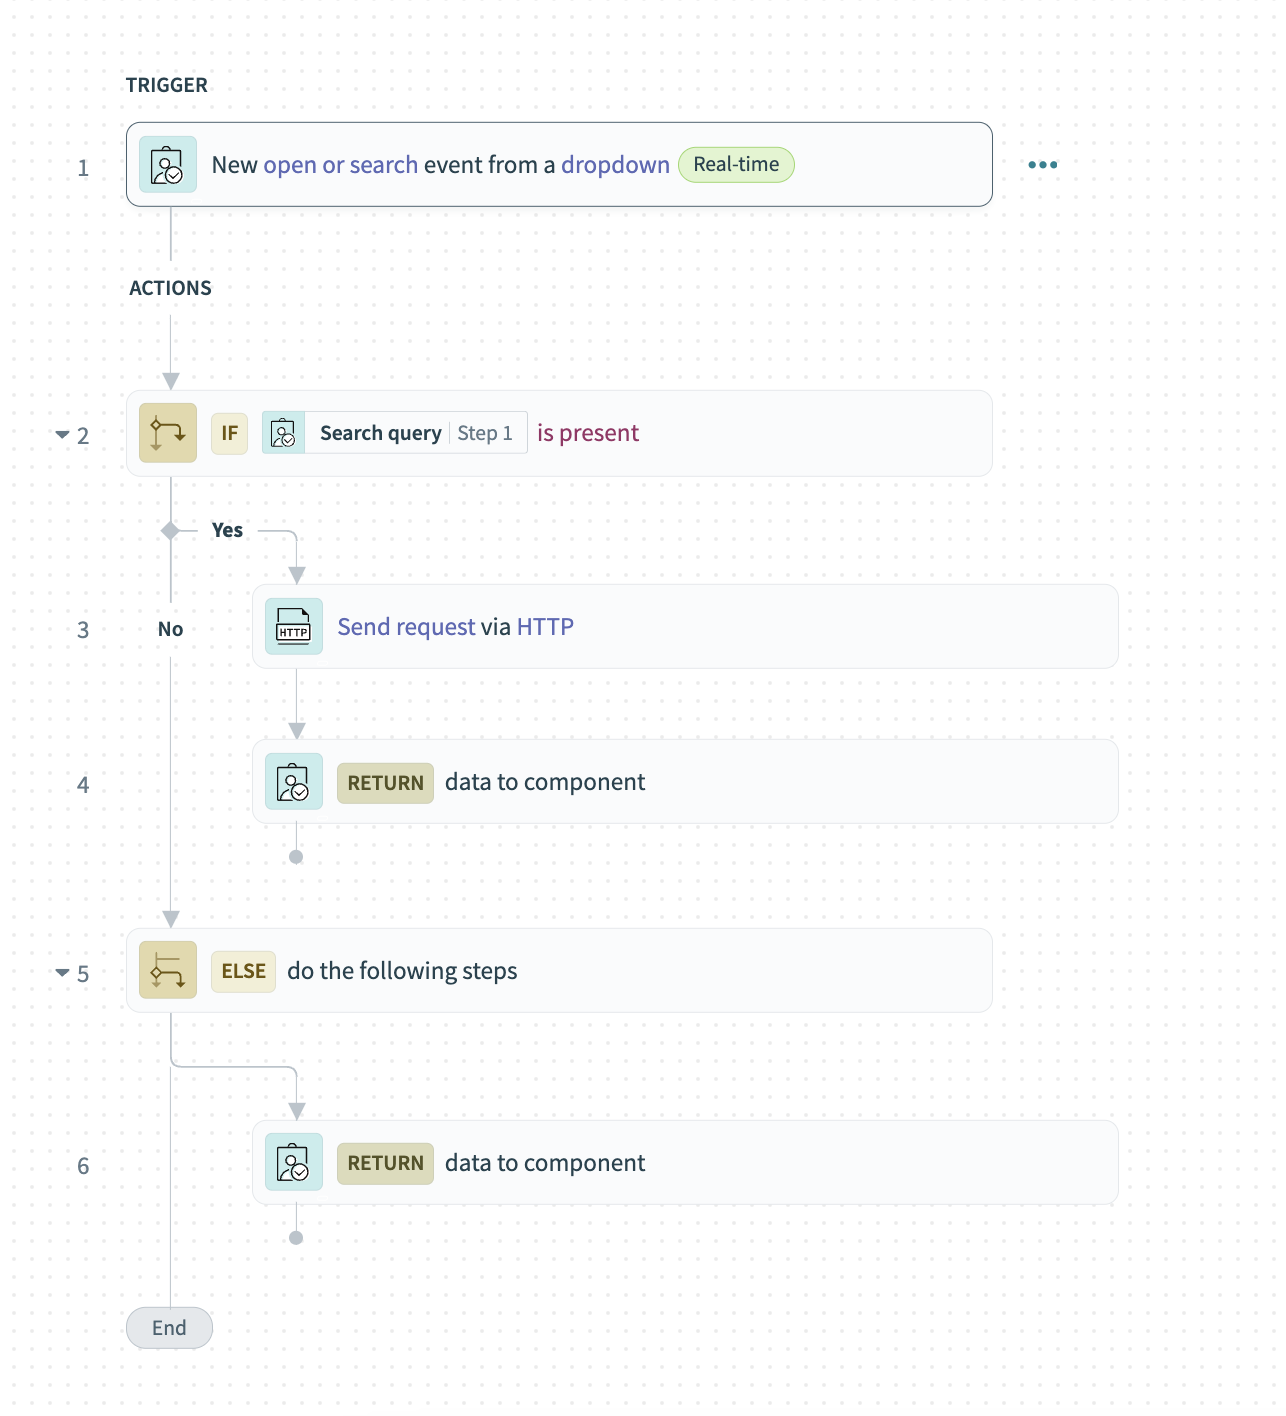 Get data for drop-down using HTTP connector
Set up this recipe
Complete the following steps to set up the recipe.
Add a Drop-down to your page. Give this component a unique name, such as Addresses and select Recipe as the data source.
Click Create recipe and name the corresponding recipe appropriately. Workato automatically generates a recipe skeleton with the New open or search event trigger and the Return data to drop-down action.
Recipe skeleton
Configure the New open or search event trigger
Set Use recipe to find search results? to Yes.
This is the appropriate choice in most situations where the number of records in the target system is high and must be searched using the recipe. When Yes is selected, Workato requires you to map the Search queryStep 1 datapill into the corresponding fetch action. Select No when the number of records in your target system is fewer than 1000.
Select yes to use the recipe to find search results
Optional. Use the Minimum search characters to trigger the recipe field to set how many characters a user must type before search is triggered. The default is 3. Alternatively, type 0 to run the recipe immediately when the drop-down component opens without requiring any user input.
Set minimum characters to trigger search
Set up an is Search query present IF condition in Step 2.
This portion of the recipe enables type-ahead search.
Map the Search queryStep 1 datapill from Step 1 into the Data field.
Select is present from the Condition drop-down.
Configure an IF condition
Click + Add step to add an action to the Yes section of your IF condition. Select the HTTP Send request action.
Configure your Send request action
Provide a Request name. Workato uses this value to name your action.
Click Start guided setup.
Select GET as the HTTP Method.
Provide the Request URL. This is the URL from which you plan to make requests. For example, https://api.geoapify.com/v1/geocode/autocomplete.
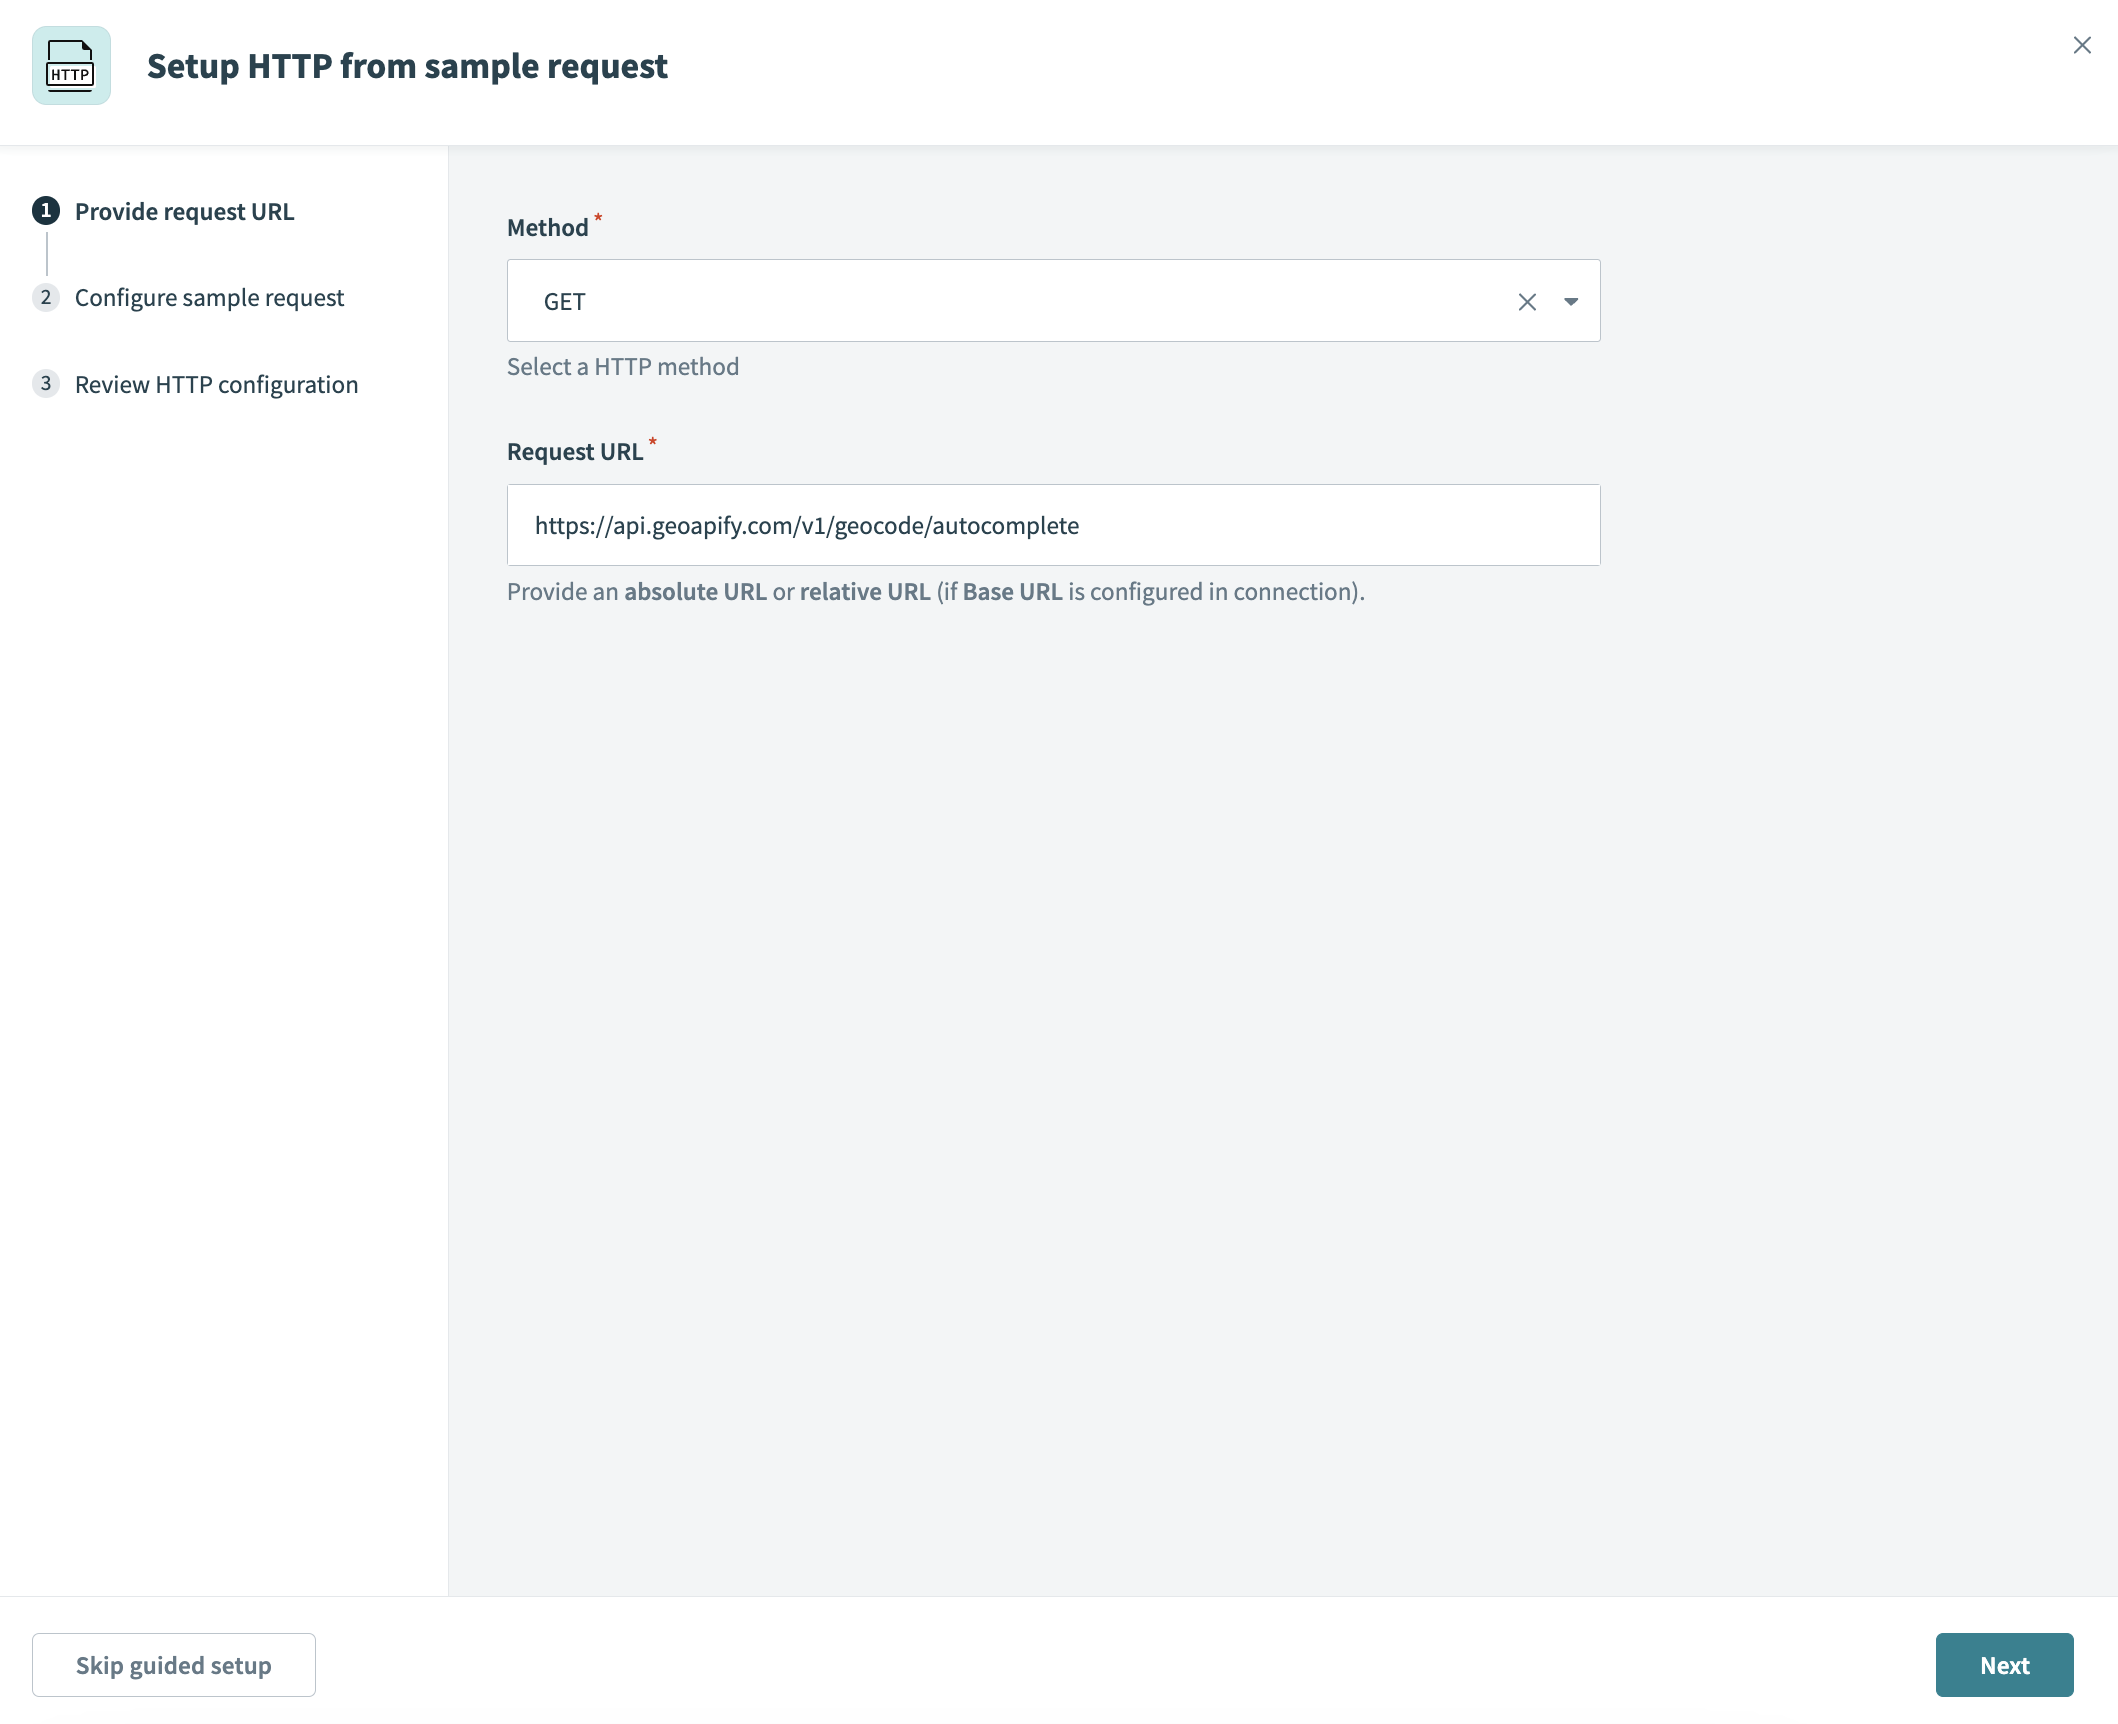 Provide the request URL
Click Next.
Under Request URL parameters, click Show. Then click Add URL parameter.
Enter text for the Parameter name and a sample location, such as Springville in the Value field.
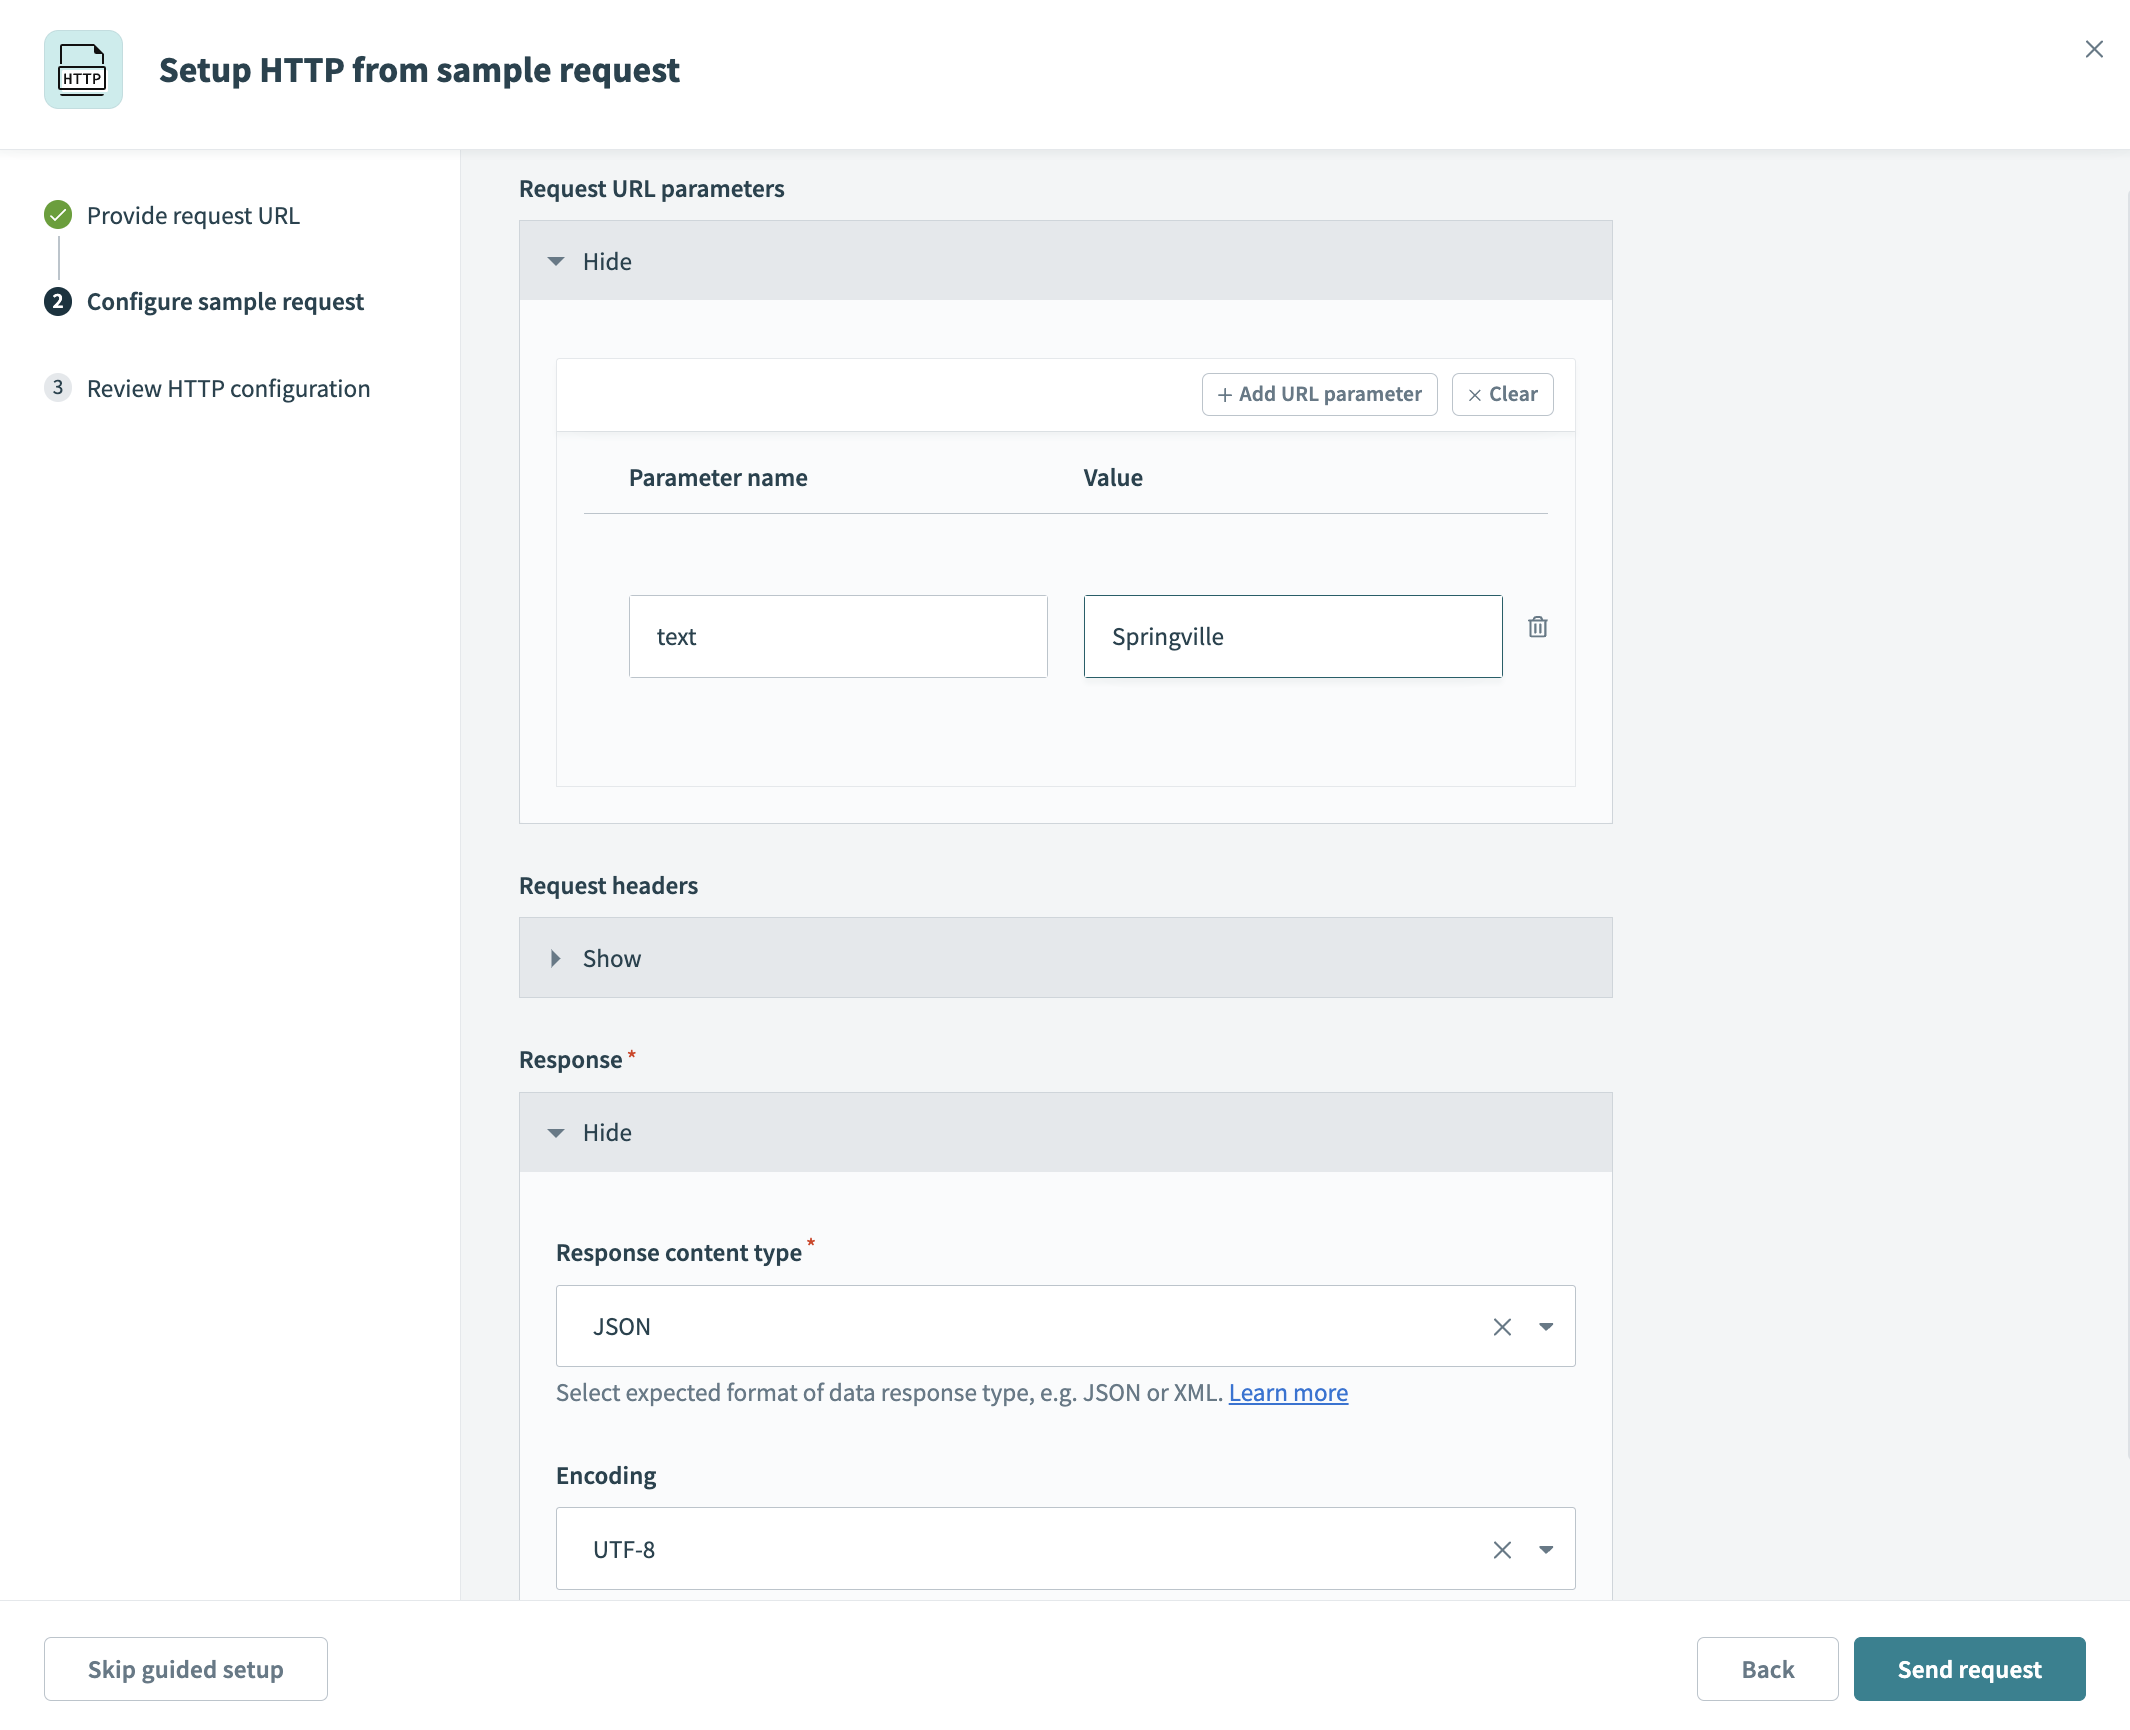 Add a parameter
In the Response section, ensure the Response content type and Encoding fields are set to JSON and UTF-8, respectively.
Click Send request.
Review the HTTP configuration. Workato uses the Response from this call to auto-generate the response schema for this action.
Click Apply configuration.
In the Request URL parameters field, remove your sample location, Springville, and map the Search queryStep 1 datapill. This enables the recipe to query the API for the location your user types into the field.
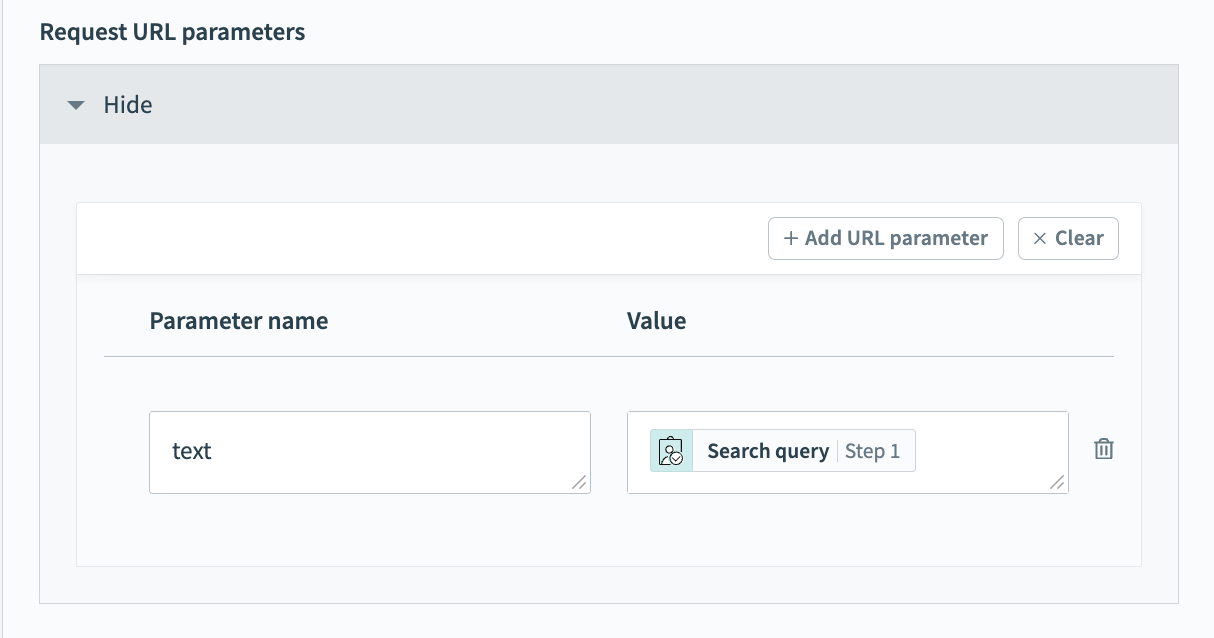 Map in the Search queryStep 1 datapill
Leave all other fields at their default values.
Click + Add step to add an app and action. Select the Workflow apps Return data to component action.
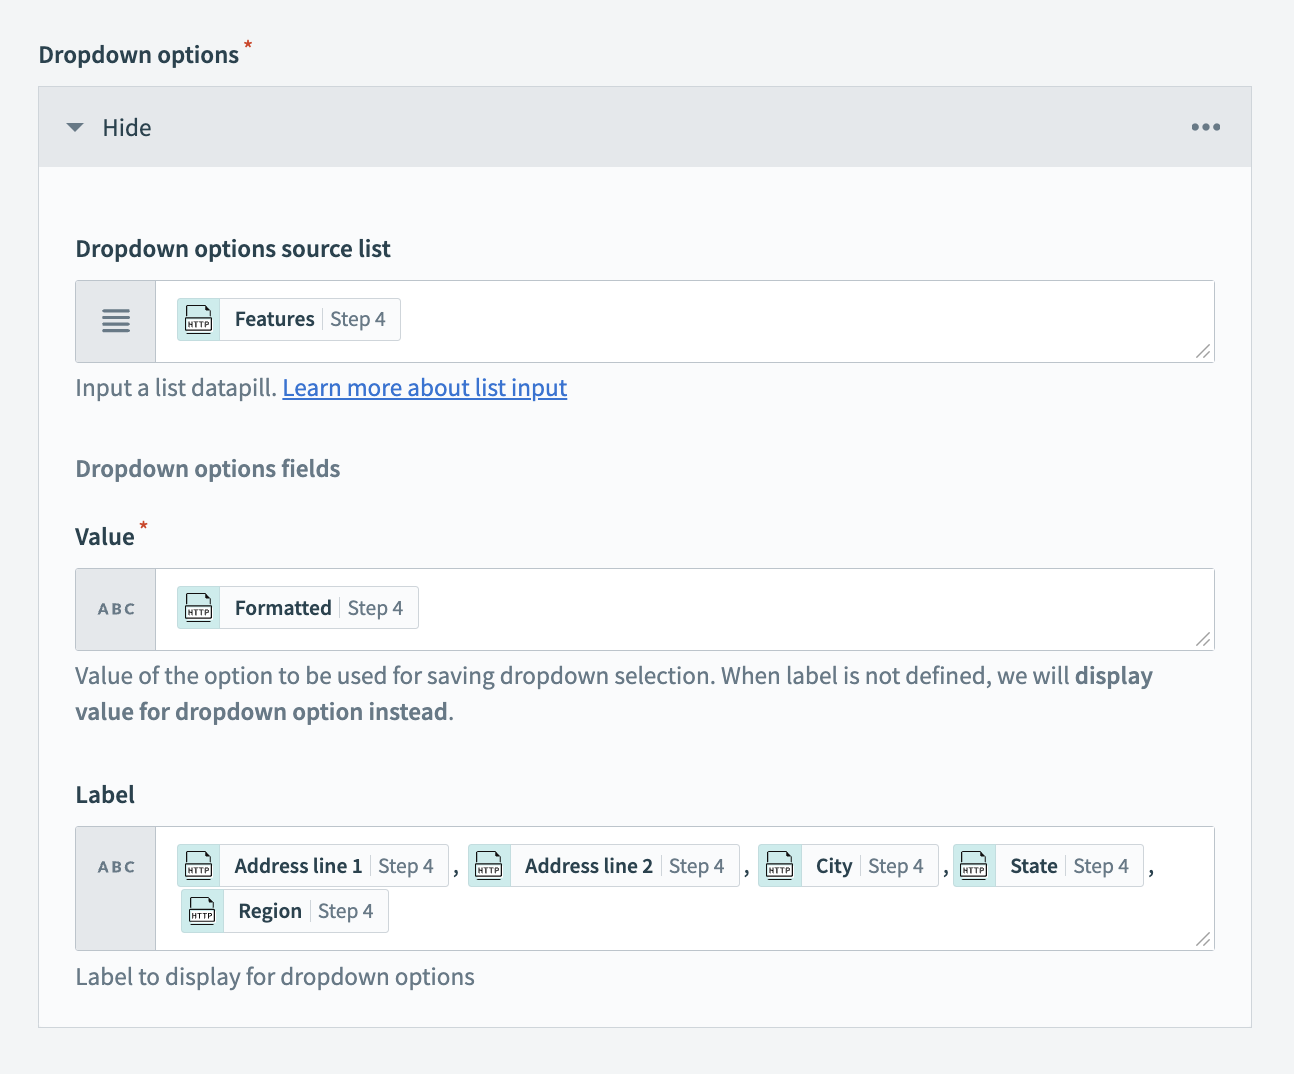
Configure the Return data to component action
In the Drop-down options source list field, map the FeaturesStep 4 datapill.
In the Value field, map the FeaturesStep 4 datapill.
In the Label field, map the Address line 1Step 4, Address line 2Step 4, CityStep 4, StateStep 4, and RegionStep 4 datapills.
 Map in datapills
Click + Add step to add an action. Select the Else action. If no results match the search query, this portion of the recipe returns an empty value to your drop-down.
Click Save, and Exit. Then, return to your page to finish setting up this component.
Save the Selected value and Selected label (Value and Label, respectively) to data columns. Saving the Selected value is required, as Workato uses this value in your recipes. Saving the Selected label is optional.
Save value and label to data columns
View and test your page in the Workflow apps portal.
Limitations
Not all recipes can serve as a data source for drop-down components. Workflow apps support recipes as a data source if the recipe's total run time is ten seconds or less. This means this feature isn't compatible with recipes that use long-running actions. This limit prevents timeouts in your Workflow apps pages.
Additionally, during the limited access release, this feature is subject to the following limitations:
Workflow apps displays recipes for the project in which the app exists only. If you plan to use recipes from a separate project, you must move them into the same project as your app.
Workflow apps' preview mode does not support recipe drop-downs. This means that you must test recipe functionality in the Workflow apps portal itself.
Last updated: