Connector building - Defining schema for your objects
In this next section, we go through our current thoughts on how to organize your connector. With this methodology and proper planning, you’ll find it easy to add support for new objects in your connector whilst keeping your code DRY through the use of our object definitions and methods fields. These are all guidelines from learnings that integration developers at Workato have learned over time and may alter slightly based on the application and API that we connect to.
This assumes you have already read all previous documentation about the functionality of the Workato SDK including advanced topics and have already defined and established a connection to the target application. In case you haven’t done so, we highly recommend you do so.
DATA FORMATS
The following examples assume you're connecting to an API that accepts JSON. However, the same approach can be applied to APIs that accept other data formats.
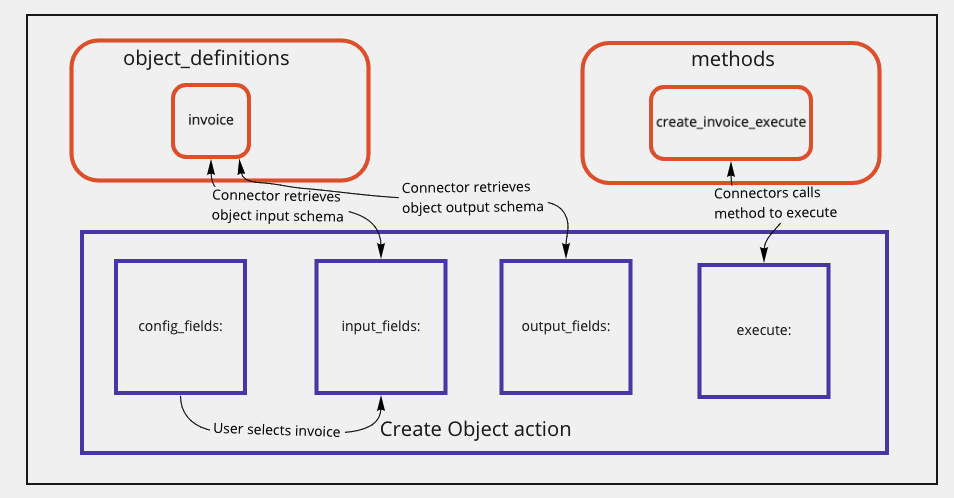
Before going into specifics, here is a high-level overview of connector code could be organized.
Our main objective is to allow users of the connector to allow them to first select from a series of actions or triggers like:
- New/updated object
- New object
- Create object
- Update object
- Search objects
- Delete object
This would be followed by the user selecting the object in the action or trigger configuration. After the user selects the object, the connector should fetch and display the input and output fields relevant to the object selected. This is by calling the appropriate object_definition based on the user's input to your config_fields. The user's input to your config_field can be found in the arguments passed to the input_fields lambda function.
For the execute block, we advise using a single method dedicated for each verb-object pair. This helps to ensure that any pre-processing of input data and post-processing of response data specific to that verb-object action can have a dedicated section in your code. Any general data formatting such as after_error_response or after_response methods can be contained directly in the execute block.
Ultimately, this helps to separate the responsibilities of each verb action and the objects it can support, allowing you to add support for new objects quickly or verb actions for existing objects.
Defining the schema of objects
Before writing the code for any actions or triggers, a good practice is to explore the API documentation. Often we find that the payloads expected in requests and responses dealing with a specific object have very similar structures.
This creates great synergy for code reuse as the same schema definition could potentially be used across various actions. For example, in the case of XYZ accounting, the same invoice schema definition could be used for “Create”, “Read”, “Update”, “Delete” and “Search” actions. Below, we will go through how various patterns in defining schema and where to place it in your connector code so that it can be easily referenced.
The schema for input and output fields can be determined both dynamically and statically in Workato. Find out more about object definitions. This largely depends on whether the API you are building a connector to has metadata endpoints available. Below, we first go through examples of how to define schema manually through examples before showing you an example of a dynamically defined input schema.
SCHEMA DEFINITION
A schema definition configures the properties of an object. The properties are rendered as input fields when used in input_fields and as output datapills in follow-up actions when used in output_fields.
Consider using a collapsible section for these code blocks. The sheer length makes it difficult to navigate the document.
Example 1: Statically defined schema
As a developer building the connector to XYZ labs, the representation of an “Invoice” object in our application might look something like this:
  {
    "TxnDate": "2019-09-19",
    "ID": "1",
    "TotalAmt": 362.07,
    "Line": [
      {
        "Description": "Rock Fountain",
        "SalesItemLineDetail": {
          "Qty": 1,
          "UnitPrice": 275
        },
        "Line-Num": 1,
        "Amount": 275.0,
        "Id": "1"
      },
      {
        "Description": "Fountain Pump",
        "SalesItemLineDetail": {
          "Qty": 1,
          "UnitPrice": 12.75
        },
        "LineNum": 2,
        "Amount": 12.75,
        "Id": "2"
      }
    ],
    "DueDate": "2019-10-19",
    "DocNumber": "1037",
    "Deposit": 0,
    "Balance": 362.07,
    "CustomerRef": {
      "name": "Sonnenschein Family Store",
      "value": "24"
    },
    "BillEmail": {
      "Address": "[email protected]"
    },
    "BillAddr": {
      "Line1": "Russ Sonnenschein",
      "Long": "-122.1141681",
      "Lat": "37.4238562",
      "Id": "95"
    },
    "MetaData": {
      "CreateTime": "2014-09-19T13:16:17-07:00",
      "LastUpdatedTime": "2014-09-19T13:16:17-07:00"
    }
  }
While a create “Invoice” action may require a POST request similar to this:
  POST /invoice/create
  Content type:application/json

  {
    "Line": [
      {
        "Description": "Fountain straws",
        "SalesItemLineDetail": {
          "Qty": 100,
          "UnitPrice": 0.075,
        },
        "Line-Num": 1,
        "Amount": 7.50,
        "Id": "192 "
      },
    ],
    "CustomerRef": {
      "value": "1"
    }
  }
and an update “Invoice” action may require a POST similar to this:
  POST /invoice/update
  Content type:application/json

  {
    "ID": "1",
    "Line": [
      {
        "Description": "Fountain straws",
        "SalesItemLineDetail": {
          "Qty": 100,
          "UnitPrice": 0.075,
        },
        "Line-Num": 1,
        "Amount": 7.50,
        "Id": "192 "
      },
    ],
    "CustomerRef": {
      "value": "1"
    }
  }
As a general rule of thumb, when defining schema of an object in Workato, we want to be able to reuse as much of it as possible across different actions (such as create invoice and update invoice actions). As such, the schema we define should be a superset of all the possible parameters for this “Invoice” object. We should arrive at something like the following:
  object_definitions: {
    invoice: lambda do |connection, config_fields|
      [
        { name: "Id" },
        { name: "TxnDate" },
        { name: "TotalAmt", type: "number" },
        {
          name: "Line",
          type: "array",
          of: "object",
          properties: [
            { name: "Description" },
            {
              name: "SalesItemLineDetail",
              type: "object",
              properties: [
                { name: "Qty", type: "number" },
                { name: "UnitPrice", type: "number" }
              ]
            },
            { name: "Line-Num", type: "number" },
            { name: "Amount", type: "number" },
            { name: "Id" }
          ]
        },
        { name: "Due-Date" },
        { name: "Doc Number" },
        { name: "Deposit", type: "number" },
        { name: "Balance", type: "number" },
        {
          name: "CustomerRef",
          type: "object",
          properties: [
            { name: "name" }
            { name: "value" }
          ]
        },
        {
          name: "BillEmail",
          type: "object",
          properties: [
            { name: "Address" }
          ]
        },
        {
          name: "BillAddr",
          type: "object",
          properties: [
            { name: "Line1" },
            { name: "Lon" },
            { name: "Lat" },
            { name: "Id" }
          ]
        },
        {
          name: "MetaData",
          type: "object",
          properties: [
            { name: "CreateTime", type: "date_time" },
            { name: "LastUpdatedTime", type: "date_time" }
          ]
        }
      ]
    end
  }
This schema is contained inside an object_definition called invoice.
For example, since creating an invoice shouldn't allow users to define the ID in cases where invoice IDs are auto-generated by XYZ accounting, this can be easily stripped from the input schema later on.
Example 2: Dynamically defined schema
In most cases, we highly recommend using metadata endpoints whenever available to generate input and output fields instead of manually defining them. This reduces the number of enhancements you would need to make if the base object had new fields added and also allows you to add support for custom fields if the application supports it. For this example, we will be using HubSpot which has metadata endpoints that describe the properties of “Contact” objects over here.
In cases like these, we want to make a request to this endpoint and use the response to build the input and output schema in a format Workato understands. Below we have a sample response from HubSpot’s metadata endpoint which gives us an array of JSON objects, each representing a “Contact” property.
[
  {
    "name": "example_property_name",
    "label": "Example Property Name",
    "description": "Example Description of the property",
    "groupName": "contactinformation",
    "type": "string",
    "fieldType": "text",
    "options": [
      // if property is a drop-down, all options are detailed here
    ],
    "deleted": false,
    "displayOrder": -1,
    "readOnlyValue": false,
    "readOnlyDefinition": false,
    "hidden": false,
    "mutableDefinitionNotDeletable": false,
    "favorited": false,
    "favoritedOrder": -1,
    "calculated": false,
    "externalOptions": false,
    "displayMode": "current_value",
    "formField": true
  },
  // More properties below
]
Using this, we can define a method called contact_schema which takes in the same action_type argument as our earlier example on static definitions.
  object_definitions: {
    contact: lambda do |connection, config_fields|
      get('/properties/v1/contacts/properties').map do |property|
        field = {
          name: property['name'],
          label: property['label'],
          hint: property['description'],
          type: call('type_mapping', property['type']),
          control_type: call('control_type_mapping', property['fieldType'])
        }

        if %w[select multiselect].include?(field[:control_type])
          picklist = {
            pick_list: property['options'].
            map { |option| [option['label'], option['value']]  }
          }
          field = field.merge(picklist)
        end

        if %w[boolean select multiselect].include?(field[:control_type])
          togglefield = {
            toggle_hint: 'Select manually',
            toggle_field: {
              name: property['name'],
              label: property['label'],
              type: 'string',
              control_type: 'text',
              toggle_hint: 'Map datapill',
              hint: "Enter in a valid option"
            }
          }
          field = field.merge(togglefield)
        end

        field
      end
    end,
  },

methods: {
    type_mapping: lambda do |input|
      case input
      when 'datetime'
        'date_time'
      when 'number'
        'integer'
      when 'booleancheckbox'
        'boolean'
      when 'bool'
        'boolean'
      when 'enumeration'
        'string'
      else
        input
      end
    end,

    control_type_mapping: lambda do |input|
      case input
      when 'textarea'
        'text-area'
      when 'datetime'
        'date_time'
      when 'booleancheckbox'
        'checkbox'
      when 'bool'
        'checkbox'
      when 'enumeration'
        'select'
      when 'radio'
        'select'
      when 'checkbox'
        'multiselect'
      else
        input
      end
    end
  }
In this method, we take the response from HubSpot and for each property, we map its values to a defined parameter in Workato’s schema. We also created 2 service methods called type_mapping and control_type_mapping that are responsible for defining the mappings of HubSpot data types (defined as type and fieldType in HubSpot) to those in type and control_type in Workato respectively.
Another thing to note would be the introduction of picklists and toggle fields for control_types that support them. In general, we will highly recommend using picklists alongside with string toggle fields as this gives your end-users the ability to statically pick a value or map a datapill instead. More details on increasing usability can be found later on.
METADATA ENDPOINTS
Workato strongly recommends using metadata endpoints when building a connector to your own API. This is especially important for applications with custom fields, as metadata endpoints allow you to generate input fields that are specific to a user’s instance.
Building actions
Now that you've learned how to build schema for the base objects you've chosen, its time to start building your first actions using these methods you've just defined.
Last updated: