# How-to guides - Using Config fields
Occasionally, input/output fields depend on user input. For example, when input fields for an action depend on a user's input in the same action. Here, we introduce config_fields. It is an optional key available in both actions and triggers. It is a special type of input field that can be used to generate other dependent input/output fields.
TIP
Config fields keys can be used in both actions and triggers to introduce dynamicity to your connector.
# Sample connector - Chargebee
{
  title: "Chargebee",

  # More connector code here

  actions: {
    create_object: {
      title: "Create object",
      subtitle: "Create object in Chargebee",

      description: lambda do |input, picklist_label|
        "Create <span class='provider'>#{picklist_label['object'] || 'object'}</span> in <span class='provider'>Chargebee</span>"
      end,

      config_fields: [
        {
          name: "object",
          label: "Object",
          control_type: 'select',
          pick_list: "objects",
          optional: false
        }
      ],

      input_fields: lambda do |object_definitions, connection, config_fields|
        object = config_fields['object']

        object_definitions[object]
      end,

      execute: lambda do |connection, input|
        object = input.delete('object')

        # Route to the appropriate endpoint based on selected object
        endpoint = case object
        when 'customer'
          '/api/v2/customers'
        when 'subscription'
          '/api/v2/subscriptions'
        when 'plan'
          '/api/v2/plans'
        else
          raise "Unsupported object type: #{object}"
        end

        post(endpoint, input).
          request_format_www_form_urlencoded
      end,

      output_fields: lambda do |object_definitions, connection, config_fields|
        object = config_fields['object']

        object_definitions[object]
      end
    }
  },

  object_definitions: {
    customer: {
      fields: lambda do |connection, config_fields, object_definitions|
        get("/api/v2/customers", limit: 1).
          dig('list',0,'customer').
          map do |key, value|
            if value.is_a?(Integer)
              type = 'integer'
              control_type = 'number'
            else
              type = 'string'
              control_type = 'text'
            end

            {
              name: key,
              label: key.labelize,
              type: type,
              control_type: control_type,
              sticky: true
            }
          end
      end
    },

    subscription: {
      fields: lambda do |connection, config_fields, object_definitions|
        get("/api/v2/subscriptions", limit: 1).
          dig('list',0,'subscription').
          map do |key, value|
            if value.is_a?(Integer)
              type = 'integer'
              control_type = 'number'
            else
              type = 'string'
              control_type = 'text'
            end

            {
              name: key,
              label: key.labelize,
              type: type,
              control_type: control_type,
              sticky: true
            }
          end
      end
    },

    plan: {
      fields: lambda do |connection, config_fields, object_definitions|
        get("/api/v2/plans", limit: 1).
          dig('list',0,'plan').
          map do |key, value|
            if value.is_a?(Integer)
              type = 'integer'
              control_type = 'number'
            else
              type = 'string'
              control_type = 'text'
            end

            {
              name: key,
              label: key.labelize,
              type: type,
              control_type: control_type,
              sticky: true
            }
          end
      end
    }
  },

  pick_lists: {
    objects: lambda do
      [
        ["Subscription", "subscription"],
        ["Customer", "customer"],
        ["Plans", "plan"]
      ]
    end,
  }
}
# Step 1 - Action title, subtitle, description, and help
The first step to making a good action is to properly communicate what the actions does, how it does it and to provide additional help to users. To do so, Workato allows you to define the title, description, and provide hints for an action. Quite simply, the title is the title of an action and the subtitle provides further details of the action. The description of the action then contains specifications and explanation on what the action accomplishes and in the context of the application it connects to. Finally, the help segment provides users any additional information required to make the action work.
To know more about this step, take a look at our SDK reference
# Step 2 - Define config_fields
The config_fields key allows us to first collect some input from the end user to generate more input fields. In this action, we want the user to first select the object that they want to create, then use that input to generate fields relevant to the object they have just selected.
  config_fields: [
    {
      name: "object",
      label: "Object",
      control_type: 'select',
      pick_list: "objects",
      optional: false
    }
  ],
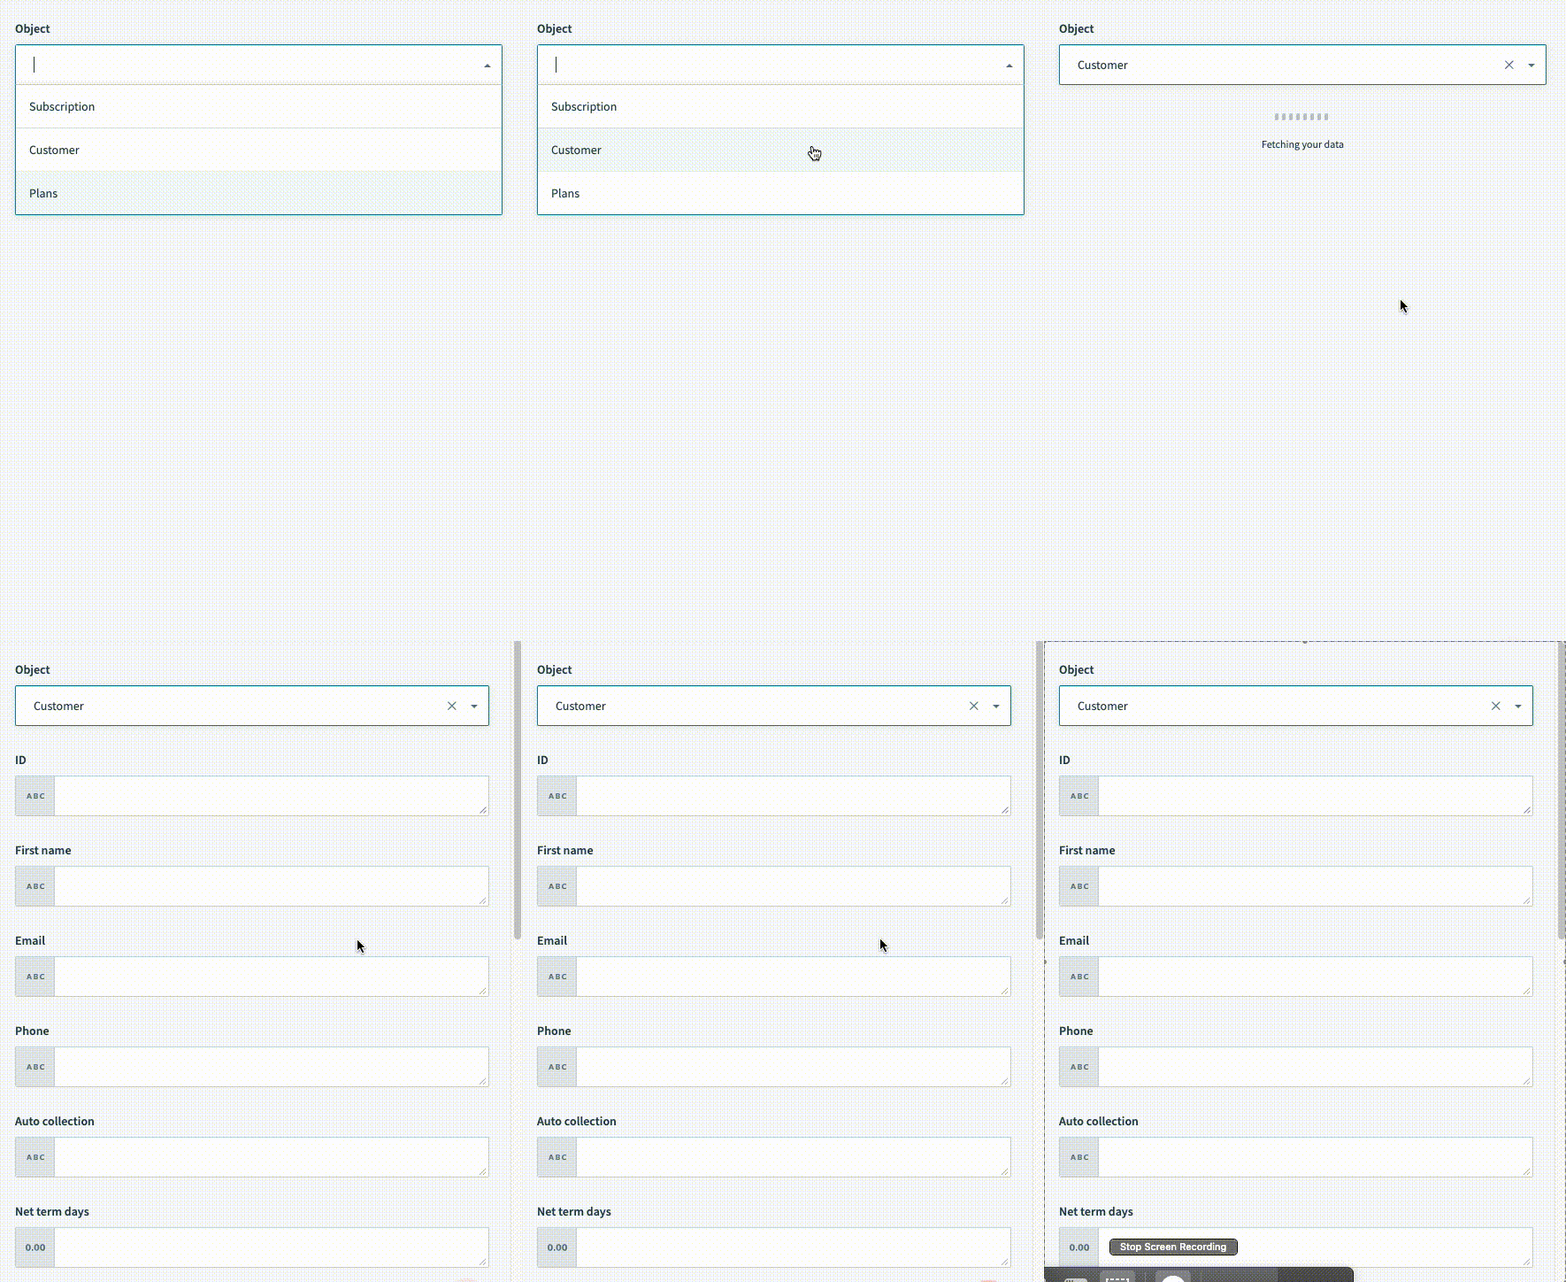
Here, we are using the select control_type which indicates a select drop-down input field. The valid options in this drop-down are from the objects picklist - Subscription, Customer and Plans.
Config fields look like input fields to the user
# Step 3 - Define input_fields
With config_fields defined, we can now utilize the config_fields argument passed to the input_fields lambda function. We can reference the input given for the Object input drop-down from this argument and route it to the proper object_definition.
  input_fields: lambda do |object_definitions, connection, config_fields|
    object = config_fields['object']

    object_definitions[object]
  end,
For example, if the user selects the Customer input in the drop-down, the input_fields key would call the object_definition['customer'].
  object_definitions: {
    customer: {
      fields: lambda do |connection, config_fields, object_definitions|
        get("/api/v2/customers", limit: 1).
          dig('list',0,'customer').
          map do |key, value|
            if value.is_a?(Integer)
              type = 'integer'
              control_type = 'number'
            else
              type = 'string'
              control_type = 'text'
            end

            {
              name: key,
              label: key.labelize,
              type: type,
              control_type: control_type,
              sticky: true
            }
          end
      end
    }
  },
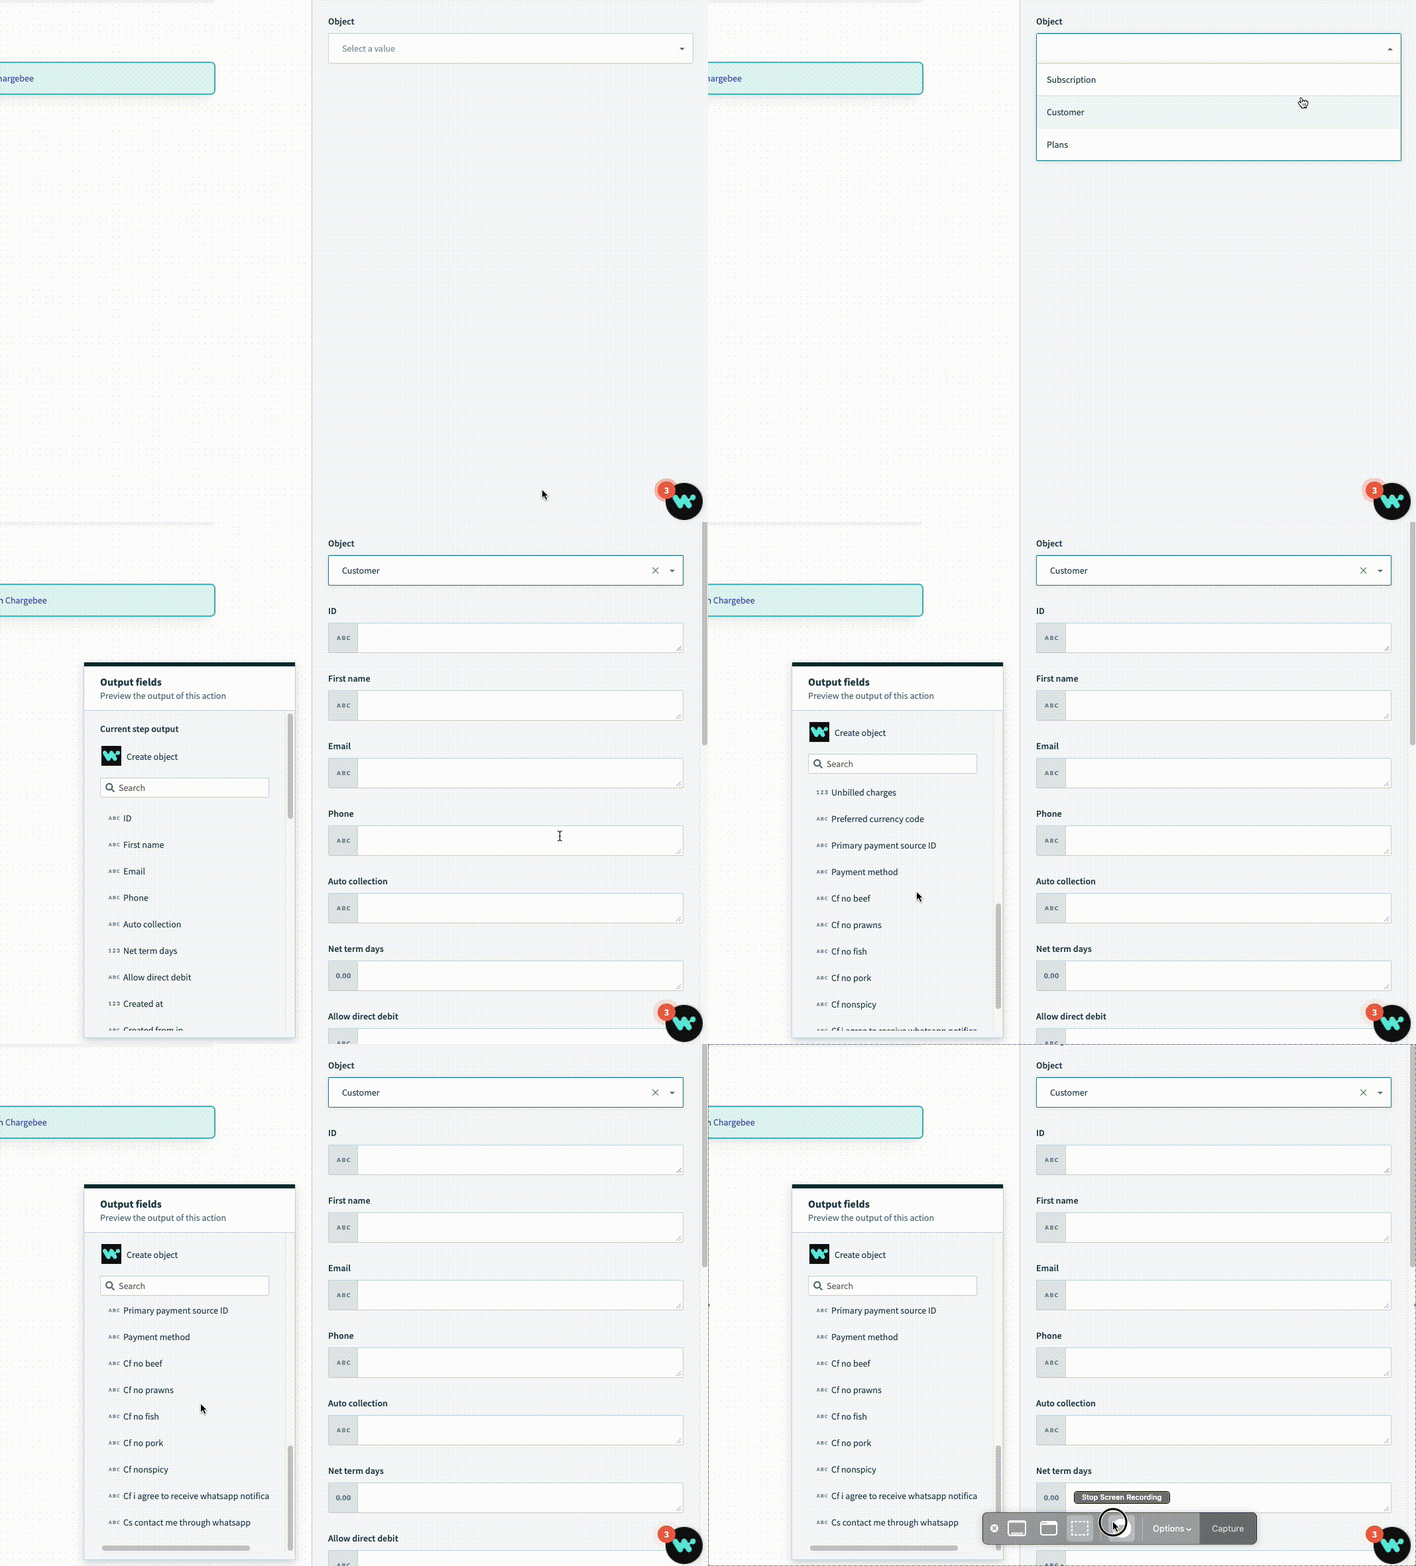
The object_definition['customer'] key sends a secondary request to Chargebee and transforms the response into Workato Schema.
 Selecting customers creates additional fields
# Step 4 - Defining the execute key
The execute key tells Workato the endpoint to send the request to and which HTTP request method to use. Different objects usually require posting to different endpoints. Extract the config field value from the input hash before you send the request to the API.
  execute: lambda do |connection, input|
    object = input.delete('object')

    # Route to the appropriate endpoint based on selected object
    endpoint = case object
    when 'customer'
      '/api/v2/customers'
    when 'subscription'
      '/api/v2/subscriptions'
    when 'plan'
      '/api/v2/plans'
    else
      raise "Unsupported object type: #{object}"
    end

    post(endpoint, input).
      request_format_www_form_urlencoded
  end,
In this example:
- We extract the selected object using
input.delete('object'), which returns the value and removes it from the input hash - We use a
casestatement to map each object type to its corresponding API endpoint - We construct the appropriate POST request to the endpoint for the selected object
- Chargebee requires the input to be form urlencoded so we use
.request_format_www_form_urlencoded
USE STRING INTERPOLATION TO SIMPLIFY ROUTING
You can simplify routing with string interpolation when your API endpoints follow a consistent pattern (such as /api/v2/{object}s):
execute: lambda do |connection, input|
  object = input.delete('object')

  post("/api/v2/#{object}s", input).
    request_format_www_form_urlencoded
end,
Use the explicit case statement approach shown in the preceding example when endpoint paths vary or require additional logic.
# Step 5 - Defining output fields
For the output fields, we use the same logic as step 3 to generate the output fields.
  output_fields: lambda do |object_definitions, connection, config_fields|
    object = config_fields['object']

    object_definitions[object]
  end
 Selecting customers creates additional fields
Object definitions
Note that object_definitions is passed in as an argument. Workato allows connector builders to supply the definitions of an object separately in the "object_definitions" key. This key is used when the definitions of an object are large and/or can be dynamically obtained.
To know more about this, take a look at our SDK reference
Last updated: 1/14/2026, 10:11:21 PM