Testing recipes
Workato's integrated recipe testing environment allows you to test your recipe before starting it. Testing ensures that your automation's works correctly and processes data accurately, helping you avoid extensive clean-up later.
Basics
- What is a test job?
- What is test mode?
- What trigger data is used to run test jobs?
- What's the best way to use test mode?
- How do I view all test jobs?
- Can I repeat a test job?
What is a test job?
A test job is executed in Workato's recipe testing environment, known as Test mode. During a test job, Workato uses new trigger data from the trigger application to test the steps in your recipe that have not been skipped.
What is test mode?
Test mode picks up a single trigger event and proceeds through all unskipped actions in the recipe. When finished, the test job is logged in the recipe's job history, and its details will be available for your review.
 Running a test job
What trigger data is used to run test jobs?
The trigger event used to run a test job depends on the trigger type:
Polling triggers
Polling triggers check for new events by periodically querying the connected app. The trigger event used for a test job depends on the trigger's When first started, this recipe should pick up events from date. Learn more about polling triggers.
Real-time triggers
Real-time triggers receive events as they occur. Workato uses the first event received by the trigger to execute the test job. For instance, if you use a webhook, create an event in the source application to send a notification to the recipe trigger. Learn more about real-time triggers.
Recipe function triggers
For recipe function triggers, you provide the trigger event data. For example, if your trigger requires a
user_idvalue as input, you must provide a sampleuser_idvalue to run a test job. Refer to the Manually testing triggers section for more information.
What's the best way to use test mode?
Use the following best practices when testing your recipes:
Use sandboxes instead of production accounts: Test your recipes in sandbox environments rather than production accounts. This approach allows you to work with realistic data without risking changes to mission-critical production data.
Build and test incrementally: Construct your recipe in small, logical segments and test at each stage. This practice ensures the recipe flow is coherent, and datapills are correctly mapped. It also simplifies debugging.
BUILD YOUR RECIPES INCREMENTALLY WITH SKIP STEP
The Skip step feature allows you to ignore steps when running a recipe. Skipping steps can be useful when you’re building a recipe and only want to test a part of it.
Learn more about how to use skip step.
Build and test for all possible scenarios: Recipes can contain multiple paths based on conditional logic. Testing allows you to check that all conditions in your recipe are present and correct.
Test all mapped data: To ensure that data is processed correctly, test all data fields and mappings thoroughly.
For example, if you are transferring
Account Name,Account Description, andAccount Phonefrom Salesforce to Zendesk, verify the following during testing:- The fields in Salesforce contain valid data.
- The input fields in Zendesk receive the correct values.
- Unexpected or missing values are handled appropriately, if necessary.
How do I view test jobs?
To view test jobs from test mode, click the job time drop-down in the job results section. In the menu that displays, click See all test jobs:
 View all past test jobs
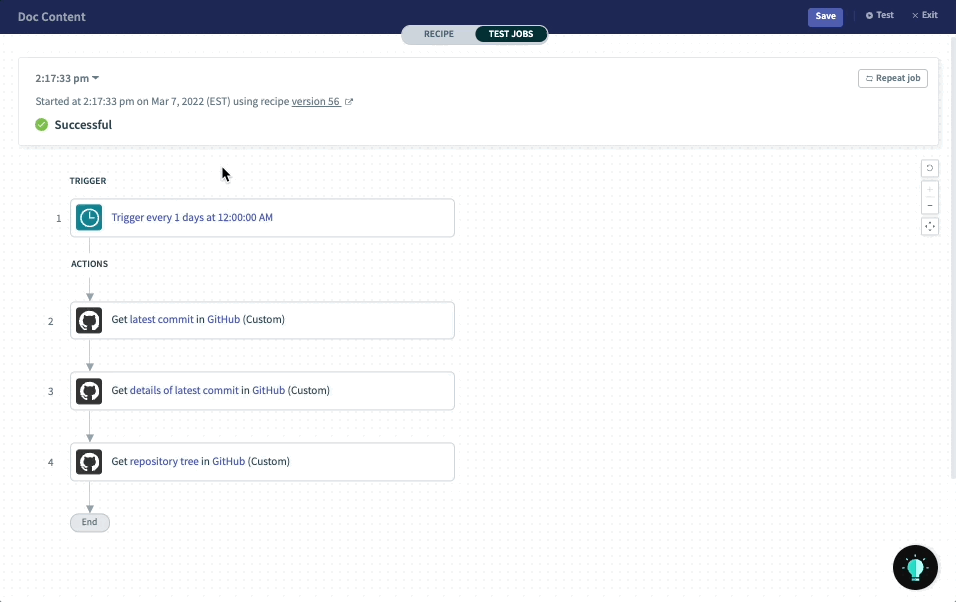
Click on individual jobs in the job report table to open the job. Once opened, you can view details for each step or repeat the job.
Can I repeat a test job?
Yes. Repeated jobs re-use the original job's trigger data but run on the latest recipe version.
To repeat a job from test mode, click Repeat job in the job results section:
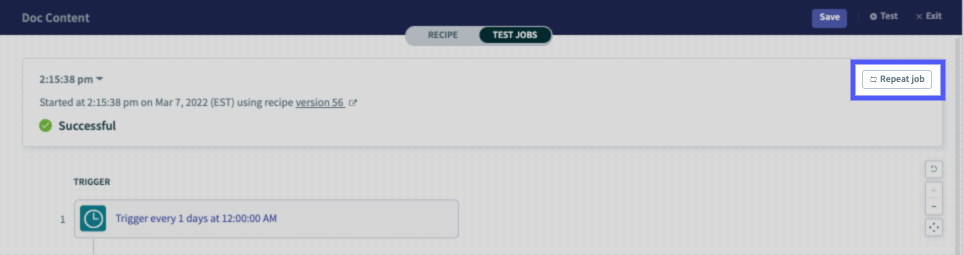 Highlighted Repeat job button in test mode
When a job has been repeated, a second drop-down containing the repeat jobs will display next to the job time in the job results section:
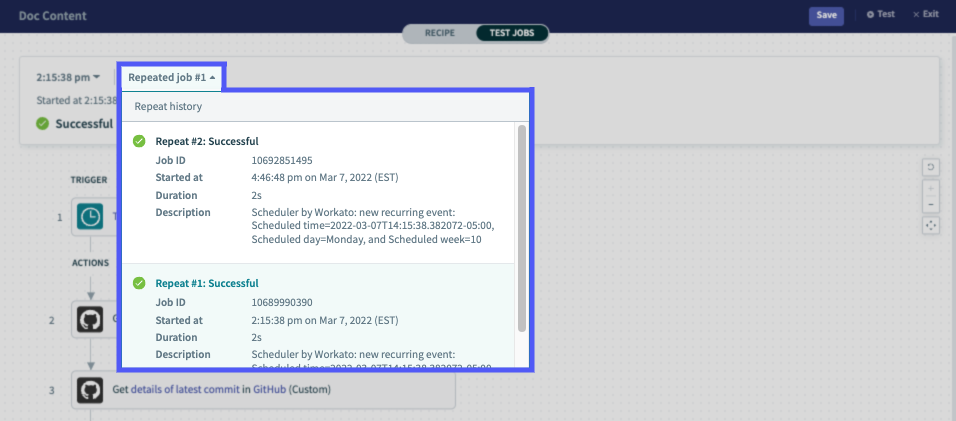 Repeat job menu and history
Click on individual jobs in the drop-down to open the job. Once opened, you can view details for each step or repeat the job.
Limitations
When using test mode for your recipes, consider the following:
Not all trigger types are supported: The following trigger types can't be used in test mode:
- Scheduled connector triggers, such as the Salesforce - Scheduled record search using SOQL trigger
- Workbot commands
Some trigger types require manual configuration to test: Recipe function triggers require you to supply test data to run tests. Refer to the Manually testing triggers section for more information.
Some trigger configurations can't be modified once the recipe has been tested or started: If a trigger requires a When first started, this recipe should pick up events from date, for example, you can't change the date after a recipe has been tested or started.
Running test jobs
In Workato, there are two ways you can kick off a test job:
IS YOUR RECIPE TEST-READY?
Running a test job requires the following:
- A fully configured trigger
- Valid data mappings
- Valid connections
Workato will check that your recipe meets these requirements when you click Test. If there's an issue, you'll be prompted to address it.
Testing triggers
In your Workato account, open a recipe in Edit mode.
In the recipe editor, click Test.
After you click Test, Workato will:
- Check that required fields are populated
- Validate data mappings, if applicable
- Validate connections, if applicable
If the data checks are successful, Workato will begin the test job. The test results will display when the job completes.
Manually testing triggers
Complete the following steps to manually test your trigger:
APPLICABLE TO SELECT CONNECTORS
This section applies to Recipe functions.
Sign in to Workato and open a Recipe function in Edit mode.
Click Test. The Add trigger data window will display.
Provide the data Workato should use to invoke the test job. There are two ways to provide the data:
Form fields view
The Form fields view displays a form with each field configured in the trigger's input. To use it, click Change view > Form fields view.
Enter values for the trigger input fields. Note: Only plaintext and static lists are allowed.
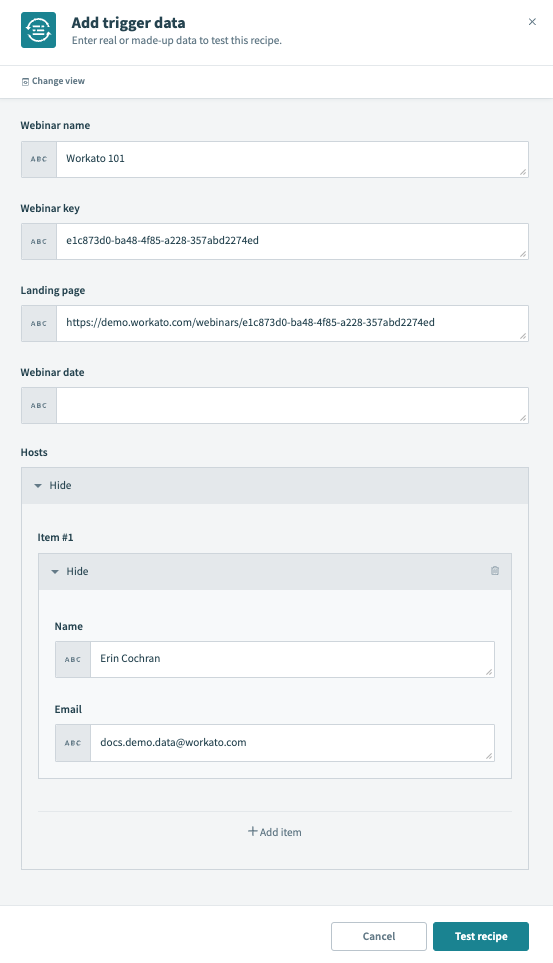 Configure manual trigger form fields view
Raw JSON
The Raw JSON view accepts a valid JSON object containing the trigger's input fields. To use it, click Change view > Raw JSON view.
Enter values for the trigger input fields, which are the fields in the parameters object:
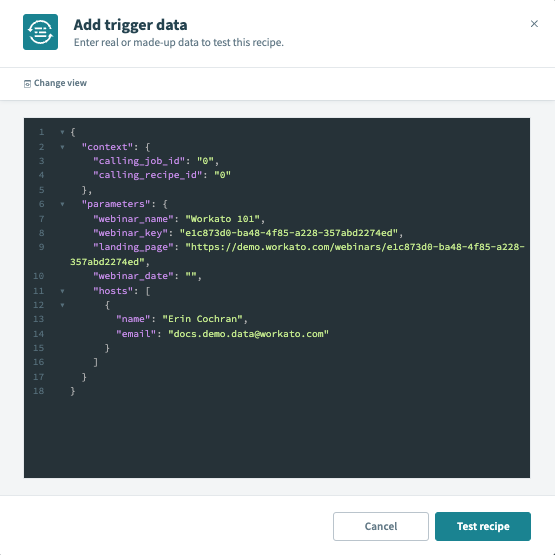 Configure manual trigger raw JSON view
Along with the input fields (parameters), the JSON view includes a context object. The context object is prefilled with sample output of the calling recipe and job IDs (0), but can be overwritten.
Note: The data in this window will be lost if you refresh or navigate away from the current recipe page.
Click Test recipe.
After the manual trigger test data is submitted, Workato will:
- Check that required fields are populated
- Validate JSON syntax, if JSON was provided
If the data checks are successful, Workato will begin the test job. The test results will display when the job completes.
Using test results
After the test job completes, the test results will display. Test jobs can result in one of the following:
Successful jobs
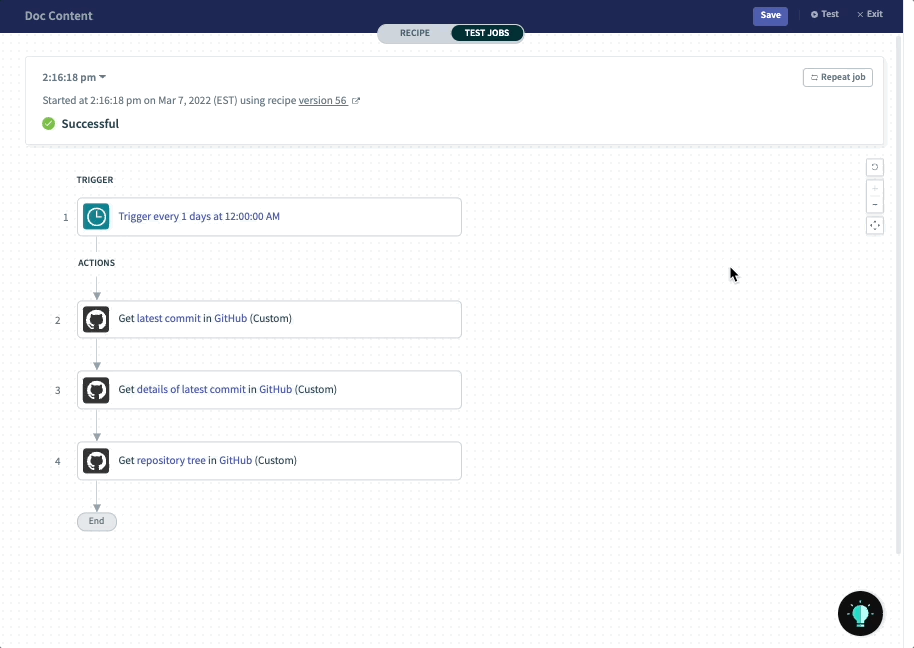
Successful jobs include the recipe path, input, and output:
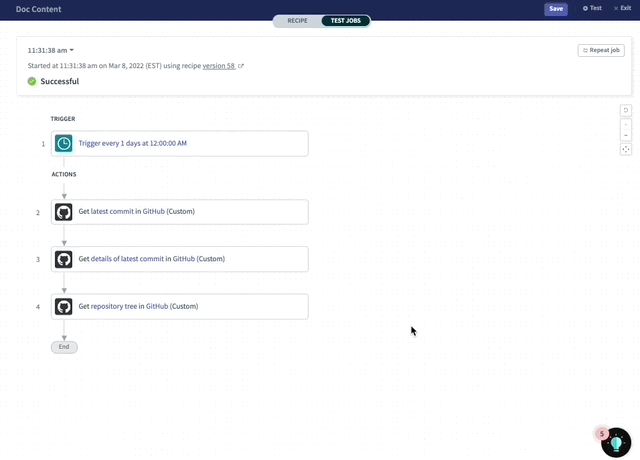 Viewing a successful test job
Failed jobs
Failed jobs include the recipe path, input, output, and debugging information.
Additionally, Workato will highlight the step at which the error occurred. Click the step view details about the issue, including a description of the error:
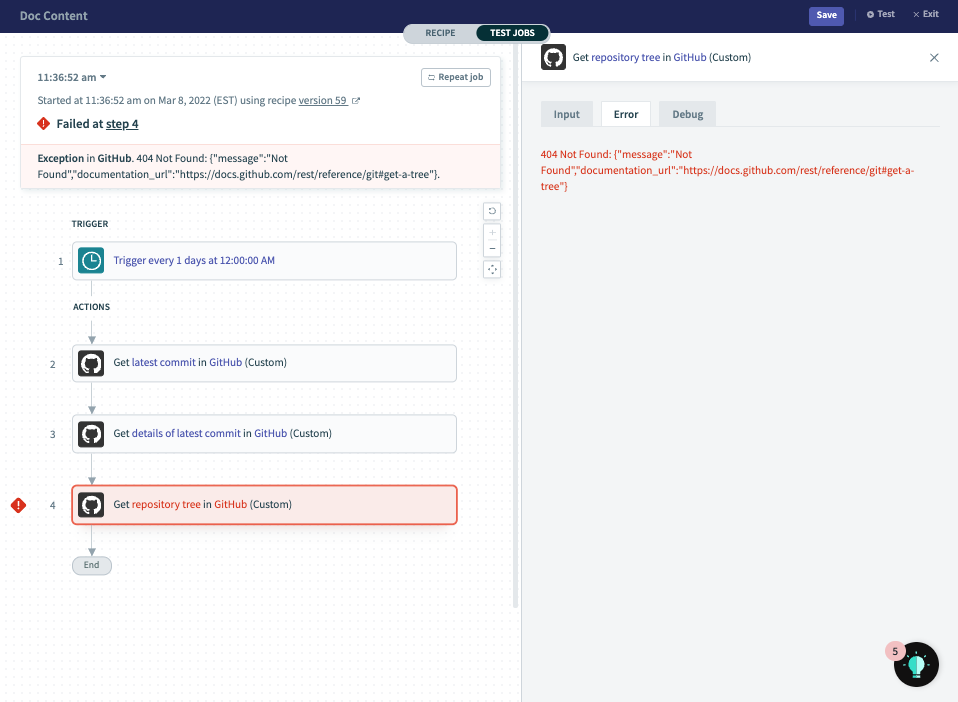 Viewing a failed job
Fix the errors in build mode before repeating the job or running a new test.
No jobs found
If the test job doesn't find a trigger event, the test job may continue to run until you cancel it.
When trigger events aren't found, we recommend:
Checking the trigger's configuration. Some triggers allow you to specify the date from which records are picked up. Verify that this field is correctly configured:
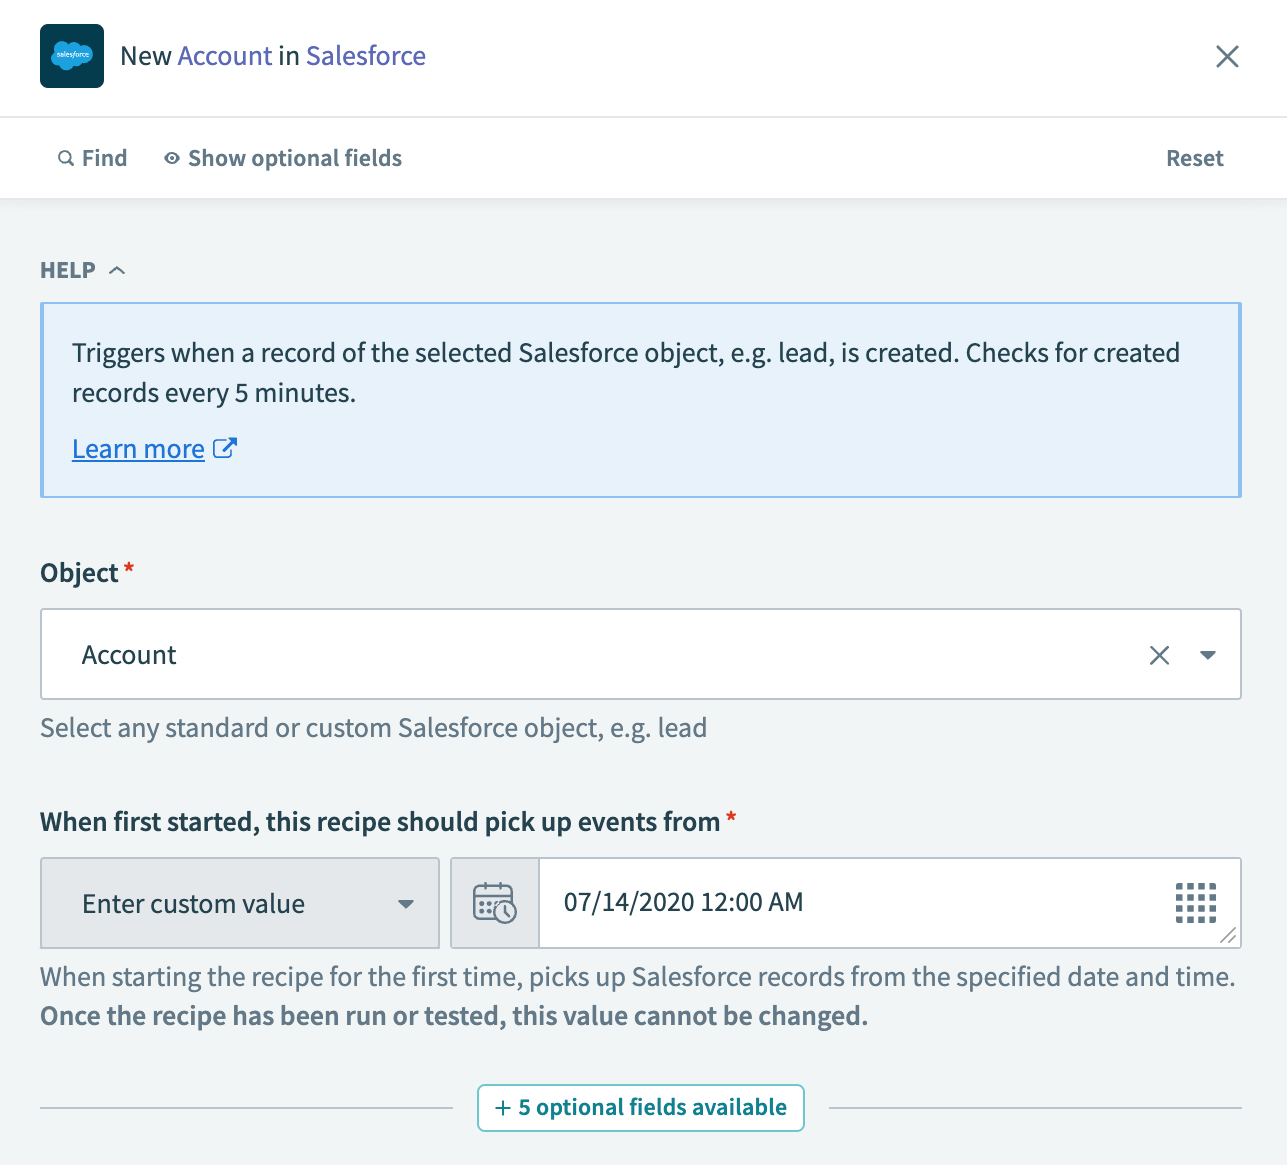 Defined since date for a Salesforce object trigger
Creating or updating a record in the trigger app and testing again. The recipe should pick up the trigger event if the trigger is configured correctly.
In the above example, the recipe is configured to pick up Salesforce accounts created or updated on or after July 14, 2020 00:00:00. If we create or update a Salesforce account now, the test job should detect the event.
Creating a copy of the recipe and setting the trigger to an earlier date. This approach allows you to try testing with another date where you know a trigger event will be available.
If, for example, you know a Salesforce account was created on May 31, 2020, set the trigger date in the copied recipe to before this date. This guarantees that at least one trigger event is available to test the recipe.
Canceling test jobs
Cancel an in-progress test job by clicking Stop test (top right corner) or the Cancel job button:
 Canceling a test job
Last updated: