Shopify
Shopify is an e-commerce platform that allows businesses to create online stores and sell products.
API version
The Shopify connector uses the Shopify REST Admin API version 2026-01 and the Shopify GraphQL Admin API version 2026-01. You can monitor the availability of the API and other services through the Shopify Status page. Refer to Shopify Status for more information.
HOW DOES SHOPIFY HANDLE ITS API VERSION UPGRADES?
Shopify generally releases a new version every three months, and maintains each release version for a maximum of twelve months. There are four stable versions supported at any point in time.
After one year, Shopify stops maintaining released versions. API calls to unsupported versions are automatically routed to the oldest currently supported stable version.
For instance, if the current available stable versions are 2025-07, 2025-10, 2026-01, and 2026-04, then any API calls requesting for 2025-04 version are automatically routed to the 2025-07 version by Shopify.
Refer to the Shopify API versioning documentation for more information.
Connection setup
The Shopify connector supports the following authentication types:
You must have a Shopify Partner account to connect to Shopify in Workato. Refer to the Shopify Create an account documentation for more information.
OAuth 2.0 authentication
You must create an OAuth profile to use OAuth 2.0 authentication. Refer to Create an OAuth profile for more information.
Minimum and default scopes
Workato requests the following scopes by default when setting up a connection to Shopify:
read_customerswrite_customersread_inventorywrite_inventoryread_productswrite_productsread_orderswrite_ordersread_draft_orderswrite_draft_orders
You can grant Workato access to the following scopes in addition to the default scopes:
write_reportsread_reportswrite_payment_termsread_payment_termsread_product_listingsread_assigned_fulfillment_orderswrite_assigned_fulfillment_ordersread_merchant_managed_fulfillment_orderswrite_merchant_managed_fulfillment_ordersread_third_party_fulfillment_orderswrite_third_party_fulfillment_ordersread_all_orders
The minimum scope required to establish a connection is read_products.
Shopify setup for OAuth 2.0 authentication
Refer to the following sections to create an OAuth profile and connect to Shopify using OAuth 2.0 authentication:
Create an OAuth profile
Workato requires a custom OAuth profile to connect to Shopify using OAuth 2.0. Complete the following steps to create a custom OAuth 2.0 profile:
Sign in to the Shopify Dev Dashboard with a Partner account.
Click Create app.
Enter a name for your app in the Start from Dev Dashboard section, then click Create.
Enter the following URL in the App URL field:
https://www.workato.comEnter the following URL in the Redirect URLs field:
https://www.workato.com/oauth/callbackGo to Settings.
Copy and save the Client ID and Secret for use in Workato.
Go to Your app name.
Click Install app.
 Click Install app.
Select the store where you plan to install the app, then click Install.
Open Workato and go to Tools > Custom OAuth profiles.
Click + New custom profile.
Search for Shopify and select it as your app.
Enter a Name for the account.
Click Create new app.
Enter the Client ID and Client secret from Shopify.
Click Done.
The custom OAuth profile is successfully configured. Refer to Connect to Shopify with OAuth 2.0 authentication to perform the remaining connection steps or to the Shopify OAuth apps documentation for more information.
Version 2022-10 and later releases require published public custom apps to satisfy Shopify's data protection policy to process customer data. Refer to the Shopify Requirements documentation for more information. You must have approval to access customer protected data if you are connecting through a published public custom app. Refer to the Shopify Request access to protected customer data documentation for more information.
This requirement doesn't apply if you connect through custom apps using access token authentication or unpublished custom apps. Refer to Access token authentication for more information.
Connect to Shopify with OAuth 2.0 authentication
Complete the following steps to set up an OAuth 2.0 connection to Shopify in Workato:
Click Create > Connection or press C twice.
Search for Shopify and select it as your app.
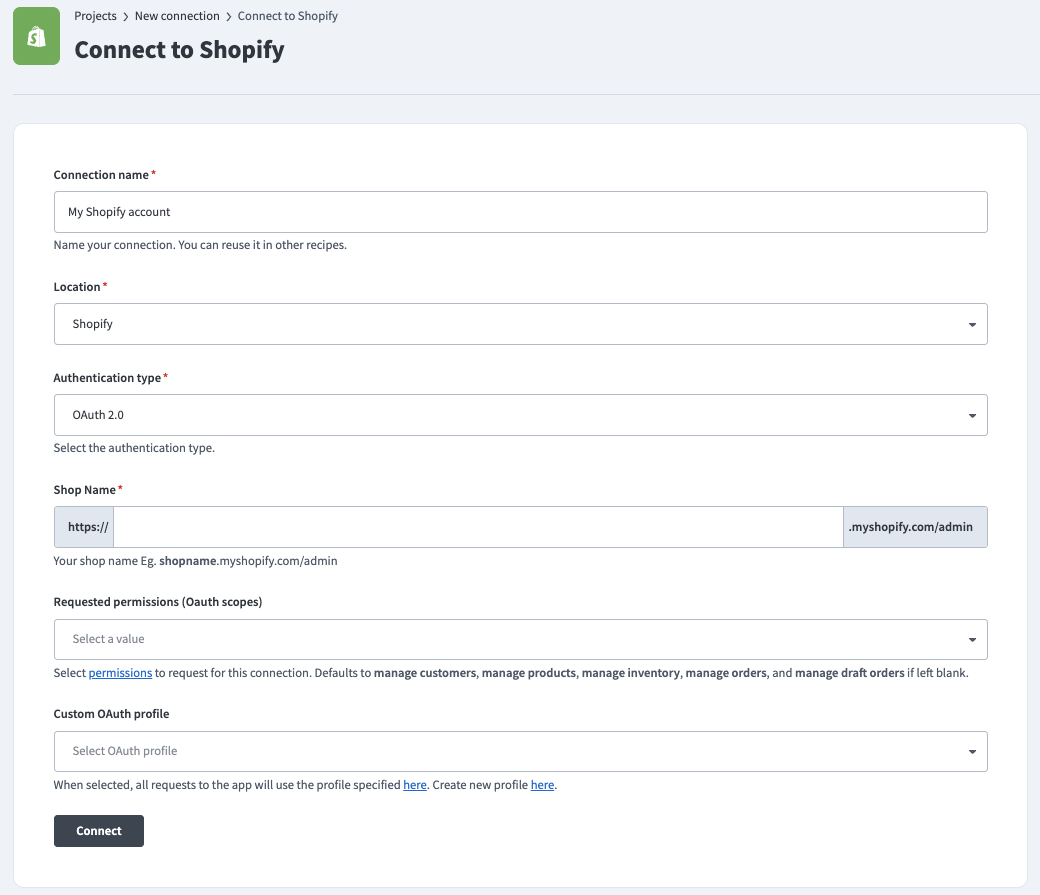
Enter a name for your connection in the Connection name field.
 Shopify Connection
Use the Location drop-down menu to select the project where you plan to store the connection.
Use the Authentication type drop-down menu to select OAuth 2.0.
Enter the Shop Name. You can find this value in the URL for your Shopify account. For example, the shop name is shopname if the URL is shopname.myshopify.com/admin.
Optional. Use the Requested permissions (OAuth scopes) drop-down menu to select the permissions to request for this connection. Refer to the Minimum and default scopes section for more information.
Select the Custom OAuth profile to use for the connection. Refer to Create an OAuth profile for more information.
Click Connect and sign in to Shopify if prompted.
Click Install to complete the connection.
Access token authentication
You must complete the following steps to use access token authentication:
Shopify setup for access token authentication
Refer to the following sections to create a Shopify integration app, an OAuth profile, and connect to Shopify using access token authentication:
Create a Shopify integration app
Complete the following steps to create a custom Shopify integration app:
Sign in to the Shopify Admin page with a Partner account.
Go to Settings > Apps.
Click Develop apps.
Click Build apps in Dev Dashboard.
Click Create app.
Enter an App name and click Create app.
Enter the following URL in the App URL field:
https://www.workato.comClick Select scopes and select the scopes to provide Workato.
Access token authentication requires at least the read_products permission to successfully connect Workato to Shopify.
The recommended set of scopes are:
read_customerswrite_customersread_inventorywrite_inventoryread_productswrite_productsread_orderswrite_ordersread_draft_orderswrite_draft_orders
Click Done.
Enter the following URL in the Redirect URLs field:
https://www.workato.com/oauth/callbackClick Release.
Optional. Enter a Version name and Version message.
Click Release.
Go to Settings.
Copy and save the Client ID and Secret for use in Workato.
Go to Your app name.
Click Install app.
Click Install app
Select the store where you plan to install the app, then click Install.
Use the client credentials grant flow to programmatically request an access token. Refer to the Shopify Using the client credentials grant documentation for more information.
The custom app is successfully configured in Shopify. Refer to the Shopify Apps for your Shopify store documentation for more information.
Optional. Refer to Create an OAuth profile to manage permissions and credentials using a custom profile.
Create an OAuth profile
Optionally, complete the following steps to create a custom OAuth profile that manages permissions and credentials for your connection:
Open Workato and go to Tools > Custom OAuth profiles.
Click + New custom profile.
Search for Shopify and select it as your app.
Enter a Name for the account.
Click Create new app.
Enter the Client ID and Client secret from Shopify.
Click Done.
Connect to Shopify with access token authentication
Complete the following steps to set up an access token authentication connection to Shopify in Workato:
Click Create > Connection or press C twice.
Search for Shopify and select it as your app.
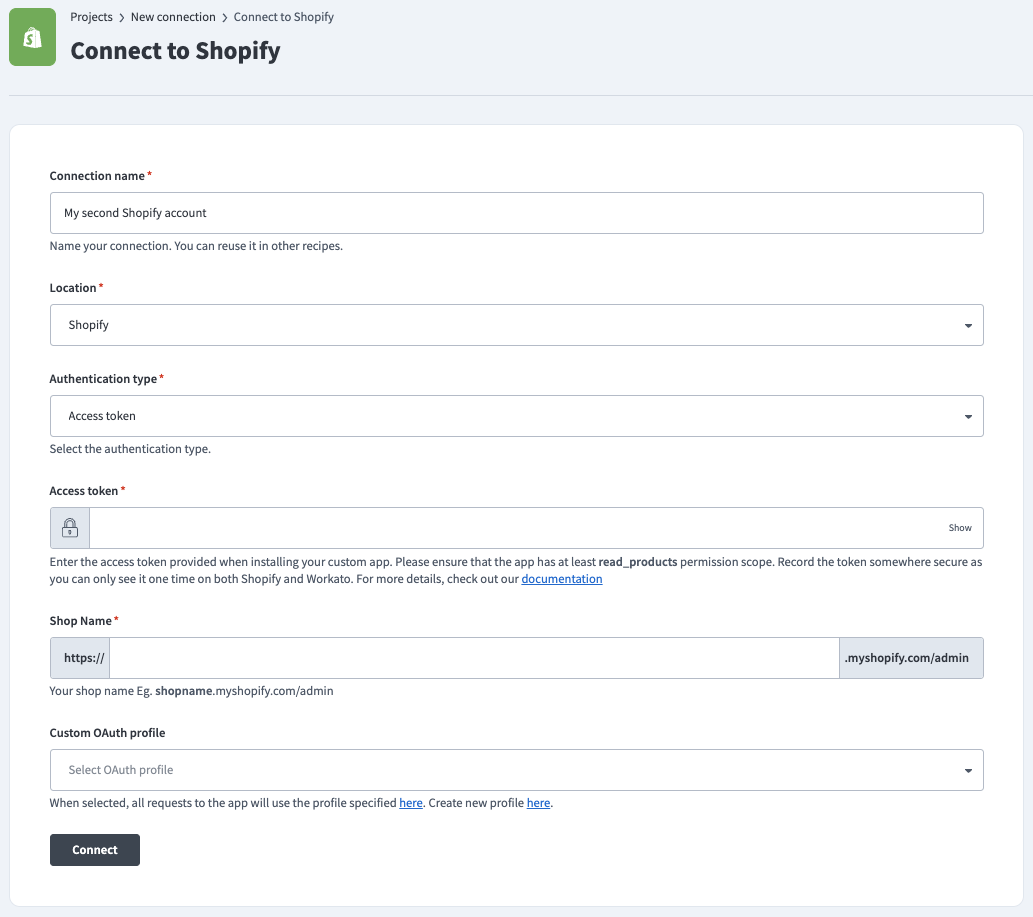
Enter a name for your connection in the Connection name field.
 Shopify Connection
Use the Location drop-down menu to select the project where you plan to store the connection.
Use the Authentication type drop-down menu to select Access token.
Enter the Access token from Shopify.
Enter the Shop Name. You can find this value in the URL for your Shopify account. For example, if the URL is shopname.myshopify.com/admin, the shop name is shopname.
Optional. Select the Custom OAuth profile to use for the connection. Refer to Create an OAuth profile for more information.
Click Connect.
Last updated: