How-to guides - JSON web token authentication
JSON Web Token(JWT) is an Internet standard for creating data with optional signature and/or optional encryption whose payload holds JSON that asserts some number of claims.
In authentication, JWTS are signed either using a private or public key. For example, a server could generate a token that has the claim "logged in as admin" and provide that to a client. The client could then use that token to prove that it is logged in as admin. The authorized client can then pull information that admins are cleared to access.
JWTs are designed to be compact, URL-safe, and usable especially in a web-browser single-sign-on (SSO) context.
Refer to the JWT Introduction for more information on JSON web tokens.
Sample connector - Google calendar connector
{
  title: 'My Google calendar connector',

  connection: {
    fields: [
      {
        name: 'iss',
        label: 'Issuer',
        optional: false,
        hint: 'The email address of the service account'
      },
      {
        name: 'sub',
        label: 'Email address',
        optional: false,
        hint: 'Email address of the user that you are impersonating'
      },
      {
        name: 'private_key',
        optional: false,
        hint: 'Copy and paste the private key that came from the downloaded json.<br>' \
          "Click <a href='https://developers.google.com/identity/protocols/oauth2/service-account/' " \
          "target='_blank'>here</a> to learn more about Google Service Accounts.",
        control_type: 'password',
        multiline: true
      }
    ],

    authorization: {
      type: 'custom_auth',

      acquire: lambda do |connection|
        jwt_body_claim = {
          "iat": now.to_i,
          "exp": 1.hour.from_now.to_i,
          "aud": 'https://oauth2.googleapis.com/token',
          "iss": connection['iss'],
          "sub": connection['sub'],
          "scope": 'https://www.googleapis.com/auth/calendar'
        }
        private_key = connection['private_key'].gsub(/\\n/, "\n")
        jwt_token = workato.jwt_encode(
          jwt_body_claim,
          private_key,
          "RS256"
        )

        post('https://oauth2.googleapis.com/token').
          payload(grant_type: 'urn:ietf:params:oauth:grant-type:jwt-bearer',
            assertion: jwt_token).
          request_format_www_form_urlencoded
      end,

      apply: lambda do |connection|
        headers("Authorization": "Bearer #{connection['access_token']}")
      end,

      refresh_on: [401, 403]
    },

    base_uri: lambda do |connection|
      'https://www.googleapis.com/calendar/v3'
    end
  },

  test: lambda do |connection|
    get('/colors')
  end,

  # More connector code here
}- Refer to the full Google Calendar connector code for a complete example.
- Check out the Google calendar API
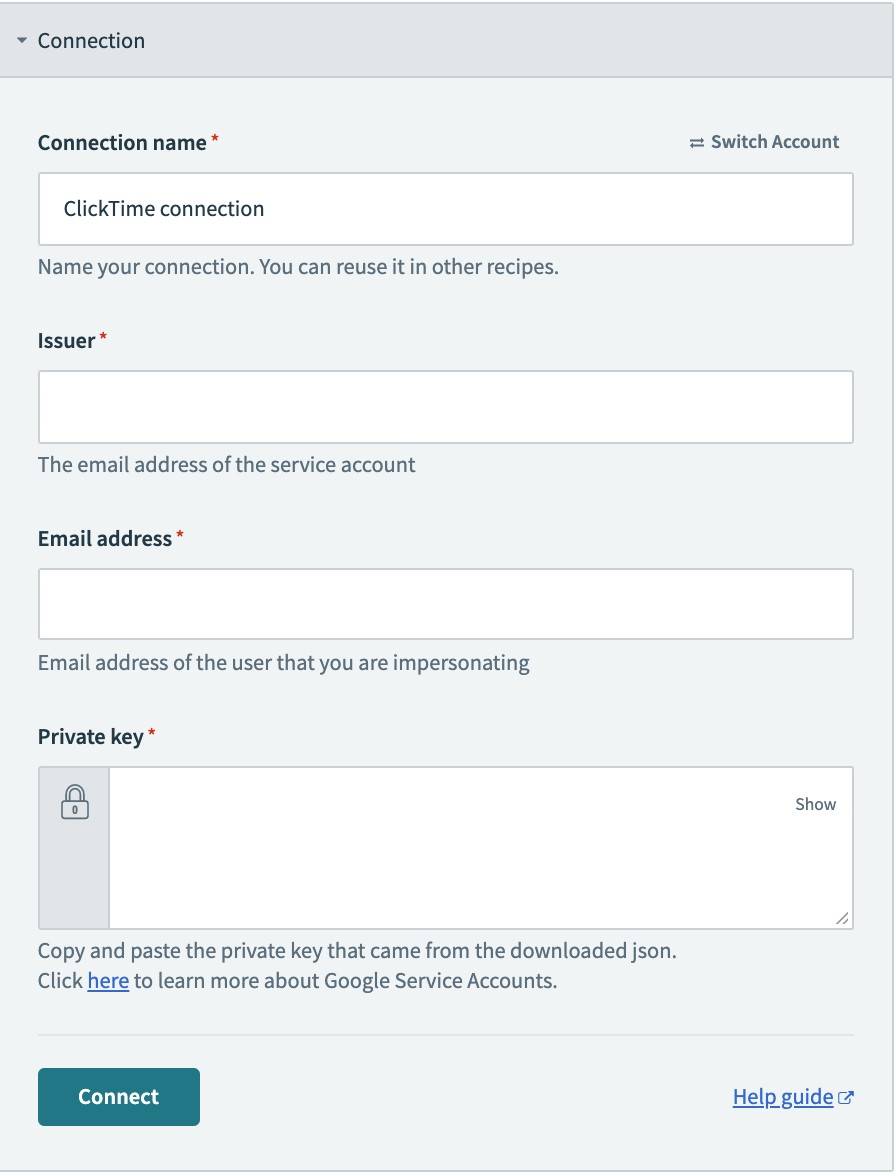
Step 1 - Defining Connection fields
This component tells Workato what fields to show to a user trying to establish a connection. In the case of Client Credentials Authentication, you would need the Client ID and Client Secret that the user has generated in Percolate.
| Information needed | Description |
|---|---|
| Issuer | The "iss" (issuer) claim identifies the principal that issued the JWT. |
| Subject | The "sub" (subject) claim identifies the principal that is the subject of the JWT. The claims in a JWT are normally statements about the subject. In this case, it is the email address of the user that you are impersonating. |
| Private/public key | This is the "password" that is obtained from the downloaded JSON. |
This is done in the fields key, which accepts an array of hashes. Each hash in this array corresponds to a separate input field.
    fields: [
      {
        name: 'iss',
        label: 'Issuer',
        optional: false,
        hint: 'The email address of the service account'
      },
      {
        name: 'sub',
        label: 'Email address',
        optional: false,
        hint: 'Email address of the user that you are impersonating'
      },
      {
        name: 'private_key',
        optional: false,
        hint: 'Copy and paste the private key that came from the downloaded json.<br>' \
          "Click <a href='https://developers.google.com/identity/protocols/oauth2/service-account/' " \
          "target='_blank'>here</a> to learn more about Google Service Accounts.",
        control_type: 'password',
        multiline: true
      }
    ],
TIP
When defining fields, you need to at least provide the name key. Additional attributes like optional, hint and control_type allow you to customize other aspects of these fields. For sensitive information like Client Secrets, remember to use the control_type as password.
Refer to Connection fields for more information on defining input fields in Workato.
Step 2 - Defining the authorization type
This component tells Workato what to do with the values received from the input fields to establish a connection. This is handled through your authorization key. In this key, you begin by first defining the type of authorization. For JWT authentication, you should use custom_auth.
type: 'custom_auth'Step 3 - Acquiring the access token
In the acquire key, we first generate a JWT token by creating a JWT body claim and signing it with the private key that the user provided. We do this by passing in the jwt_body_claim and private_key to Workato, note that this must be sent with jwt_encode under the RS256 signing algorithm. Next, we then pass in the generated token to Google API's token URL as payload. Here, we assign the grant_type and assertion as urn:ietf:params:oauth:grant-type:jwt-bearer and the generated JWT token respectively. Note that the payload of the request must be sent with request_format_www_form_urlencoded.
    acquire: lambda do |connection|
      jwt_body_claim = {
        "iat": now.to_i,
        "exp": 1.hour.from_now.to_i,
        "aud": 'https://oauth2.googleapis.com/token',
        "iss": connection['iss'],
        "sub": connection['sub'],
        "scope": 'https://www.googleapis.com/auth/calendar'
      }
      private_key = connection['private_key'].gsub(/\\n/, "\n")
      jwt_token = workato.jwt_encode(jwt_body_claim, private_key, "RS256")

      post('https://oauth2.googleapis.com/token').
        payload(grant_type: 'urn:ietf:params:oauth:grant-type:jwt-bearer',
          assertion: jwt_token)
        .request_format_www_form_urlencoded
    end,
Upon receiving a the request, the API returns a JSON response.
{
  "access_token": "my-authentication-token",
  "token_type": "bearer",
  "expires_in": "seconds-until-expiration",
  "error": "optional-error-message"
}
Step 4 - Applying the access token to subsequent HTTP requests
Next, you need to tell Workato how to make use of the access token it has retrieved from Google calendar. This is done in the apply block where you can reference the access token now stored in the connection argument. Any instructions you introduce in the apply block are subsequently applied to all HTTP requests this connector sends after connection is established.
    apply: lambda do |connection|
      headers("Authorization": "Bearer #{connection['access_token']}")
    end
In this example, we have defined the access token (connection['access_token']) to be added to the headers of any request. For every HTTP request sent, the headers will contain Authorization: Bearer XXX where XXX is the access token stored in the connection hash.
Step 5 - Defining token refresh behavior
As JWT tokens are only valid for short amounts of time, we need to tell this connector to refresh the JWT token when it expires. This can be easily done with the refresh_on key, that contains a list of HTTP response codes or regex functions. This list is matched to any responses to a HTTP request and triggers the acquire key is a match is found.
refresh_on: [401, 403],Step 6 - Setting the API's base URI
This component tells Workato what the base URL of the API is. This key is optional but allows you to provide only relative paths in the rest of your connector when defining HTTP requests. Refer to base URI configuration for more information on configuring your base_uri.
    base_uri: lambda do
      'https://www.googleapis.com/calendar/v3'
    end
TIP
This lambda function also has access to the connection argument. This is especially useful if the base URI of the API might change based on the user's instance. The connection argument can be accessed in the following format:
    base_uri: lambda do |connection|
      "https://#{connection['domain'].com/api}"
    end
Step 7 - Testing the connection
Now that we have defined the fields we need to collect from an end user and what to do with the inputs from those fields, we now need a way to test this connection. This is handled in the test key.
    test: lambda do |connection|
      get("/colors")
    end
In this key, you need to provide an endpoint that allows us to send a sample request using the new credentials we just received. If we receive a 200 OK HTTP response, we show the connection as Successful. In the example above, we are sending a GET request to the /colors endpoint and expecting a 200 response if the JWT is valid.
Connections SDK reference
To be more familiar with the available keys within the connection key and their parameters, check out our SDK reference.
Last updated: